It’s time to learn an advanced 3D design software for 3D printing; let’s try a 4-week Blender course. Why Blender? Because it’s powerful, free, and one of the most popular 3D design tools out there. Blender has been around since the early 90’s. This software may appear hard to handle, with moderate-to-hard difficulty to be able to use it like a PRO. Luckily, there are plenty of Blender training courses and YouTube tutorials.
Table of contents
- 4-Week Blender Training Introduction
- What’s included?
- Online Interactive Course vs YouTube Tutorials
- Workshop Schedule
- Blender Tutorial – Extra Notes
- Source and Links
In this post, we will talk about a 4-week Blender course by Jayson Wall, a fellow 3D designer who understands better than just about anyone the modeling requirements for desktop 3D printing. In addition, we will explain why this online interactive training course is far more valuable than a random YouTube tutorial. 4-Week Blender for 3D Printing Training Course by Jayson Wall moved to Udemy

(Image: 3DWithUs)
4-Week Blender Training Introduction
It is important to follow Jayson’s tutorial step by step. Students are asked to create models and then use their imaginations to customize them. There are several models to design each week. Both functional and decorative models are thoughtfully chosen to highlight the important aspects of 3D design for 3D printing at home. Jason teaches us to utilize 45-degree angles in order to avoid the support placement and to make a model “solid” and “manifoldable” (i.e. 3D printable). There are many different aspects to take into account when creating the models. This is where the file management comes in handy. It allows you to return and further customize for different purposes. It might mean adding an extra curve to the vase or a new text to the ring. Here are a few pointers from the 4-week Blender course for beginners.

(Image: 3DWithUs)
Blender Training 4-Weeks Tutorial – What’s included?
– Browser-Based Interactive Platform. A well-organized chain of short videos that students have to follow step by step completing all tasks. If you manage to achieve the same results as on the tutor’s screen, mark as completed and move to the next task. If you get stuck at some point, then you can visually compare your Blender view with the tutor’s screen. Jason keeps his tutorial videos up-to-date and reloads them if there were any updated on the software development side.
– Discussion tool. This is a great tool where it is possible to ask the questions. Write down the exact time when you got stuck. Use Windows Snipping Tool for mini screenshots and copy/paste them into discussions. The tutor will then have a clear picture of where you got stuck and will be able to act to help you accordingly.
– Cloud. Upload your result (a design) onto the cloud. The links are provided. The tutor asks to add a student’s full name to the file name when uploading the model. Further, he checks the models in a slicing software to see if it is 3D printable.
– Weekly live meetups. At the end of each week, Jayson holds a live Workshop Meetup. He then looks through his students’ files and discusses the possible faults, admires the originality, and gives advice on how the improvements can be implemented. Also, there is an opportunity to meet some active 3D printing community members. These meetups have a very friendly atmosphere.

(Image: 3DWithUs)
– VR Chat Room. A VR Chat room is open to join at any time. It is similar to a game world, where instead of the monsters and buildings, there are 3D models, freshly designed by Jayson’s students. Sunday meetups in the VR Chat room are super fun. Students can use funny-looking avatars while walking around in a 3D world. This is great for shy students. Good to note here that it doesn’t require any headsets or super-fast internet, neither a special VR gear, only a laptop. The future is NOW.
Online Interactive Course vs YouTube Tutorials
A year ago, as part of the New Year’s resolution, we learned to 3D sculpt. As a result, we managed to create a beautiful model (Easter Bunny). But it took us so much effort and patience that we dropped the idea of further progress, but kept coming back to the subject multiple times. We had to spend a lot of time on Googling and searching for tips and guidance in connection to that 3D design software, even as simple as for the navigation. And this was unsettling for us, especially when being used to TinkerCAD. Jayson’s Blender training course provided a smooth transition here.
– Disruption. Advertisement and clickbait thumbnails that come up together with YouTube tutorials will tear your FOCUS to nothing. And procrastination will sit deeper in. In the 3D design tutorial course, it only takes two clicks to get to the subject, with no disruptors.
– Updates. The interactive course gets updated regularly. You cannot say this about random YouTube tutorials. Any well-edited and to-the-point tutorial may be irrelevant in a few months as the software developers publish a newer version.
– Organization. Blender has a lot of different tools and functions which any person may forget about. Short videos provided in a course are like a well-organized bookshelf. It is great to have the opportunity to use these recordings as a refresher and to come back for a particular hint or two.
– Grinding Game Effect. It reminded us of grinding games’ effect. Some time ago, we used to play grinding games like World of Warcraft and Guild Wars 2. We noticed that on the completion of a quest we felt a so-called Dopamine rush. The same achievement satisfaction comes from completion of the tasks in the course. And no doubt, the biggest satisfaction comes when a freshly designed model is finally 3D printed.
(Image: 3DWithUs)
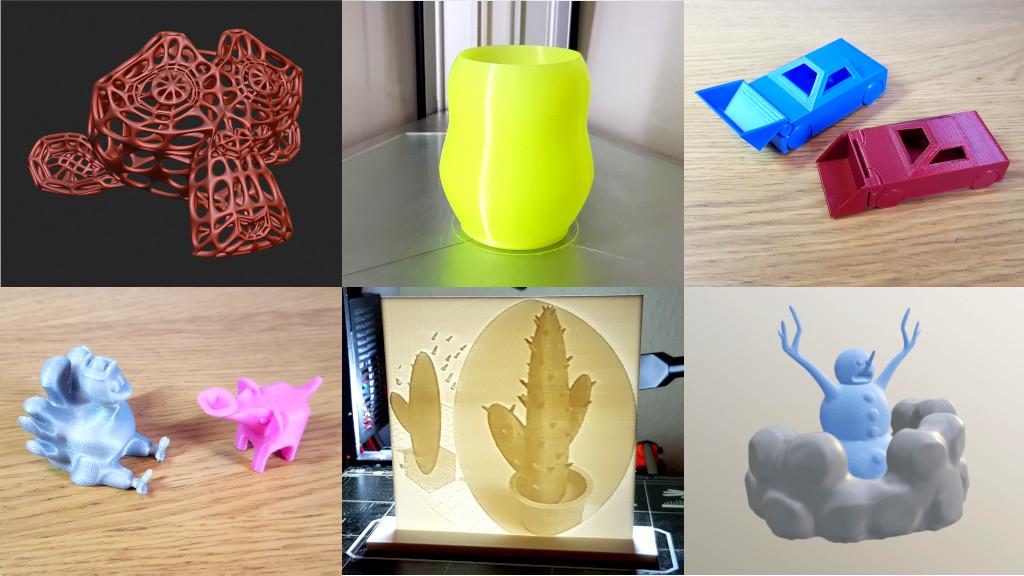
3D Printable Models & Customizable Variations
During the 4-week course, you learn how to design and to 3D print the models listed below. Simplistic at the first glance, these designs actually teach us how to use all the tools and the mods we may need. Is it a Boolean tool or a Bisect Knife? Edit Mode or Object Mode? Also, Jason encourages us to use the short keys on a keyboard – which greatly fastens the workflow.
Blender Course – Week 1
Suzanne in Different Mods – Low Poly, Smooth, Blocky, Voronoi – just in a few clicks.
Cheese Wedge – a Functional door stopper. Bool tool. It is so easy to be original here, just use different objects for boolean function.

(Image: 3DWithUs)
Blender Course – Week 2
Lithophanes – An art picture from the past. 3D Printed photo with the stand. How to add pictures and play with settings.
Pottery – Customized shapes. Flowerpot with a hole or thin wall vase? It’s up to you. Drawing then thickening the object.
Rings – With customizable text – With a file ready to get back anytime and customize further for friends or even for clients.

(Image: 3DWithUs)
Blender Course – Week 3
Box animal – Simplistic designs from the box. How to use Extrude and Insect tools. Vertex, Edges, and faces. Adding the eyes.
Toy Car – How to design and 3d print a car with functional wheels. Without supports.
Slicing Large Models – Knife, Bisect tool. Complex model cutting, patching the holes.

(Image: 3DWithUs)
Blender Course – Week 4
Snowman – 3D Sculpting mode. Brushes. Dynamic Topology. Symmetry
Cell Phone Amp – Basic design of a phone holder. Measuring and fitting.
Blender Tutorial – Extra Notes
Collections – It is important to learn how to preserve a collection for future editing – it is much easier and quicker than modeling from the beginning or remodeling from the solid model.
Eevee Studio – a brilliant built-in studio for model rendering and showcasing.
Name Your Files Well – By coincident Jason teaches how to name your models properly. It will come handy if you start sharing your STL on file repositories.
It is easy to design all listed models following step by step guidance. Jason encourages to realize our own idea in the designs. When improving the skills while creating your own designs, and it will be harder to forget them in the long term. Also, if you plan to start your own or your brand focused account on any file repository website, you can start with these models – just customize them a little bit more, add a key ring hole to Suzanne, or put the holes of different shapes in a door stopping wedge.
Blender Course – Live workshop
Live workshop – can be considered as Sunday fun. It is a weekly gathering of all students with their teacher. Then they discuss the printability of the freshly designed models. On week two we also set up our mics and video to fully interact in this session. The good part that Jason uploads it to YouTube, and everyone can get back to it as a point of reference. Good to have a recording to go back to as a refresher.
Blender Training – Additional Notes:
It is recommended using Google Keep or Microsoft Notes in order to save the pointers for a few short keys. For example: Shift+Alt+Q = 4 Windows, etc. So all 3D design software notes are in one place and can be reached from a laptop or a mobile phone easily.

(Image: 3DWithUs)
Special Thanks
Special thanks to Jayson Wall aka PrintThatThing, the tutor and the creator of this course. We earlier followed Jason and his tutorial videos on YouTube. Back then he helped us with TinkerCAD, in using the blocks, and with Meshmixer, in 3D sculpting. Now here with Blender, Jason helps us to master this software to create great 3D models.

Blender 2.9 Software Source & Links:
Download Blender Software
Blender Software – Wikipedia
Blender for 3D Printing Training Course on Udemy

How much the course