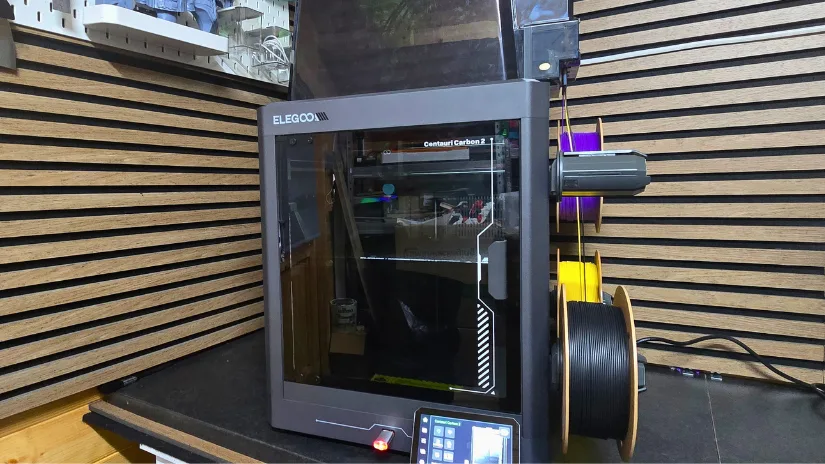
Today, we’re looking at the Elegoo Centauri Carbon 2 Combo, a fully enclosed, budget-friendly CoreXY FDM 3D printer with multi-colour printing via the Elegoo CANVAS system. Elegoo has recently launched a wave of new products, and the Centauri Carbon 2 is positioned as an accessible option for makers who want faster printing and multi-colour capability without stepping into premium price territory.
In this article, we’ll cover the printer’s key hardware features, the unboxing and setup process, software workflow, and hands-on test prints (including multi-colour projects). In the end, we will finish with a summary and a list of Pros & Cons.
Table of Contents (Jump to a Section) Where to Buy the Elegoo Centauri Carbon 2 Combo Price: $429-$499
Compare the Prices & Bundles:Official Store | Amazon
Elegoo Centauri Carbon 2 Overview The Centauri Carbon 2 aims to make multi-colour 3D printing feel more approachable. Its CoreXY motion system keeps the moving mass low, which helps maintain detail at higher speeds. The enclosed frame improves temperature stability and reduces drafts, which can be helpful not only for tougher materials (like ABS/ASA), but also for consistency on longer, colour-heavy jobs.
The multi-colour workflow is built around the CANVAS system, designed to simplify filament handling and colour changes. In practice, the goal is straightforward: fewer “multi-colour headaches” (loading, switching, waste management) while keeping the machine compact and easy to operate.
The Centauri Carbon 2 Combo also includes a built-in camera and light for monitoring and timelapses, plus remote viewing through Elegoo’s app/web tools.
Elegoo Centauri Carbon 2 Specifications Printing technology FDM (Fused Deposition Modelling) Motion system CoreXY Build volume 256 × 256 × 256 mm Printer dimensions 500 × 480 × 743 mm Extruder Direct drive Multi-colour Elegoo CANVAS Nozzle diameter 0.4 mm (standard) Max extruder temperature 350°C Heated bed temperature Up to 110°C Max print speed Up to 500 mm/s (300 mm/s typical) Max acceleration Up to 20,000 mm/s² Filament diameter 1.75 mm Layer thickness 0.1–0.4 mm (0.2 mm recommended) Connectivity USB, Wi-Fi
What’s in the Box Centauri Carbon 2 Combo printer, Touchscreen display, Nozzle wiper assembly, Power cord, 4-pin cable, Spool holder modules (x4), Filament hub, CANVAS mounting bracket, Thermal cover, Unclogging pin, Allen key, Screwdriver, Filament sample, Spare nozzle wiper, User manual, USB flash drive, Scraper blade, PTFE tubes (x4)
All accessories and components included in the box after unboxing. Design & Hardware Features The Centauri Carbon 2 is built around an enclosed CoreXY frame, aiming for stable, fast printing with fewer drafts and a more consistent build environment. Elegoo uses a mix of metal structural components and side panels, and the enclosure includes a filtration system intended to reduce odours during printing.
Print Head & Hotend The print head is designed to stay lightweight for CoreXY motion, helping preserve detail during fast moves. The all-metal hotend is rated up to 350°C, and the hardened nozzle is intended to better handle abrasive filaments (for example, fibre-filled materials) over time.
Print head cover fitted over the toolhead assembly. Close-up view of the print head cover and front assembly. Heated Bed & Build Surface The printer uses a high-power AC heated bed (1000W) rated up to 110°C. This helps reduce warm-up time and supports a wider material range. The included build plate is dual-sided: one textured PEI side intended for a range of common filaments, and a smooth side aimed primarily at PLA at lower bed temperatures.
Textured PEI build plate used for improved first-layer adhesion. Enclosure, Camera & Monitoring A built-in camera and internal light support live monitoring and timelapses. Monitoring can be done through the Elegoo Matrix app and also via a browser on a computer. The printer also includes “spaghetti detection” using the camera feed (useful as a basic failure-signal, though it’s not a replacement for proper first-layer checks).
Built-in camera and internal light. Elegoo CANVAS Multi-Colour System The CANVAS system is Elegoo’s integrated multi-colour solution. It supports RFID-tagged spools to automatically identify filament type and colour, which reduces manual setup and helps keep profiles consistent. The goal is predictable colour switching and smoother handling for multi-colour prints.
Elegoo CANVAS system (multi-colour filament handling). Waste Management & Internal Layout Multi-colour printing generates purge waste, and Elegoo includes a dedicated waste chute that routes purge material into a purge box. This helps keep the inside of the enclosure cleaner and reduces the chance of stray purge strands interfering with prints.
Waste chute installation. A removable bucket-style lid sits over the CANVAS system area and PTFE tube routing. It protects the moving zone and makes access easier for cleaning. The front-mounted USB port is also a small but practical convenience for frequent file loading.
Bucket lid cover over the CANVAS area. Unboxing & Initial Setup The Centauri Carbon 2 Combo arrives semi pre-built, and overall assembly is beginner-friendly. The printer targets high-speed printing (up to 500 mm/s and 20,000 mm/s² acceleration), which aligns with current CoreXY trends—just at a lower entry price. The build volume is a standard 256 mm cube, and the enclosure is intended to help with temperature stability and odour management (via the built-in filter system and fans).
One design choice worth noting: the external side spool system is convenient, but it’s not enclosed for moisture control. If you print in humid conditions, you may still prefer running filament from a dry box.
Physical Assembly Before powering on, remove the three transport screws that lock the build plate for shipping.
Touchscreen connection and mounting. CANVAS Installation Install the CANVAS mounting bracket (top-right area) and attach the CANVAS unit to the bracket. Then connect the included 4-pin cable: from the printer (rear/top-left connector area) to the CANVAS unit.
>CANVAS mounting bracket. CANVAS unit connection Install the waste chute from inside the enclosure and secure it with four screws at the rear.
Waste chute mounting location (rear) Spool Holders & PTFE Routing Connect the four PTFE tubes to the top of the CANVAS unit (push-fit). Tube order is not critical because the hub accepts them. You’ll also connect the filament hub at the print head.
Four PTFE tubes connected to CANVAS (push-fit). Practical note from installation: to fully access the filament hub installation area, the print head cable may need to be temporarily removed. This wasn’t clearly described in the printed instructions, but it makes the install much easier.
Removing the print head cable to access the filament hub install area. Filament hub installation. Install the four spool holder brackets on the right side of the printer, then push-fit each spool holder module into place. The modules are numbered, and placement matters—match the numbers to the correct positions.
Spool holder module brackets installed. Assembling Push-fit spool holder. Finally, assemble the top lid (two pieces) and click it into place.
First Power-On & Calibration On first boot, the touchscreen guide walks you through language selection, a reminder to remove transport screws, Wi-Fi setup (optional), and then a full calibration sequence. The initial calibration takes roughly 15–20 minutes and includes auto bed levelling, vibration compensation, and pressure advance.
Touchscreen device self-check and calibration steps. Calibration & Firmware If a firmware update is applied, it’s good practice to re-run calibration afterwards. The option is available in the printer’s settings menu.
Firmware update notification (recalibrate after updating) After calibration, you can load filament spools. With RFID-tagged spools, identification happens at the central reader area on the CANVAS unit.
Software & Slicer Workflow For all our slicing needs, we used the latest version of Elegoo version of Orca Slicer. With its numerous options and frequent updates, it has become a favorite for preparing FDM prints. All prints were sliced using the base profile, with only a few changes made to wall speeds: the inner walls were set to 300 mm/s and the outer walls to 250 mm/s.
Elegoo Orca Slicer Preview – Hueforge – Home Alone Preinstalled Test Models The printer includes several pre-sliced models in internal memory. These are useful for confirming that assembly, calibration, and filament loading are all working correctly before moving on to longer prints.
Preinstalled Model 1: Multi-Colour Benchy The first print was the obligatory benchy in multiple colour layers, not challenging at all. And will just simply show that all 4 colours are functioning as intended. This model took around 2hrs to complete with not too much filament waste. I managed to monitor the progress of the print via the Elegoo Matrix app , which was clear and descriptive. Overall, a clean print and all the aspects of the model was visible. See below the final print of the Benchy.
Multi-colour Benchy. Preinstalled Model 2: Little Buddha The second preinstalled model was the Little Buddha. This was a quick single-colour print, taking approximately 35 minutes .
Little Buddha. Preinstalled Model 3: Elegoo Name Tag The third preinstalled model was an Elegoo name tag (two colours), taking roughly 1 hour . The lettering was clean and readable, with distinct colour separation.
Elegoo name tag
Test Printing & Results Model 1: Multi-Colour Keyrings Design: Football Club Keyrings by Phil Macey0.08 mm layer height to ensure a clean and detailed finish.
Multi-colour football club keyrings. Model 2: Gengar Power Rangers Model Design: Nostalgic 3D Models (Patreon)0.14 , with this model it took approximately 14hrs to print , is roughly 5 inches tall.
Gengar model: slicer preview with colour assignments. Completed multi-colour Gengar print. The purge waste was considerable though, almost the same amount as the model itself, the unfortunate downside of multi colour printing with 1 print head.
Purge waste from the Gengar multi-colour print. Model 3: HueForge Wall Art Design: Home Alone HueForge (2 colours) by 3dGlow (MakerWorld)
For the final print test I decided to carry out a Hueforge Model of the HomeAlone character, this model was from Makerworld and needed just 2 colours to create this stunning piece. The model used approximately 80% of the print bed and took around 6hrs to print on the lowest speed setting, 0.08 layer height and 100% infill. Filaments used where Esun black PLA and Esun White PLA, the layer variation created this almost grey like view.
Elegoo Orca Slicer Preview – Hueforge – Home Alone Completed HueForge wall art print (Home Alone). The print was my favourite to print on THE Elegoo Centauri carbon 2.
YouTube Video VIDEO
– Watch: Elegoo Centauri Carbon hands-on overview: Elegoo Centauri Carbon assembly, feature breakdown, and test printing.
Multi-Colour Printing Observations Colour assignment workflow: Straightforward in the slicer, with CANVAS/RFID helping reduce setup friction.Transition quality: Clean enough on most jobs without heavy tuning, especially on simpler colour layouts.Purge waste: Can be substantial on prints with frequent colour changes (single-nozzle reality).Waste handling: The dedicated waste chute helps keep purge material controlled and the enclosure tidier.Monitoring: Camera + app/web monitoring is genuinely useful on long multi-colour runs.
Compare Elegoo Centauri Carbon 2 Combo to Other 3D Printers The CoreXY segment continues to expand, with several brands now offering compact, enclosed machines focused on speed and material compatibility. The Elegoo Centauri Carbon 2 Combo enters the field with a sub-$500 price tag, enclosed frame, and sturdy CoreXY motion, making it a notable addition to our Best Budget FDM 3D Printers guide.
When compared to other CoreXY printers in this range, like the Anycubic Kobra S1 , Bambu Lab P1S , or Creality K1, the Centauri Carbon stands out by offering many of the same core features at a lower entry cost.
It meets key performance specifications, including a 500 mm/s speed and 20,000 mm/s² acceleration, and features common high-speed capabilities such as auto bed leveling, input shaping, and vibration compensation.
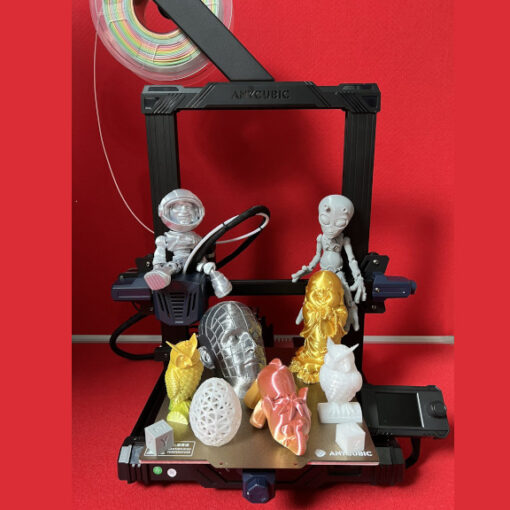
Elegoo Centauri Carbon 2 Combo and compilation of test prints Compared to the original Elegoo Centauri Carbon (which we previously covered in our hands-on testing, from unboxing to print results — see the full article here ), the Centauri Carbon 2 Combo represents a clear step forward rather than a minor refresh. The most significant difference is the introduction of native multi-colour printing via the CANVAS system. The Carbon 2 Combo also refines the overall platform with a more complete, factory-configured multi-colour workflow, updated hardware integration, and a smoother setup experience aimed at reducing manual intervention. While the original Centauri Carbon focused on delivering fast, enclosed CoreXY performance at an aggressive price point, the Carbon 2 Combo builds on that foundation by expanding functionality and flexibility.
Have questions? Feel free to ask in the comment section below.
Visit 3DWithUs Forum
Conclusion and Pros & Cons Price: $429-$499
Compare the Prices & Bundles:Official Store | Amazon