Bambu Lab has established itself as a notable company in the field of 3D printing, owing mostly to the widespread acceptance of their X1C and AMS, award-winning combo which has had a considerable impact on the industry. Bambu Lab P1S is a budget, improved from the P1P version, CoreXY FDM 3D printer. This model preserves the P1P’s core capabilities but adds an integrated enclosure and other remarkable features. The most notable difference in comparison to X1C is that P1S lacks the LiDAR sensor. In our review, we will delve into the P1S’s Pros and Cons, evaluating print quality, speed, and the effectiveness of the AMS system. Also, we will print and feature remarkable models of talented designers in order to thoroughly test the machine and AMS system.
Table Of Contents (Jump to a Section)
- Specifications
- Unboxing – What’s Included
- Setup and Design
- Screen and Control Interface
- Slicer Software – Bambu Slicer
- Noise and Plastic Waste
- Print Tests and Speed
- Compare to Other 3D Printers
- Conclusion and Pros & Cons
Where to Buy the P1S Combo
Price: $$869.00 – $1,148
Bambu Lab P1S Combo Specifications
Combo: P1S with AMS
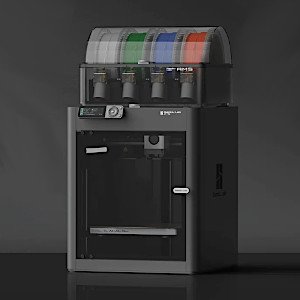
AMS – Automatic Multi-Material System
Build Volume: 256 x 256 x 256 mm
All Metal Hotend: Max 300 ℃
Max Speed: 500 mm/s
Monitoring Camera
Filament Run Out Sensor
Bambu Textured PEI Plate
Supported Filament: PLA, PETG, TPU, PVA, PET, ABS, ASA
The Bambu Lab P1S stands out as one of the top printers on the market today. It distinguishes itself as a top-tier solution for printing enthusiasts, with optional multi-material and multi-color capabilities, lightning-fast print speeds, and a fully enclosed design designed for high-temperature printing. Despite the possibility of increased waste generated by the AMS – Automatic Material System and somewhat higher noise levels, the P1S remains one of the best printers available.
©3DWithUs – Photo: Will Zoobkoff
Unboxing – What’s Included
• Bambu P1S
• Spare 0.4mm stainless steel nozzle
• Build platform
• Unclogging tool
• Power Cable
• Spool holder
• Control interface
• Scraper parts
• Spare nozzle wipe
• Spare filament cutter x2
• Bambu Lap AMS
• AMS bus cable 4-pin
• AMS bus cable 6-pin
• 2 sample spools PLA
• 1 sample spool support material for PLA
• Glue stick
• Accessory bag (Thermal paste, Grease, assembly screws)
• Quick start guide

©3DWithUs – Photo: Will Zoobkoff
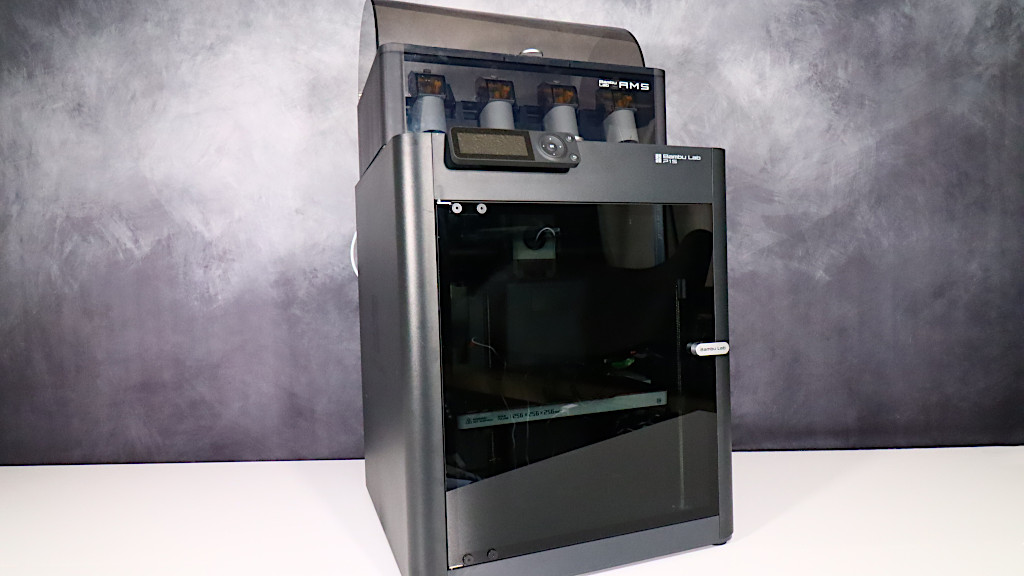
Setup and Design
There are only a few steps involved in setting up the printer before you can begin printing. To begin, remove all of the packaging items surrounding the print head and bed. An additional step in the case of the P1S combo equipped with the AMS is to loosen the two screws that hold the AMS shipment frame within the printer.
Following that, remove the three screws that secure the printing platform to the bottom of the container. The red arrow stickers placed on the printing platform frame make it easy to identify these screws.
©3DWithUs – Photo: Will Zoobkoff
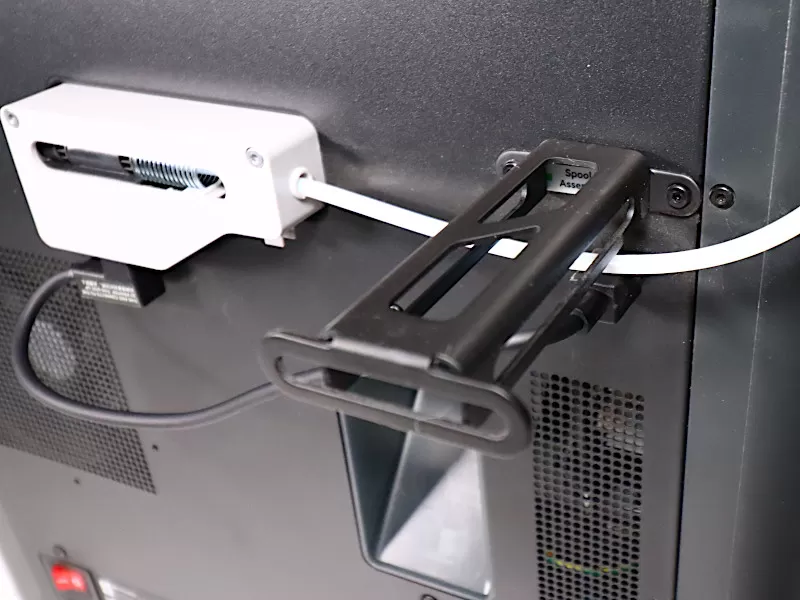
Following that, you will install the spool holder and the control screen. In the case of the AMS, you must also connect the accompanying 6-pin connection from the AMS to the filament buffer. The buffer is then connected to the printer. You’ll also need to connect the Bowden tube from the AMS to the filament buffer.
After you’ve done these steps, you’re ready to turn on the P1S and begin the on-screen setup guide. It’s critical to remember to remove the shipping foam from beneath the print bed when it rises throughout the setup procedure.
has durable side panels that are strong and robust. Among its unique features are a glass door and a glass top that can be removed to allow for ventilation or as a platform for the the AMS setup. These parts add to the printer’s elegant and practical appearance while also improving functionality.
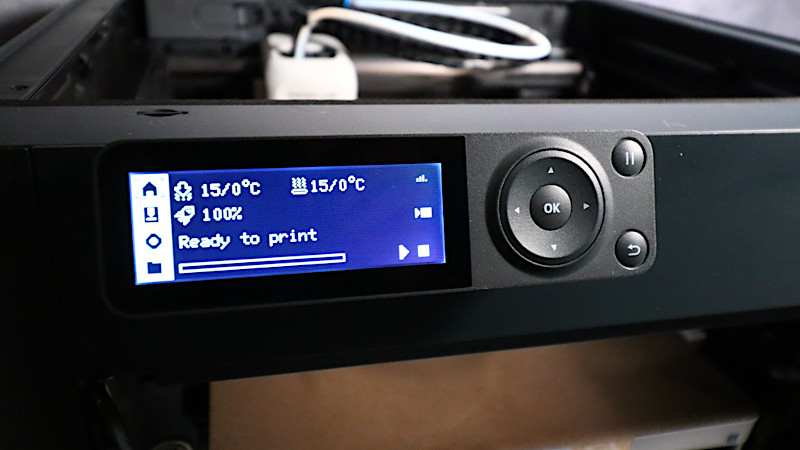
Screen and Control Interface
The screen and control interface are identical to the P1P model, giving users access to control buttons in addition to a simple yet useful text screen. In spite of its simplicity, the screen gathers all the necessary data and settings needed to properly start and monitor prints. Beyond the control panel, users may readily monitor the printer’s development using the Bambu app or the Bambu slicer, adding to its accessibility. These interfaces enable users to upload and commence prints seamlessly, offering a user-friendly and versatile printing experience.
©3DWithUs – Photo: Will Zoobkoff
In addition, the P1S offers a number of improvements over the P1P model. Among these improvements, the built-in light is noteworthy since it greatly enhances visibility while in use. It’s also a wonderful feature that a camera has been integrated, allowing customers to watch their prints in real time and make captivating timelapse films of the printing process.
©3DWithUs – Photo: Will Zoobkoff
These improvements show Bambu’s dedication to offering a complete and user-focused printing solution while also improving the user experience. With its well-thought-out design and extra features, the P1S satisfies the need for improved ease and monitoring during the 3D printing process in addition to offering practical usefulness.
Slicer Software – Bambu Slicer
With their printers, Bambu Labs offers their in-house slicer, the Bambu Slicer, a tool whose wide range of uses justifies an in-depth review. I’ll quickly go over some of the more important aspects, but the slicer itself has a ton of features that are well worth investigating.
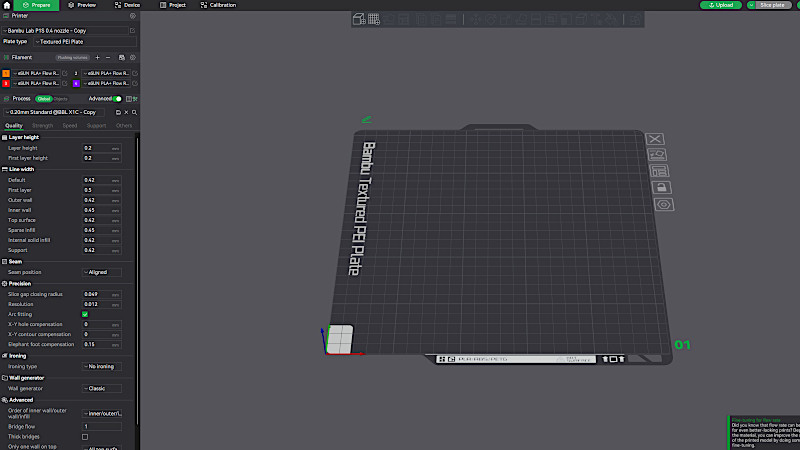
Screenshot: Bambu Slicer
Among the best slicing software solutions on the market right now is the Bambu Slicer. It’s important to note that there is a well-liked version called the Orca Slicer, which is derived from the Bambu Slicer but has a number of feature enhancements designed to improve print quality even further.
Preview: Bambu Slicer
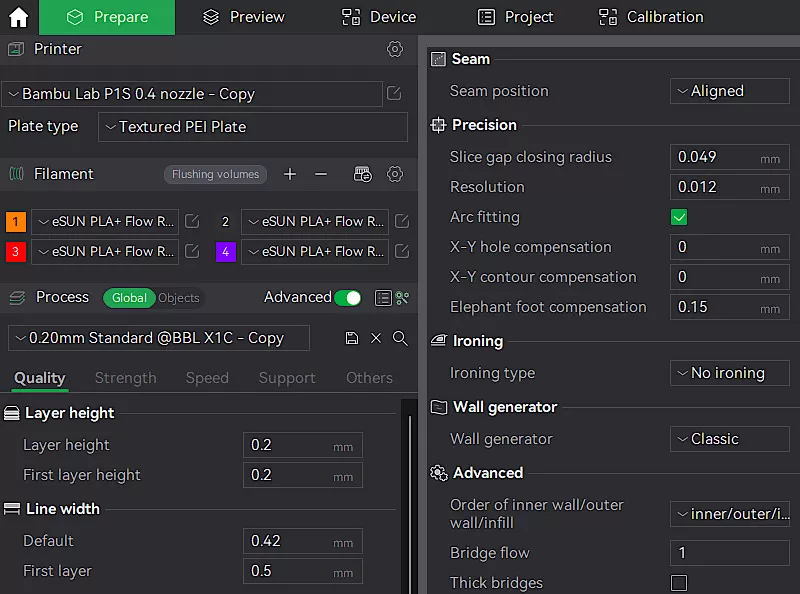
The Bambu Slicer presents a wide range of slicer settings and filament management and AMS (Automatic Material System) options on its main interface, which appears when the slicer is launched. Furthermore, users may load models for slicing with ease and switch between different printers within the interface.

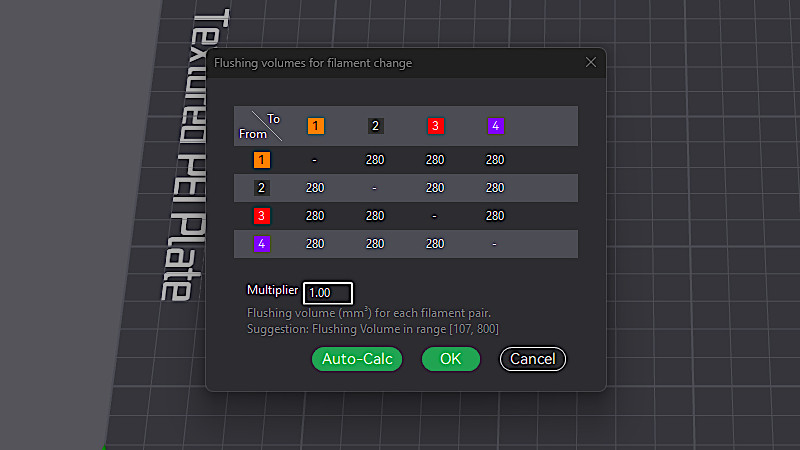
After selecting the second tab, users are presented with the preview window, which offers the ability to save the sliced file or send it straight to the printer for printing in addition to displaying the sliced models. The transition from model slicing to real printing is made easier by this streamlined approach.
Preview: Bambu Slicer
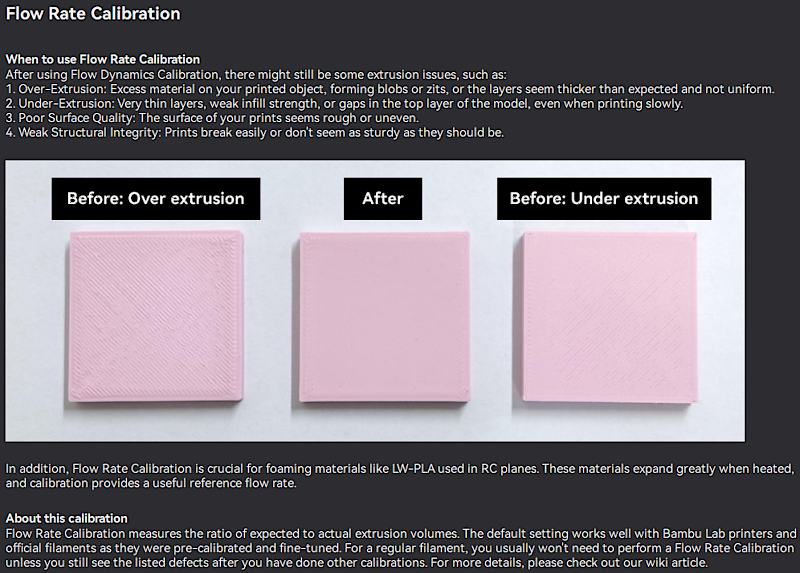
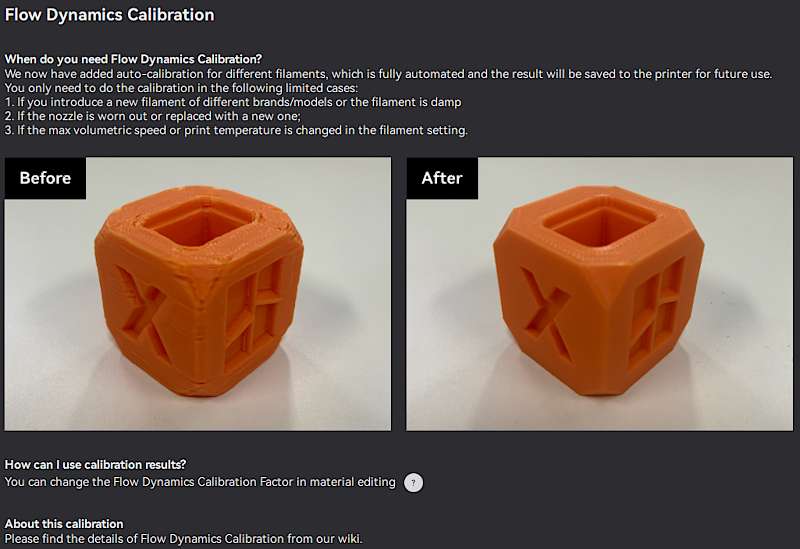
The third main screen of the slicer, which has calibration settings for flow dynamics and flow rates, is one of its most useful portions. This specific feature greatly improves print accuracy and user convenience by making the calibration process for different filaments much easier.
Screenshot: Bambu Slicer
With its extensive toolkit and easy-to-use interface, the Bambu Slicer enables consumers to maximize their printing experiences. Because of its adaptability and capacity to adjust settings for exact outcomes, it is regarded as an essential element in producing prints of remarkable quality.
Noise and Plastic Waste
Our thorough examination revealed the P1S’s strengths and flaws. Its positives include an enclosed design for high-temperature printing, quick operation, optional multicolor capabilities (up to 16 colors), and dependably clean prints, earning it a 4.8 out of 5 rating. However, its enhanced operational noise and AMS waste are disadvantages.

©3DWithUs – Prints & Photo: Will Zoobkoff
Although the AMS system contributes to somewhat increased waste output, the P1S compensates by providing superior print quality and the ability to produce multi-colored prints. Furthermore, while the printer’s operational noise may be slightly higher, its remarkable performance and capabilities firmly establish the P1S as a market leader.
Print Tests and Speed
By supporting up to 16 simultaneous colors, the Bambu Labs P1S revolutionizes 3D printing capabilities. Our focus was on the basic package, which featured a four-color palette. To ensure objectivity, we kept print parameters consistent throughout all tests: inner walls and infill at 300mm/s, exterior walls at 200mm/s, a 10% gyroid infill, and organic tree supports in either Bambu or Orca Slicer. This technique supported a fair assessment process by stressing the printer’s consistent and exceptional output quality across a wide range of model types. The steady performance demonstrated its dependability, demonstrating its capacity to produce high-quality prints.
Design by Pipe Cox on Cults3D
©3DWithUs – Print & Photo: Will Zoobkoff
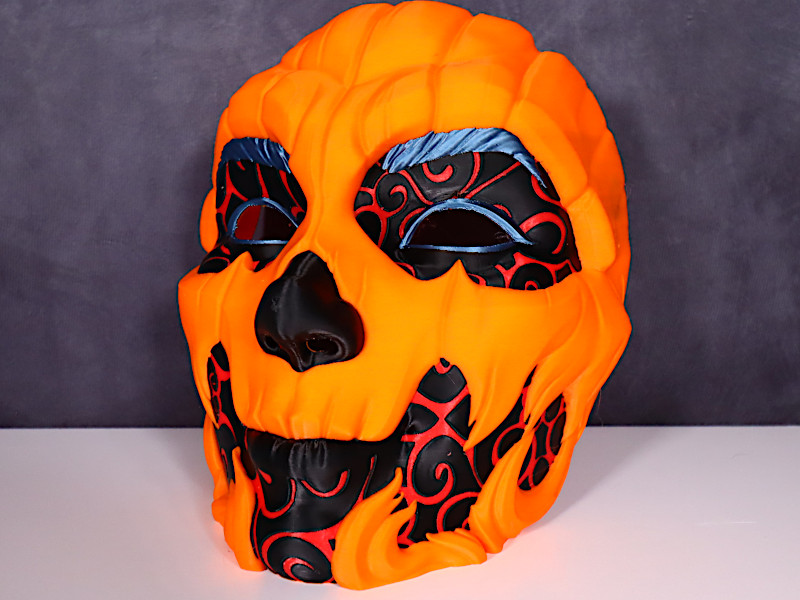
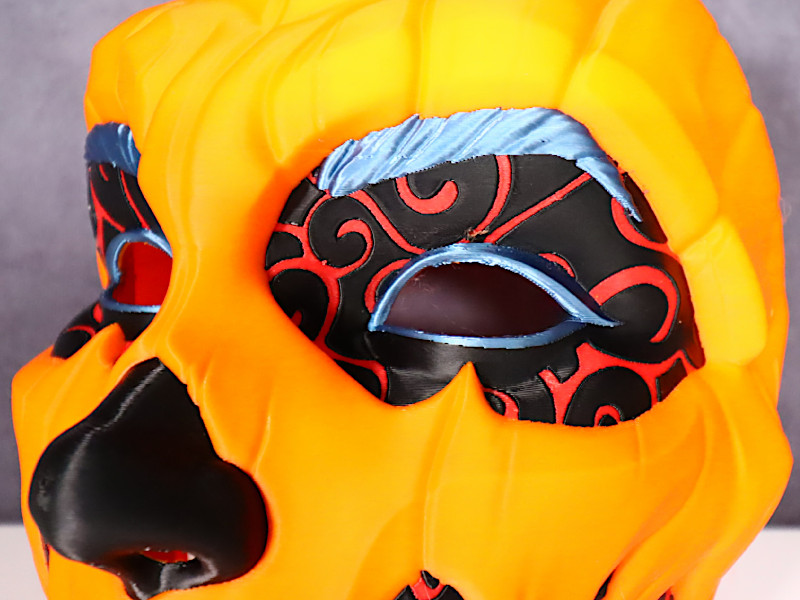
The Pumpkin Girl mask from Pipe Cox’s Patreon collection was the first model chosen for printing. This wearable mask was made with a combination of Sunlu Black and Red PLA filaments, as well as Anycubic Metallic Blue and Overture Orange PLA filaments. This detailed sculpture took about 33 hours to complete.
©3DWithUs – Print & Photo: Will Zoobkoff
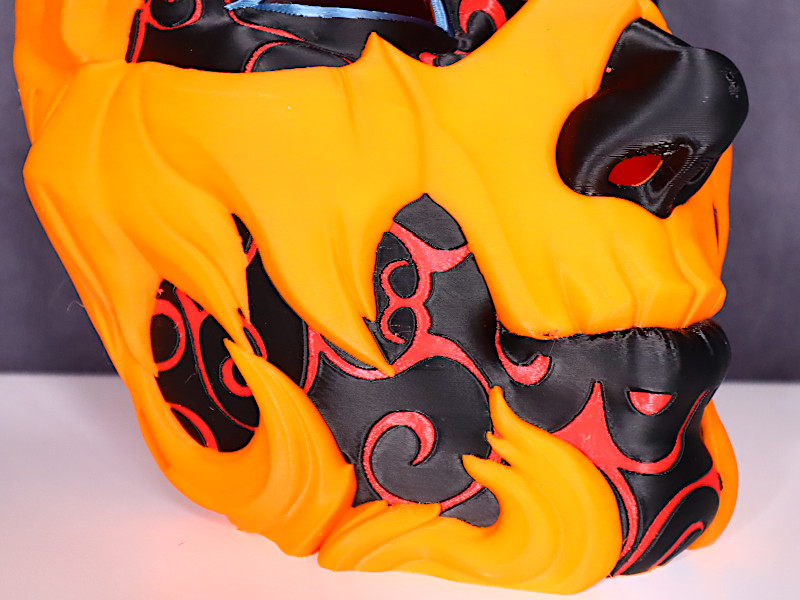
Despite the fact that the P1S is a fast printer, the numerous color changes had a major impact on print time. Before proceeding, each color must be purged and primed using a prime tower, which is a painstaking and time-consuming process that includes unloading and loading. The end result, however, was clearly impressive—the mask had immaculate details and overhangs, demonstrating its great quality without any concerns. Though time-consuming, the painstaking color changes produced a gorgeous multicolored outcome that truly impressed.
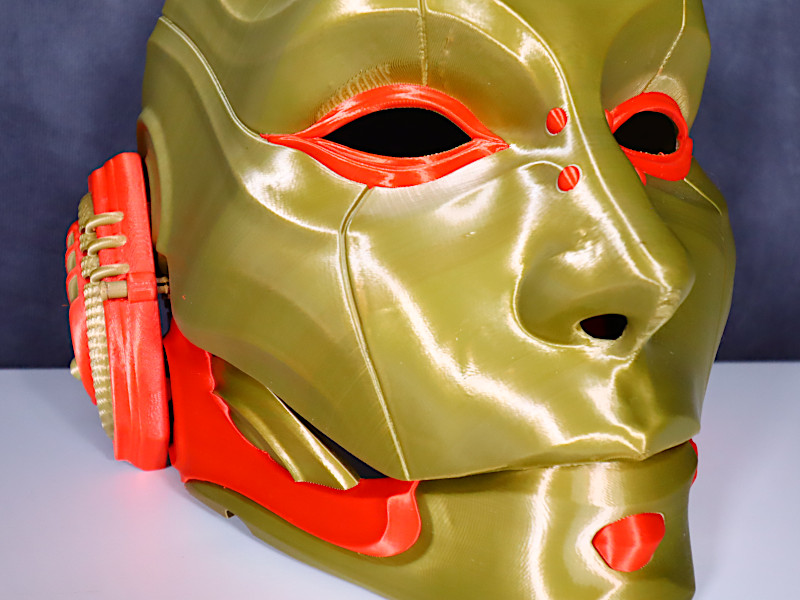
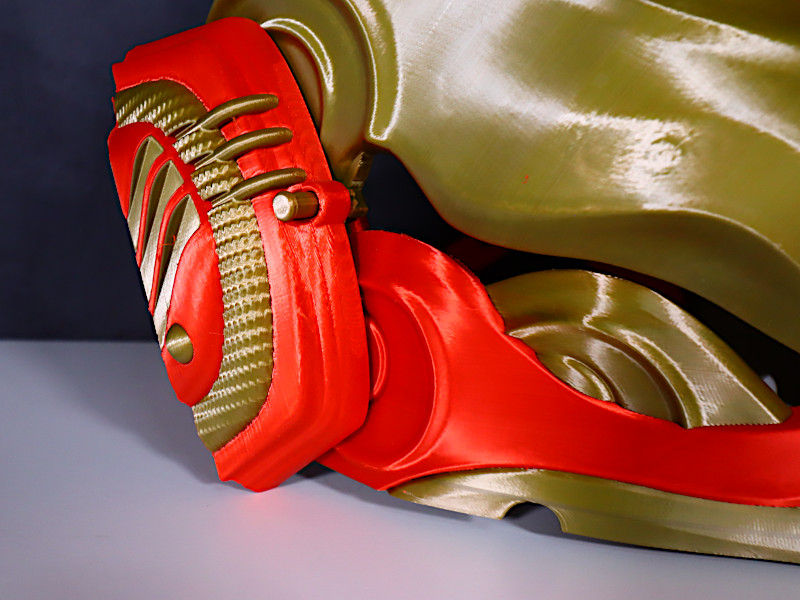
After printing the Pumpkin Girl mask successfully, we moved on to the Pipe Cox Droid wearable mask for our next project. We kept the palette to two colors for this project: Eryone’s dual-color Gold/Copper and Polymaker Red Silk PLA. Despite the reduced color variety, the resultant mask turned out beautifully. The interaction of the rich tones of Red Silk PLA and the shiny Gold/Copper generated a remarkable contrast, as shown in the accompanying photographs.
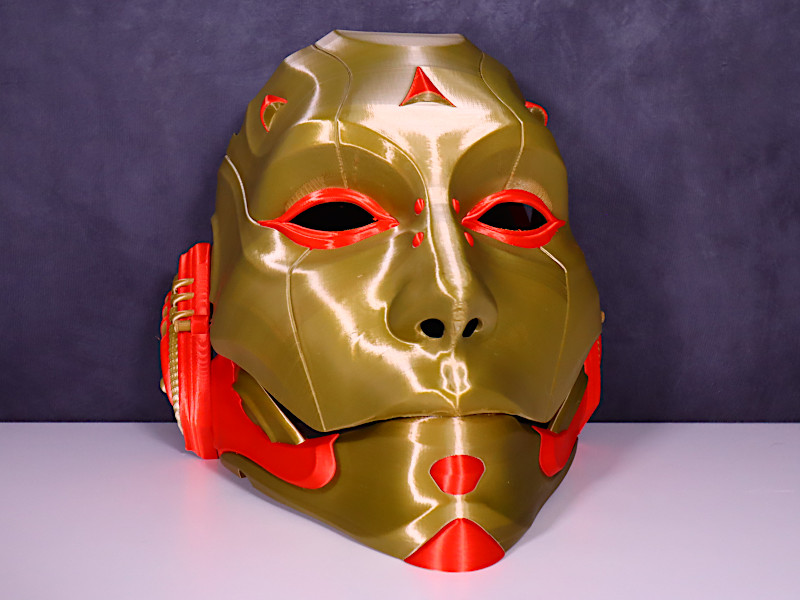
Design by Pipe Cox on Cults3D
©3DWithUs – Print & Photo: Will Zoobkoff
Unlike the last project, this mask was made up of numerous sections, which contributed to a significantly longer printing time. Overall, the assembly procedure took about 40 hours to complete. The precise blend of Red Silk PLA and Gold/Copper filaments emphasized the intricate design of the mask, resulting in an eye-catching and visually beautiful outcome.
©3DWithUs – Print & Photo: Will Zoobkoff
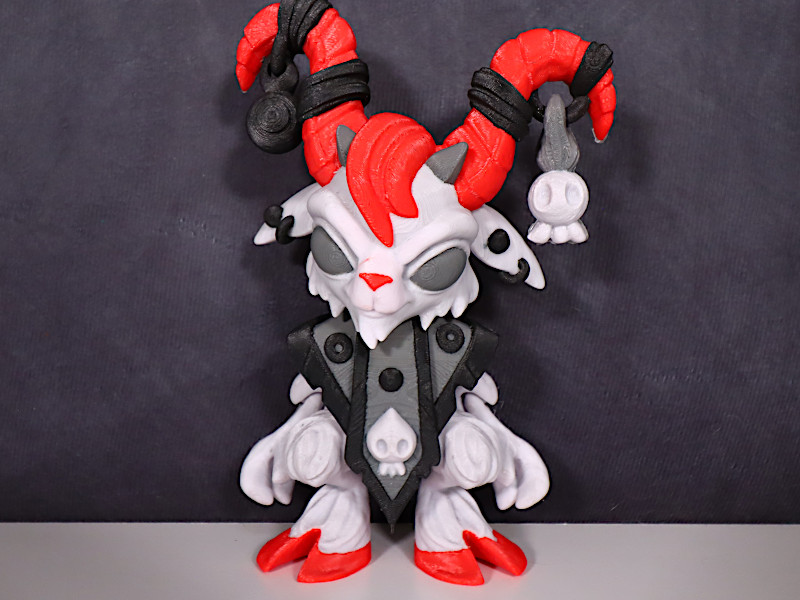
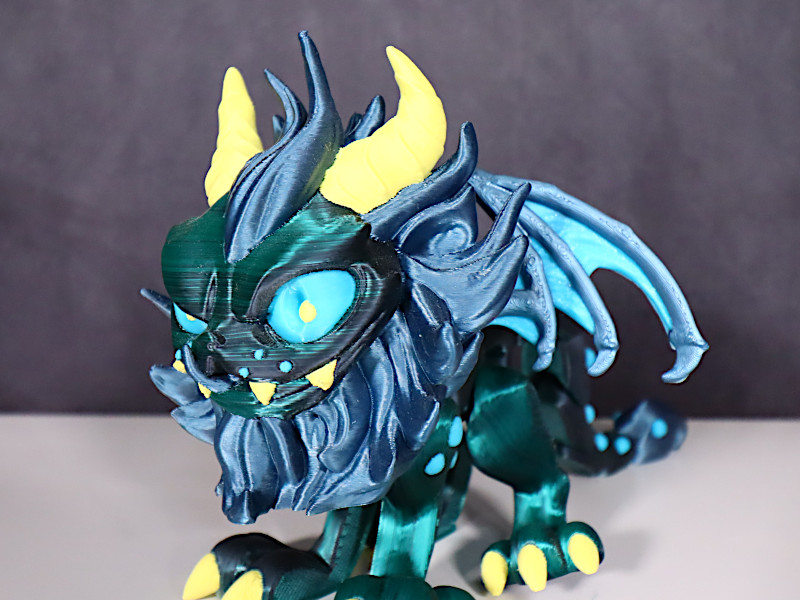
Now, we’ll look at three flexible articulated prints from TwistyPrints’ Patreon page: the Reaper, Heretic Goat, and Manticore. Some Patreon creators include Bambu 3MF files, which enable multicolor printing by permitting quick color loading for desired selections.
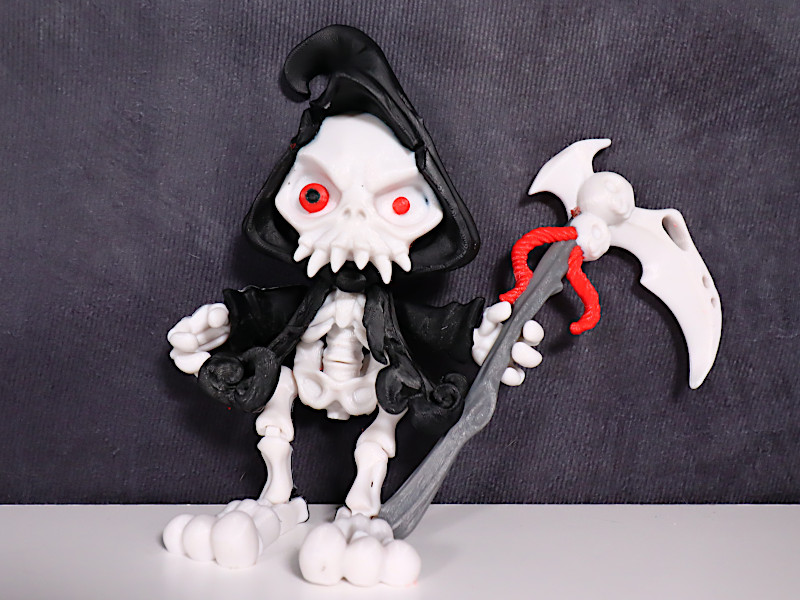
Design by TwistyPrints on Cults3D
©3DWithUs – Print & Photo: Will Zoobkoff
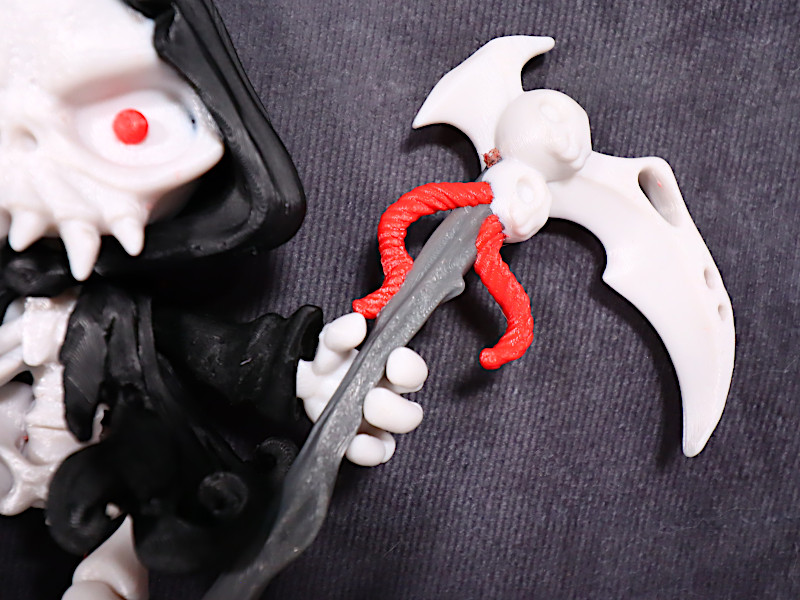
These sculptures were created using a variety of filaments to highlight their intricate details. Sunlu’s high-speed White, Black, and Red PLAs were used in the prints, along with Yellow and Grey standard PLAs. We also used Anycubic Metallic Blue PLA and Eryone’s dual-color Black/Green Silk PLA. These prints turned out incredibly well, as evidenced by the following photographs, matching the success of earlier prints.
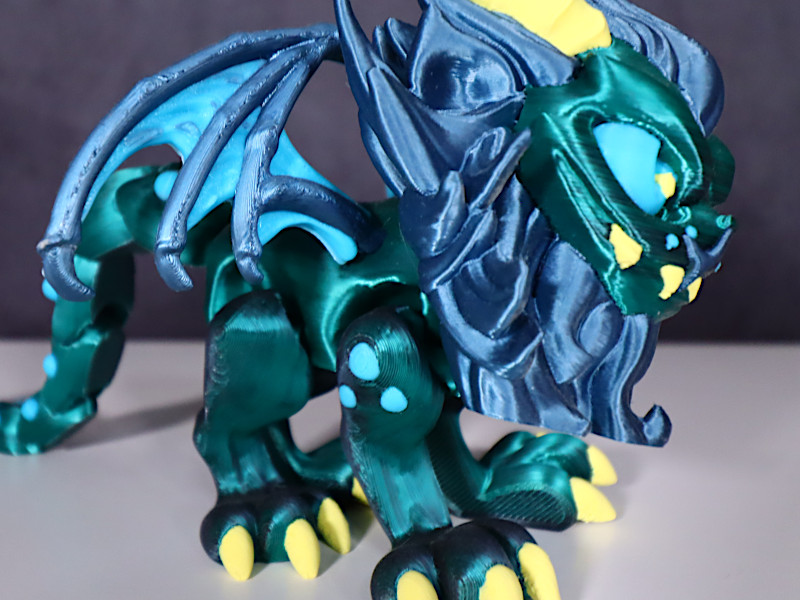
Design by TwistyPrints on Cults3D
©3DWithUs – Print & Photo: Will Zoobkoff
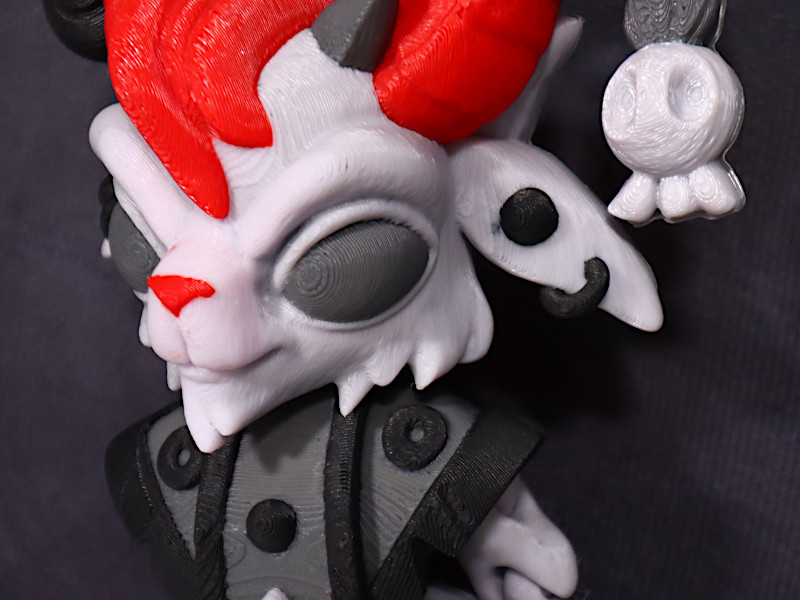
The capacity to include many colors distinguishes these prints, resulting in improved final goods. There were no problems with any of the prints, and all of the joints operated freely and without issue. Even though only four colors were used, the results were really amazing. The varied color palette provided an extraordinary range of choices, heightening the visual impact and complexity of these prints.
Design by TwistyPrints on Cults3D
©3DWithUs – Print & Photo: Will Zoobkoff
In order to continue our print journey, we decided to make another lovely model from TwistyPrints, specifically the Halloween Spider Pumpkin Cat, which is a free file on their Cults3D store. This lovely sculpture has a delightful appeal and was painstakingly built from a combination of Sunlu’s Black PLA, Yellow PLA, and Overture’s Orange PLA.
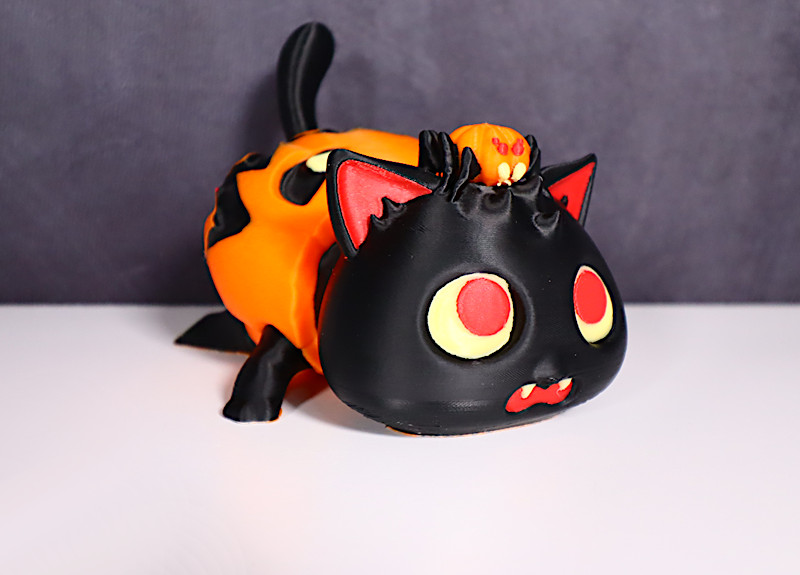
Design by TwistyPrints on Cults3D
©3DWithUs – Print & Photo: Will Zoobkoff
This artwork, like our prior test prints, turned out beautifully, capturing attention to detail flawlessly. Even the smallest detail, such as the little spider sitting on the cat’s head, appeared flawlessly without any visible flaws. The vibrant photographs that accompany this showcase demonstrate to the great quality of the print, showcasing the intricacy and precision achieved with the color combination. This adorable model is simply another example of the printer’s consistency and quality.
©3DWithUs – Print & Photo: Will Zoobkoff
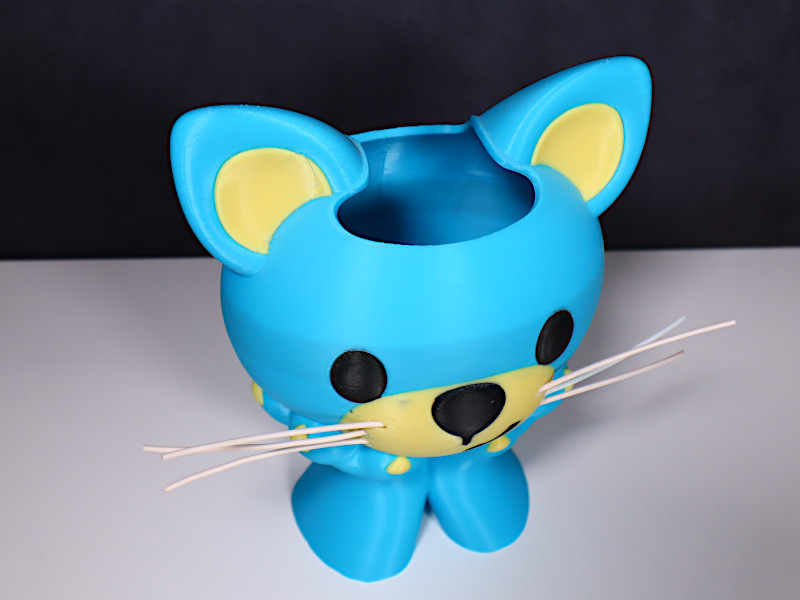
Sunlu Light Blue Metallic PLA, Sunlu Yellow, and Black PLA were used in the last print in our testing lineup, a Koza Design design from Patreon, with white PLA for the whiskers. Despite its simplistic form, the model’s visual attractiveness is considerably enhanced by the use of numerous colors, making it stand out. The charm comes in the opportunity to personalize this beautiful holder with various color combinations, providing limitless possibilities. This design flexibility allows customers to customize the holder to their tastes or to complement specific themes.
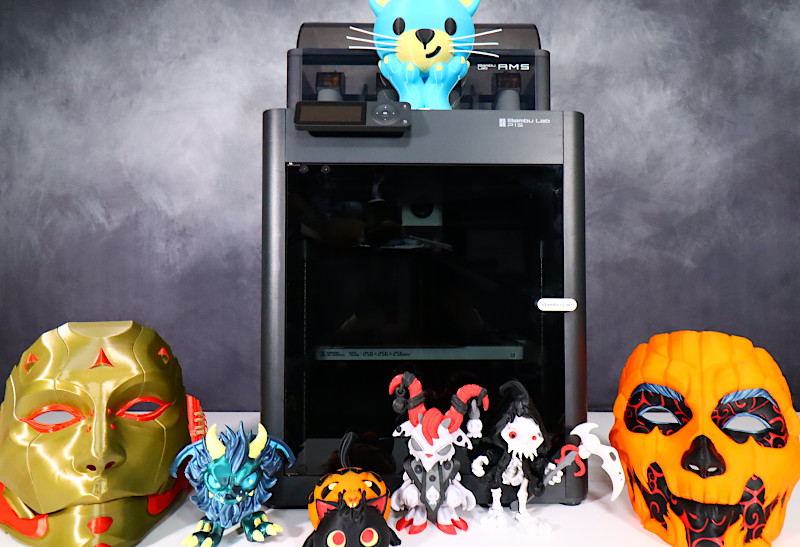
©3DWithUs – Prints & Photo: Will Zoobkoff
The printer demonstrates its capacity to enhance even seemingly simple designs, transforming them into fascinating and personalized works, showing its agility in making visually attractive and individualized prints.
Compare Bambu Lab P1S to Other 3D Printers
Compare to the similar volume FDM 3D printers in the same price range:
– Speed. There is fierce competition for speed in the consumer 3D printer market. AnkerMake M5, Bambu Lab P1S, and Creality K1 are speedy 3D printers.
– Price. AnkerMake M5, Bambu Lab P1S, Creality K1 Max, and Prusa i3 MK4 Kit are in the same price range of $600-1000 depending on campaigns.
– Build. Build-wise, both the BambuLab P1S and Creality K1 are on the same level, featuring a stable CoreXY with an enclosed chamber.
– Multi-Material Option. With Bambu Lab P1S AMS and Prusa MMU already on the market, AnkerMake plans to bring their V6 version as well. Creality still has to offer their version of a multi-color option.
In the comparison conclusion, I would say that the four machines mentioned above are in competition at the moment for the same price range.
Compare to the Other Bambu Lab 3D printers:
If Bambu Lab’s X1 Carbon has established itself and won awards since 2022, then Bambu Lab’s A1 is a new format launched in 2023. The bed-slinger A1, with its smaller build volume, is still AMS compatible. It is one of the most affordable multi-material 3D printing compatible 3D printers on the market.
Conclusion and Pros & Cons
Bambu Lab P1S Combo Review
Review Summary
The Bambu Lab P1S Combo stands out as one of the top printers and AMS systems on the market today. It distinguishes itself as a top-tier solution for printing enthusiasts, with optional multi-material and multi-color capabilities, lightning-fast print speeds, and a fully enclosed design designed for high-temperature printing. Despite the possibility of increased waste generated by the AMS – Automatic Material System and somewhat higher noise levels, the P1S remains one of the best printers available.
PROS
• Enclosure
• Fast
• Optional 4 color up to 16
• Clean prints
CONS
• Loud
• waste from AMS