If you’ve ever wanted to modify your 3D printer so it could make food, there’s no better time than the present to give it a try! Although it may seem like a futuristic concept, you can 3D print food out today and be eating it by tonight. This is largely due to the advancements in the consumer 3D printing market marking difficult-to-find components easier to source, and advancements in 3D printing software and documentation allowing users to modify and adjust the printing process to work with their particular applications. I was pleasantly surprised by how easy it was to print out food on my 3D printer, and I think the process is easy enough that anyone who is interested in replicating my results will be able to do so. In this article, I’ll cover my process of retrofitting the Mingda D2 with a paste extruder to create a 3D printer that is capable of printing a variety of different foods.
What is a 3D Printer, Anyway?
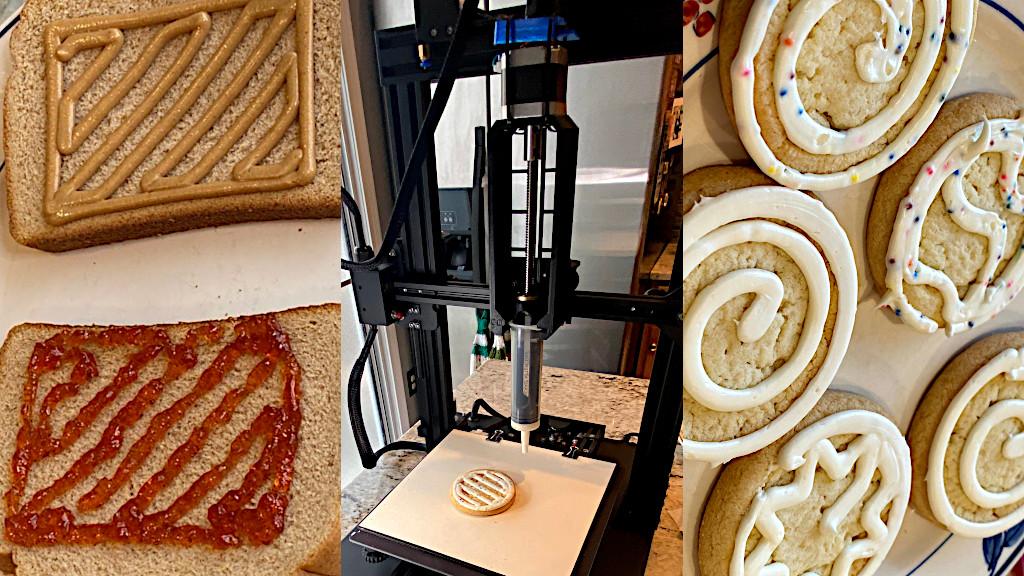
Before we talk about printing food, we should take a step back and define a few things. A typical FFF (Fused Filament Fabrication) or 3D printer is generally thought about as a CNC (Computer Numerical Control) programmable machine with three axes of motion and an extruder that deposits material in layers which fuse together to form a completed object. With that knowledge in mind, it’s easy to see how simple it is to convert a standard FDM 3D printer into a printer capable of extruding food. To create my food printer, I used the Mingda D2 as a base.

(Photo: Andrew Sink)
The D2 has many features that work in its favor for this sort of experimentation: silent stepper drivers, a rigid frame and gantry, and an easily-accessible touchscreen make the D2 an easy choice. To convert this printer into a food printer, the only hardware change that needs to be made is to replace the heated extruder module that is designed for printing plastic with a system that is capable of extruding a paste.

(Screenshot: Thingiverse)
Building the Paste Extruder Tool Head
After watching a video in which YouTuber constantjin shared his design process for creating a paste extruder, I decided it was finally time to give it a try myself. The overall motion system is fairly simple, with a threaded lead screw attached with a coupler to a stepper motor acting as the drive mechanism. A standard 60 ml syringe is attached to the body of the extruder and the plunger is replaced by a printed component with a rubber seal. When the stepper motor turns, the leadscrew rotates and causes the plunger mechanism to drop into the syringe, extruding the contents through the nozzle. In the video, constantjin did an excellent job of demonstrating the mechanical system, and I highly recommend watching it if you are interested in building one of his paste extruders for yourself. The frame of the paste extruder includes a 3×3 bolt pattern to attach to a mounting bracket, which I designed to attach to the Mingda D2. The stepper motors on the D2 proved easily capable of extruding peanut butter (a relatively thick paste), and I have no doubt that even thicker materials could have been used.

(Photo: Andrew Sink)
Generating Printable Patterns for 3D Printing Food
The first paste I used on the Mingda D2 food printer was frosting. It flows easily, holds its shape well, and is easily compressed into the syringe. I bought a few boxes of sugar cookies to test, and I was really happy with the results! Because I was printing directly onto these cookies; I needed to determine a few measurements so I could make sure my CAD file would be properly calibrated. I measured a dozen of the cookies and calculated the average diameter and thickness of the set, and used that as my starting point. To compensate for the thickness of the cookies, I set the Z-offset in PrusaSlicer by the measurement amount, which causes the toolpath to begin in mid-air. The diameter measurement was used to create a single-layer cylinder with a 4mm thickness. By altering the infill patterns of this layer, I was able to create several different shapes and styles of frosting on the cookie.
Printing a Peanut Butter and Jelly Sandwich
I’ve talked about printing a peanut butter and jelly sandwich for a long time, and having this paste extruder functioning finally allowed me to make this dream into a reality. Before printing, I expected the jelly to print without any issues while the peanut butter might be a challenge to extrude. I was really surprised with just how easy the peanut butter was to print; it flowed effortlessly and created an even, consistent toolpath. Because I packed the peanut butter slowly into the syringe, I didn’t have a lot of air pockets and the toolpath was largely consistent.

(Photo: Andrew Sink)
Printing the jelly was a completely different story; it is so light and delicate that the slightest movement of the syringe caused it to eject from the nozzle, which makes packing the syringe and printing a challenge. To make the sandwich, I swapped between syringes and replaced the bread, creating two identical halves that could be folded together.
MP4: Andrew Sink
3D Printing Food in the Kitchen
Overall, the process of creating a syringe extruder for a 3D printer and making food has never been easier from a feasibility standpoint, and I think that it will likely become more commonplace in bakeries and kitchens to replace monotonous, repetitive tasks that could be performed by a robot or mechanical system. However, it is still an inherently messy and imprecise process when done with a homemade machine and I did run into issues with the toolhead not being aligned with the food it was supposed to be extruding onto. I only printed frosting, peanut butter, and jelly, but I believe that any food that can be squeezed through a nozzle is potentially a good candidate for being used in a 3D printing process.
If you’re interested in learning more, you can watch my 3D printed food video on YouTube to see my printer in action and see if this is a project that you want to replicate.
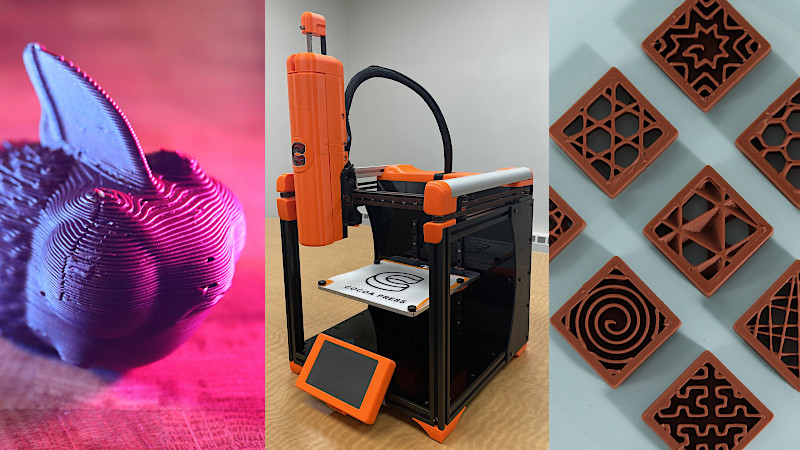
Read more: Cocoa Press: A Chocolate 3D Printer
The Cocoa Press is a 3D printer that uses chocolate as a material and can print complex and edible 3D models. Cocoa Press founder Ellie Weinstein has been working on 3D printing chocolate since 2014 and has previously launched a larger chocolate printer. The new Cocoa Press 3D printer is the result of her years of experience, research, and development to perfect the process of 3D printing edible chocolate models.