
In this guide, I will explain how to create your own Kit Card models. We will look at what software to use, highlight valuable tips and tricks on how to design such delicate models and show preferable 3D printing settings. And of course, there will be a printed model as an example.
This Guide Covers
- Introduction
- Software & Scene Setup
- Blueprints/Schematics
- Tracing the Lines
- Thickness & Scale
- Common Connectors
- Assembling the Kit Card
- Printing Tips
- Fire up Your Printer!
- Conclusion & Links
Support Nakozen on Ko-Fi. Get early access to exclusive offers, custom commissions, permission to sell physical prints and generally to support creative 3D printing.
Since I was a kid, I’ve been infatuated with aeroplanes, or just about anything that flew. When I got my first Airfix kit, I was impatient with the transfers and did a sloppy job of the paintwork, but loved every step of it, finishing with a globby red Hawk T1 Red Arrow. Kit Cards capture a similar sense of this to me, in a simpler and less messy way. They are fun to design, fun to build, and make excellent gifts to hand out! They need not only adhere to aircraft designs of course; the possibilities for what you could make are just about endless.
Software and Scene Setup
For this guide, I will be using Blender, a free open-source 3D design programme which is what I am most accustomed to and what all of my 3D models are created through, but most other 3D software out there could do the job just as well. This simple guide will assume you at least have a baseline understanding of 3D modelling.
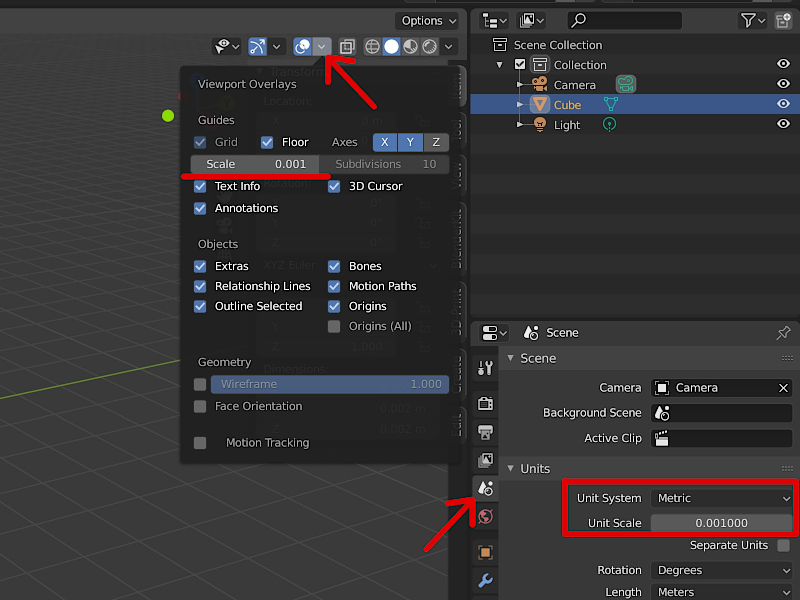
Image: Nakozen
Now, for setting up your new scene, we will be working at a very small scale around 0.1mms, so setting up your units now will save some heartache later, and it’s easy peasy! Switch to good ol’ Metric and set the unit scale to 0.001, along with your grid scale to the same value! The grid is your friend.
Blueprints/Schematics
First up, search online for schematics or blueprints of what you want to create a kit from, you are looking for top and side views, preferably in the same image. If you cannot find suitable images, then be ready to get creative with whatever you can get!
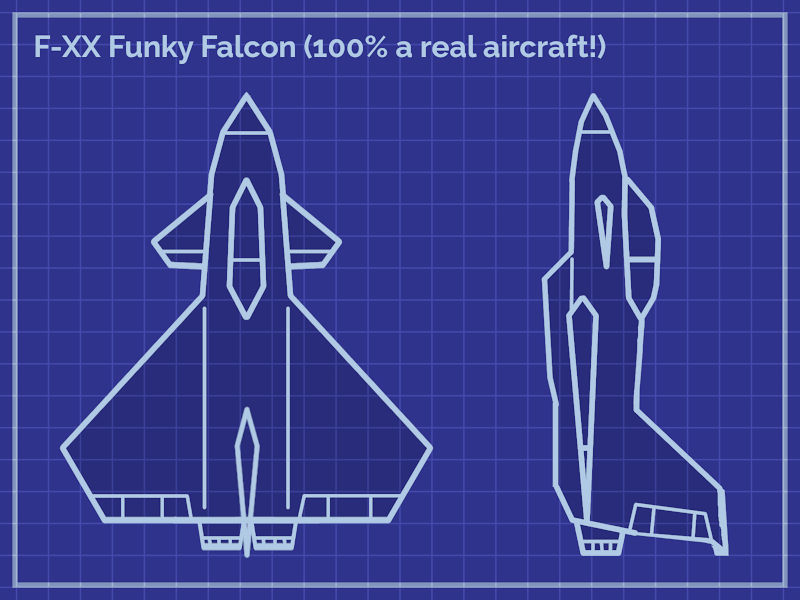
Image: Nakozen
Tracing the Lines
The next step is the easiest, so get out your tracing paper! You want to trace the outlines of the top and side views into 2 flat planes (badum-tss). There are a few ways to do this, I quite enjoy doing it through planar modelling, but you can also try it through Photoshop/similar and importing the silhouettes as .SVGs!
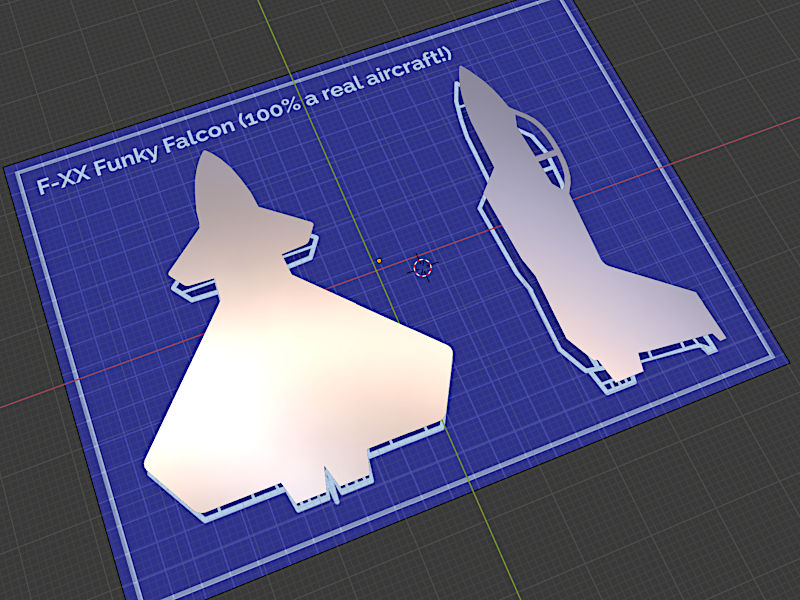
Image: Nakozen
Thickness and Scale
Decide on how large you’d like your kits to be and the thickness of your parts. It’ll take some trial and error, but I found 1.8mm high (Z axis) is just right for me, and that’s what I have always stuck to for every kit. It is much easier to keep track of tolerances! Make sure whatever height you choose is divisible by layer height, commonly being 0.2mm.
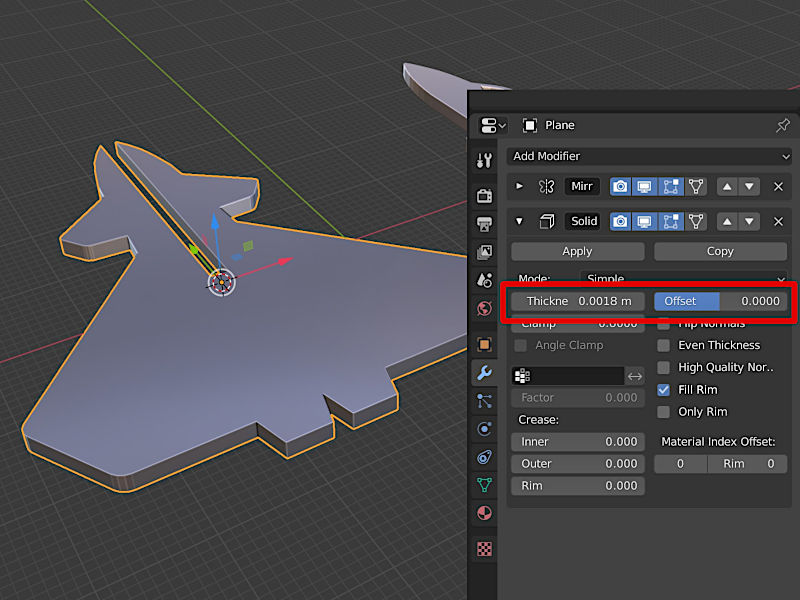
Image: Nakozen
The best way to do this in Blender is with a ‘Solidify’ modifier and entering your desired thickness.
Common Connectors
Your basic slot-together connector should have a width matching the height of your parts, plus an added tolerance for a looser fit. I use 0.1mm on either side of the slot, but experiment with what works best for you! Often the ‘Boolean’ modifier will be your best bet for this, just keep in mind it can have a mind of its own sometimes…!

Image: Nakozen
There are a multitude of other connection methods out there, and it’s extremely satisfying finding new creative ways to piece things together, and in time you’ll get better at hiding them from the result you are aiming for.
Assembling the Kit Card
Now that we’ve got all our parts ready, it’s time to assemble the Kit Card!
Word of advice here, take your time! With just 2 parts it’s fairly straightforward, but other times it can be a bit of a head-scratcher.
– When in doubt, try for 3 points of contact, especially on larger parts, while smaller parts can often get away with just 1.
– The fewer sprues, the less clean-up required after.
– Find a good medium between kit rigidity and ease of disassembly!
– ‘Sprues’ should not be the same height as the kit parts, or else the connection could be too strong and be harder to remove cleanly.
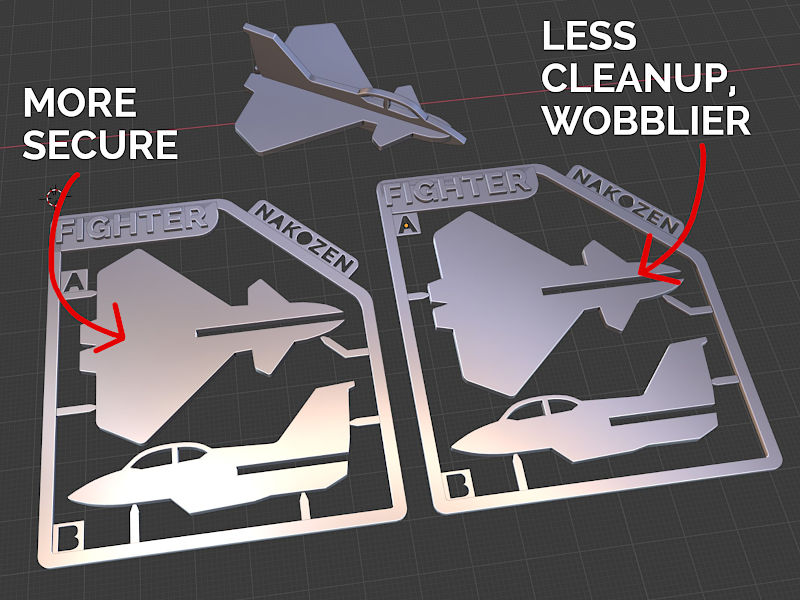
Image: Nakozen
Printing Tips
When printing Kit Cards popular slicer software default settings will get you far, as long as your belts are well sinched up and the bed is nice and level.
– There is little reason to print at a higher resolution than 0.2mm, and keep your part thickness and layer height in mind. 1.8mm does not divide evenly by 0.16mm and may result in a very loose fit.
– If printing with the purpose of hanging via a loop, 100% infill will ensure it is balanced every time. Finding the centre of mass can be tricky, and may take some trial and error!
– Gaps between top perimeters and infill? Increase ‘Skin Overlap’ to ~30%, and make sure you’re not printing Inner Walls too fast.
– Slow down!
– Print sticking to bed? Throw it in the freezer. If that doesn’t help, scoosh a little isopropyl alcohol under the print and enjoy those light crackles and pops!
– And the magic ingredient… ‘Outer Before Inner Walls’. This should help get that perfect fit, and minimise the necessity for added tolerances.
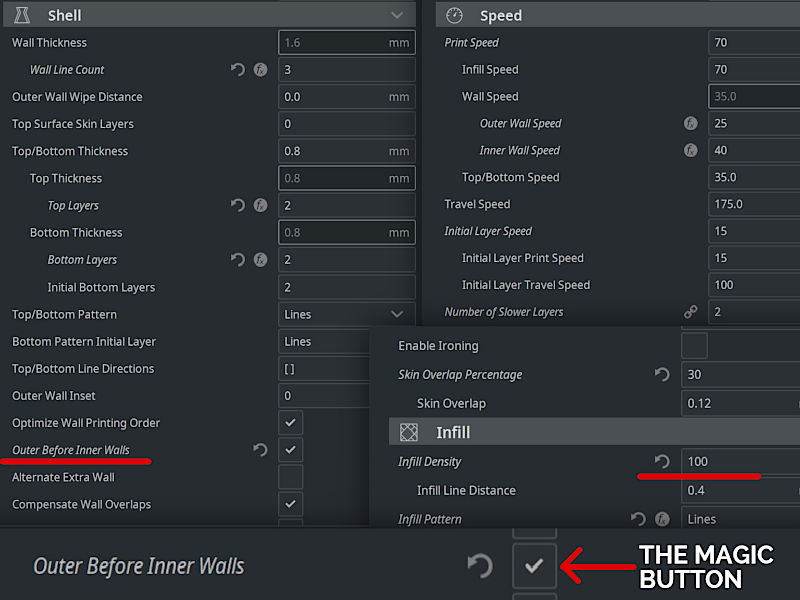
Image: Nakozen
Fire up your Printer!
And you’re all set, fire it up to the printer and get mass-producing your new pride and joy! A kit as simple as this prints in no time at all. The model in the picture below is printed on a budget 3D printer Creality Ender 3.
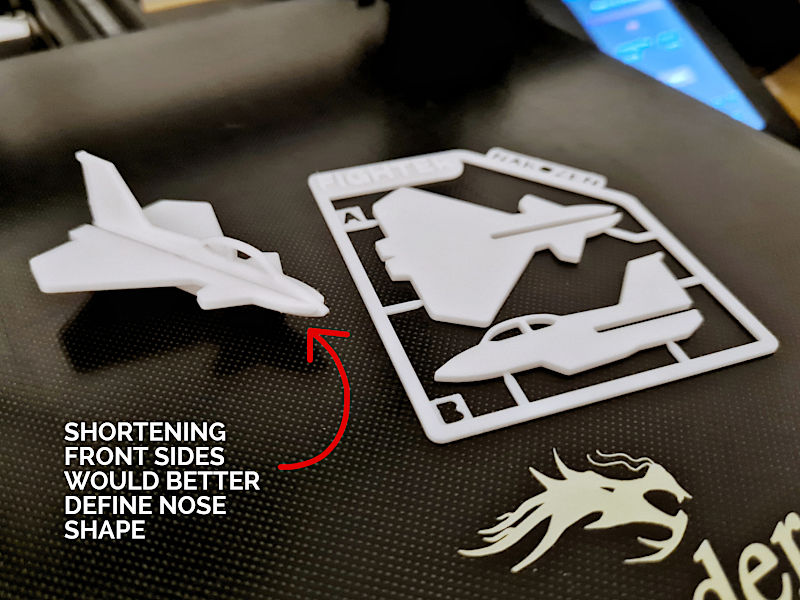
Image: Nakozen
Conclusion
While much of my own work is created from existing objects and vehicle designs, I find that my favourite pieces are ones that are 100% original out of my own noggin! The Gingerbread House and Zombie Kit Cards have to be my all-time favourites from just how much fun and challenging they were to make, and by how satisfying the final results were! Working off blueprints is a great start to learn how things all fit together, but don’t be too afraid to step out and try something new once you find your feet! Unsure how to break something down into flat pieces? Whip out your trusty sketchbook!
If this brief guide has helped you realise your Kit Card dreams, I would love to see what you come up with, and feel free to ping me a message if you have any further questions!
Check out all of my work over on Printables or Thingiverse, whether it’s for printing my models or research for your next great project.
In conjunction with this page, I am working on a much more in-depth Kit Card tutorial with secret tips, fancy graphics, and extra 3D resources which will be available to all kind donators over on my Ko-Fi!
Read more: Top 3D Printable Kit Card Models
A wide range of so-called “business card” sized models is available on STL-sharing websites. These models are small and flat, and therefore they are 3D printed in no time. Read more …


Hey I use shapr3d software for cad can you help me on how to make a kit card on it