Tensegrity models, that are popular in 3D printing, can be used both for decorative and functional purposes. Let’s look into different designs and the settings to apply for printing on a regular FDM desktop 3D printer.
This guide covers:
- What is Tensegrity
- How to Design Tensegrity Structures
- Print-in-Place Designs
- Slicer Software Settings – Continuous Extrusion
- Other Design Ideas
What is Tensegrity
Tensegrity, a portmanteau of tension and integrity, describes a system where two (or more) components are under compression inside a network of continuous tension. This tension/compression combination provides stability to the multi-part structure.

(Photo: Natalie Cheesmond)
How to Design Tensegrity Structure
With respect to design the most important thing to understand is that to create a successful tensegrity structure you need at least two sets of ‘strings’ one set positioned top to bottom and the other bottom to top.

(Image: Natalie Cheesmond)
It is easy to see that 3d printing would be great for printing the two main parts of a tensegrity table to which wire or string could be added post print, and 3d-print designers have created some beautiful models using this approach.

(Photo: seabirdhh)
I wanted to take it one step further and design a completely 3D printed print-in-place tensegrity structure. A tensegrity where the strings were single extruded lines of filament printed into, rather than glued or tied onto, the model. To design a print-in-place tensegrity structure we need to look at specific 3d printing considerations as well as the design of the structure in more general terms. Let’s look at the general design first.
Design – Part Shapes
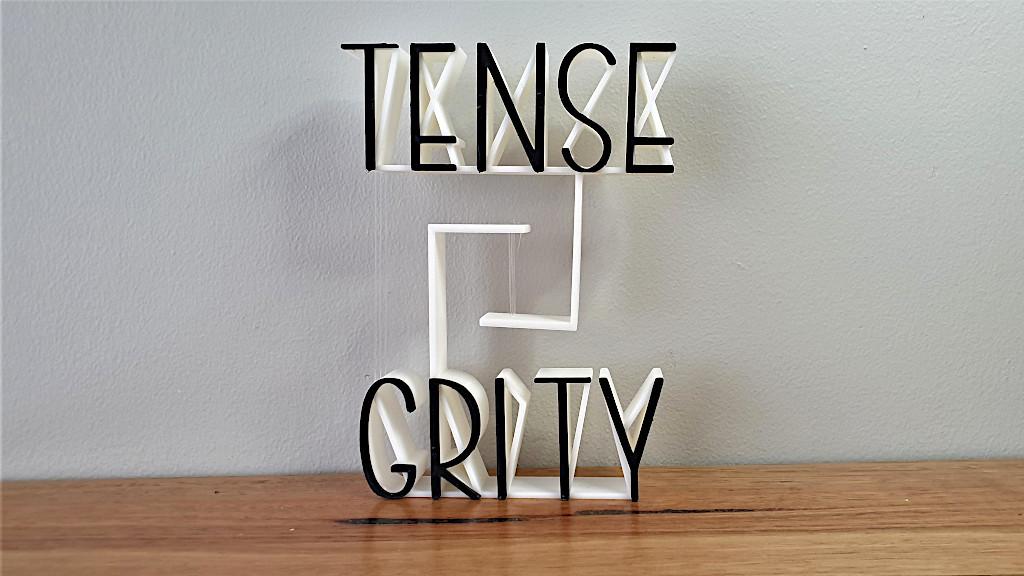
The most important element of any tensegrity design is the shape of the two (or more) parts and the relationship between them. The parts need to overlap vertically and horizontally to provide positions where the two types of strings (top to bottom, bottom to top) can be anchored. A C-shape, rounded or squared off, is the simplest way to achieve this but we can also use a V shape and, of course, we can add design features around these core shapes.
In the examples below, we can see a variety of designs that work well in tensegrity structures, example 3 which uses 2 short sets of strings will work, but is not as stable as example 1 where the two sets of strings straddle the middle section more completely.

(Image: Natalie Cheesmond)
There are two further things to consider when designing a tensegrity structure, the base and the anchor point.
Bases and Anchors
The base of your tensegrity structure needs to be flat and have a decent surface area. In general, I would advise that the base be at least the width and depth of the top part of the structure to ensure stability. Using a smaller base is not impossible but balance begins to play an increasing factor in models with smaller footprints.
Anchor points are the areas on the two main models where the strings connect. It is good practice to make sure these areas are neither too thin nor too narrow as these anchor points will experience tension stress and if too fragile may break.
3D Printing Print-in-Place Designs
As well as the general design considerations, creating a 3D printed print-in-place tensegrity structure introduces some extra challenges to overcome. We need to add the strings that hold the two parts together to the model, and we need to persuade the printer to print those lines as a single continuous extrusion that overlaps the main model parts. As the majority of 3D printers print in horizontal layers we also need to orient our print so that the tensegrity strings run along the x/y axes.
Designing the strings to be extruded as a single extrusion can be achieved by setting the height of the string to a single layer height and the width to the approximate width your printer normally prints at (use your nozzle size as a guide). Tensegrity print in place structures are best when printer at larger layer heights (0.3mm), the height dictates the thickness of the tensegrity string so small layer heights have significantly thinner strings which are more likely to break.
Slicer Software Settings – Continuous Extrusion
If we add a string like this directly to our model we will come across two issues when slicing. The string may not show up on your slicer preview and if it does it may appear to have small breaks in it or not be attached to the main model parts. We need to tell the printer that we want to print this string and we want to print it as a continuous extrusion that is attached at either end to the main model.

(Screenshot: Cura)
To make sure the printer will attempt to print the strings we need to check the box ‘detect thin walls’, ‘print thin lines’ or similar. The slicer sees the string as too thin to print so we are just telling it that, yes, it is thin but, yes, we do want to print it.
To address the fragmented printing of the string or the slicer starting to print the string in thin air we can make an adaptation to the model. By adding a gap, one layer thick around the string we can force the printer to print the string from beginning to end with no breaks.

(Screenshot: PrusaSlicer)
By taking account of the tensegrity design and print-in-place considerations it is possible to design and print a completely 3D printed, print-in-place tensegrity model that is surprisingly strong and stable. I have successfully printed tensegrity structures on Creality Ender 3 and my Original Prusa MK3S, sliced using Cura and PrusaSlicer.
Other Design Ideas
Tensegrity structures can be stacked. The more structures you place on top of each other the more flexible the structure becomes. This tensegrity man is very bendy and bounces around happily!

(Image: Natalie Cheesmond)
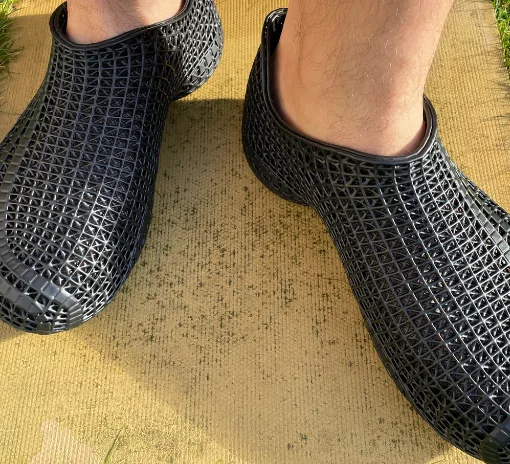
Tensegrity structures can be clustered. By clustering tensegrity structures one next to another you increase the strength of the structure proportionate to the number of strings. Using this method you can create print in place models that are incredibly strong such as this tensegrity sandal which can hold the weight of a person.

(Image: Natalie Cheesmond)
Tensegrity structures can be incorporated into other models to accentuate a feature. In this Benchy diorama I designed for my Patreon patrons, I used tensegrity strings to make the 3 boats appear to be floating on the water.

(Image: Natalie Cheesmond)
Most of the models and designs featured in this guide were printed on Original Prusa MK3S and Creality Ender 3 (affiliate links). Follow 3DPrintBunny on Patreon to get early access to exclusive designs and generally to support creative 3D printing.


You can see 3DPrintBunny’s designs on Thangs.
For more artwork, please visit the 3DPrintBunnyArt website.
Read More: Infill Pattern Art – 3D Printing Without Walls
In this article, we will have a look at infill, how it works and some of the available patterns before exploring how we can use it to enhance models, inform designs and create art.