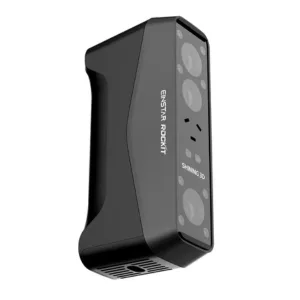
The EINSTAR Rockit is a new handheld 3D scanner from SHINING 3D that combines IR and Blue Laser scanning in one lightweight device. In this hands on review, I tested it across a range of objects, from a battle hardened DeathRacer to a DIY RC boat, to see how it performs in real use. From setup and software to texture capture, mesh quality, and wireless workflow, this review covers the key areas that matter. As usual, I will wrap up with final thoughts and a list of pros and cons.
SHINING 3D brings more than 20 years of metrology-based 3D scanning experience into the EINSTAR series. While aimed at entry-level and prosumer users, EINSTAR scanners benefit from professional software and algorithm development, while keeping a strong focus on usability, beginner-friendly design, and value.
Table Of Contents (Jump to a Section)
Where to Buy the EINSTAR Rockit
Price: $1,699 – $1,899
Compare the Prices & Bundles:
Official Store | Amazon
Specifications
EINSTAR Rockit Specifications
| Feature | Laser HD Mode | IR Rapid Mode |
|---|---|---|
| Light Source | 38 laser lines (crossed) + 7 blue parallel lines | IR VCSEL |
| Resolution | 0.05 – 10 mm | 0.2 – 10 mm |
| Scan Speed | Up to 2,800,000 points/s | Up to 4,800,000 points/s |
| Working Distance | 100 – 600 mm (laser) / 100 – 400 mm (parallel) | 160 – 1400 mm |
| Max Field of View | Up to 545 × 620 mm | Up to 1170 × 1385 mm |
| Minimum Scan Volume | 5 × 5 × 5 mm | 50 × 50 × 50 mm |
| Alignment Modes | Markers, Features, Global Markers | Markers, Features, Texture, Hybrid |
| Camera Resolution | 3D: 2 MP × 2 / Texture: 5 MP | |
| Output Formats | STL, OBJ, PLY, 3MF, ASC | |
| Working Environment | Up to 110,000 lux | Up to 70,000 lux |
| Power & Interface | USB-C, 5500 mAh battery, 60W PD support | |
| Dimensions | 130 × 37 × 61 mm | |
| Weight | 420 g (with battery) | |
Note: EINSTAR Rockit supports both high-detail laser scanning and fast IR scanning, allowing users to switch between precision and speed depending on the project.
Recommended PC Configuration: For optimal performance with the EINSTAR Rockit, a Windows 11 (64-bit) system is recommended, powered by a 13th Gen Intel Core i7-13700H processor or above. A dedicated GPU such as the NVIDIA GeForce RTX 3060 Laptop GPU (or higher) with at least 6 GB of VRAM ensures smooth real-time processing. The scanner benefits from high system memory, with 32 GB DDR5 RAM as a minimum and 64 GB recommended for more complex projects. A USB 3.0 interface is required for stable data transfer during scanning.
Recommended Mac Configuration: On macOS (Tahoe 26.2), the EINSTAR Rockit is supported on MacBook Pro models starting from M1, with better performance on M3 and newer chips. A minimum of 16 GB RAM is required, while 24 GB or more is recommended, particularly for handling larger scans and detailed textures. Higher-end configurations, such as M3 Max or Ultra, provide a more fluid workflow when working with complex 3D data.
What’s Included – Accessories
What’s in the box: The EINSTAR Rockit comes with a well-organized kit, including a protective carrying case, the scanner itself, and a calibration board with a universal holder. The package also includes a power adapter, battery, battery compartment, and a dedicated charging cable, along with a Type-C cable for connecting the scanner and battery compartment. For tracking and alignment, both 3 mm and 6 mm markers are provided, alongside a wrist strap and a printed packing list.
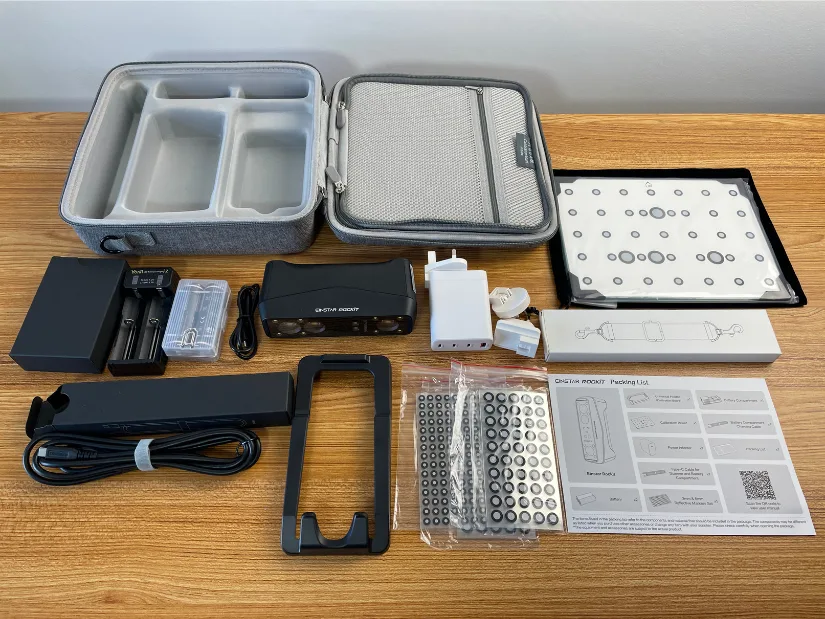
©3DWithUs – Photo: Max Funkner
Setup and Design
Apart from a small cardboard insert with the packing list and QR code, there were no printed instructions included. Scanning the QR code leads to the official Quick Start Guide, which immediately points you to the EXStar Hub software download and helps you get started.
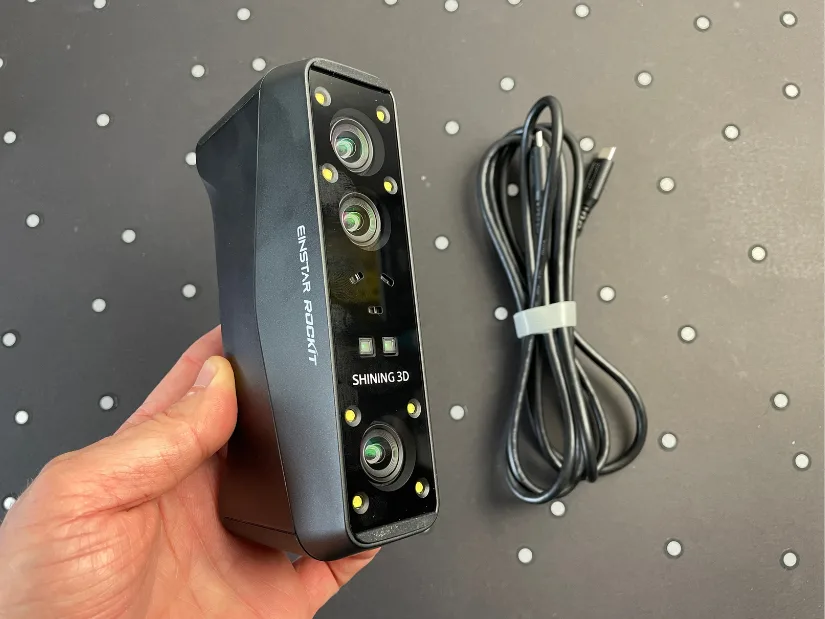
Before testing the wireless mode, I decided to begin with a wired setup. After installing and launching EXStar Hub, the process was straightforward. Simply connect the Rockit to your PC using a USB 3 cable, and the software will recognize the device automatically.
Calibration
©3DWithUs – Photo: Max Funkner
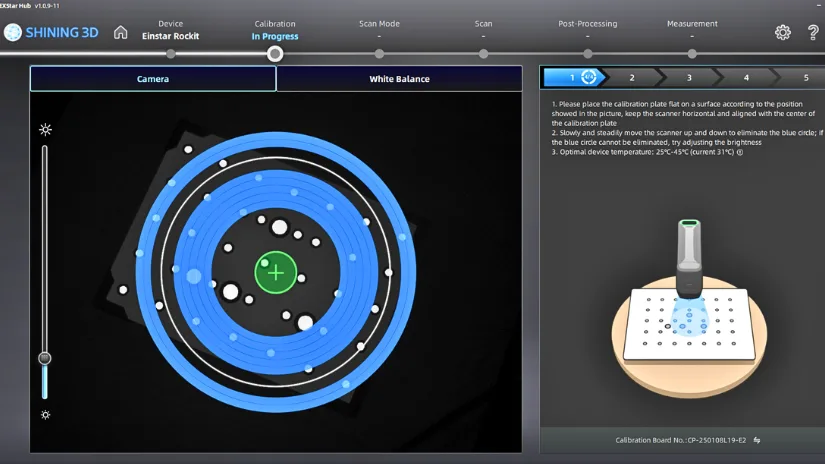
When the scanner is connected to the computer, EXStar Hub prompts you to calibrate the device. The process is straightforward, with a calibration board included in the top section of the case. There is also a plastic stand, which I initially struggled to understand, but it is used to position the calibration board at different angles required during the calibration stages.
Batteries and Charging Station
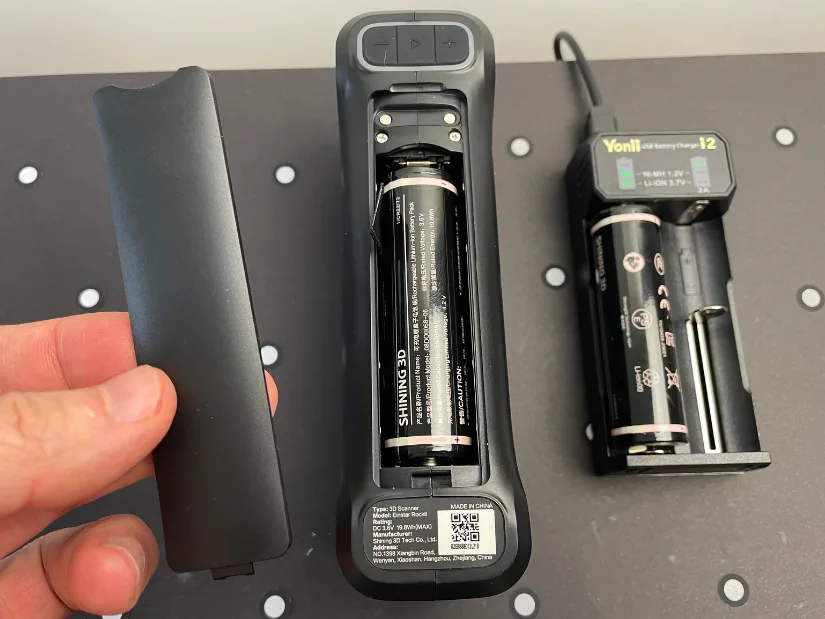
I did not measure the exact battery life, but according to the manufacturer, it should last up to 3 hours of operation. In my testing, I was scanning and processing throughout the day, and the battery was not depleted. A second battery can remain in the charging compartment, ready to swap in when needed. This setup makes the workflow effectively uninterrupted and very convenient for longer scanning sessions.
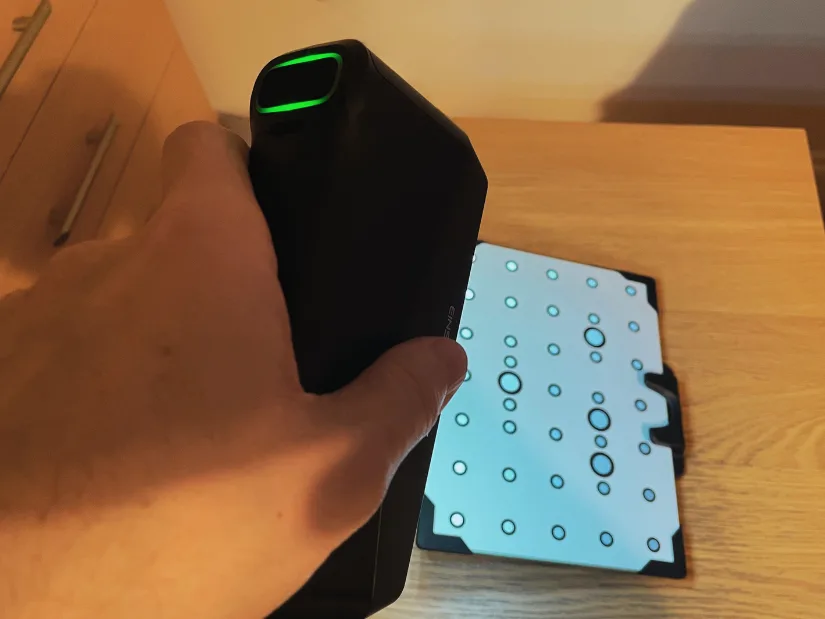
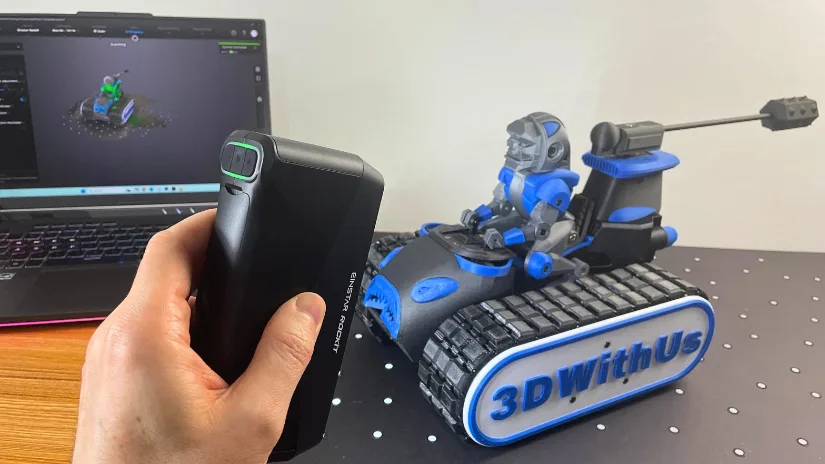
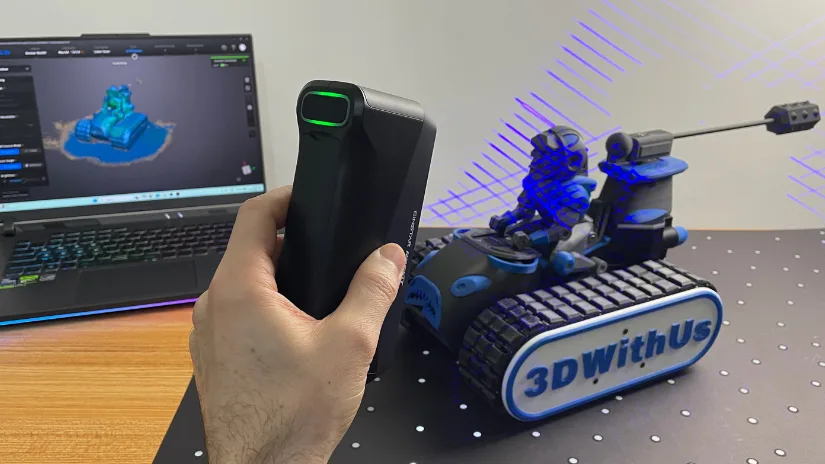
As you can see, the design is very lightweight and minimalistic, making the overall setup quick and straightforward. At first, I was slightly concerned that I might accidentally drop the scanner and thought it might need additional grip, but in practice this was not the case. The scanner sits comfortably in the hand and feels well balanced during use, which adds confidence when scanning for longer sessions.
Software: EXStar Hub
EXStar Hub for both Rockit and EINSTAR 2 can be downloaded via the links provided in the official Quick Start Guide. I found the layout and overall workflow slightly different compared to other 3D scanning software.
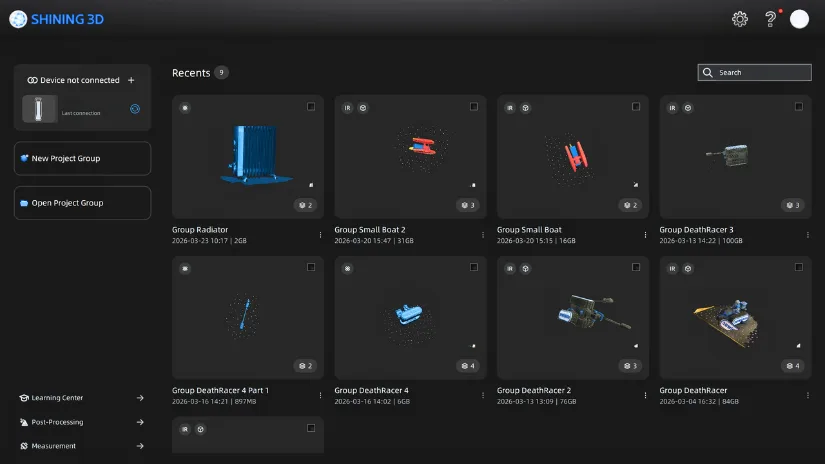
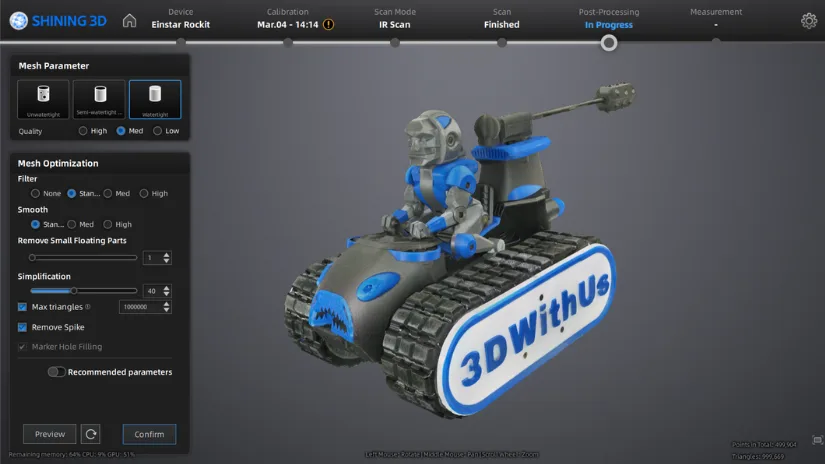
Instead of jumping between tools, EXStar Hub guides you step by step, starting from selecting the scan mode (Laser or IR) through to post-processing. This structured workflow feels intuitive and can be less confusing, especially for users who are new to 3D scanning.
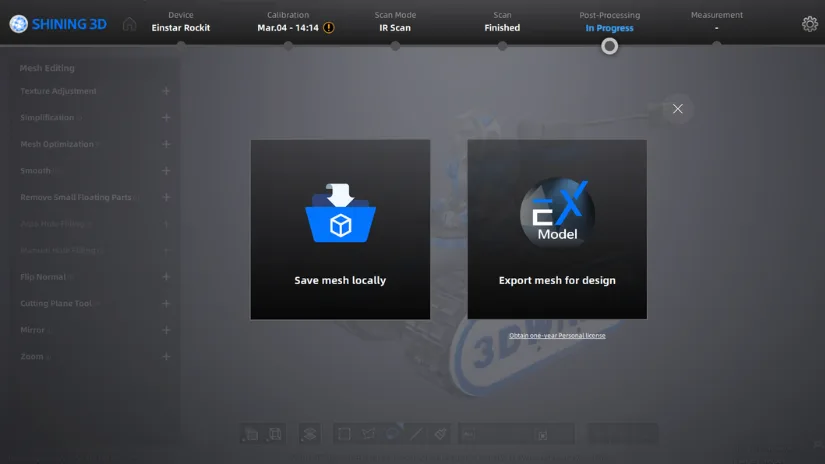
After processing the scan, I would strongly recommend saving your mesh in the available formats. If you close the software at this stage, the processed mesh and texture, which can take 5 to 15 minutes to generate, will be lost. I found this behaviour a bit unusual. It might be designed to reduce storage usage, but it would be helpful to have an option to retain the processed result directly within EXStar Hub without needing to reprocess it repeatedly. Note: An EINSTAR representative later confirmed that a feature to save the mesh directly within EXStar Hub is already on the roadmap for future updates.
Please find more detailed notes on the software, along with additional screenshots, in the Testing and Results section.
Testing and Results
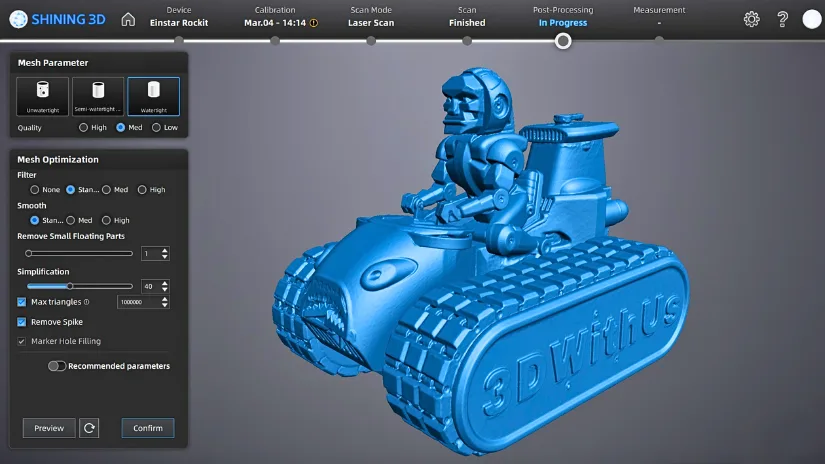
IR Hybrid Color Texture Mode – DeathRacer
The popular DeathRacer robot from the 3D printing community proved to be a great test object for evaluating both Infrared Rapid Mode and Blue Laser Mode. It is genuinely challenging for 3D scanners and software due to its complex geometry, black surfaces, and thin elements, such as the rod holding the Bludgeon weapon. As a result, I scanned it multiple times using different modes.
©3DWithUs – Scan and Photo: Max Funkner
This particular DeathRacer took part in the carnage at SMRRF, and you can clearly see battle damage, including broken “Piranha” teeth on the front. Just before the event, I captured a short teaser scan for our YouTube channel. After the battle, I returned to scan the object more thoroughly.
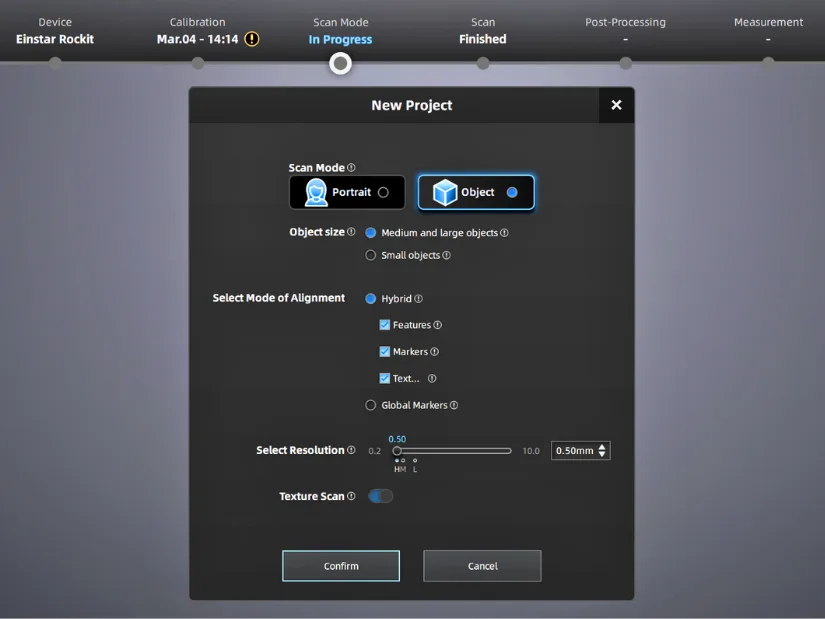
– IR Hybrid Color Texture Mode. I tested scanning on different surfaces. It works on a standard wooden table, but from experience, I prefer using a dedicated A3 black sheet covered with markers. The Rockit responded very well to these markers. After selecting IR mode, I enabled all three options in Hybrid Mode, which resulted in a very smooth scanning experience.
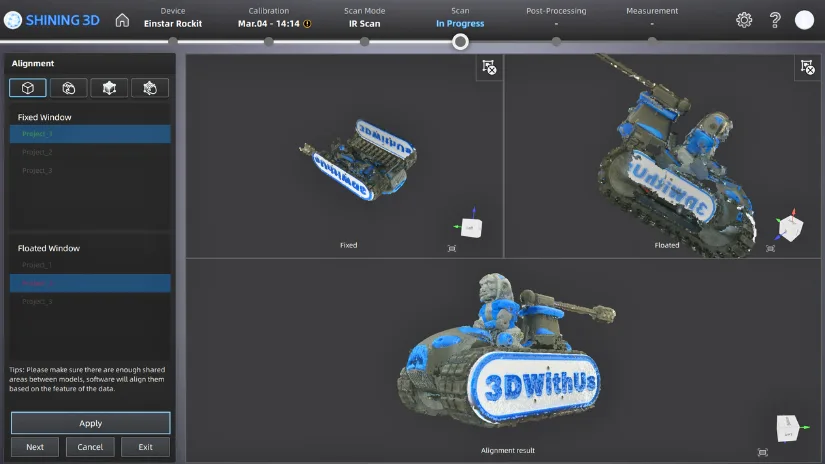
– Scan Alignment. Project alignment is essential for capturing a complex object like this. It typically requires at least three scans to cover all sides. In this case, after initial scan from the the top, I turned the model to the left, and to the right. It is important to keep the object consistent between scans, which can be challenging since the DeathRacer tracks move easily. Marking positions or carefully turning the model helps maintain alignment. Using the Project Alignment feature, the scans were combined automatically and with good precision.
– Mesh. Once the scans are cleaned and combined into a single model, the next step is generating the mesh. Processing the DeathRacer took around 15 to 20 minutes on my relatively powerful laptop, so the more data you capture, the longer this stage will take. Next, in the Post Processing section, you can further refine the model and export it in various formats, or even send it directly to Sketchfab.
Tip: When uploading models to Sketchfab from EXStar Hub, make sure to export and upload your files as a single zipped folder. In my case, the direct upload from EXStar Hub did not package the files correctly, and the texture was missing. I had to reupload the model on Sketchfab using a ZIP archive with .OBJ, .MTL, .JPG.
I had not used Sketchfab for a while, so this was a good opportunity to update my existing collection of scans with a new model. Viewing the model on Sketchfab allows you to explore it in 360 degrees and even toggle the texture on and off.
From my testing, IR Rapid Mode works well for capturing texture, while Blue Laser Mode is better suited for achieving higher mesh precision, which I will explore in the next section.
Blue Laser Mode – DeathRacer
Because of its rich geometry and protruding elements, such as the rod holding the weapon, the DeathRacer is a great model to test the Blue Laser capabilities of the EINSTAR Rockit. It presents a mix of fine details, sharp edges, and challenging surfaces.
The scanning speed in Blue Laser Mode is impressive, making the overall workflow much easier. Since the scanner captures data quickly, there is more room to repeat scans and refine results without significantly increasing the total time.
– Markers. In IR Rapid Mode, the A3 marker sheet is more of an optional addition, but in Blue Laser Mode, markers are essential. Using a marker-covered board meant I did not need to place markers directly on the object itself. This not only sped up the workflow but also helped keep the object clean, avoiding any interference with the scanned surfaces.
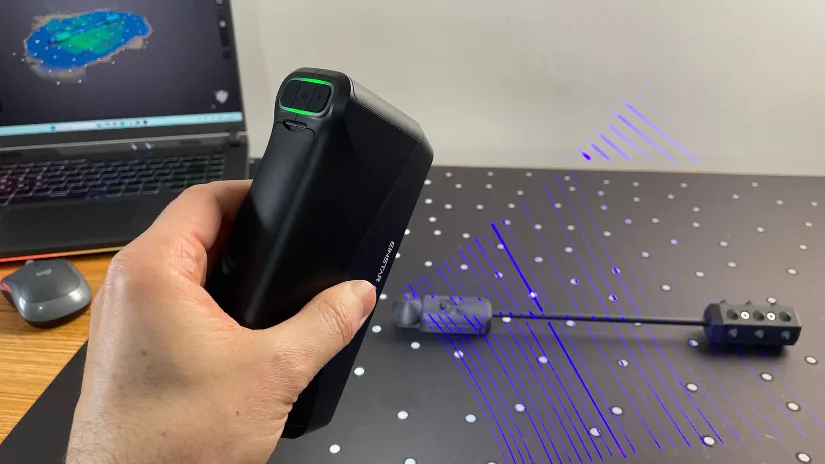
DeathRacer, together with the Bludgeon weapon attached to the DeathRacer on a long rod, proved too tricky to scan. I believe it would be possible to capture it fully with more attempts, but after several unsuccessful tries, I decided to dismantle it and scan it separately. With the weapon detached, both the DeathRacer and the Bludgeon were scanned more precisely and much faster, partly because the resulting files were lighter and easier to process.
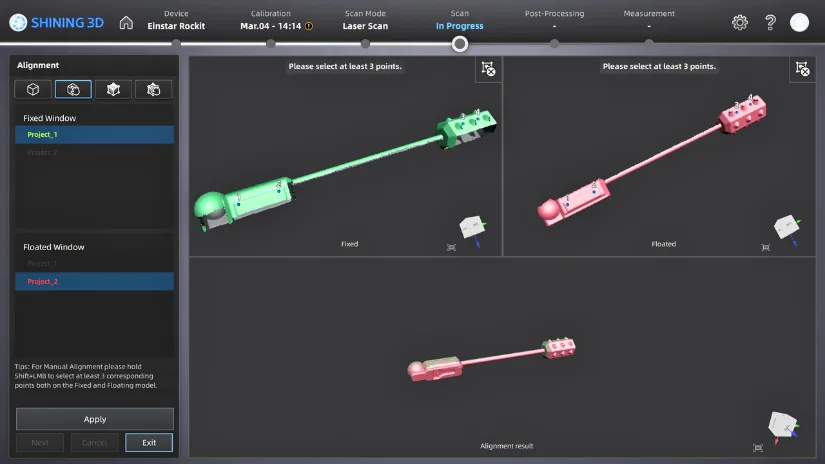
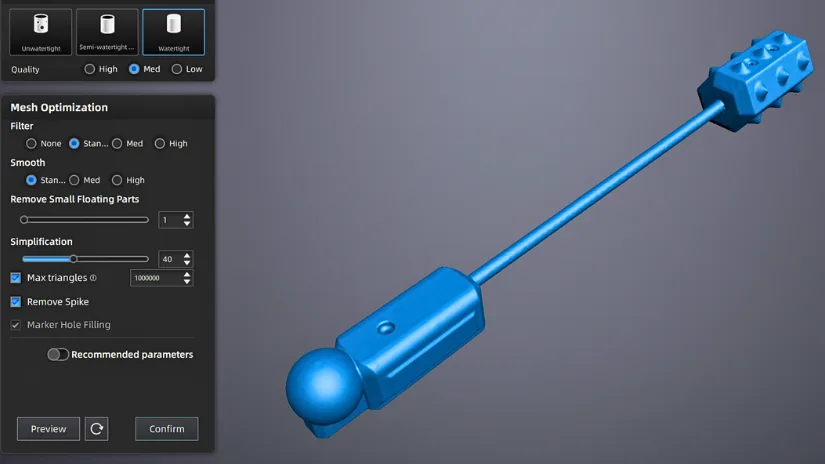
Clean, featureless cylindrical objects are a known weak point for both scanners and software. After three quick scans, this object required manual alignment by applying four reference points to merge the data accurately.
Looking forward to testing my new Snapmaker U1, and if everything goes well I will print a miniature based on this Blue Laser scan.
Compared to IR mode, Blue Laser Mode is better suited for capturing precise geometry and handling more complex shapes. This makes it particularly useful for objects with intricate details or areas where accuracy is more important than speed.
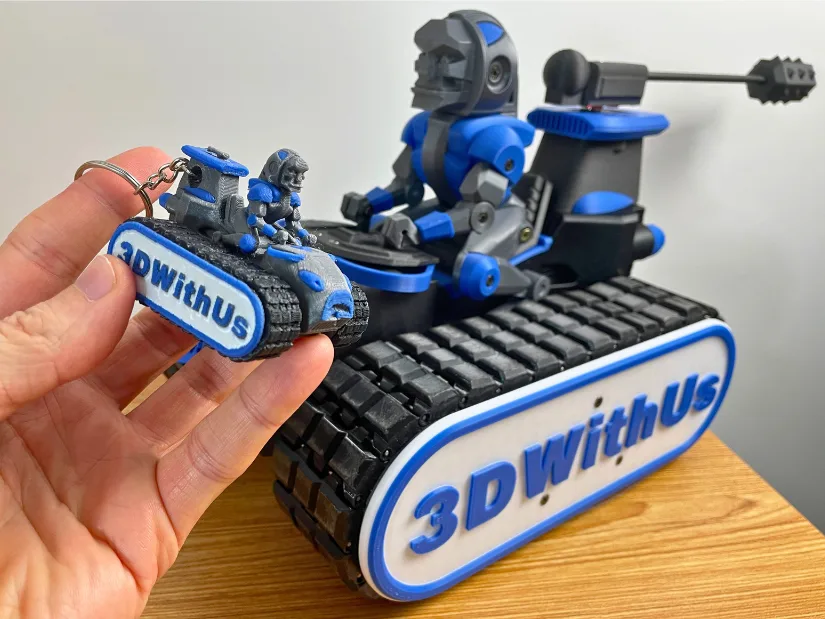
– Scan to 3D Print. To test the Snapmaker U1, I decided to scale an existing scan down to miniature size to use it as a keychain. After an attempt at printing DeathRacer flat, I printed it at a 45-degree angle. It came out great. Read more about printing settings and experience in the Snapmaker U1 article.
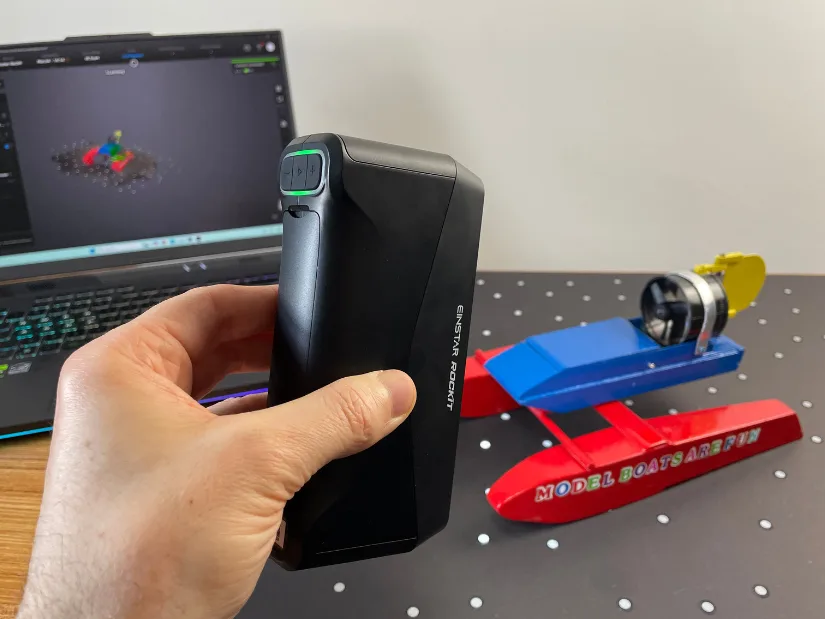
Wireless Mode – Small RC Boat
To test wireless mode, I initially tried scanning a small object, a DIY RC boat, in IR Rapid Mode. In the past, I wrote a detailed guide about RC boats in our local park, and I cannot thank Clive enough for letting me 3D scan his models from time to time.
©3DWithUs – Photo: Max Funkner
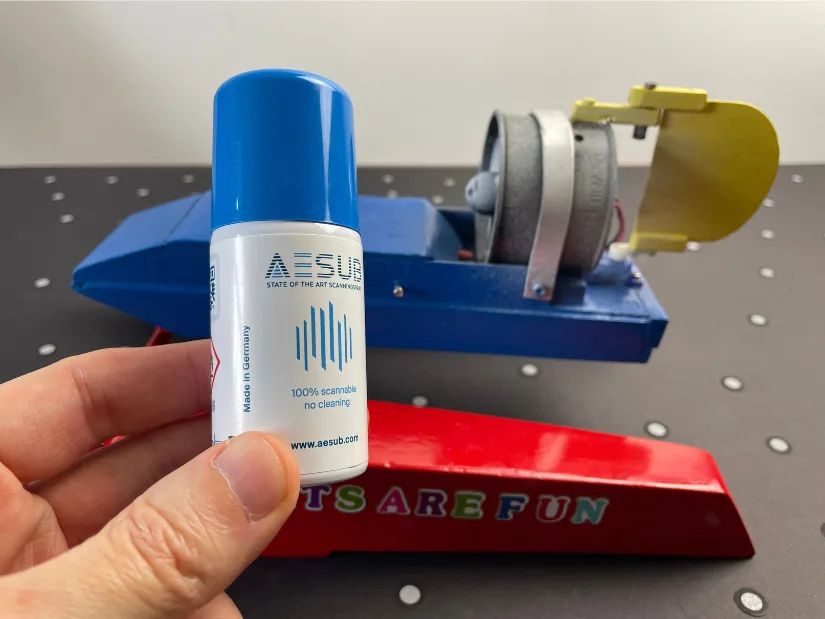
My initial scan was nearly perfect, except for the fan area, where the black shiny surface was captured poorly. To resolve this, I used a small AESUB scanning spray that I received at a trade show a few years ago. The spray temporarily coats the surface with a matte layer, making it much easier for the scanner to capture accurate geometry. Note: Switching to Reflective Mode and increasing exposure, some objects may work without a scanning spray.
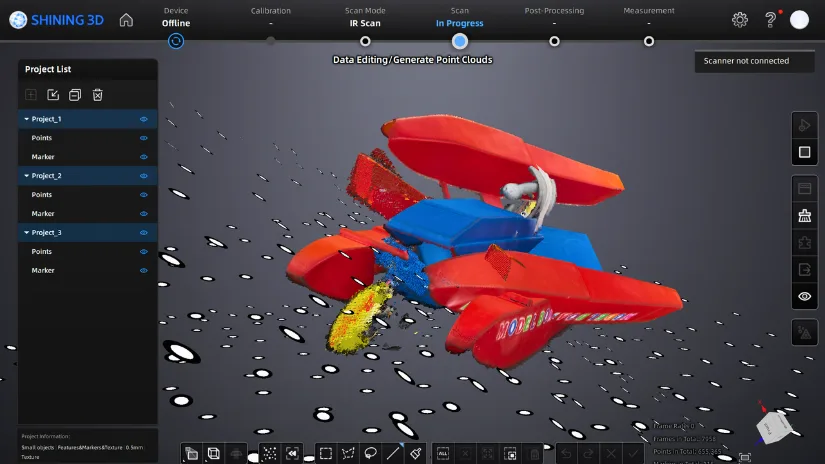
– Tips. Initially, I struggled to find how to add a new scan to the group. The path is Project List then Add New Scan. When the object is scanned multiple times from different sides, the unaligned scans can look quite chaotic, as shown in the image above.
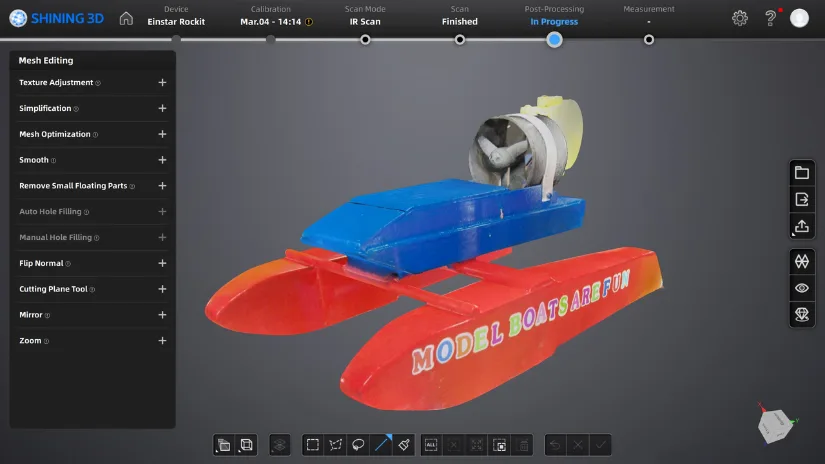
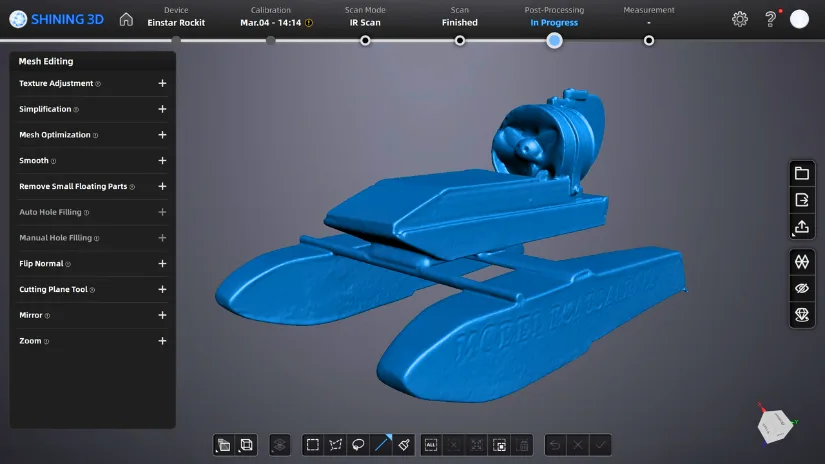
I am quite happy with how the texture turned out. The fan engine area, however, would benefit from a different approach to achieve higher precision, especially if the model is intended for scaled 3D printing. If I were to refine this further, I would detach the fan and rescan it separately to capture more accurate geometry and finer details. Note: In laser mode, seamless switching between cross lines and parallel lines is supported; therefore, you can first use crossed lines to scan the overall structure, and then use parallel lines to capture the details.
As usual, I will try to create a miniature from this object and 3D print it in multicolour as a Christmas ornament or keyring. I should have quite a collection of these by now. Stay tuned.
Compare to Other 3D Scanners
SHINING 3D offers a wide range of scanners for consumers, makers, and prosumers. Earlier, we published a hands-on review of the standalone EINSTAR Vega, which was highly praised by Will Zoobkoff. However, that is a different class of 3D scanner. A closer comparison for the Rockit would be the EINSTAR 2.
Rockit vs EINSTAR 2, a Brief Comparison
EINSTAR Rockit and EINSTAR 2 are closely related scanners that share a similar design philosophy and overall scanning approach. Both are compact handheld 3D scanners aimed at makers, creators, and prosumers, and both rely on EXStar Hub for scanning and basic processing. In practical use, the workflow feels familiar across both devices, making either option approachable for users looking for a flexible scanning solution.
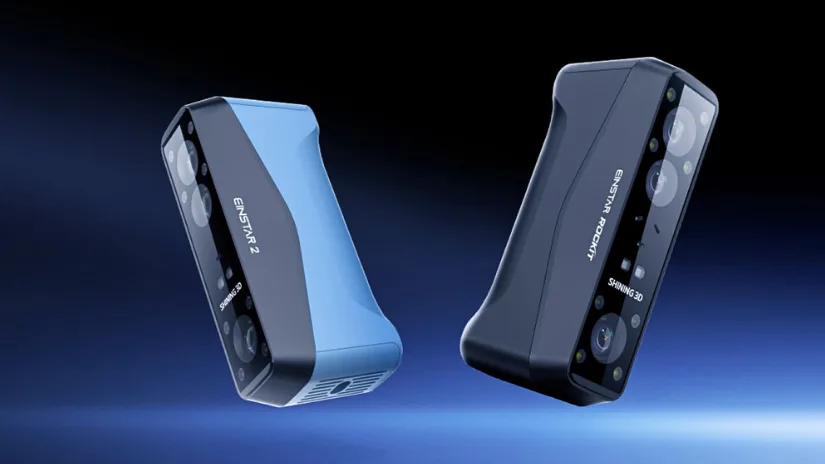
EINSTAR 2 is equipped with 17 parallel blue laser lines and offers scanning speeds of up to 90 fps, while its IR VCSEL projector supports efficient capture of larger objects. EINSTAR Rockit expands on this by combining 38 crossed laser lines with infrared scanning for faster large-area capture, while also adding 7 parallel blue laser lines for finer detail work.
The difference between the two appears to be positioned mainly around price and application range. EINSTAR 2 remains the more accessible option for general handheld scanning, while EINSTAR Rockit is designed to offer more flexibility for users who want both fast scanning and more detailed laser-based capture in one device.
As 3D scanning technology becomes more accessible, competition is also growing, with brands such as Revopoint, Creality, and 3DMakerpro offering capable handheld scanners. If you would like a broader overview of the market, you can read more about other 3D scanners on our website.
Within this category, one of the closest alternatives to the EINSTAR Rockit is the Revopoint MetroX. Both combine infrared and blue laser technologies, giving users a balance between faster large-area capture and more precise detail scanning. I tested MetroX last year, and there is already a newer version now, but the overall difference is still quite clear: MetroX feels heavier and generally comes in at a lower price point, while Rockit offers a smaller and lighter design, wireless operation, and more sophisticated hybrid scanning features.
For a wider discussion or to share your own Rockit scans, join us in the forum:
Conclusion and Pros & Cons
Compare the Prices & Bundles:
Official Store | Amazon
EINSTAR Rockit Review
Review Summary
The EINSTAR Rockit turned out to be a very interesting handheld 3D scanner to test. What I liked straight away was the lightweight and minimalistic design, quick setup, and the fact that it sits in the hand comfortably despite looking like it may need extra grip. EXStar Hub also made the workflow approachable, especially for moving step by step from scan mode selection to post processing.
In testing, the scanner showed good flexibility. IR Color Texture Mode worked well for capturing textured objects and gave pleasing visual results, while Blue Laser Mode delivered cleaner and more precise mesh data. Challenging objects such as the DeathRacer, thin parts, dark shiny surfaces, and separate moving elements still required patience and sometimes a different approach, but that is also where the Rockit showed its strengths when used carefully.
Overall, I found the EINSTAR Rockit to be a capable scanner for makers, creators, and prosumers who want both speed and detail in one device. It is not a magic wand, and some scans still take time, repeat attempts, or manual alignment, but that is part of real 3D scanning. So far, Rockit feels like a strong addition to the growing handheld scanner market, especially for users who want a flexible workflow with both IR and Blue Laser options.
Pros
- Lightweight and comfortable handheld design
- Quick setup and straightforward calibration process
- Combination of IR Rapid and Blue Laser modes adds flexibility
- Good texture capture in IR Color Texture Mode
- Blue Laser mode delivers cleaner and more precise mesh results
- Wireless workflow with swappable battery system is very convenient
- EXStar Hub offers a guided and beginner-friendly workflow
Cons
- Processed mesh and texture need to be exported or will need to be processed again
- Some objects require multiple scans and careful alignment
- Direct Sketchfab upload did not package texture files correctly in my testing
- Frame count display in EXStar Hub could be larger and easier to read
- More complex scans can take noticeable time to process even on a capable laptop