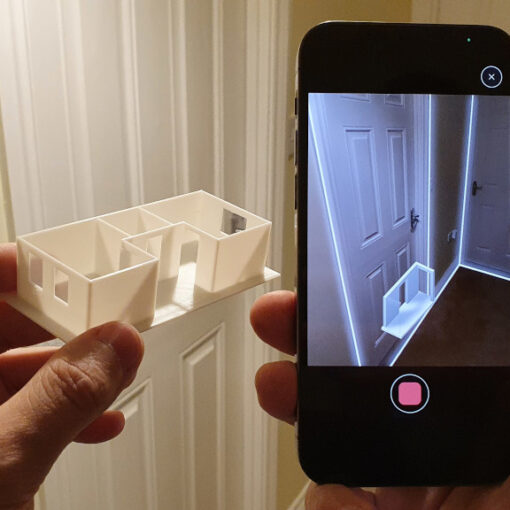
One of the convenient ways to 3D scan objects or the scenery is by taking pictures from all angles using a mobile phone camera, what’s known as photogrammetry or a 3D photoscan. The images are then uploaded into a photogrammetry software for processing. After a clean-up, hopefully, a quick one, the end result will be a 3D printable or ready for AR object. Also, it is possible to achieve a highly textured and rich-colored object with a stunning 3D view. The results may not be far from what the professionals achieve in their animation for games and 3D movies.
This guide covers:
- Take Pictures Now – Process Later
- Photogrammetry Tips & Tricks
- Turntables
- Photogrammetry Software
- Object Capture Apps
- Clean Up Software
- 3D Scan Friendly File Repositories
- Photogrammetry for 3D Printing
Of course, those who use expensive equipment like cameras with multiple lenses and process the results in a licensed software, may get better results and spend much less time for post-processing the images. In this article, we will focus on what is possible to achieve by a casual user who wants to try photogrammetry for free/affordably with tools at hand.
Photogrammetry – Capture Now – Process Later
Zebra. Once on holiday, knowing the basics of photogrammetry, I captured a beautiful zebra (imitation) using my mobile phone. It was a very nice experience and time well-spent in the fresh air in a park.

(Image: 3DWithUs)
For a few years, I’ve been putting off processing the images, and my free Autodesk ReCap Photo (previously ReMake) 30-day trial expired. I liked using the ReCap software when processing the Dolphin Standard for the Scan the World, but paying a subscription fee for a rare casual photoscan doesn’t work for me. To my delight, I achieved a surprisingly good result when I uploaded zebra images to Meshroom, a free photogrammetry software. Now I have a beautiful zebra model. A 3-year-old photo set didn’t go wasted.
The Dolphin Lamp Standard was captured using a mobile phone camera, processed in Autodesk Re-Cap, and further reconstructed in Meshmixer.
Photogrammetry Tips & Tricks
Before going further, the first thing we have to learn is taking the pictures for the photogrammetry software. Here are some tips and tricks:
– The amount. At least 50+ depending on an object. As I mentioned earlier, capture now – process later. Some pictures may be blurry, as we are using the mobile camera, and then the photogrammetry processing software may reject without a known reason (for a casual user), so the more the merrier.
– Stable object. Make sure that your object stays still and is not shaking, changing position while taking the pictures. If the object is accidentally moved during the photo session, it’s better to start all over.
– For shiny or reflective objects, the only way to capture them is to make them stop reflecting the light. To achieve this, cover them temporarily in some matt solution. Otherwise, the photogrammetry software will be confused, and the photoscan will fail.
– Focus and capture all pictures manually. Use the Open Camera app for mobile phones.
– Consistent light. On and off sunshine during capturing your object may also confuse the software. The best 3D photoscans with a mobile phone can be achieved outside but it should be in the consistent lighting. A cloudy day is better as there are no shadows that may cause a problem. If the object has a lot of shadows, pay extra attention to the places affected and take more pictures.
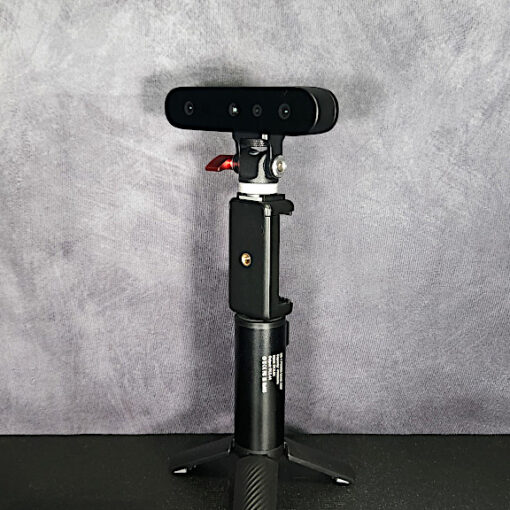
Turntables – Poor Results When Using a Mobile Phone
Photogrammetry software greatly benefits from mapping the environment by measuring the distance between the object and points in the environment. In case of a turntables, the location of the object pointers keeps changing, which causes a big mess for the processing software.
Here are a few pointers on how to achieve good results with a professional photo camera.
– Consistent lighting. Mini LED-lit studios, for it not to recognize any other points around the object.

(Photo: Andrew Sink)
– Consistent void. Black matt blanket and clear focus, again, for it not to recognize any other points around the object. Check how Andrew Sink creates a void background to 3D capture an apple by using photogrammetry and Agisoft Metashape software.
So basically, in both cases above, there are attempts to trick the photogrammetry software into believing that we are actually going around capturing the object.
Photogrammetry Software
Processing the bulk of images involves a lot of data, and because of this, the more powerful the computer is the quicker it deals with the processes involved. In some cases, laptops or other PCs are better to be left alone during the processing in order to avoid the crash, and it may take a while.
Other software that involve cloud are installed on the PC, but for the most difficult task – the processing – all images are uploaded to the cloud. After this a 3D object becomes available locally for the cleaning, editing and exporting.

(Image: 3DWithUs)
Meshroom – Free, Open-Source, 3D Reconstruction Software
NB! Software is dependent on Nvidia (CUDA-enabled GPU) graphics cards.
After briefly trying a few other free/affordable 3D scanning related software, I stopped on the Meshroom, which struck me with a straightforward interface. Everything is presented on the same screen, and the whole software tutorial can be done by using a single screenshot below.

(Image: Meshroom)
1) Load the images.
2) Press the “Start” button.
3) Wait patiently. Depending on the number of images to load, the quality, and your computer capabilities, it may take over 3 hours to process.
When the processing is completed, you will see the “Load” button in a 3D viewer section. Don’t be put off when you see a lot of debris. It is easy to clean those up using Meshmixer or Blender. The only place where I got confused was how to export an .obj file as there was no “export” button on the interface. To find the .obj file, go to the Meshroom Folder – MeshroomCache – Texture. Then open a folder with a very long name.
So far so good, and if you need just an .obj file for 3D printing then the next step is Blender or Meshmixer for the clean-up. And if you want to upload a beautifully textured model to Sketchfab, please mind that there is a limit for the file size. Sketchfab accepts files of max. 50 MB.

(Image: Meshroom)
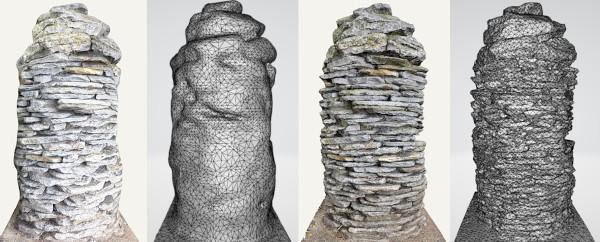
To help with the cleaning and the file size reduction process, I found a detailed Meshroom tutorial on the Sketchfab by YANN LANTHONY, which was very useful. By following the “Decimate Mesh” and “Adjusting Parameters” instructions step by step, I managed (using nodes) to reduce the file size of my Loaf of Bread from 120 MB to 18 MB. Click and rotate the model in Sketchfab view.
Cleaning up, patching, and getting ready for 3D printing can be done in Blender or Meshmixer. In Blender 2.8 “Edit mode” select all surrounding debris with a lasso selection, delete them, patch the holes, and export as STL. For AR (Augmented Reality) check the Sketchfab uploading tips.
As any 3D design for 3D printing creator, I have some experience in uploading STL files to file repositories. Uploading a .obj file with the high textured 3D view onto Sketchfab may feel a bit tricky and may take a few attempts until it is done in the right way. To successfully upload a model with textures you have to send all files, for example, .obj, .mtl, .png together in a zipped folder.
I had some issues with the textured PNG images. Such images can be 30-40 MB each. So the next task is to locate them and reduce in size. These are situated in the same folder as .obj and .mtl. To scale the images, I played around in GIMP.
Autodesk ReCap Photo
Free trial and then $50 p/m Autodesk ReCap Photo photogrammetry software deals with difficult, data-rich (2-3GB sometimes) task like a boss. And it does it via the cloud.

(Image: 3DWithUs)
We mentioned Autodesk ReCap Photo (previously known as ReMake) in one of our blogs. We used this software to create a GW2 cannon 3D scan from the in-game screenshots. We also filled our 3D Scanned Tree Texture Gallery with the new models of the tree trunks with the help of ReCap Photo.

(Image: 3DWithUs)
What is Object Capture? Emerging Apps for iPhone and Mac Users
Object Capture is an API (Application Programming Interface) introduced by Apple. Basically, it is photogrammetry made easier for the iPhone and Mac users, and apparently other Apple products in the future. iPhone users can use their phone camera to capture approx. 50+ images the way we recommend in Tips & Tricks section, by following all basic photogrammetry rules, and then emerging apps in Mac will turn these images into a 3D object in USDZ format. And such applications already exist:
PhotoCatch
Shortly after Object Capture was introduced, Ethan Saadia developed a PhotoCatch application for Mac computers. PhotoCatch can turn a photo set or video taken by iPhone into a 3D object in minutes. Then it is possible to view and share the model in AR/VR.
Here is an object is captured with iPhone (247 images) by Alban (Sketfab), processed with Object Capture and PhotoCatch.
Polycam
Another interesting app to add here is Polycam. We have already mentioned Polycam application as one of the LiDAR scanner apps. Polycam has now a Photo Mode option next to a LiDAR option. Photo option enables the processing of 20-200 images in a photogrammetry (Apple’s Object Capture) in the cloud. A convenient all-in-one functionality.
(Image: 3DWithUs)
Good news for Android phone users. According to Polycam, an Android version of the application with the Photo Mode feature is expected to be released by the end of this year.
Photo Mode is powered by Apple’s Object Capture. It could definitely be used with an Android device since the mobile device is just uploading to a computer that does the actual reconstruction. We have plans to create an Android version by the end of the year.
Quote by Elliot (Polycam) via Discord.
Polycam for Web
Photosets taken by Android, DSLR, or other non-Apple devices can now be uploaded to the cloud for Object Capture photogrammetry to process thanks to the Polycam for Web browser-based feature.

(Screenshot: Polycam)
Up to 250 images that are taken following basic photogrammetry rules, after uploaded and processed, are turned into a 3D Capture. Captures can then be shared with the community and on social media. Also, a mesh of the 3D Capture can be downloaded in the OBJ, GTLF, FBX, DAE, STL formats for further cleaning and editing.
By following the #objectcapture hashtag on Twitter, we saw a lot of impressive 3D models together with the praise, particularly about the good processing speed. A blog about Object Capture is coming soon.
Clean up .obj File and Get it Ready for 3D Printing or High-Quality 3D View
Photogrammetry with post-processing and clean-ups is still unbeatable in terms of quality. Various 3D scanning smartphone apps, LiDAR apps are more convenient in terms of speed than quality. For more details please check our existing blogs.
Cleaning up, patching, and getting ready for 3D printing or high-quality 3D view can be done in Blender or Meshmixer. In Blender 2.8 “Edit mode” select all surrounding debris with a lasso selection, delete them, patch the holes, and export as STL or export as OBJ with MTL and PNG files to preserve texture skins (bakes).
Check the course by PTT, if you need to learn 3d design for 3D printing basics. Here is a detailed review of the Blender 2.8 for 3D printing.
3D Scan Friendly File Repositories
– Sketchfab. At the moment of writing this post, Sketchfab stays unbeatable in terms of 3D scan friendliness. But there are some upload rules.
As any 3D design for 3D printing creator, I have some experience in uploading STL files to file repositories. Uploading a .obj file with the high textured 3D view onto Sketchfab may feel a bit tricky and may take a few attempts until it is done in the right way. To successfully upload a model with textures you have to send all files, for example, .obj, .mtl, .png together in a zipped folder.
– MyMiniFactory. MyMiniFactory curated initiative Scan the World created a great repository of 3D printable models. In a big part, such models became available thanks to photogrammetry.
Photogrammetry for 3D Printing
On this website, you will find a lot of quality blogs covering 3D scanning generally. Read about mobile phone photogrammetry, iPhone and Android 3D Scanning Apps, software reviews, LiDAR Apps etc. Also, you can find striking 3D models and their 3D print collections achieved thanks to these technologies and techniques described in Scan The World and 3D Scanned Tree Textures articles and galleries.
In the YouTube video below we briefly show the way to transfer the texture of any tree to a 3D printable object. It is possible to achieve this using just a mobile phone camera, photogrammetry software like Meshroom, and 3D design software like Blender3D for texture cleaning for further editing.
If you’ve ever been interested in using your smartphone as a 3D scanner, there’s no better time than right now to give it a try…