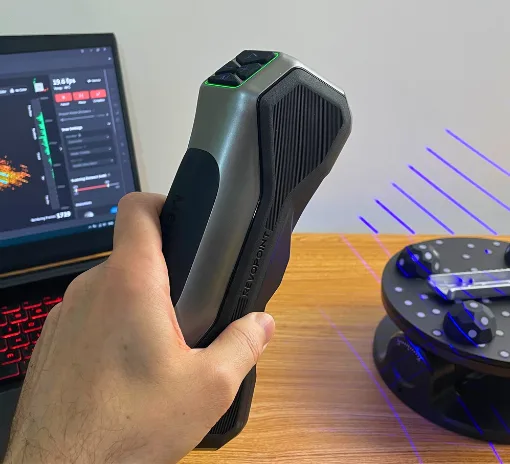
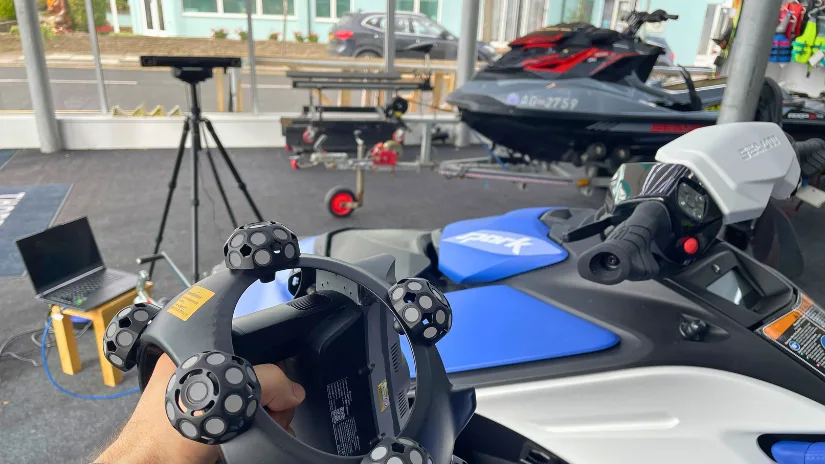
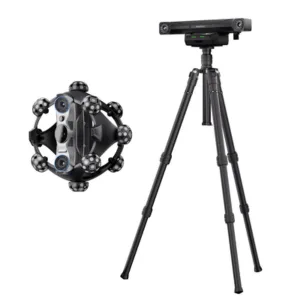
Revopoint follows up the original Trackit with the Trackit SR, a more compact optical-tracking 3D scanning system aimed at making professional large-object scanning more practical and portable. It combines a smaller tracker with a high-speed blue-laser scanner, adds Wi-Fi operation, and keeps the marker-free workflow that made the original Trackit so interesting. The result is a system designed for engineers, designers, workshops, and makers who want accurate scanning of furniture, vehicles, machinery, and other large objects without stepping up to much more expensive industrial tracking systems.
In this hands-on review, we will test a variety of objects across different modes. As usual, we’ll wrap up with final thoughts and a list of pros and cons.
Table Of Contents (Jump to a Section)
Where to Buy the Revopoint Trackit SR
Price: $3,514 – $3,699

Compare the Prices & Bundles:
Official Website
What’s in the Box
©3DWithUs – Photo: Max Funkner
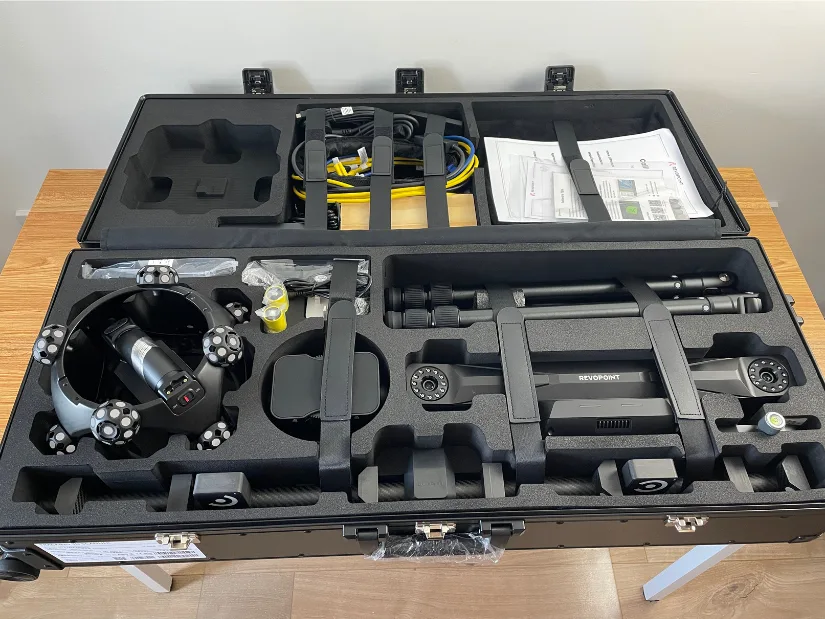
Scanner • Tracker • Auto Calibration Dual-axis Gimbal • Tripod • Gimbal Adapter Plate • Quick Release Clamp • Calibration Board • Calibration Pole • Power Adapter • Tracker PC Cable (Tracker–PC) • Scanner PC Cable (Scanner–PC) • Scanner Cable (Tracker–Scanner) • Gimbal Cable (Tracker–Gimbal) • Cable Sleeve • Magnetic Markers ×20 • Sticky Markers ×200 • Case with Wheels • Scanner Batteries ×2 • Scanner Battery Charger
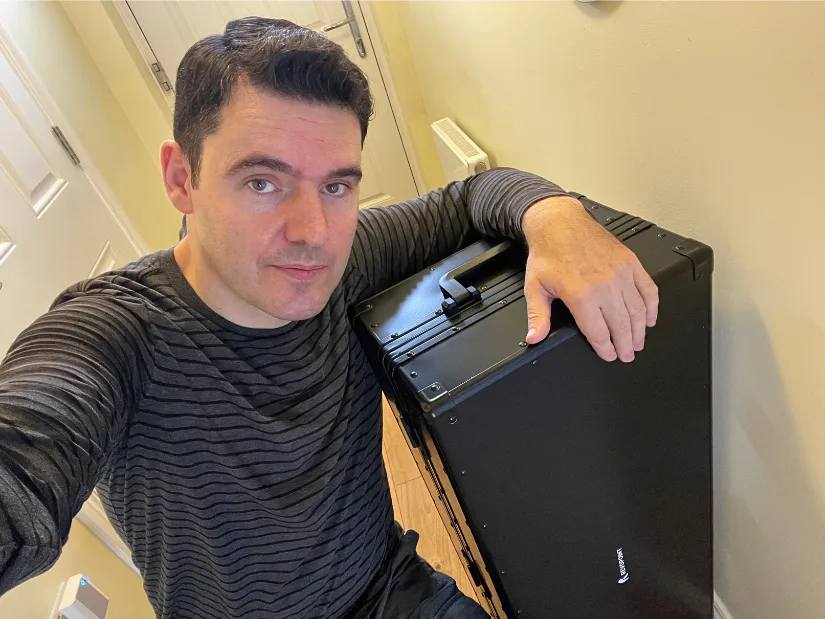
The first and most obvious difference compared with the original Trackit, which launched through a remarkable Kickstarter campaign last year, is that the new scanner comes packed into a single, very cool-looking case.
Please note that the product may be slightly revised over time, with additional add-ons or features introduced. Visit the official product page for the latest product contents and specifications.
Revopoint Trackit SR Specifications
Single-frame Accuracy: 0.02 mm
Volumetric Accuracy: 0.025 mm + 0.04 mm × L (m)
Scanning Speed: Up to 2,000,000 points/s
Fused Point Distance: Up to 0.05 mm
Recommended Part Size: 0.01–4 m
Scanner Working Distance: 200–500 mm, depending on laser mode
Tracker Working Distance: 800–2,500 mm
Tracking Volume: 3 m³
Light Source: 30 blue cross laser lines, 17 blue parallel laser lines, or 1 blue single laser line
Wi-Fi: Wi-Fi 6
Scanner Weight: 1.0 kg
Tracker Weight: 1.5 kg
Scanner Dimensions: 250 × 250 × 177 mm
Tracker Dimensions: 441 × 111 × 103 mm
Output Formats: PLY, OBJ, STL, ASC, 3MF, GLTF, FBX
Operating Temperature: 0°C–30°C
Setup and Calibration
The Trackit SR’s tracker is significantly smaller than the one supplied with the original Trackit. This is one of the reasons the complete system now fits into a single case. The smaller tracker also takes up less space during use, which should make the Trackit SR easier to work with in tighter workshops and scanning environments.
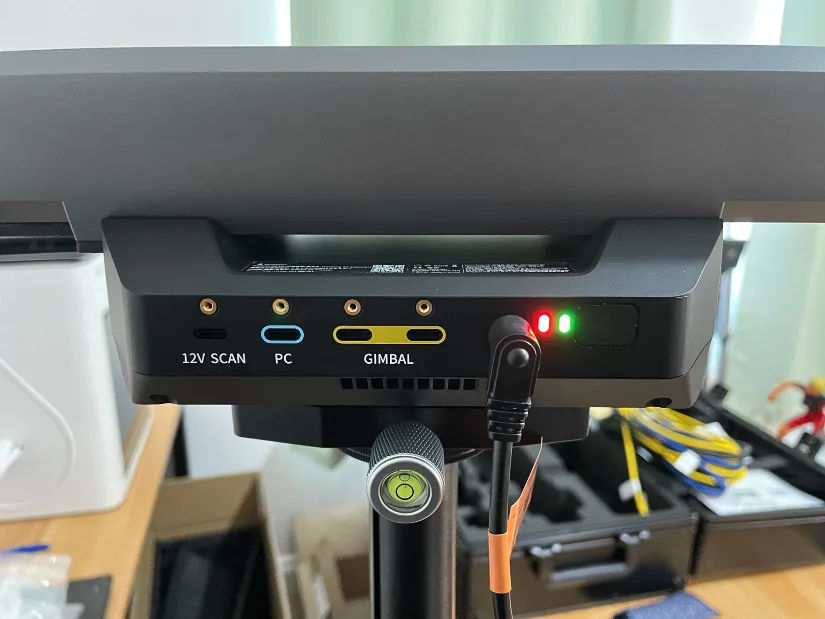
The setup process is straightforward as well. I first attached the Quick Release Clamp to the tripod, then mounted the tracker onto it. Wiring is easy to follow, with large labels on the cables and clearly marked ports on the tracker. Before experimenting with Wi-Fi mode, I started in wired mode to make sure everything was connected and operating correctly.
My unit didn’t include a printed quick-start guide, but the Learning tab in Revo Track provides access to Trackit and Trackit SR tutorials. Here is the direct link to their Unboxing & Setup Tutorial video, which covers both wired and Wi-Fi connection setups.
Batteries and Wi-Fi
One of the Trackit SR’s biggest selling points is that both the scanner and tracker can be operated wirelessly in Wi-Fi mode. This makes the system more versatile, particularly in environments where dragging cables across the floor would be inconvenient, dirty, or potentially damaging. I have also seen professional users mention in Facebook groups that cables can take a lot of abuse during heavy use in garages and workshops, so a wireless setup could be a real advantage in some situations.
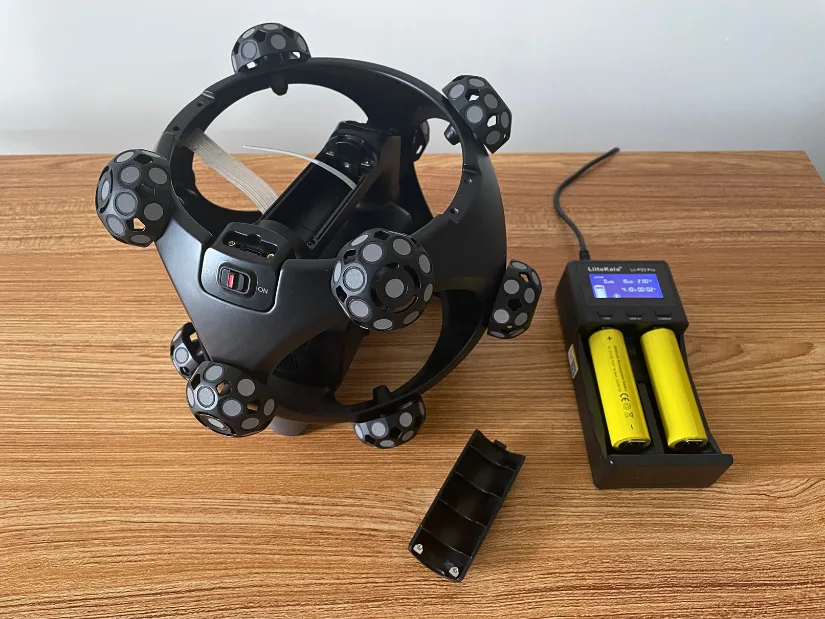
The scanner battery charger confused me a little at first. Because it is a lithium battery charging dock with its own display, it feels more complicated than a basic plug-in charger. Without printed instructions, some users may need to watch a short video before feeling completely confident with it. In my case, I simply inserted the two supplied batteries and let the charger do its job.
Calibration
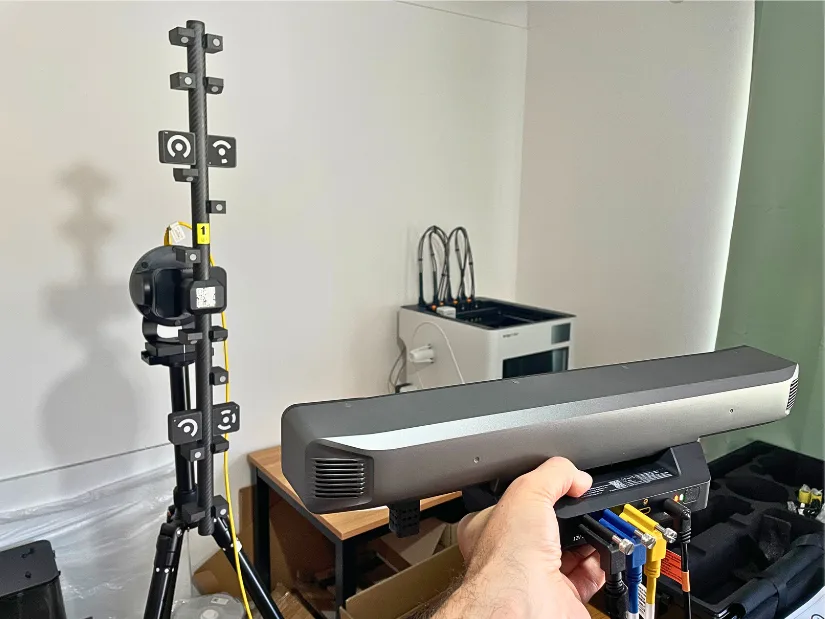
Calibration is recommended after transport, after a noticeable change in temperature or scanning environment, or when you need the best possible accuracy. The first calibration can take more than an hour, so you’ll need some patience. One difference compared with the previous Trackit version is that the Trackit SR package includes an additional tripod with an automatic gimbal that rotates the calibration pole during the process.
©3DWithUs – Photo: Max Funkner
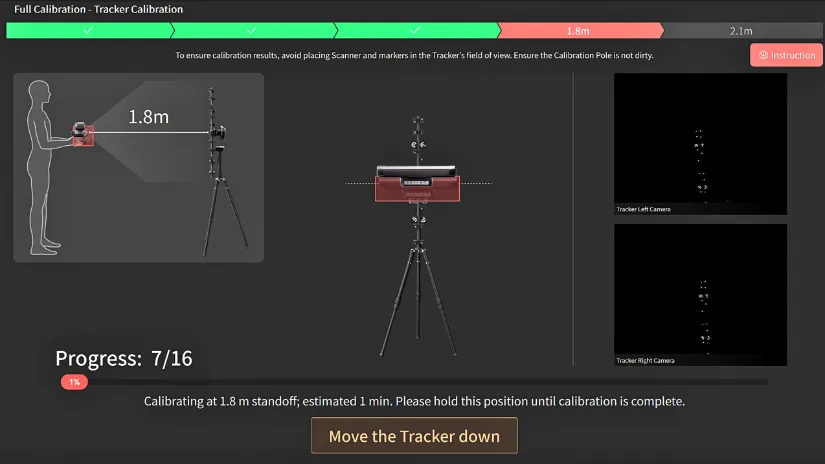
In my case, I had to hold the Trackit SR and move or align it according to the instructions shown on screen. The process itself is not particularly difficult, but the tracker is quite substantial, so care is needed when holding it during the calibration. Most importantly: don’t drop it. Here is the official video.
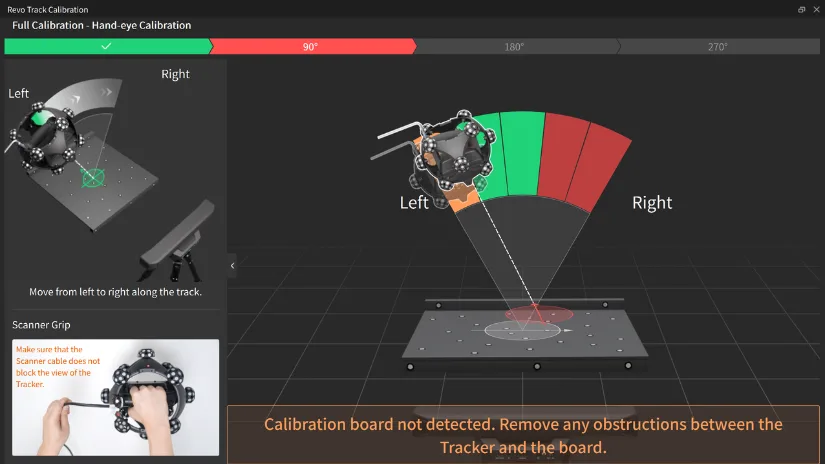
After the tracker calibration comes the scanner calibration. If you have worked with 3D scanners before, the process should feel familiar: follow the on-screen guidance, move the scanner through the required positions and angles, and make sure the calibration board stays clearly visible to the tracker.
Ball Plate Measurement: Precision Check
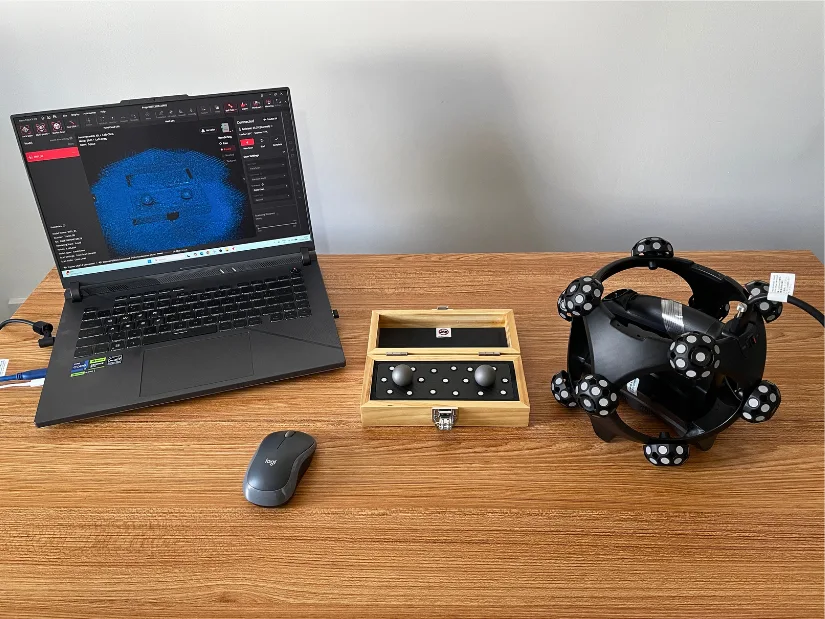
My Trackit SR is the CMM Edition, which comes with a ball plate for accuracy verification. CMM stands for Coordinate Measuring Machine, and this edition is aimed more at metrology, inspection, and dimensional measurement workflows. The ball plate measurement process itself is quite straightforward: follow the guided steps in Revo Track, scan the reference plate, and at the end the software generates an Accuracy Analysis report showing how closely the measured results match the known reference values. Official Ball Plate video.
Software: Revo Track
Compared with the original Trackit, which launched with Revo Metro 5 software, both the original Trackit and the Trackit SR now use the dedicated Revo Track software. It feels much more focused on the Trackit product range and brings the scanning, processing, calibration, and project tools together in one place.
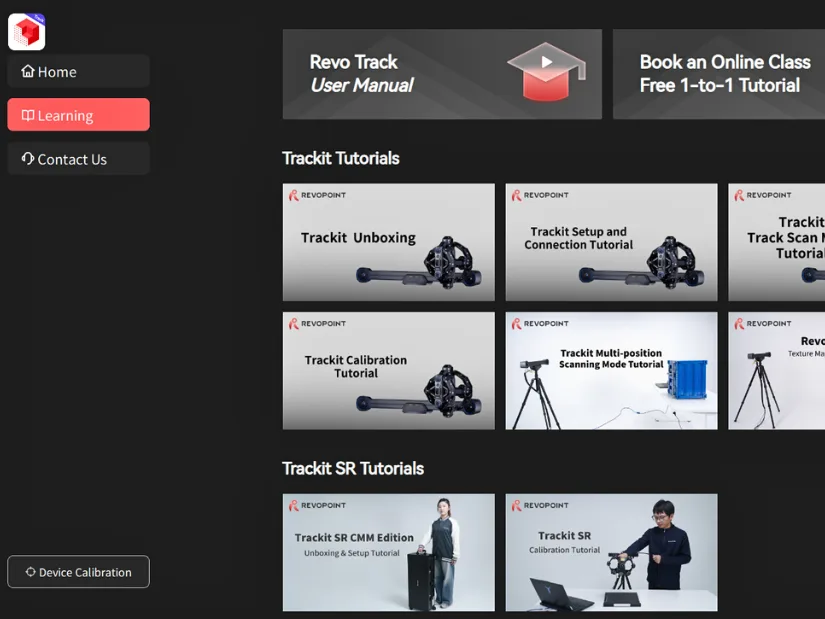
I also recommend checking the Learning tab. Revopoint has gathered tutorials for both the Trackit and Trackit SR there, which is especially useful for setup, calibration, Multi-position scanning, and other less familiar workflows.
One thing worth keeping in mind is project size, especially if your PC is not particularly powerful. During testing, I had one larger project crash while processing, and afterwards it no longer appeared normally in Revo Track. I suspect the project could probably have been recovered with help from Revopoint support, but in my case it was quicker simply to rescan the object. Since then, I have preferred to keep individual scans lighter, process them in smaller groups, and merge them later rather than pushing very large projects through the laptop in one go.
Testing and Results
Large Object Scanning: Jet Ski
To test the Trackit SR for large-object scanning, I took it on a field trip to our local marine shop, Thorpe Bay Marine, which specializes in jet skis. They kindly offered me the opportunity to scan one of their Sea-Doos. This was my first field trip with the Trackit SR, and having the complete system in a single case made traveling considerably easier. Even though the protective case has wheels, I still needed a car to transport it comfortably.
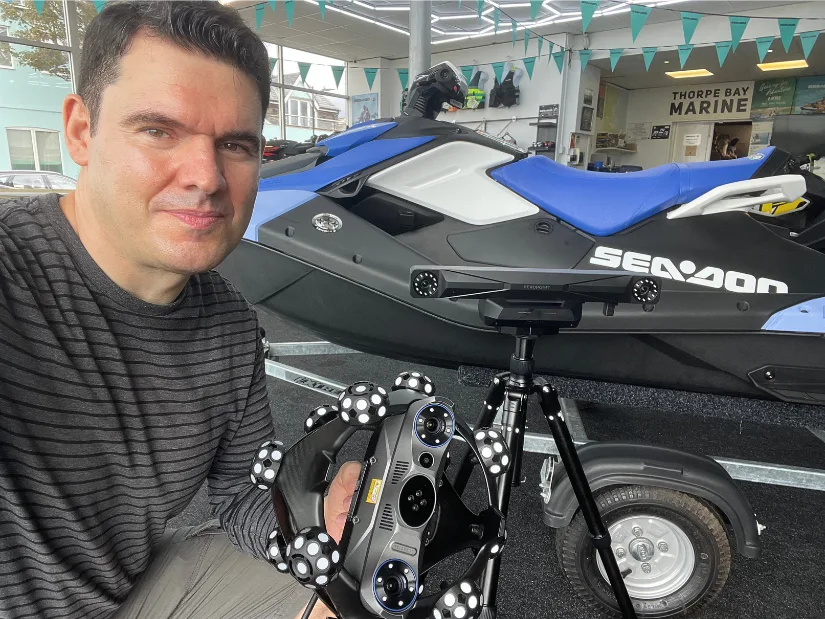
The Sea-Doo I scanned is, volume-wise, larger than a motorbike but smaller than a car. Because I only had one morning available, I scanned several sections of the machine separately, intending to bring the parts together later. Another reason for working this way was that I do not completely trust my laptop with very large scanning projects. I therefore tried to keep each scan below roughly 50,000 frames so the data could be processed more quickly and with less risk of crashes.
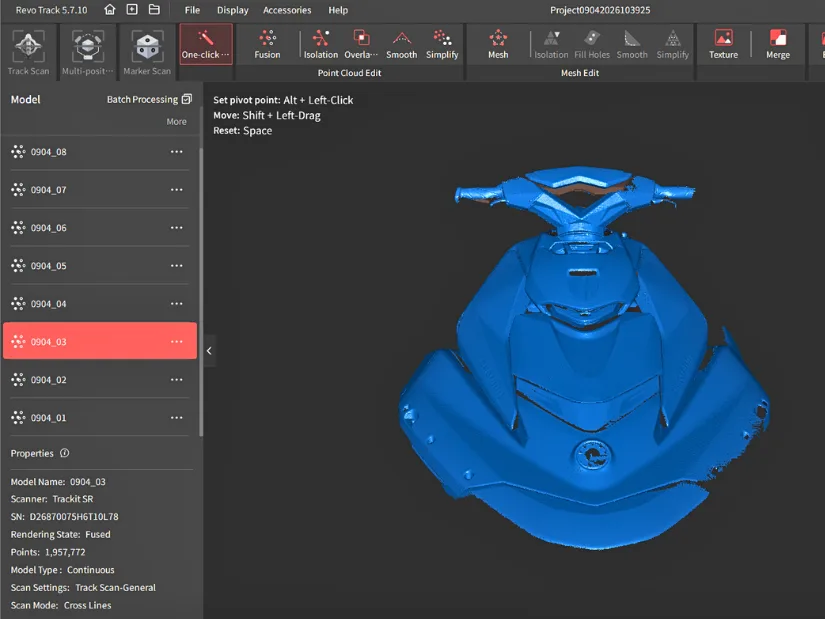
I also changed the point distance depending on the area being scanned. For the main body, I treated the Sea-Doo as a large object and used a 3 mm point distance. For more detailed sections, such as the exhaust and reverse bucket, and later the handlebar area, I reduced the point distance to 1.5 mm to capture finer geometry.
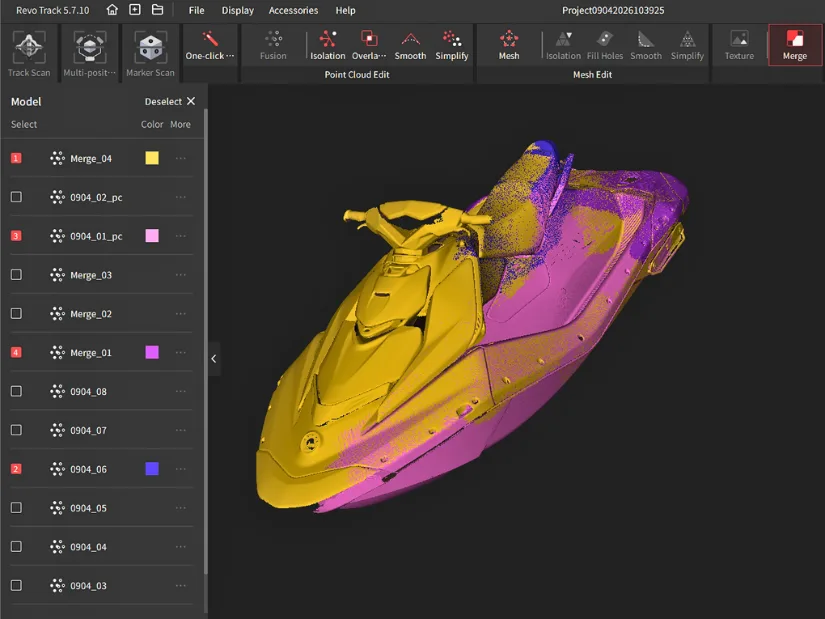
Revo Track’s Merge Feature Alignment tool worked very well for this project. I was able to bring several separately scanned sections of the Sea-Doo together in one go, with the different color shades making it easy to see how each scan contributed to the final alignment. Considering that the scans were captured separately and at different levels of detail, the automatic feature matching was impressively effective and saved a lot of manual positioning.
– Tip. One useful part of this workflow was that two of the nine Sea-Doo scans had originally been captured in a separate project group. I exported those two scans from the second project and imported them into the main project, after which all nine scans could be aligned and merged without issues. This also makes the workflow more flexible, as you can return to the project later, rescan any missing or problematic areas, and add the new data to the existing set rather than starting again.
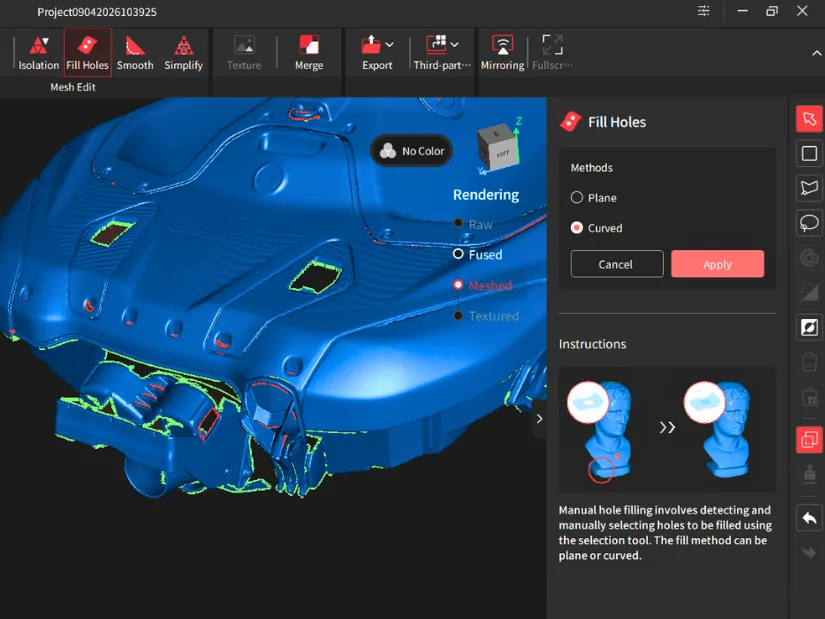
Large yet detailed scans like this can still contain quite a few unfilled holes. These are often connection points, screw holes, or other small features that were not fully captured during scanning. In my case, I did not have enough time to capture every area in full, or to use scanning spray where it might have helped. Ideally, some of these areas could be rescanned in a more precise mode for better detail. Nevertheless, the Fill Holes feature in Revo Track also worked very well in certain situations and helped tidy up the model.
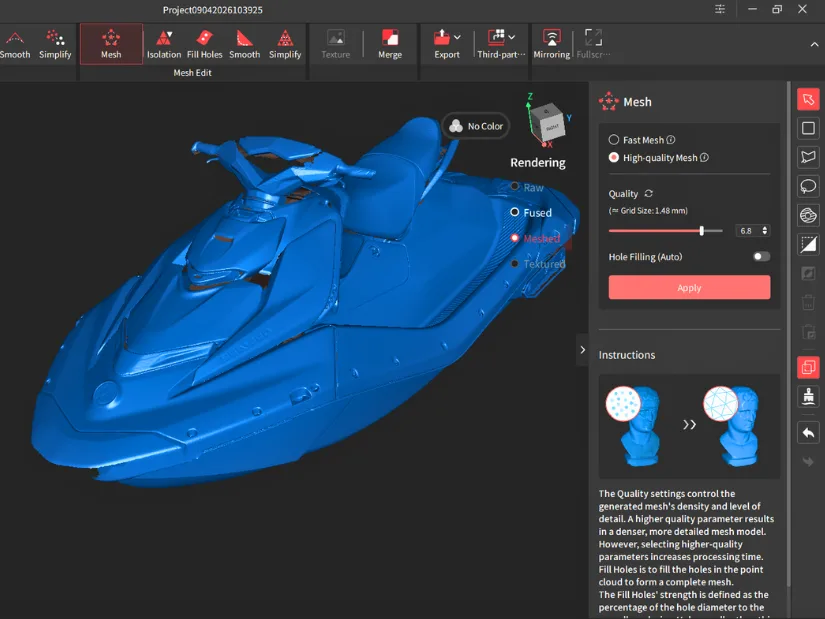
It took me around 2–3 hours of scanning to get this far, plus another 2–3 hours to process, align, and merge the nine separate scans in Revo Track. Even after all that, I still feel the model is not quite finished. If I had another chance, I would go back and rescan the front area, maybe with a little bit of help from scanning spray. Capturing the underside would also require either lifting the jet ski or getting down on the floor with the scanner. Overall, I just needed more time. It is a pity I could not complete the scan well enough to 3D print the full model (without needing to go to Blender or other CAD). Maybe next time.
Jet skis may not be as common a scanning subject as car parts, but there are still plenty of practical reasons to digitize them. A 3D scan can help with replacement parts, custom accessories, repairs, fit checks, aftermarket modifications, or simply keeping an accurate digital copy of the original shape.
3D Scanning Furniture
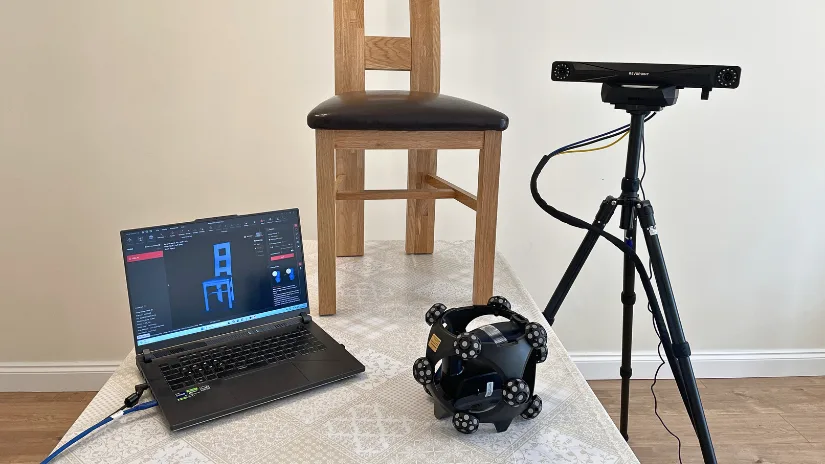
Furniture is another area where the Trackit SR can really shine. These objects are often large and bulky, while fabric surfaces can make marker-based scanning difficult. I tested several pieces of furniture, including a particularly challenging swing chair, to see how well Multi-position Mode could handle them.
©3DWithUs – Print and Photo: Max Funkner
To warm up, I started with a less challenging piece of furniture: a chair. I completed the project with just two separate scans. With its large, clear surfaces and relatively simple geometry, the chair presented no real difficulties for the Trackit SR.
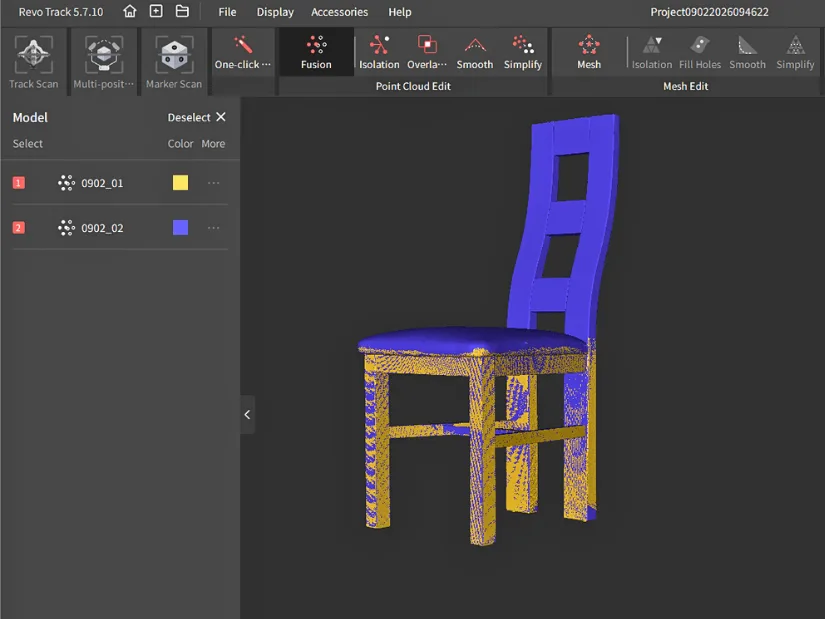
Once again, Feature Alignment worked very well automatically. The two separate chair scans lined up with minimal effort, and the color overlay makes it easy to see how closely the geometry matches. The next step is to clean up the scan, create a watertight mesh, and turn it into a 3D printable model.
Turning the merged raw point cloud into a mesh and filling the remaining holes was straightforward. One thing I did have to redo, though, was the mesh resolution. I initially selected a high-quality mesh, but the exported STL ended up at around 1 GB, which was far too large for this project. I therefore used Revo Track’s built-in Simplify feature to reduce it to about 12.5 MB. At that size, the file became much easier to handle in Snapmaker Orca.
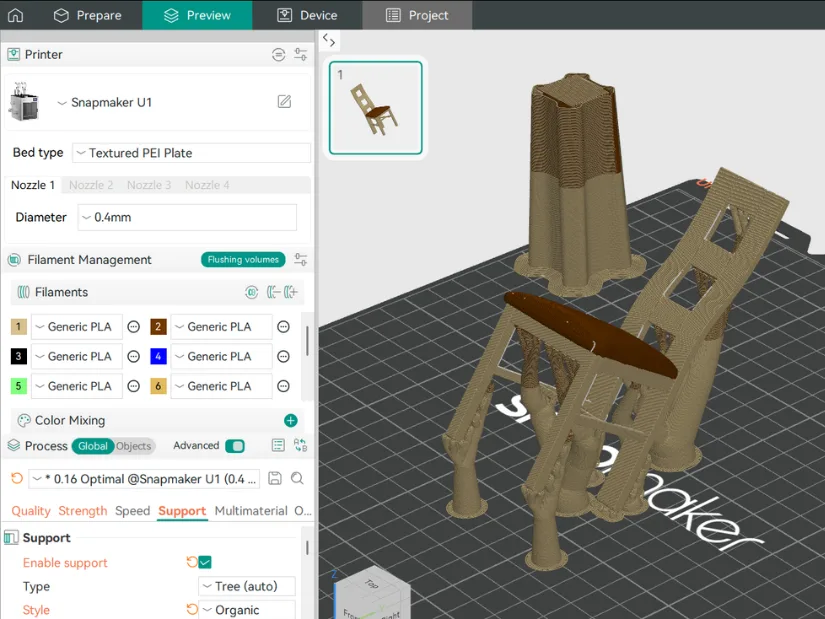
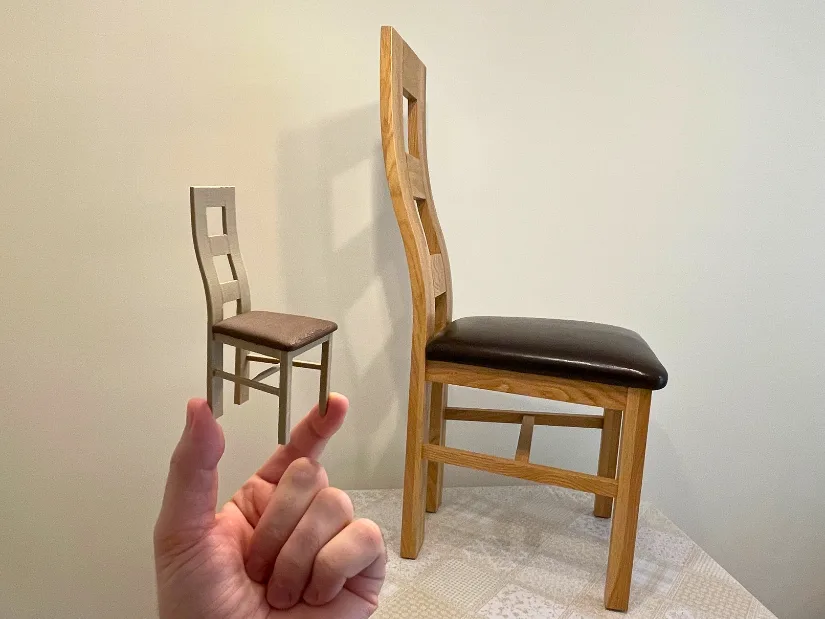
This miniature should be printable on most budget FDM 3D printers. In my case, I scaled the model down to 10% and prepared it for a two-color print on the Snapmaker U1. I tilted the chair to roughly 45 degrees, applied Organic Tree supports, and selected a Concentric Top Surface Pattern in Snapmaker Orca. This should help the seat print more cleanly while keeping the support structure manageable.
©3DWithUs – Print and Photo: Max Funkner
The result came out very nicely. There is something almost magical about turning a full-size piece of furniture into a miniature replica. I immediately thought of furniture for dollhouses, architectural models, or simple keepsakes. My inner child definitely approves! I may offer this scanning-and-printing workflow as a service to a local furniture shop.
Dining Table
The next object was quite challenging. The dining table was large, and its repeated, similar geometry made automatic alignment more difficult, so manual alignment was unavoidable. Adding a few markers would probably have made the process easier, but I deliberately challenged myself to complete the test marker-free and see how far the Trackit SR could go without them.
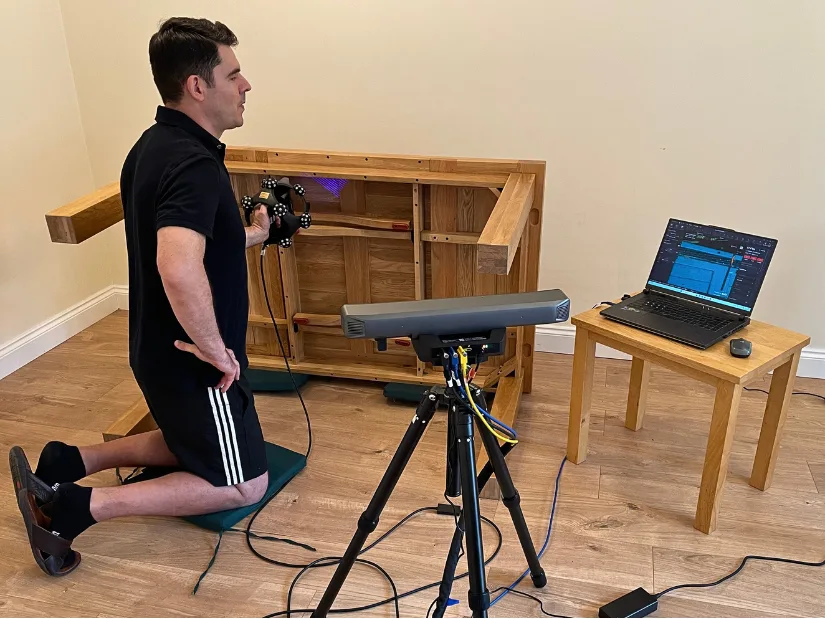
This dining table can be extended from four seats to six using a clever system of side wings, without making the table look awkward or feel unstable. From a 3D modeling perspective, that makes it a particularly interesting object: beneath the relatively simple exterior is a sophisticated wooden structure with several functional elements. It is a nice example of traditional craftsmanship combined with smart mechanical design.
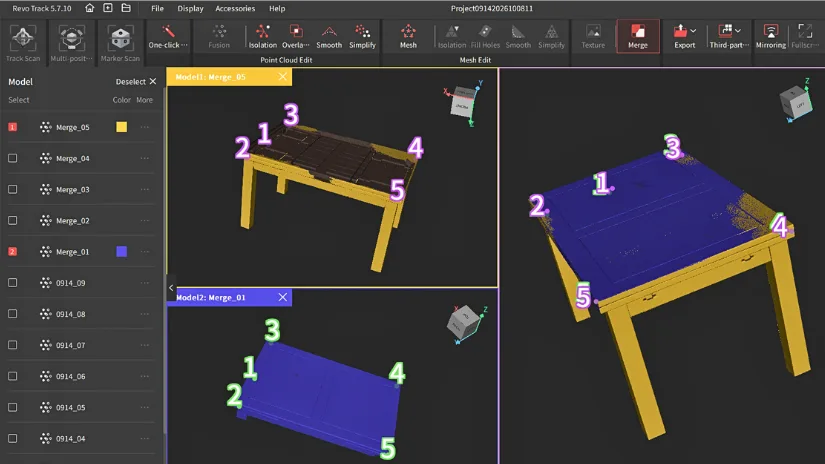
It took nine separate scans to capture the table, followed by six merging steps to bring everything together. Some sections could be aligned automatically, but for one difficult merge I had to manually identify five matching points on both scans to achieve precise alignment. I processed the scans using Fast Fusion to save time, and I was genuinely relieved when all the sections finally came together correctly.
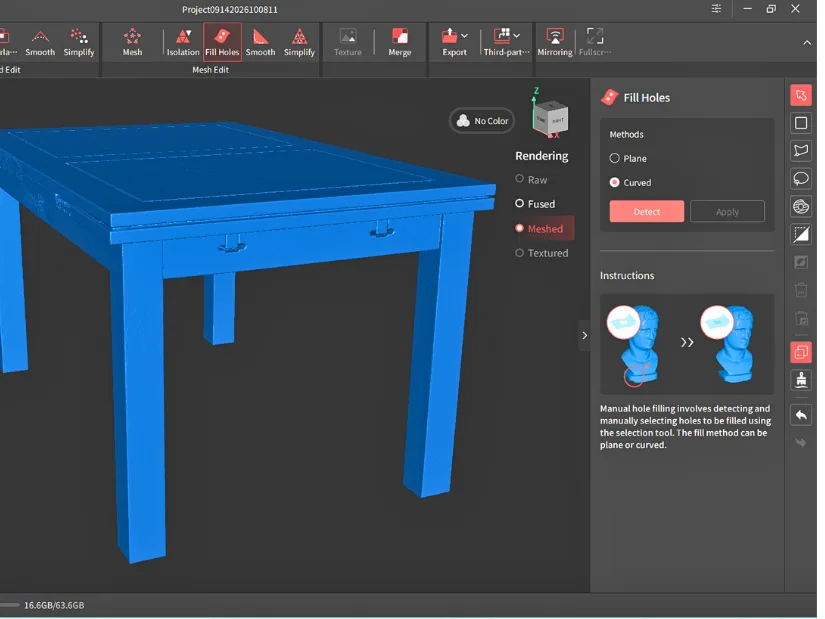
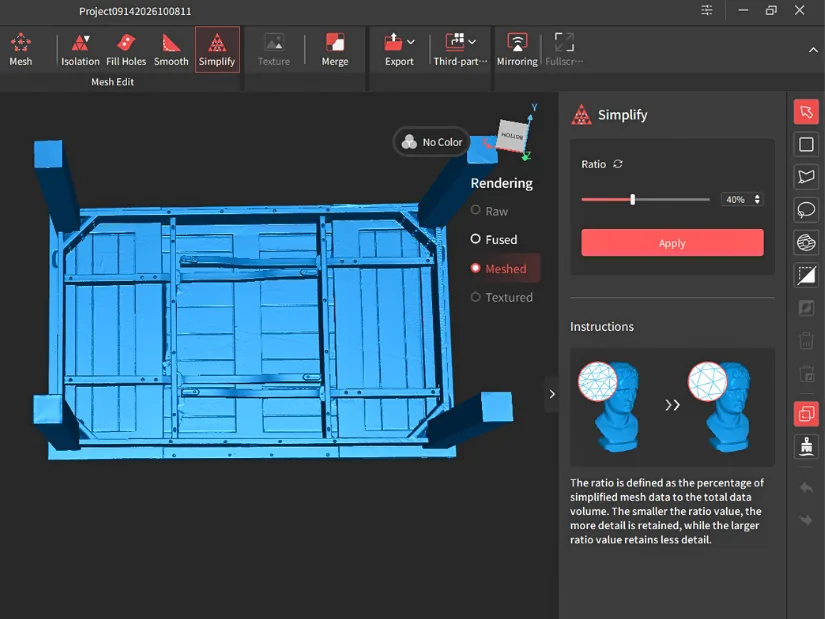
Filling the holes and reducing the mesh size was the next step. I should mention that the main table surfaces were scanned in Large Object mode with a 3 mm point distance, while for the more detailed areas I switched to a finer 1.5 mm point distance. Once again, another 3D model was completed entirely in Revo Track without the need for third-party software, and the final result will now be printed as a miniature.
A simple trick that helped the visible surfaces print so cleanly was tilting the models to around 45 degrees before slicing. At only 10% scale, the result does a very good job of showing the Trackit SR’s level of detail. Even the small seams and panel lines on the table are still visible on the miniature.
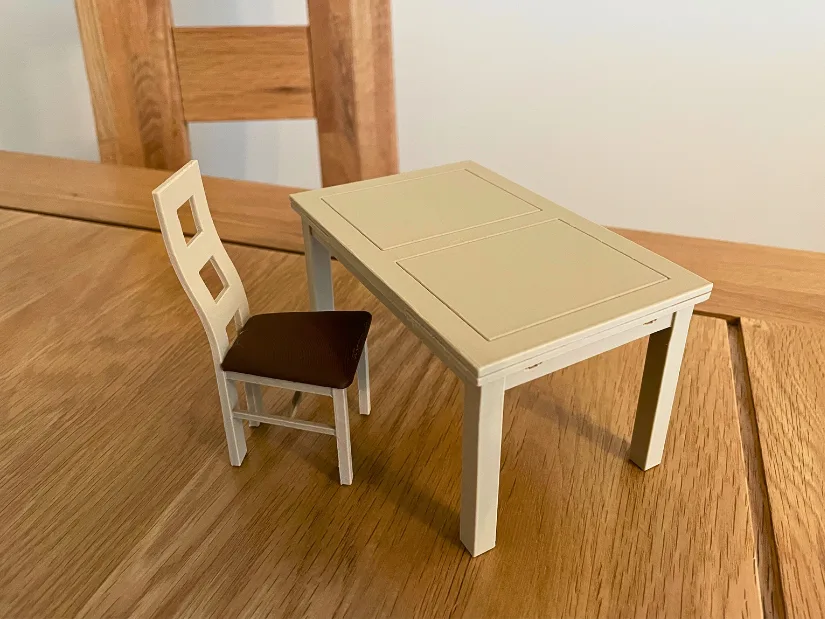
©3DWithUs – Print and Photo: Max Funkner
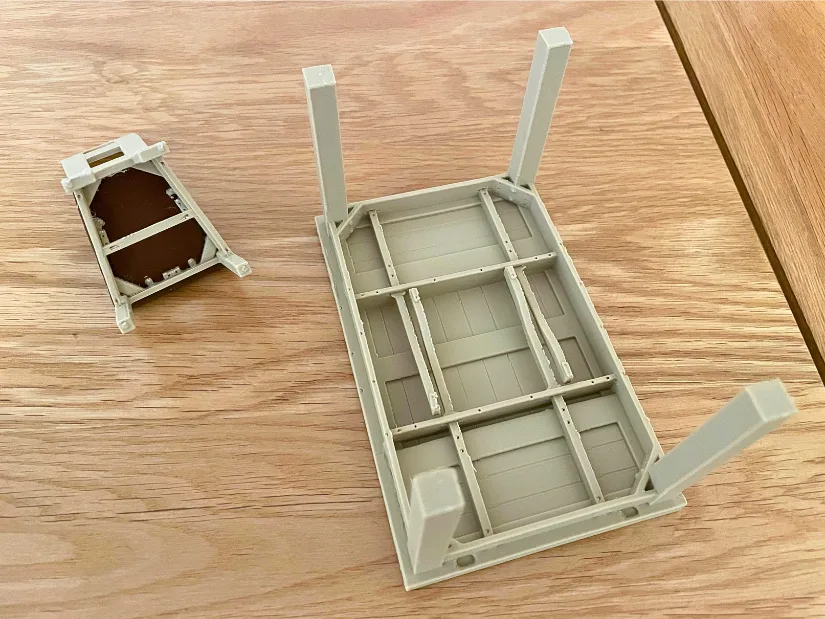
I’m especially happy with how much of the original construction was preserved. Looking underneath the table and chair, the support structure, joints, and other small elements are still clearly represented. That makes these miniatures a nice demonstration not only of the final 3D print, but also of how much geometry the Trackit SR managed to capture.
Scanning a Swing Chair in Wi-Fi Mode
3D scanning the swing chair was not as challenging as I initially expected, although there were a few things I had to watch carefully. If I were scanning it again, I would probably use 3D scanning spray on some of the more difficult surfaces and move the chair more carefully between scans. For this test, I also switched to Wi-Fi mode, so I’ll share my experience with the wireless setup in this section.
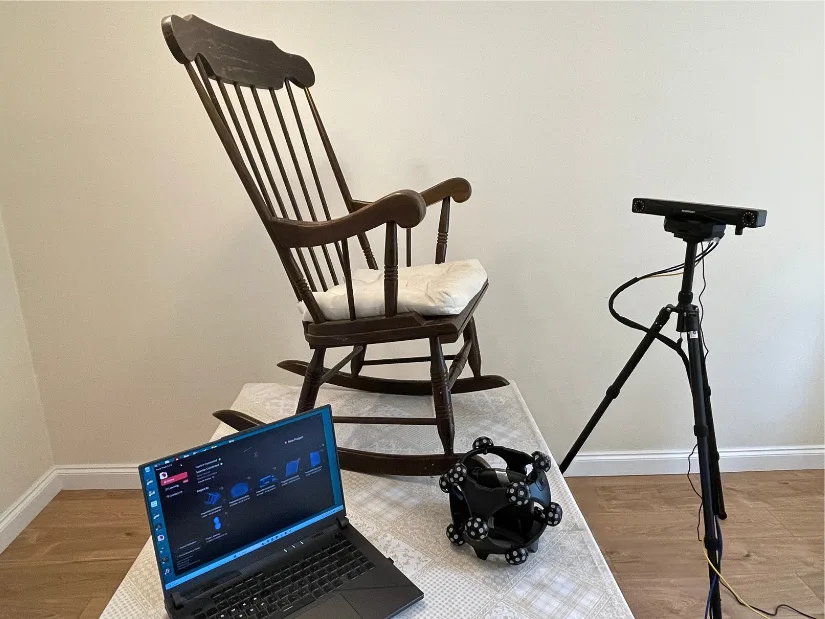
©3DWithUs – Print and Photo: Max Funkner
– What to watch. The chair’s dark, slightly shiny finish was not ideal for scanning. Even after eight separate scans, I still ended up with a few holes that only became obvious later when the mesh was generated. This is where 3D scanning spray would have helped. I deliberately avoided using it for this test, but applying a little spray just to the shinier areas would probably have improved the result.
Another challenge was the chair itself. Because it is quite old, turning it upside down slightly changed its geometry. As a result, the first two scans no longer aligned properly and became unusable. Somehow, I still managed to complete the project with the remaining scans, which was a relief.
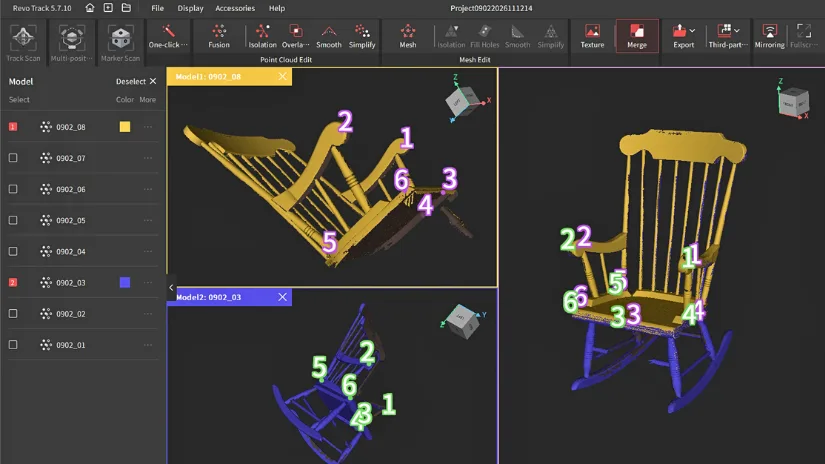
In one case, Revo Track’s Alignment tool was particularly stubborn and repeatedly returned a “less than 10%” overlap error. Automatic alignment was not enough, so I eventually had to place six matching points manually before the two scans would align correctly.
I must admit that the final mesh still contained quite a few holes. If I were doing the scan again, I would probably rescan some of the darker and shinier areas with scanning spray, as mentioned earlier. For my current purpose, though, the mesh is more than good enough. Revo Track’s Fill Curved Holes feature also worked very well and helped clean up many of the remaining gaps.
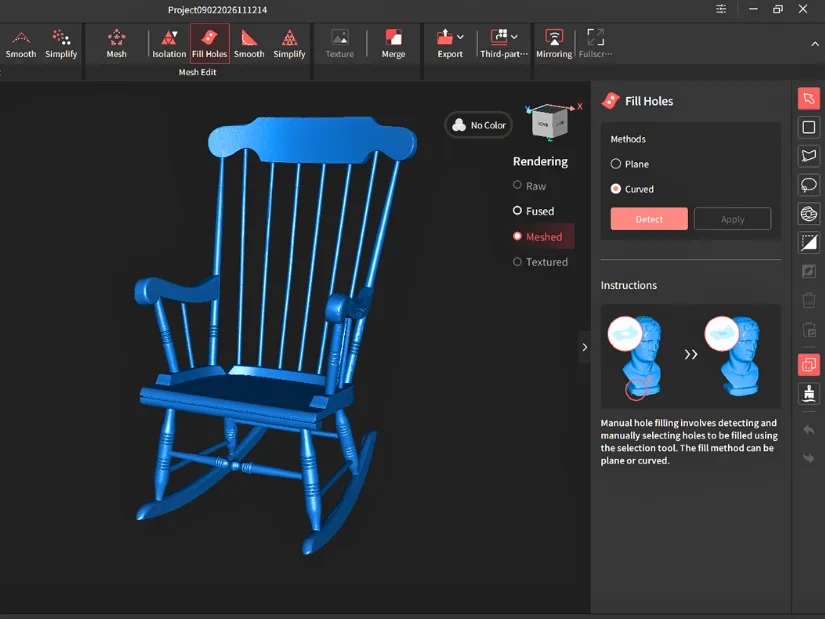
I would also like to 3D print this chair at some point. Some of the spindles and other features are very thin, so scaling the model down to around 10% may be too much for FDM printing. Resin printing should have a better chance of preserving those fine details, so that is probably the route I will try first.
After trying several scans in Wi-Fi mode, I can definitely see the potential of the system. I did experience a few interruptions during scanning, but each time the connection recovered and I was able either to continue the same scan or start another scan within the same project group.
I could not identify exactly what caused the dropouts. With the amount of data being transferred during 3D scanning, the wireless network itself may need some tuning. A strong Wi-Fi 6 connection, keeping the PC and Trackit SR relatively close to the router/access point, and avoiding congested wireless channels should all help. Revopoint also recommends checking that Revo Track is not being blocked by Windows Firewall or security software when troubleshooting unstable connections.
Even with those interruptions, I can see a lot of potential in wireless scanning. Removing the PC cable is especially useful in hard-to-reach areas, around bulky objects, or in workshop and garage environments where dragging cables across dirty floors is inconvenient and can eventually damage them.
Compare to Other 3D Scanners
Revopoint’s current lineup covers several quite different use cases. The MetroX and MetroY series are aimed more at industrial scanning, metrology, inspection, and reverse engineering of small-to-medium parts, while the MIRACO series offers an all-in-one standalone scanner with its own screen and processing hardware. At the more accessible end, scanners such as the POP 4 and INSPIRE 2 are designed for more general-purpose and portable scanning. The Trackit series sits on top of these categories as a professional optical-tracking system, particularly suited to larger or fixed objects where marker-free scanning, freedom of movement, and maintaining tracking around the object are important. Revopoint itself positions the Trackit SR for large or fixed workpieces, vehicles, and production-floor scanning.
Read more:
- Revopoint MetroY Ultra Review: Blue Laser 3D Scanner Hands-On Testing
- Revopoint POP 4 Review: Hands-On 3D Scanning Tests
- Revopoint MIRACO 3D Scanner Review: Portable 3D Scanning
Trackit SR vs. Trackit
The Trackit SR builds on the original Trackit rather than replacing it with a completely different concept. The SR is smaller and lighter, adds Wi-Fi 6 and wireless operation, increases scanning speed to up to 2,000,000 points/s, and introduces an additional 17-line parallel laser mode for fine scanning. The trade-off is a smaller tracking volume (3 m³ vs 11 m³) and shorter tracker working distance than the original Trackit, so the older model can still make sense for particularly large working areas. Many of the applications remain the same, though. Our original Revopoint Trackit hands-on review includes model boats, automotive parts, furniture, and other scan examples that could just as easily be tackled with the Trackit SR.
For this price range and this type of optical-tracking technology, Revopoint’s offering is difficult to beat. SHINING 3D also launched the EinScan Trak series, which sits at a higher price point but offers a detachable scanner for more flexible handheld use. For a broader comparison with more conventional and affordable 3D scanners, have a look at our Budget 3D Scanners guide.
Have questions? Feel free to ask in the comment section below.
For a wider discussion or to share your own Trackit SR scans, join us in the forum:
Conclusion and Pros & Cons
Price: $3,514 – $3,699
Compare the Prices & Bundles:
Official Website
Revopoint Trackit SR Review
Review Summary
I spent a lot of time testing the Revopoint Trackit SR on very different objects, from a simple chair and dining table to a difficult swing chair and a full-size Sea-Doo jet ski. That gave me a good feel for where this scanner works best. For large objects, furniture, workshop parts, and other situations where marker-free optical tracking is useful, the Trackit SR is a very capable system.
Compared with the original Trackit, I found the SR much easier to live with. The smaller tracker, single protective case, Wi-Fi option, and faster scanning make it more practical in a fixed setup. Revo Track also worked well for most of my workflow. I could align, merge, mesh, simplify, and fill holes without relying on third-party software for every project.
It is not completely effortless. I ran into difficult dark and shiny surfaces, a few Wi-Fi interruptions, manual alignment on some scans, and one project crash I couldn’t recover from. Calibration also takes time. But these problems were balanced by the fact that I still managed to complete several fairly ambitious scans, including objects with repeated geometry and large overall volume.
Overall, I came away very positive about the Trackit SR. It feels like a more mature and practical version of the Trackit concept, even though it gives up some capture volume compared with the original. I can see strong potential for furniture, automotive work, reverse engineering, workshop use, and even creative projects such as turning objects into 3D printable miniatures.
Pros
– Excellent for large-object and furniture scanning
– Marker-free optical tracking works very well
– Smaller tracker and single-case transport improve portability
– Wi-Fi mode adds useful flexibility
– Revo Track has strong built-in alignment, meshing, simplifying, and hole-filling tools
Cons
– Smaller capture volume than the original Trackit
– Dark and shiny surfaces may still require scanning spray
– Complex scans can require manual alignment
– Wi-Fi mode gave me occasional connection interruptions
– Large projects are demanding on the PC