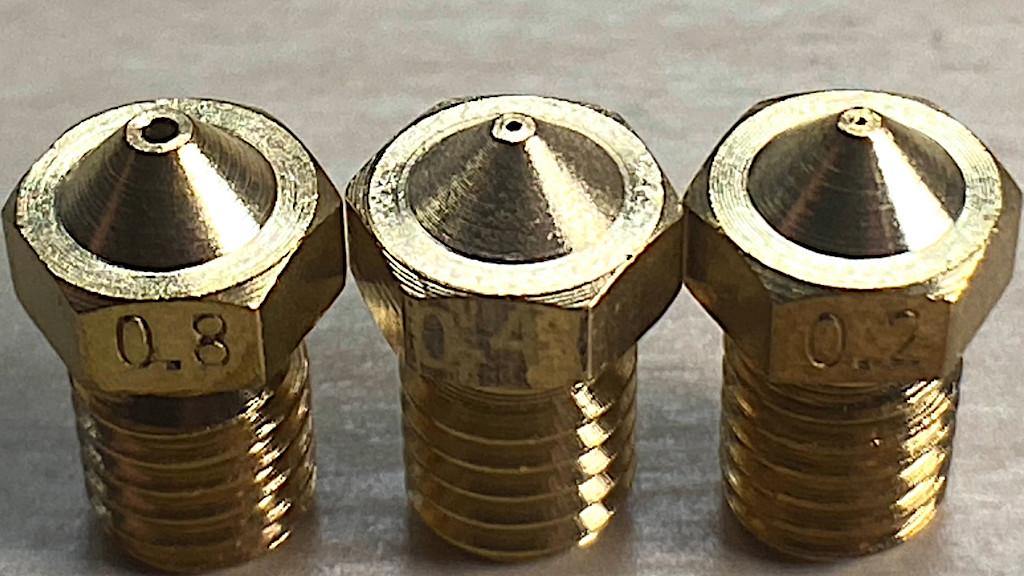
Replacing the nozzle on your 3D printer is one of the quickest ways you can make a major impact to your printed parts without making expensive hardware or extensive software changes. 3D printer nozzles are available in a variety of sizes, with the most common aftermarket nozzles ranging in diameter from .2mm (thin) to .8mm (thick). For printing models with fine details or small features, using a .2mm diameter nozzle allows you to extrude very thin layers that allow the printer to replicate more accurate geometry to the original CAD or STL file. Conversely, using a .8mm nozzle allows you to extrude a thick, wide bead of filament that can create large objects in a fraction of the time of a traditional .4mm diameter nozzle. If you’ve never changed a nozzle on your printer before, there’s never been a better time than now to experiment with different sizes. If you’re interested in learning more about how to change a nozzle and when to use different sizes, be sure to check out the examples used in this article.
This guide covers:
- 3D Printer Nozzle Types: MK8 (CR10, Ender 3) vs v6 (Prusa MK3S)
- Nozzle Set with Different Sizes for Testing
- 3D Printing with a 0.2mm Nozzle
- Slicer Software Settings for 0.2mm Nozzle
- 3D Printing with a 0.8mm Nozzle
- Slicer Software Settings for 0.8mm Nozzle
- Vase Mode Print Results
- Flexible TPU Filament Print Results
3D Printer Nozzle Types – MK8 vs v6
The Anet ET4X ships by default with a .4mm nozzle installed on the hot end, which is the default diameter for the vast majority of budget 3D printers. The ET4X uses a MK8-style hot end, which accepts MK8-style nozzles. The MK8 configuration is commonly seen on Bowden-style printers such as the Creality Ender 3, CR-10, and the Anet ET family of machines. This style of nozzle is slightly shorter than the v6 nozzle, which is another popular standard. When replacing the nozzle on your machine, it’s important to determine that the nozzle you are purchasing is compatible with your hot end. If the nozzle isn’t long enough to reach the heatbreak, it’s possible for filament to leak out and create a mess that can be very difficult to clean up.

(Photo: Andrew Sink)
Inexpensive Nozzle Sets with Different Sizes for Testing
There are many options for .2mm nozzles available for purchase by most major 3D printer manufacturers, as well as combination offerings that provide a range of different sizes for a bundled price. Because the cost of the nozzles decreases with quantity, I decided to try a set sold on Amazon that included .2mm, .3mm, .4mm, .5mm, .6mm, .8mm nozzles as well as a few tools for removing the nozzle from the hot end. For $10.99, this bundle provides a good way to test a few inexpensive nozzles to get a better idea of how changing the diameter can impact a finished part. The tools that are included (a small wrench for holding the hot end stationary and a screwdriver with a socket for removing the nozzle) are worth the price of the kit alone, as they make removing/swapping the nozzle a quick process.
Product affiliate links:
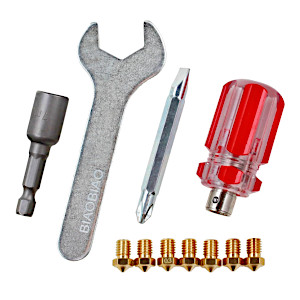
3D Printer Nozzle Set For e3d v6 Heat Block and M6 Thread Printers on:
Amazon
AliExpress
Compatible with the following 3D Printers: Select Mini, Prusa i3 MK3S, Anycubic Chiron,
3D Printer Nozzle Set For MK8 Heat Block on:
Amazon
AliExpress
Compatible with the following 3D Printers: Creality CR10, Ender 3 v2, Ender 5 PRO, Ultimaker 2, Anet ET, Tevo Tornado, Anycubic i3 Mega
3D Printer Nozzle Size 0.2mm – For Small and Detailed Prints
Most 3D printers sold today ship by default with a .4mm diameter nozzle, which is a good size for general 3D printing and striking a compromise between print quality and print speed. Thanks to an explosion in growth in the 3D printer accessories market, it’s easier than ever to replace your standard .4mm nozzle with a more application-specific nozzle for creating small, finely detailed parts.
0.2 mm Nozzle Slicer Software Settings
- Layer Height – 0.08 mm
- First Layer Height – 0.12 mm
- Layer/Extrusion Width – 0.15 – 0.25 mm
- Extrusion Multiplier – Can be adjusted between 0.95 – 1.05
- Speed – Same as with 0.4mm nozzle
- Temperature – Same as with 0.4mm nozzle
- Exotic Materials (Wood, PETG, TPU) and Home Made Filaments – NOT Recommended (Increased risk of nozzle clogging even with bad quality PLA)
- Settings for desktop 3D printers such as: Creality CR10, Ender 3, Ender 5, Prusa i3 MK3S, Prusa Mini, Monoprice, Anycubic, etc.

(Photo: Andrew Sink)
To test out the 0.2mm nozzle, I decided to use the 3DBenchy model which is ideal for testing FDM printers and experimenting with hardware changes. The Benchy model includes many features that are indicative of overall print quality like steep overhangs, thin walls, and fine details. Before printing the Benchy, the first step of the process is to create a slicing profile with a .2mm nozzle, as opposed to the default profile of .4mm. For this test I used PrusaSlicer, a free and easily modifiable printer slicing software tool. Building off of my Anet ET4X profile, I designed a profile for the .2mm nozzle that printed with a .08mm layer height, which is thinner than the standard .2mm layer height most 3D printers extruder material at.
Printing Benchy Scaled to 18%
Instead of printing the Benchy at standard scale, I scaled it down to 18% of its original size. This was the smallest size I could scale to while still creating a reliable toolpath to send to the printer. At this scale, the toolpath had to be checked on a layer-by-layer basis, as the walls become so thin in areas that the printer simply doesn’t extrude material. Even at this fine resolution, the total print time for this model is right around 10 minute due to the tiny amount of extruded material.

(Photo: Andrew Sink)
The Benchy printed quickly, with most layers only taking a few seconds to print out. The first and most immediate thing I noticed was that layers all seemed to be slightly deformed; this was likely due to the speed of the printer and the material not having enough time to cool before additional layers were added. This caused some slight bulging on the thin walls and a few other noticeable defects.
Overall, the general quality of the part was impressive for a first try, and the easily modifiable PrusaSlicer software is able to be dialed in on a per-machine per-material basis.
Why Use a 0.2mm Size Nozzle?
There are a lot of reasons why you would want to use an aftermarket nozzle with a different diameter than the .4mm standard, and I think it’s important to think about your application before picking a nozzle. While the .2mm diameter nozzle is able to print very fine layers with lots of detail, it also takes a long time to print larger models and may not be ideal for large, strong parts. Using a larger nozzle, such as a .8mm diameter, is ideal for extruding material more rapidly, but the drawback is the lower level of detail. Overall, I was impressed with the level of detail I was able to capture with a .2mm nozzle, and with some experimenting and optimizing of settings I think an even finer level of detail and part quality is achievable on an FDM 3D printer.
3D Printer Nozzle Size 0.8mm – Print Large Parts Quickly
For printing large parts quickly, a .8mm diameter nozzle is an excellent tool to have in your toolbox. Increasing your print temperature, slowing your print speed, and manually previewing your sliced model are all ways that you can increase the benefits of printing with this larger diameter nozzle. Given the low cost of 3D printer nozzles, it is certainly worth experimenting with a few to find out if they are able to benefit your projects. Paired with an inexpensive printer like the Anet ET4X, you can get some very interesting and unique results without replacing the entire toolhead.
0.8 mm Nozzle Slicer Software Settings
- Layer Height – 0.6 mm
- First Layer Height – 0.6 mm
- Layer/Extrusion Width – 0.6 – 1 mm
- Extrusion Multiplier – Can be adjusted between 0.95 – 1.05
- Speed – Lower than with 0.4mm nozzle
- Temperature – Slightly higher than with 0.4mm nozzle
- Exotic Materials (Wood, PETG, TPU) and Home Made Filaments – Recommended (reduced risk of nozzle clogging)
- Settings for desktop 3D printers such as: Creality CR10, Ender 3, Ender 5, Prusa i3 MK3S, Monoprice, Anycubic, etc.
Printing with a 0.8mm nozzle requires a bit of slicer preparation and planning as opposed to printing with a standard .4mm nozzle. Using a .8mm nozzle is ideal for printing large, monotonous objects that don’t have a lot of fine details or organic curves. Due to the larger nozzle diameter, more material is extruded during the printing process than a standard nozzle printing at the same speed. For this reason, you may find it necessary to reduce your print speed when using a larger nozzle to give the material enough time to heat properly while travelling through the hot end. Printing at a higher speed can cause the extruder drive gears to chew through the material as the hot end struggles to heat the material fast enough.

(Photo: Andrew Sink)
Printing Benchy Scaled up to 580%
Similar to the test I ran with the .2mm nozzle, I wanted to test the .8mm nozzle with a Benchy to compare my results and see what I could learn from the process. I sliced the model with PrusaSlicer and I was able to increase the size of the Benchy to 580% by aligning it diagonally on the build platform. I used a .6mm layer height for this build and dialed down the speed to allow the filament to heat up properly when extruding. The first layer for this print took nearly an hour and the total build time was just over 20 hours. While printing, the extruder motor moves very quickly as it pushes material through the hot end. One of the surprising aspects of printing with such a large layer thickness is how consistent the layers look. When printing with a .2mm nozzle and using very thin layer heights such as .07mm, the smallest layer shift sticks out and is very hard to overlook. Printing at a .6mm layer height, the layers looked remarkably consistent and even, with no inconsistent extrusion present.
Printing a Benchy at 580% scale on the Anet ET5X (300x300x400mm Build Plate)
Printing in Vase Mode with a Large Nozzle
When using a .8mm nozzle, it’s also possible to utilize Vase Mode 3D Printing (also known as Spiralized Contour), where the print slicer software creates a toolpath that traces the outer contour of the model, and only prints in a single helical toolpath. This results in a continuously rising Z height throughout the model, with no layer changes to slow down the printing. The printed model has only a single shell, which is ideal for models that don’t require any physical strength and are just used for aesthetic or functional purposes. Parts printed in Vase mode tend to be delicate, but when printed using a larger layer height they can be surprisingly durable considering their light weight and thin walls.

(Photo: 3DWithUs)
3D Printing in Flexible TPU Filament with a 0.8mm Nozzle in Vase Mode
Another interesting use of the large .8mm nozzle is 3D printing flexible filament at larger layer heights to increase the amount of optical clarity in the part. An ideal flexible filament for printing with a large diameter nozzle is TPU (an acronym from ThermoPlastic polyUrethane). When printing with larger layers, the overall amount of light diffusion is lower and the part can have a more transparent and clear surface finish. This lends itself to applications where the desired outcome is a large part that can transmit light, and it needs to print quickly. An additional side benefit of these thick layers is that the overall porosity of the part is reduced, as there are fewer potential voids where fluid can leak through. A slower print speed, higher temperature, and larger layer height all combine to create layers that are tightly fused together, preventing fluid from seeping through. The amber-colored vase pictured above was able to hold water for several hours; before eventually leaking through.

(Photo: 3DWithUs)
Read More: 3D Printer Tools & Accessories
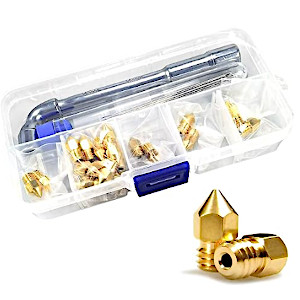
When we bought our first printer we didn’t realize that there is a number of essential 3D printer tools and accessories to come with it. There are tools for the printing process and also for safety. Day by day we kept filling our toolbox with more essentials and now we have a neat workshop in a spare bedroom. It is important to know what’s needed in order not to overspend money. We have put together a list to give an idea of what’s required and to help find the right items.
Product affiliate links:
3D Printer Nozzle Set For e3d v6 Heat Block on:
Amazon
AliExpress
Compatible with the following 3D Printers: Select Mini, Prusa i3 MK3S, Anycubic Chiron,
3D Printer Nozzle Set For MK8 Heat Block on:
Amazon
AliExpress
Compatible with the following 3D Printers: Creality CR10, Ender 3 v2, Ender 5 PRO, Ultimaker 2, Anet ET, Tevo Tornado, Anycubic Kobra


um where is the nozzle size settings in between .2mm and .8mm? Title says:
“Settings for 3D Printer Nozzle Sizes – . .”
( missing)