The review everyone’s been waiting for has finally landed—and I was lucky enough to get my hands on the Original Prusa XL for an exclusive hands-on look. With multi-color printing gaining serious momentum and filament waste becoming a hot topic, Prusa’s latest release arrives with perfect timing. Their clever use of multi-tool heads aims to tackle both innovation and sustainability head-on.
In this article, we’ll explore its key features, assess its printing performance, and—as always—wrap things up with a clear list of pros and cons. Before we start, I want to give a big thanks to Sam, TheRealSamPrentice for letting me thoroughly test this machine for both the 3DPUK Tech channel and the 3DWithUs website.
Table of Contents (Jump to a Section)
- Prusa XL Specifications
- What’s in the Box
- Initial Overview
- Assembly & Calibration
- Test Prints
- YouTube Video
- Compare to Other 3D Printers
- Conclusion and Pros & Cons
Where to Buy
Price: $ 3,299 – $4,799

Compare the Prices & Bundles:
Official Store | Amazon
Prusa XL Specifications
– Build Volume: 360×360×360 mm (14.17’’×14.17’’×14.17’’)
– Filament Diameter: 1.75 mm
– Layer Height: 0.05–0.30 mm
– Printer Weight (5-head): 33.7 kg
– Dimensions: 700 mm × 900 mm × 720 mm
– Mainboard: Custom 32-bit xBuddy (STM32)
– Extruder: Nextruder, Direct Drive, E3D V6 compatible
– Hotend Path: All-metal with aluminum heatsink
– Nozzle Temp Max: 290 °C
– Bed Temp Max: 120 °C
– Screen: 3.5″ Color LCD
– Connectivity: USB, LAN, Prusa Connect (Wi-Fi optional)
– Print Surface: Segmented heatbed, magnetic sheets
– Supported Materials: PLA, PETG, Flex, PVA, PC, PP, etc.
– Power Draw: 235W (average while printing)
What’s in the Box?
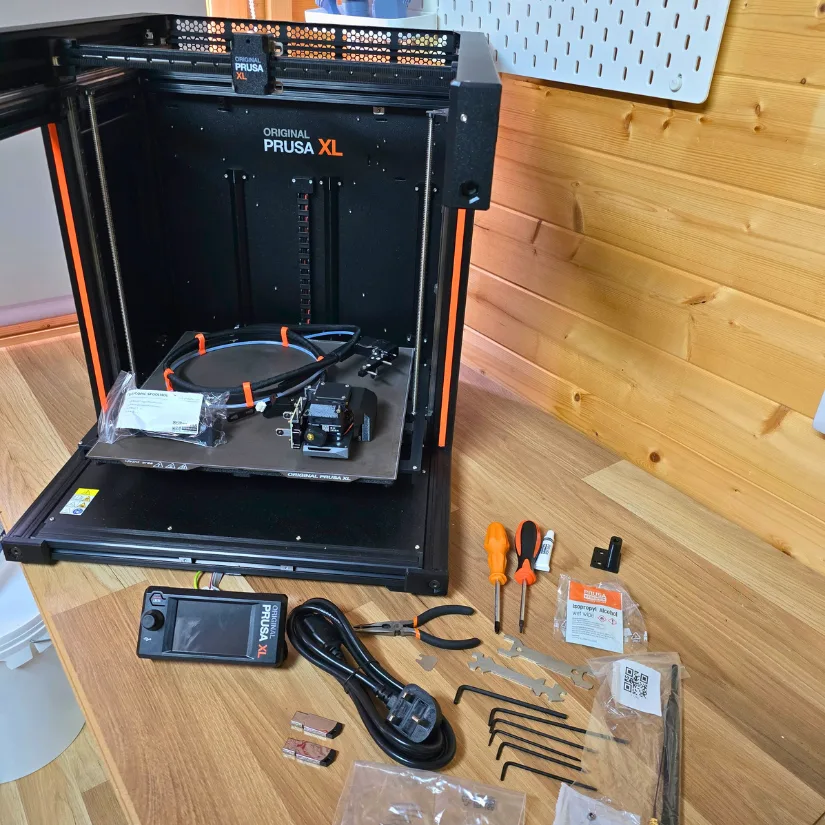
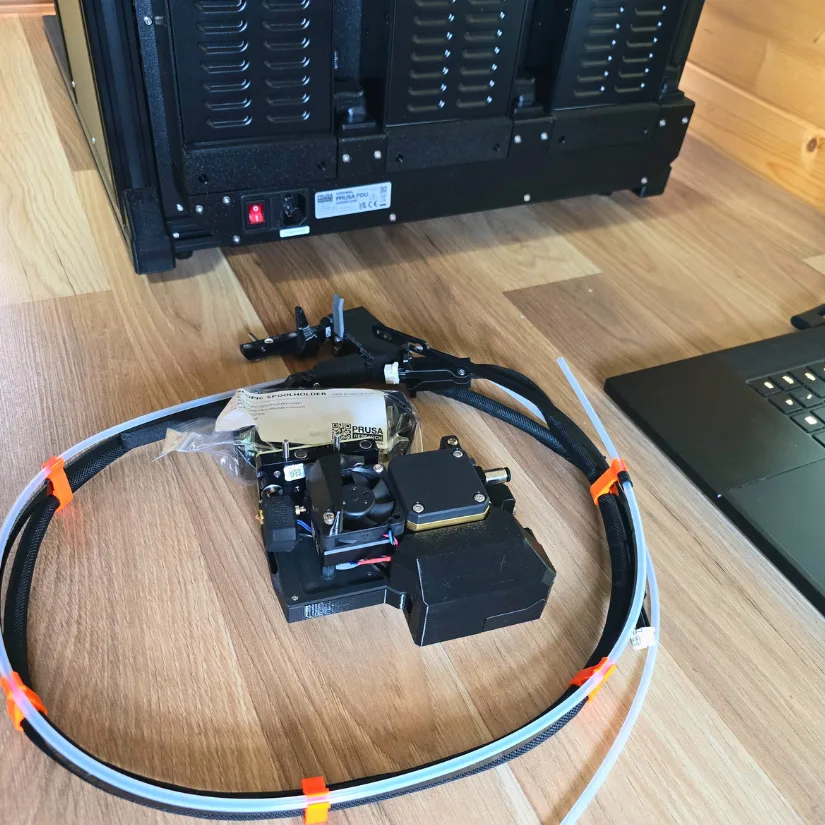
The semi-assembled Prusa XL with five tool heads comes packaged with a 3.5″ LCD screen, a PEI spring steel plate, 1 kg of Prusament PLA in Galaxy Black, and a USB stick preloaded with models. Also included are a full tool kit, lubricant, a cleaning needle, alcohol wipes, manuals, a filament catalog, and even a bag of Haribo gummies.
©3DWithUs – Photo: Phil Macey
Initial Overview
The Original Prusa XL didn’t arrive in a thousand pieces, thankfully—but it still asked us to roll up our sleeves to install the screen, toolheads, and spool holders. Challenge accepted. There are, of course, a few versions of the Prusa XL—from unassembled to semi-assembled, and with one to five toolheads—depending on what you choose at checkout.
The version we’re reviewing today is the semi-assembled 5-toolhead model. Inside the box? A full toolkit, a handbook, a filament catalogue, stickers, and—because Prusa knows how to treat us—a jumbo bag of Haribo Gummy Bears. Yes, really. The Galaxy Black Prusament PLA spool gleams like obsidian, and the USB stick is packed with ready-to-print models to get you started straight out of the gate.
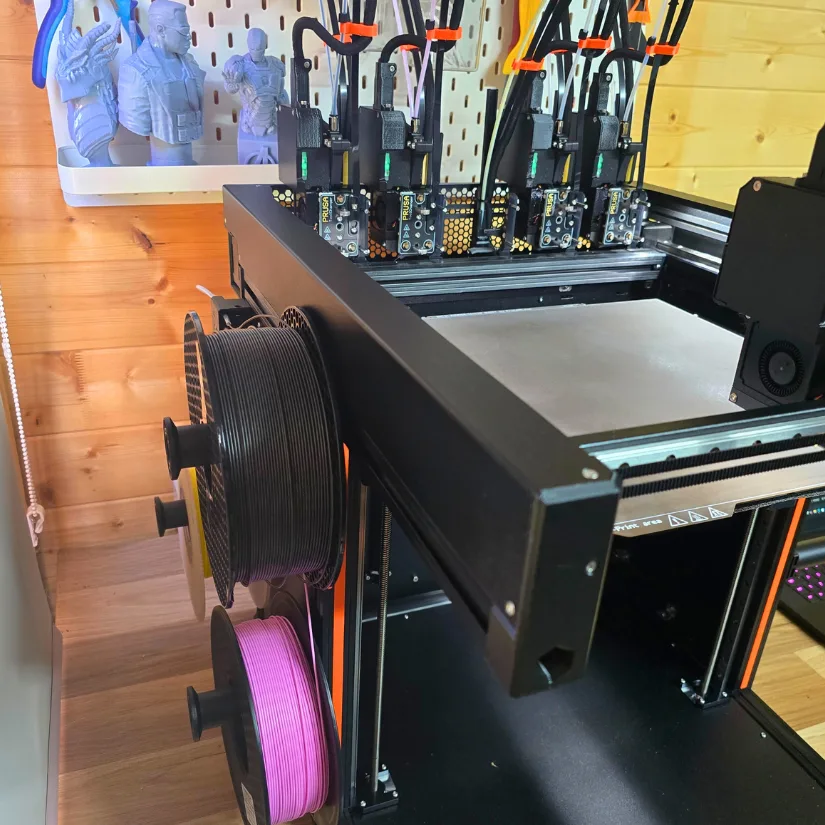
The build of the machine is a thoughtful blend of steel, aluminum, and PETG-printed components, striking a balance between durability and precision. Prusa clearly prioritized robust construction, and it shows. The linear rails ensure smooth, consistent motion across all axes—though it’s worth noting that the design features only two Z-axis motors, which may raise eyebrows for those expecting triple-Z stability on a printer of this scale.
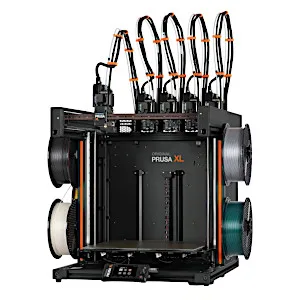
Prusa has stuck with its classic look—black frame, orange accents, and logos right where you’d expect them: on the toolhead and back panel. The Bowden tubes arch neatly over the top, and spool holders sit on both sides for balance. The open front makes it easy to reach in and grab your prints, and those LED strips along the top edges? They’re a great addition for keeping an eye on your progress or getting crisp lighting for timelapses.
Assembly & Calibration Process
We must admit — the Prusa Research team consistently provides excellent assembly instructions for all their products, and the official Prusa XL assembly guide is no exception.
In this article, I challenged myself to create a step-by-step assembly walkthrough based on my own experience with the 5-toolhead version. By scrolling through this section, I hope to give you a clear glimpse of what’s involved in getting this machine up and running.
Feel free to Jump to Test Prints and see how the Prusa XL performs in action.
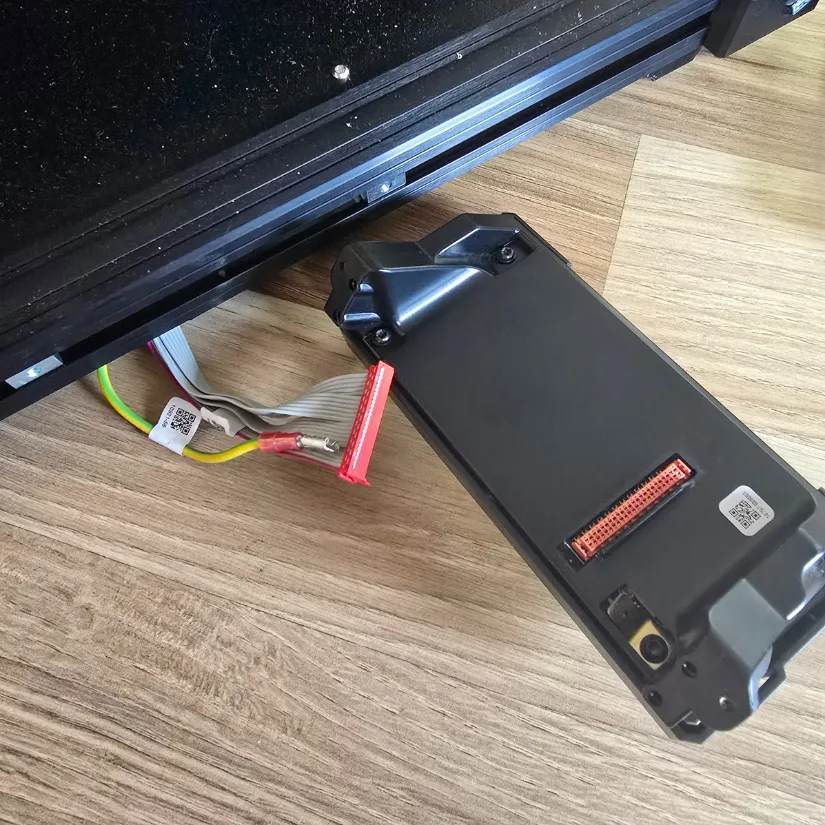
– Step 1: Screen Installation – Note: Starting from September 2024, you may receive a new injection-molded xLCD. Check the photos and identify your version, for me it’s the Injection moulded version. You will require the xLCD assembly (1x) & M3x10 screw (2x) to carry this out. First, connect the xLCD cable to the slot on the xLCD board, and then push the grounding connector fully into the PE faston, as shown in the image below.
– Step 2: Connecting Screen to Unit – Align the xLCD assembly with the nuts in the front aluminum extrusion. Insert and tighten the M3x10 screws from the right side of the xLCD and then the left; the screen should be central to the unit.
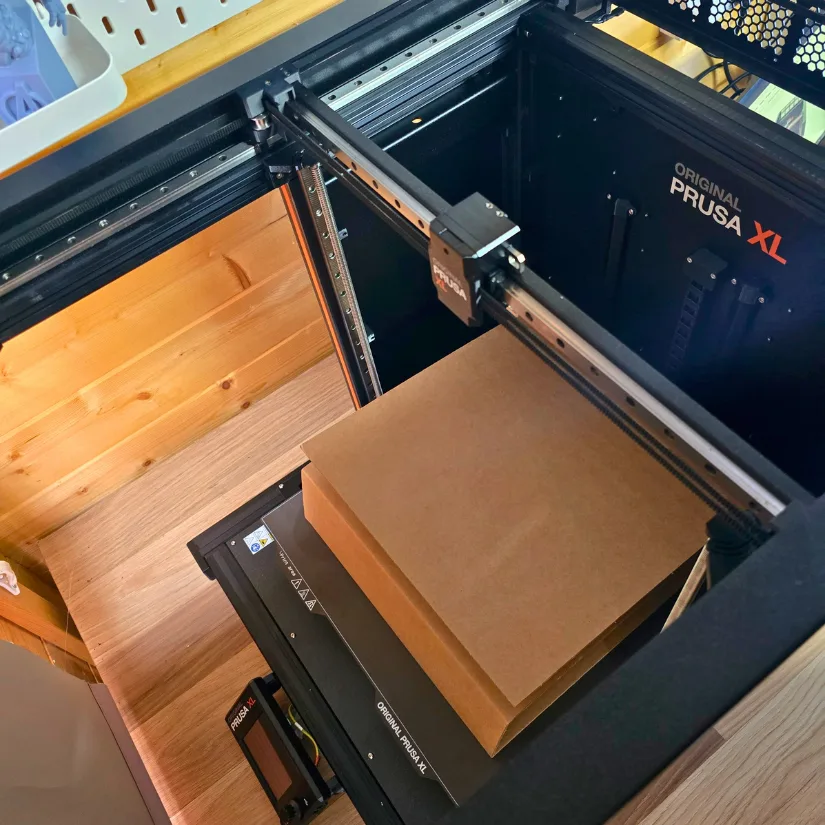
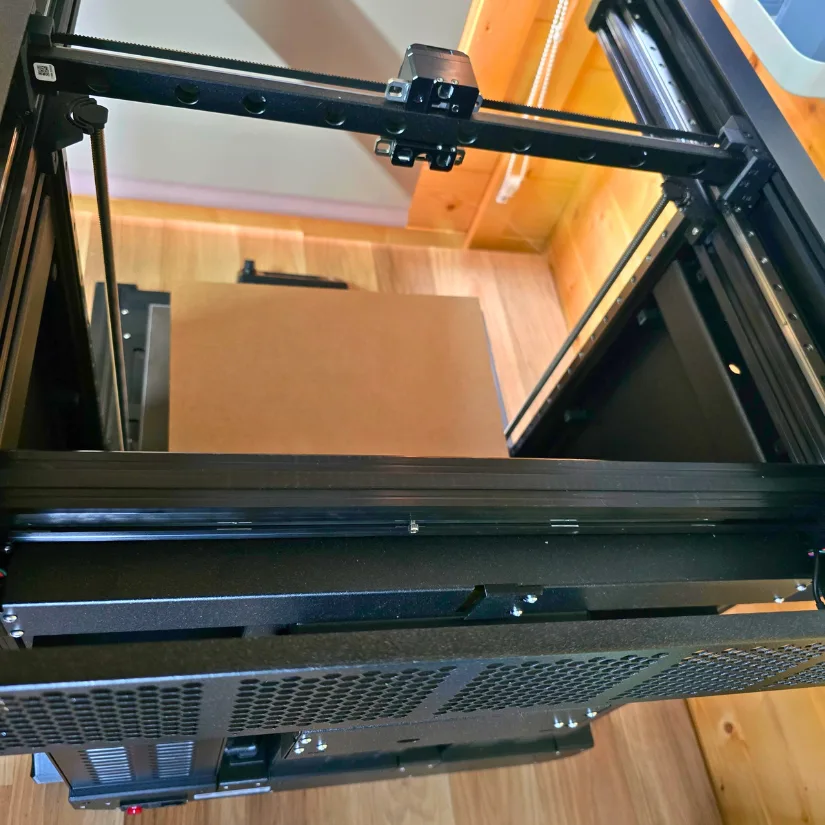
– Step 3: Preparing the Printer – Reminder: To handle the printer, always grab the handles on both sides of the printer. Do not lift the printer by the aluminum extrusions or the metal sheet profiles on top. Place the empty cardboard box approximately to the front center part of the heatbed.
– Step 4: X-axis preparation – Manually move the X-axis assembly all the way to the front of the printer, and then manually move the X-carriage approximately to the center of the X-axis.
Note: start with Nextruder box 1 (depending on package 4 further boxes needed) for this step.
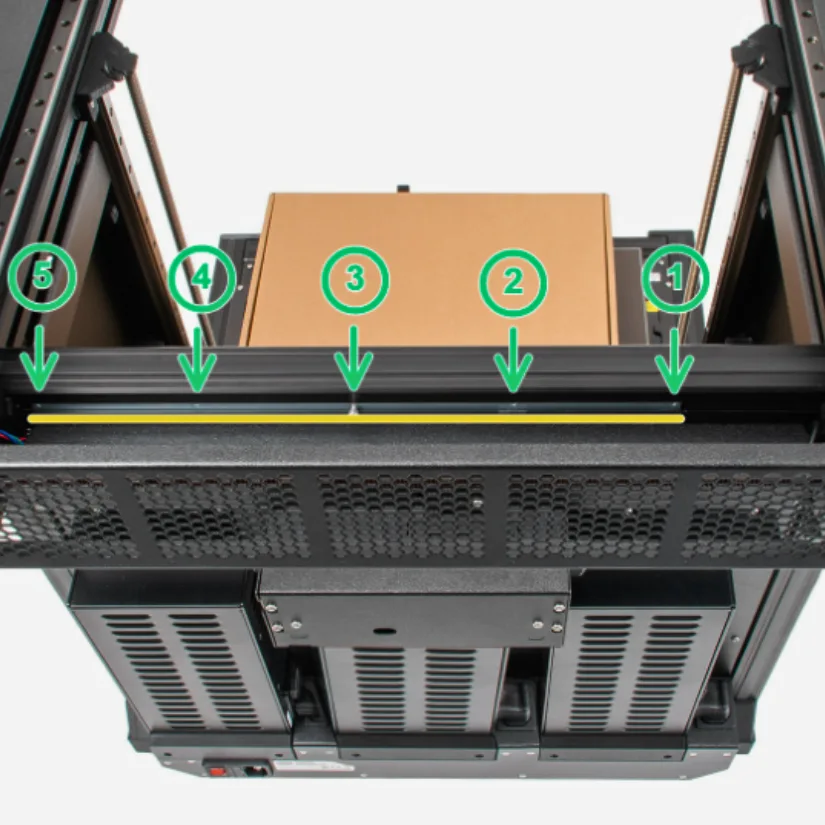
– Step 5: Guiding the nextruder cable – Carefully rotate the printer 180° so that the PSU (Power Supply Unit) side is facing you. Locate the long metal profile with five M3 holes inside the rear aluminum extrusion. Use all M3 holes in the metal profile.
– Step 6: Installation of the Nextruder bay 1 (Repeat this process for all 5 bays) – Place the xl-dock-cable-router on the bottom metal sheet below the aluminium extrusion on the right side of the printer.
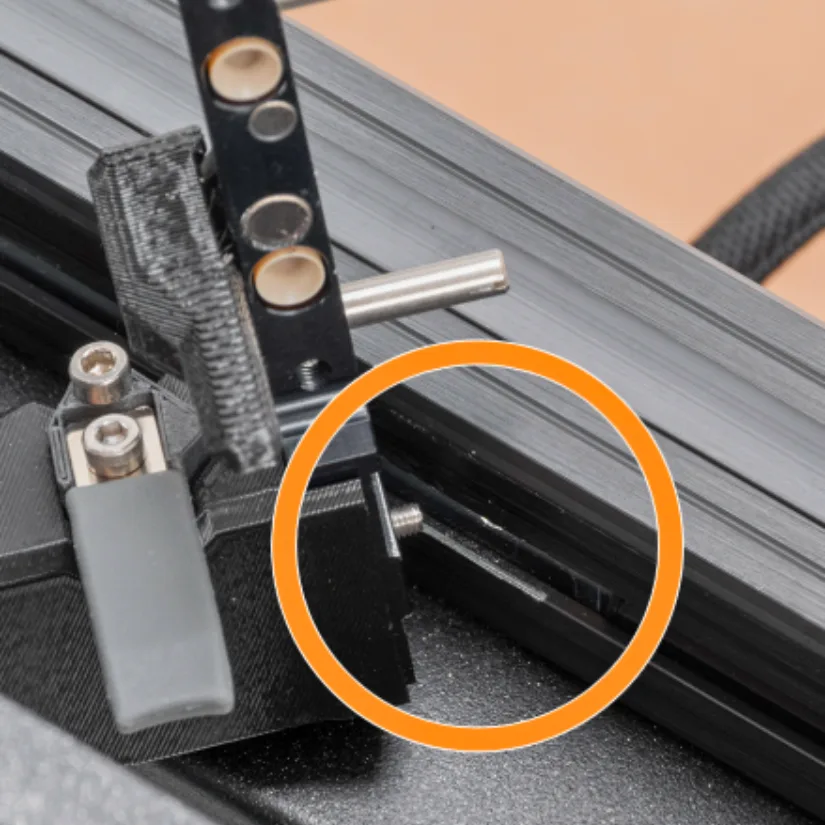
Locate the protruding screw from the XL-dock-cable-router. Attach the screw to the first M3 hole in the long metal profile (tch-mounting-insert). Check through the hole in the rear if the cable holder is lined up with the hole. Push the 2.5 mm Allen key all the way through the hole in the rear metal sheet until you reach the middle screw in the xl-dock-cable-router and tighten the screw.
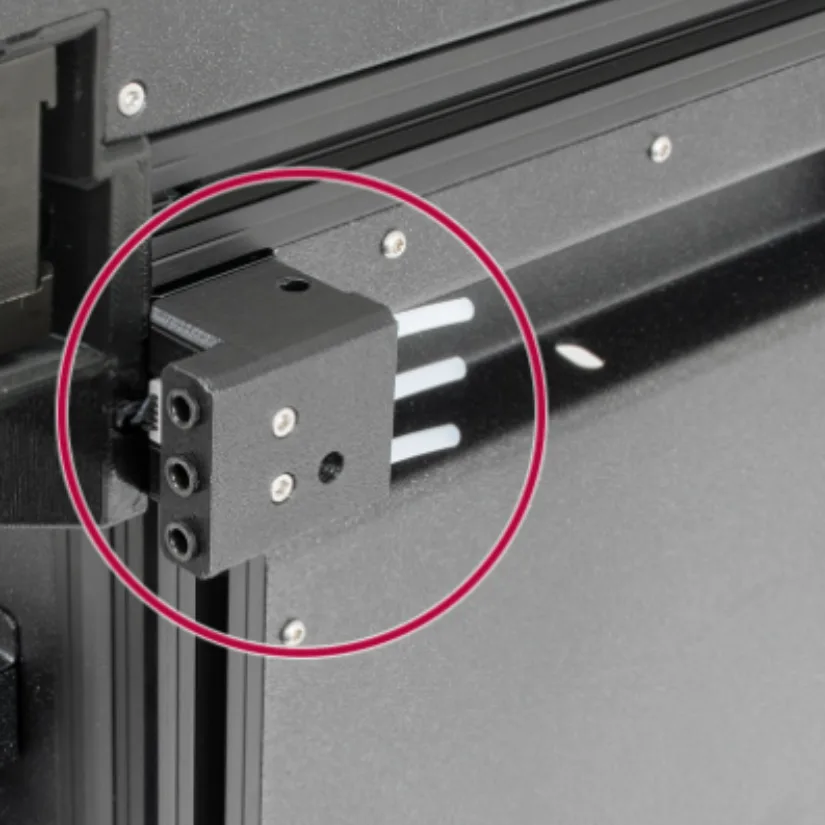
– Step 7: Dock inspection – This step is the same for all versions of the dock assembly. Check that the dock is properly tightened. The dock must not move. The dock is a press fit; the screw must be tightened firmly.
– Step 8: Third dock: removing the screw – This step is the same for all versions of the dock assembly. At this point, you should have already installed two docks. Locate the M3 screw in the metal insert. Using a 2.5mm Allen key, remove the screw from the metal insert (this was used as transport support only). Attach the third, fourth, and fifth docks the same way as the first two docks.
Note: The attached docks have to look like in the picture – Depending on the package you selected

Well done! You deserve a reward before we install other components. With this version, you receive 1kg of legendary Haribo, take a break.

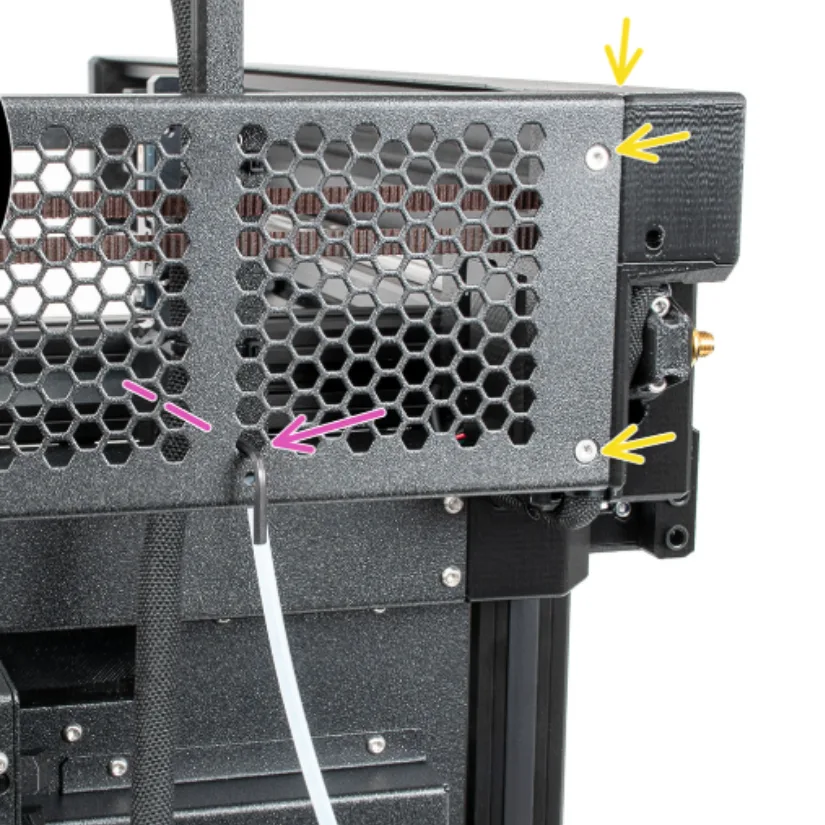
– Step 9: Wi-Fi antenna holder versions – Let’s connect the Wi-Fi antenna now. There are two versions of this component. Identify which version of the Wi-Fi antenna your printer has; in my case, it’s the back version. The antenna connector has to be assembled, and the Wi-fi antenna will be mounted in the middle of the rear side of the printer.
Locate the XL-rear-cable-management-plug (cover) on the rear of the printer.
Slightly loosen two screws on the cover. No need to remove them completely. Slide the cover to the right and remove it from the printer.
Connect the first dock (from the right side) cable to the upper slot labeled ‘DWARF 1’. Connect the second dock (located on the right side) cable to the lower slot labeled ‘DWARF 2.’ Attach the connectors cover to the screws. Slide it to the left and tighten the screws. Make sure that the cables are not pinched or damaged
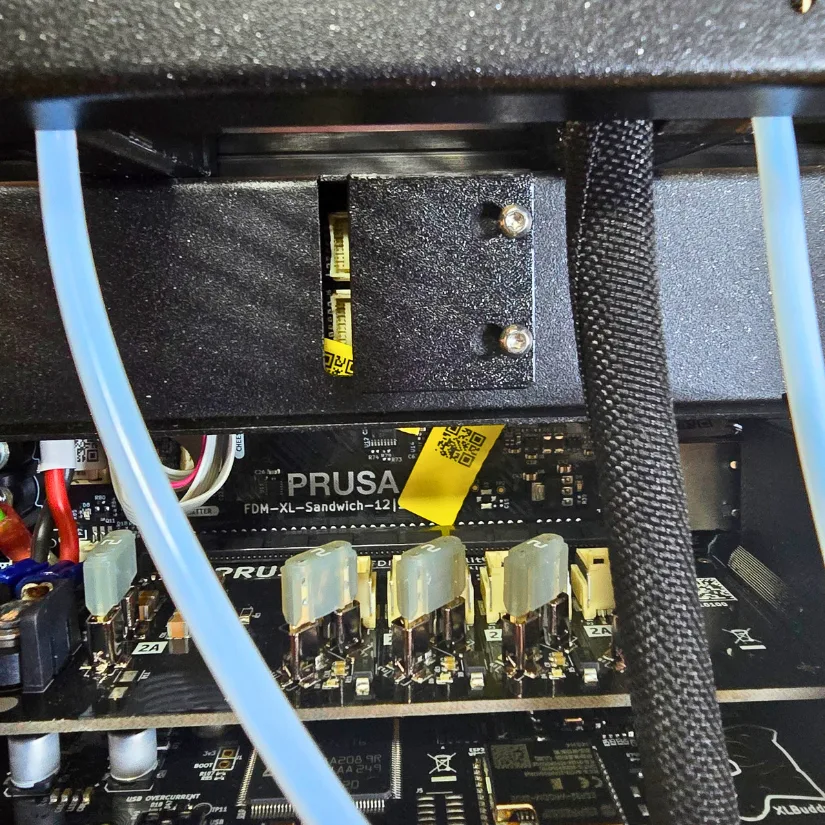
– Step 10: Removing the XL buddy box cover – Loosen four screws on the cover slightly. No need to remove them completely. Push the cover up and remove it from the printer.
Don’t pinch the antenna cable while connecting the Nextruders cables!
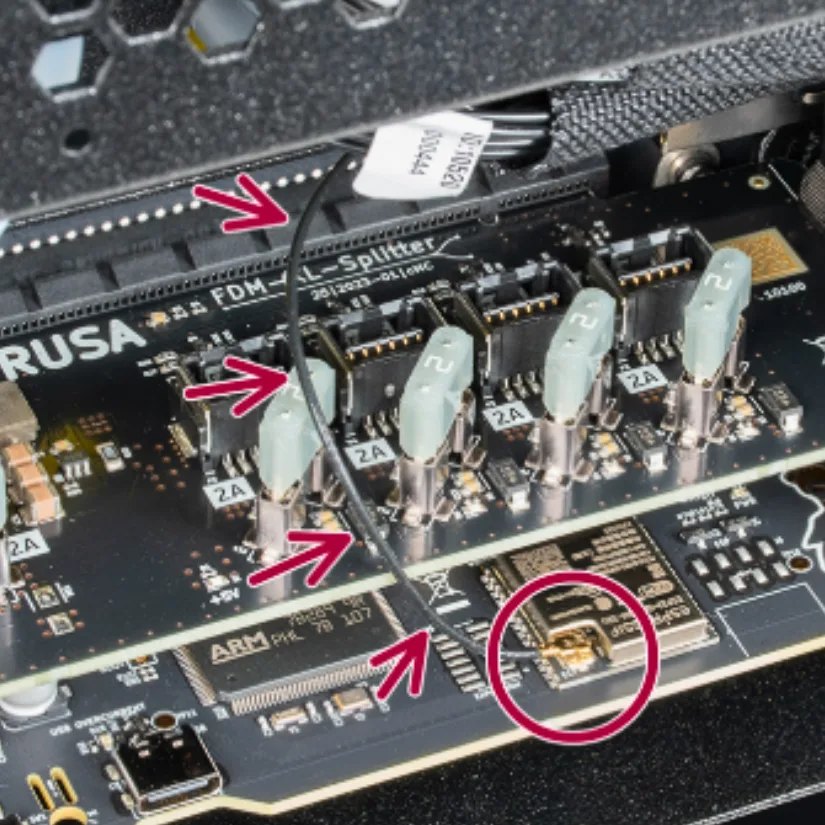
– Step 11: Connecting the Nextuder cables – Do not take the XL-Splitter board out of the printer; the photo is only an illustration of the connector locations. Connect the third, fourth, and fifth (from the right) Nextruder to the XL-Splitter.
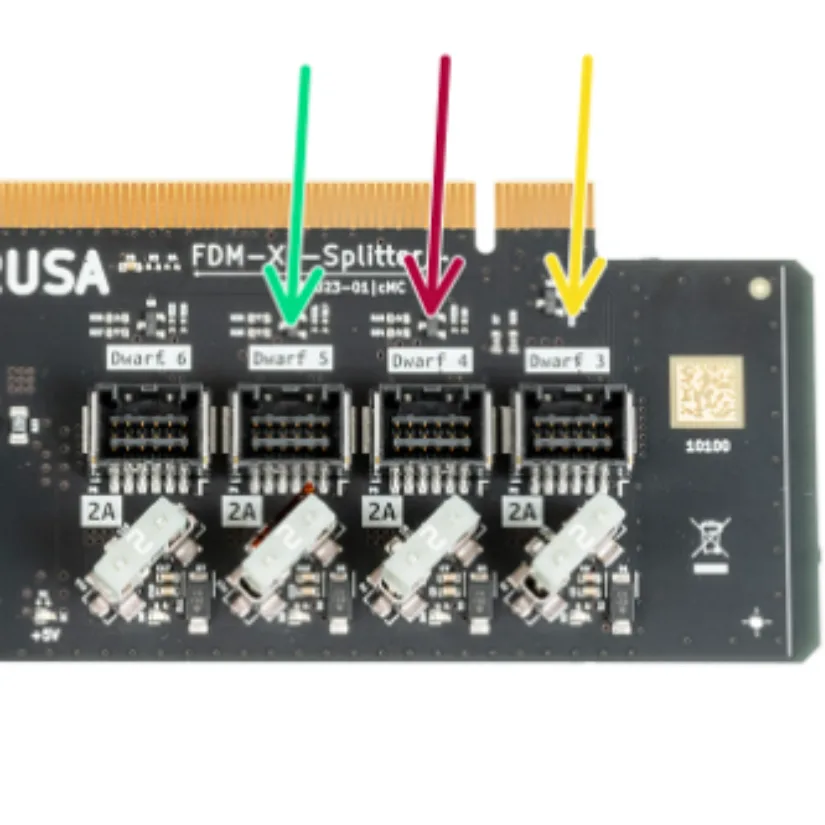
– Step 12: Put the XL-buddy-box-cover back on the printer. Check that the Nextruder cables are positioned inside the cutout in the cover. Use a T10 key to tighten the four screws.
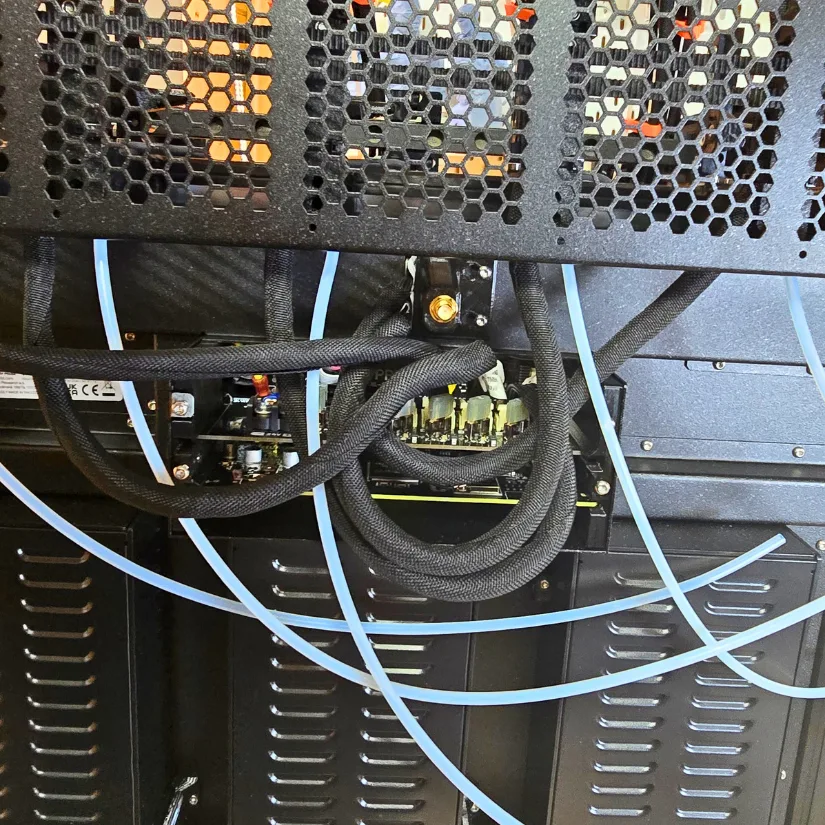
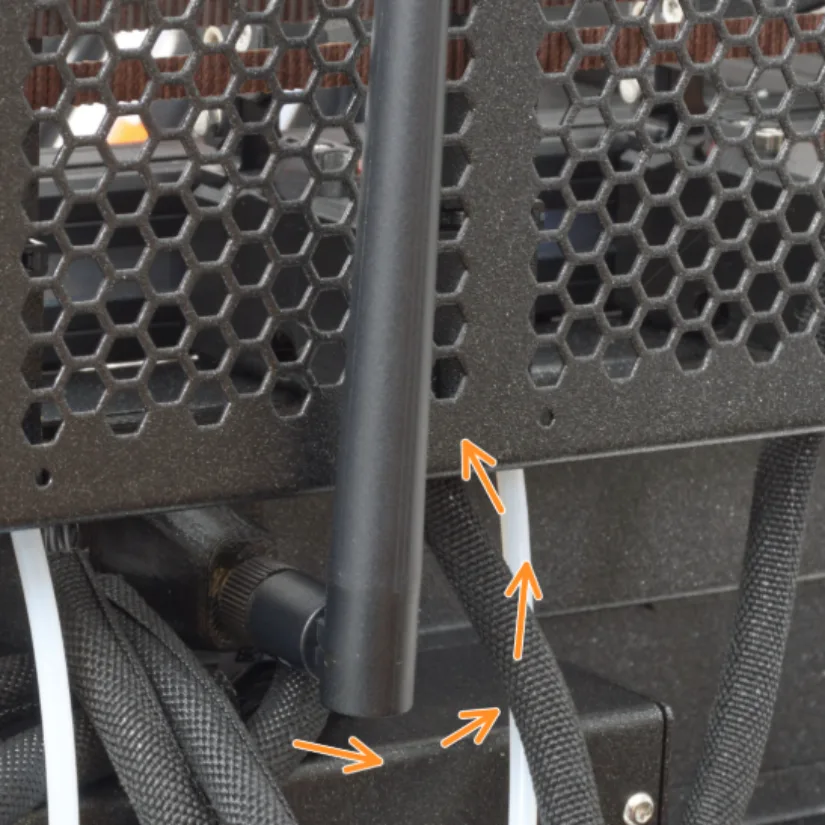
– Step 13: Guiding the PTFE tubes – Locate the right filament sensor. Insert the first dock (from the right) PTFE tube into the upper hole, the second into the middle hole, and so on for all five Nextruders. Each one is clearly marked.
– Step 14: Connecting the Wi-Fi antenna – Locate the antenna connector in the middle of the printer. Screw the antenna on. It can be rotated and bent in two directions.
– Step 15: Spool holder assembly – For the injection-molded version, prepare the two parts and attach the spool holder to the mount. Insert the M5x85 screw into the assembly.
©3DWithUs – Print and Photo: Phil Macey
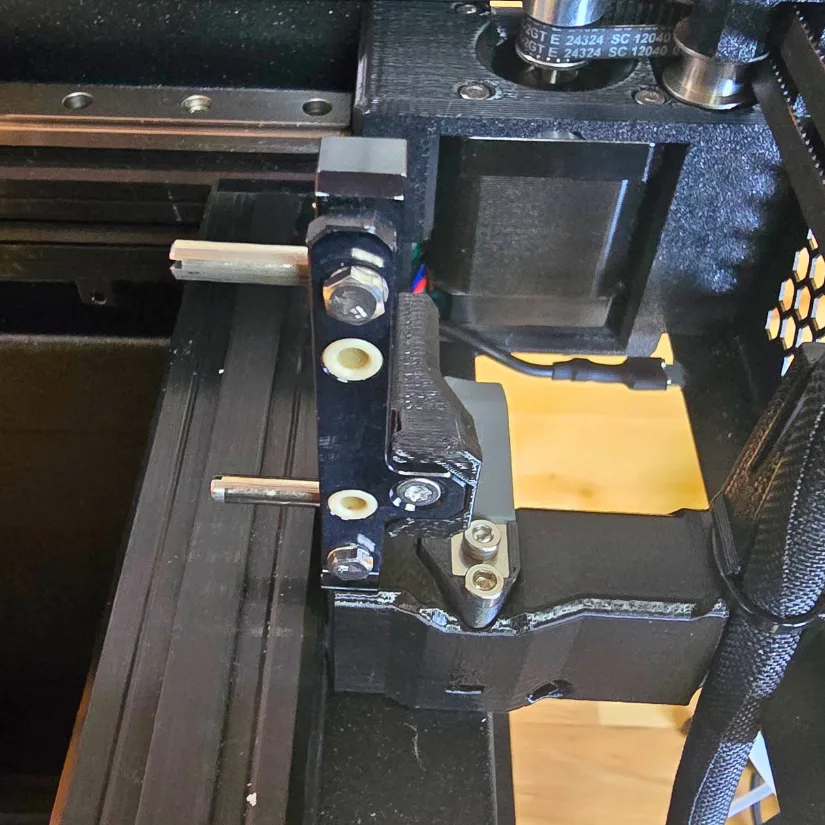
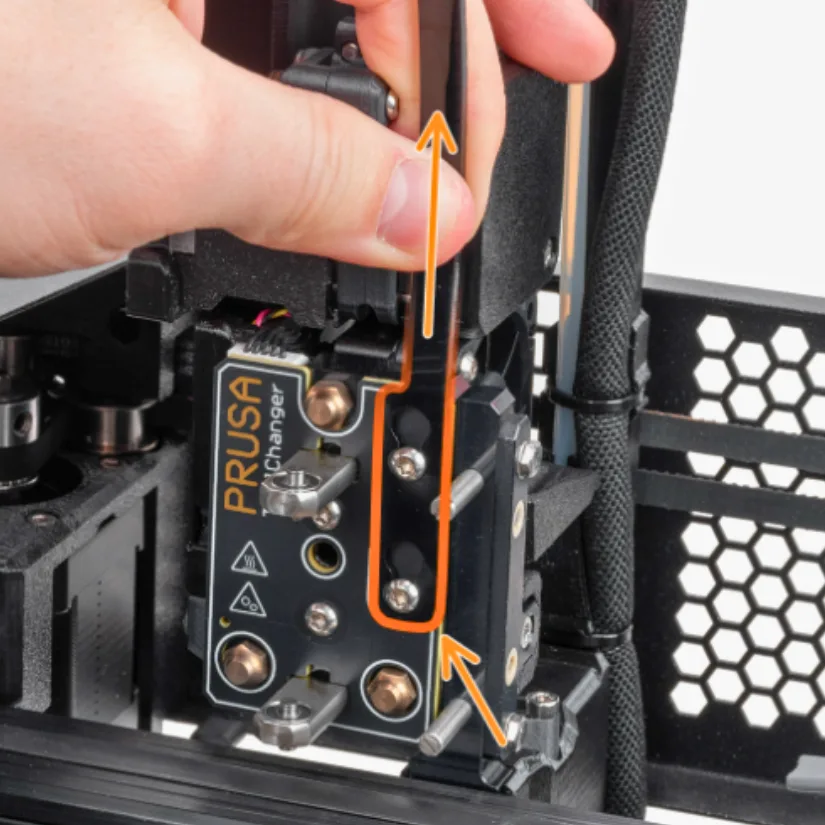
– Step 16: Nextruder assembly – As this is a 5-toolhead version, repeat this process four more times. Take the Nextruder and carefully place it next to the dock. Insert the two metal rods through the white holes in the dock. Magnets will help lock it in.
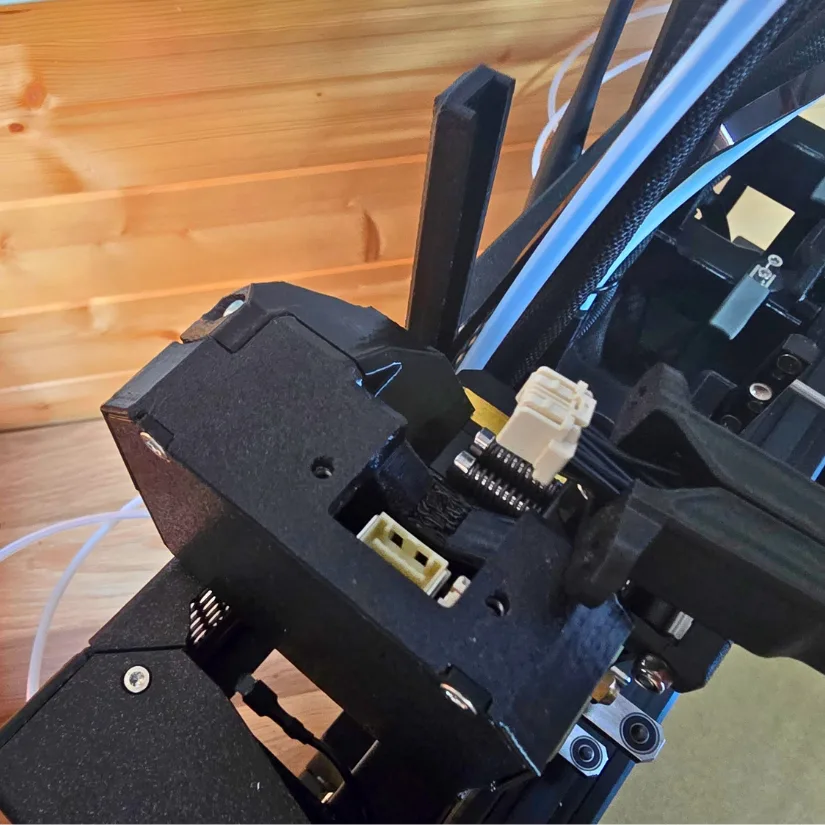
– Step 17: Nextruder cable connection – This step is the same for all five toolheads. Loosen the two highlighted screws. Hook the keyhole openings in the flexible plate of the cable bundle onto the screw heads, push it into position, and tighten both screws using a T10 Torx screwdriver.
– Step 18: Connect the cable bundle – Secure it with two screws. Insert the semi-transparent PTFE tube into the Nextruder fitting and push it in fully.
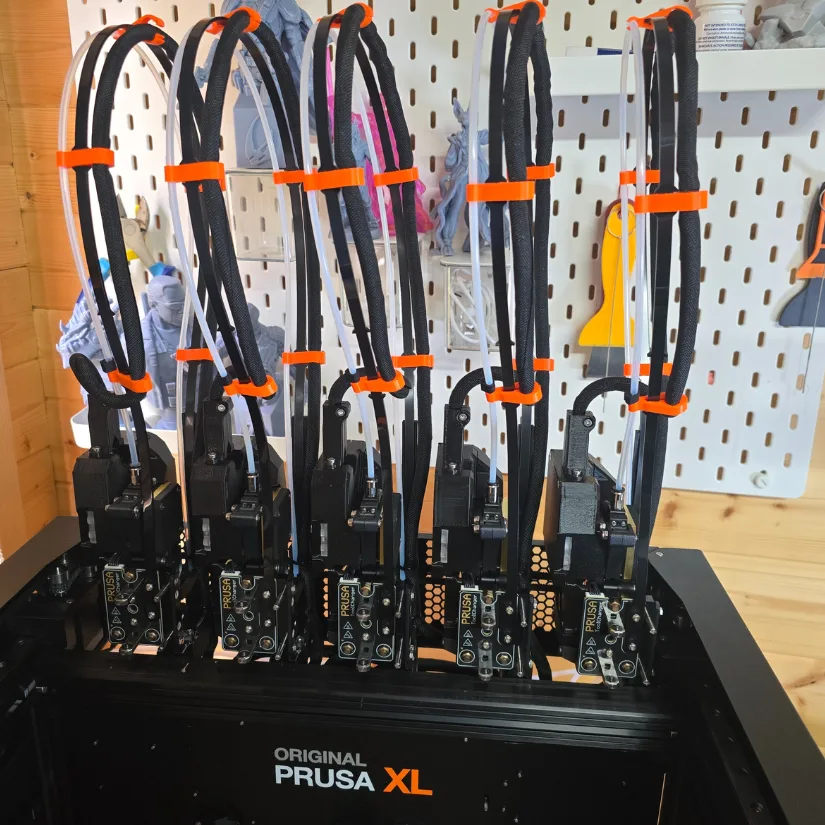
– Step 19: Assemble and connect all Nextruders using the same process. Your printer should now look like this if you have the 5-toolhead setup.
– Step 20: Preparing the printer for calibration – Turn on the printer.
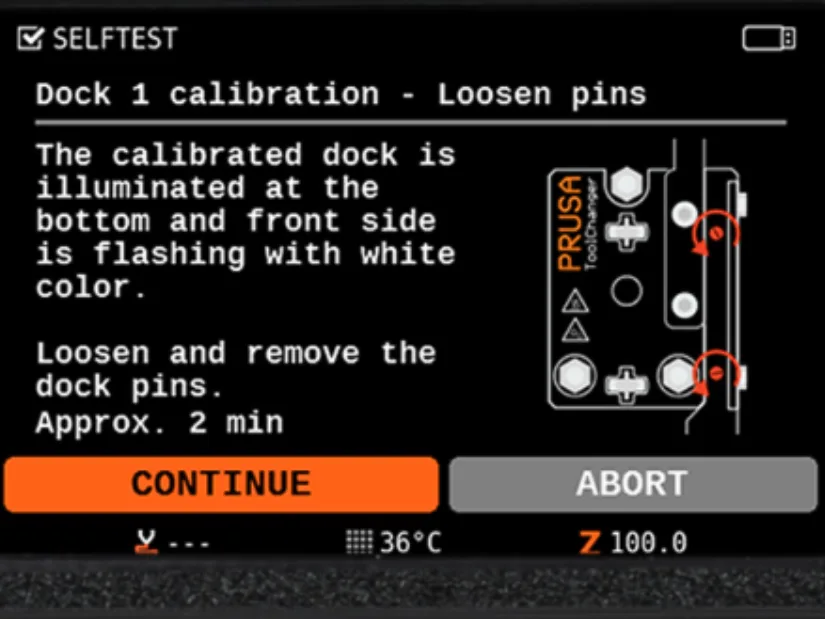
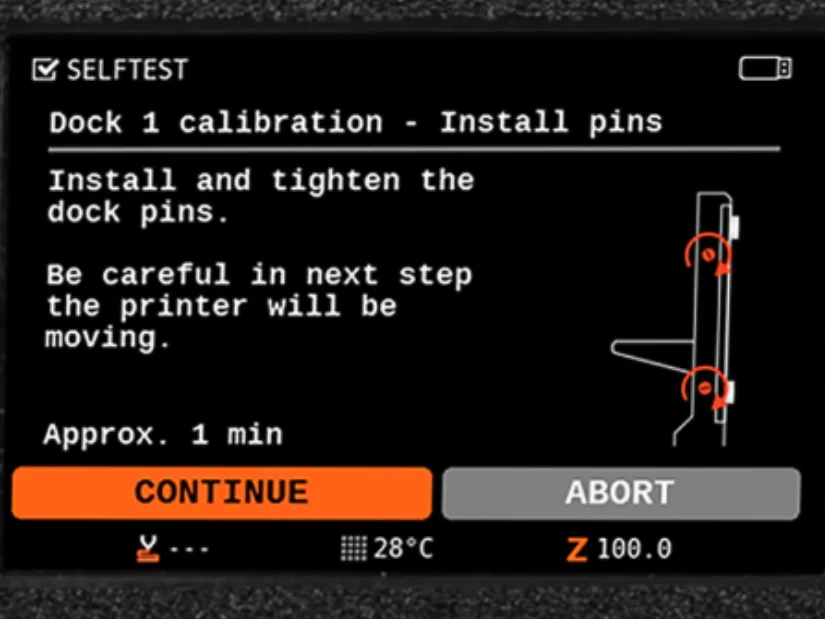
– Step 21: Dock pin removal – Follow the wizard instructions on screen. Using a mini wrench, unscrew and remove both dock pins on Dock 1. You’ll need them again soon.
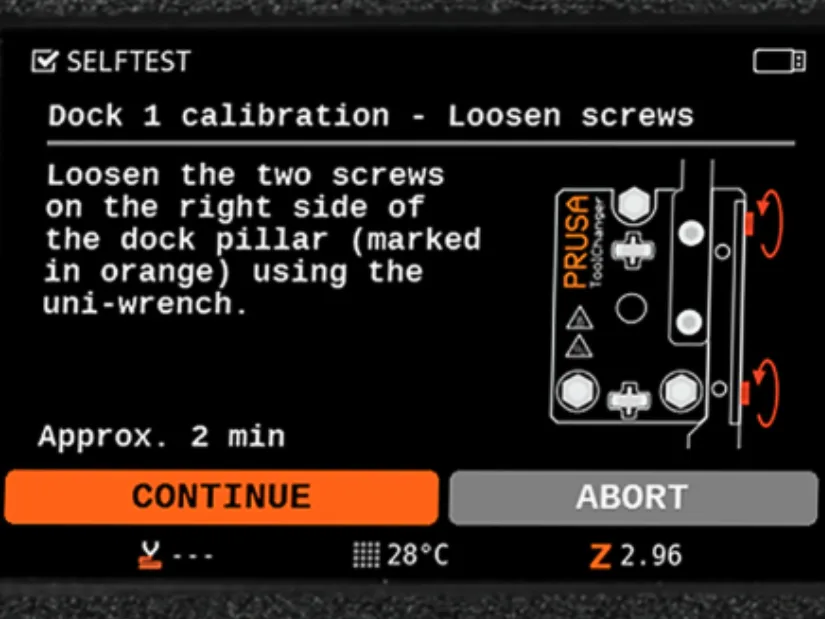
– Step 22: Loosen two screws with a universal wrench. A few turns are enough — don’t remove them entirely.
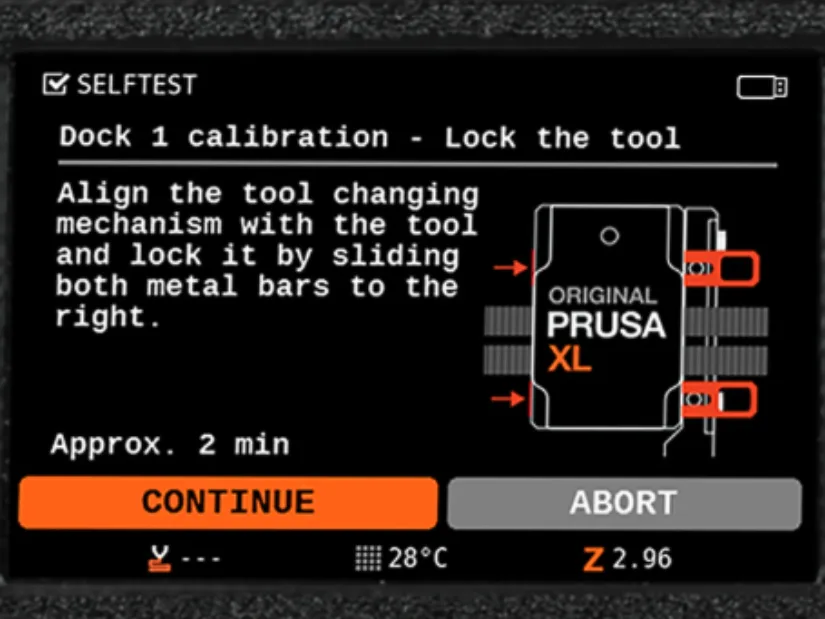
– Step 23: Locking the tool – Carefully move the toolchanging mechanism to the first (leftmost) toolhead and manually lock the metal bars as shown. Repeat this for all five toolheads.
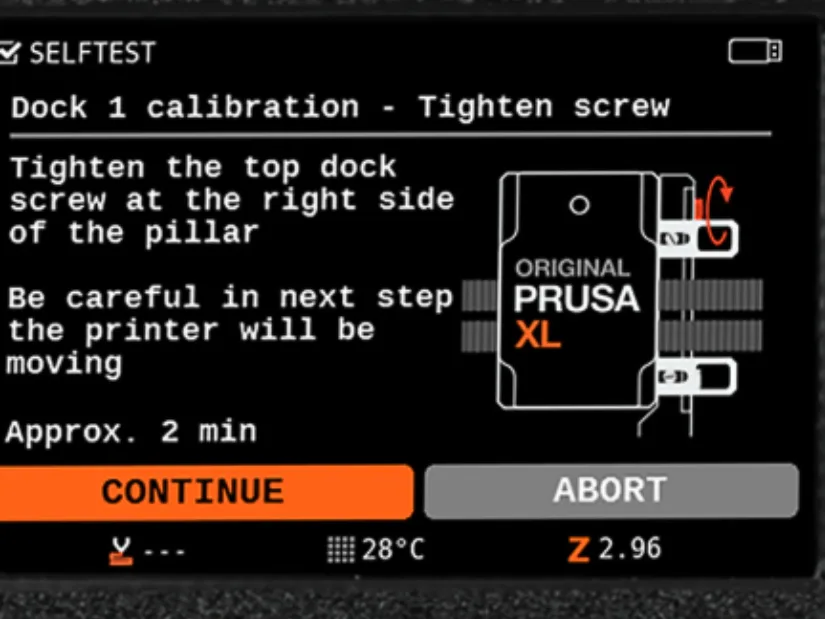
– Step 23 (continued): Tighten the upper screw on the side of the dock using a universal wrench. After confirming on the screen, the XY axis will move. Ensure there are no obstructions.
– Step 24: Insert and secure both metal pins using a mini wrench. Click “Continue” on the screen. The printer will return the tool to Dock 1 and run calibration moves. Repeat this for all toolheads.
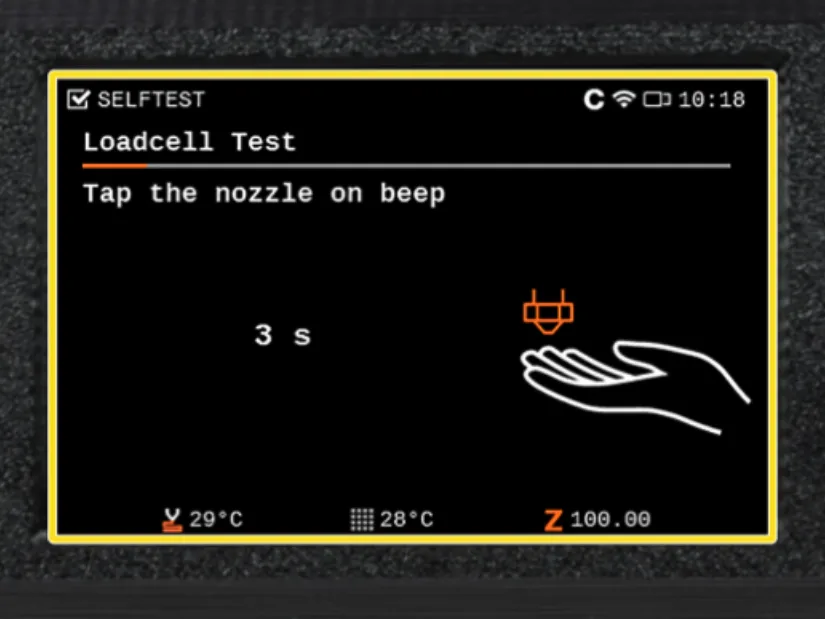
– Step 25: Loadcell test – This test will be repeated for each toolhead. After the countdown, gently tap the nozzle when prompted. If the touch isn’t detected, you’ll be asked to repeat the step.
– Step 26: Proceed to the Z-axis and nozzle heater tests. These are automatic and require minimal input.
– Step 27: Calibrate filament sensors – The printer may ask if you want to remap the third sensor. Choose LEFT if space is limited on the right. Use at least 130 cm of filament. Use the included Prusament and mount it on the spool holder.
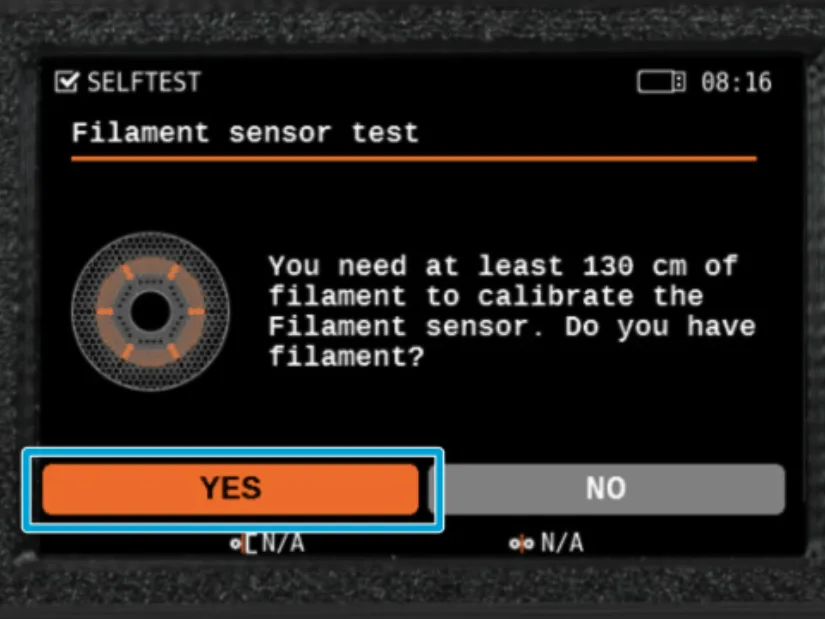
– Step 27 (continued): Insert the filament through the PTFE tube into the side sensor until you feel slight resistance. You can monitor the sensor status on the bottom of the screen. Remove the filament when prompted. Repeat this for all toolheads.
– Step 28: After successfully calibrating all five filament sensors, the printer will begin tool offset calibration.
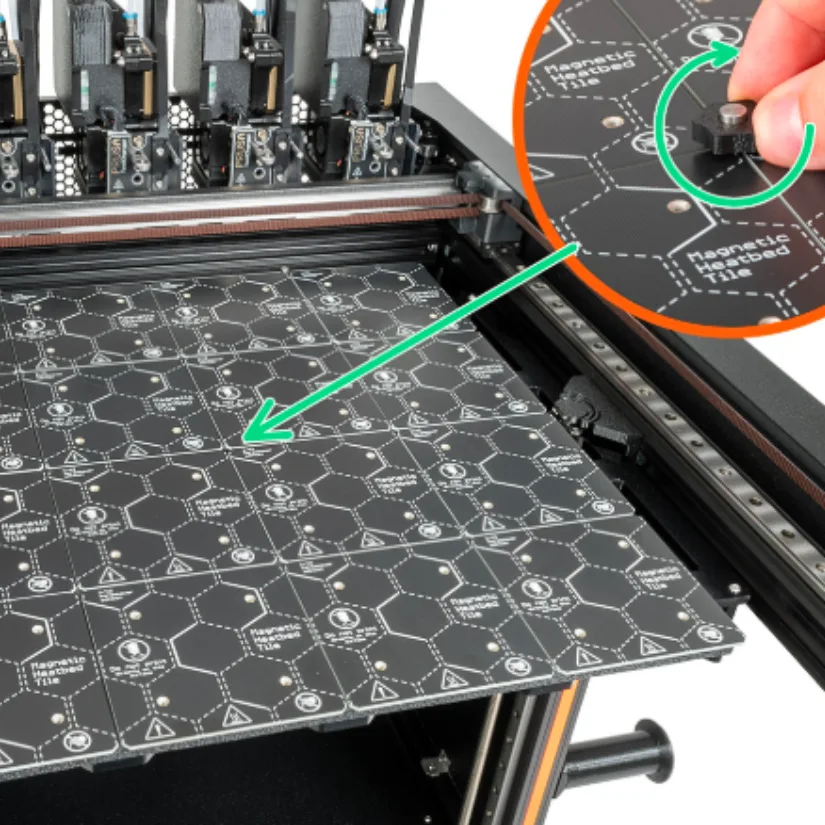
– Step 29: Offset calibration – Prepare the calibration pin and pin key. Insert the pin into the plastic holder to create a small protrusion.
– Step 30: Screw the calibration pin into the center of the heatbed and click “Continue” to begin tool offset calibration.
– Step 31: Install the print sheet if it’s not already on the heatbed. The printer will then perform a short calibration.
– Step 32: Clean the nozzles and parking plate before continuing. Remove the print sheet, install the calibration pin into the bed, and remove the key.
– Step 33: Begin tool offsets calibration. Replace the print sheet if prompted. After completion, the printer will automatically start the heatbed heater check.
– Step 34: Phase stepping calibration – This automatic process reduces motor vibration. The printer will move the first toolhead diagonally across the bed at varying speeds. You’ll see the vibration reduction results displayed at the end.
That’s the full setup completed. Now you’re ready to carry out your first print.
Test Prints
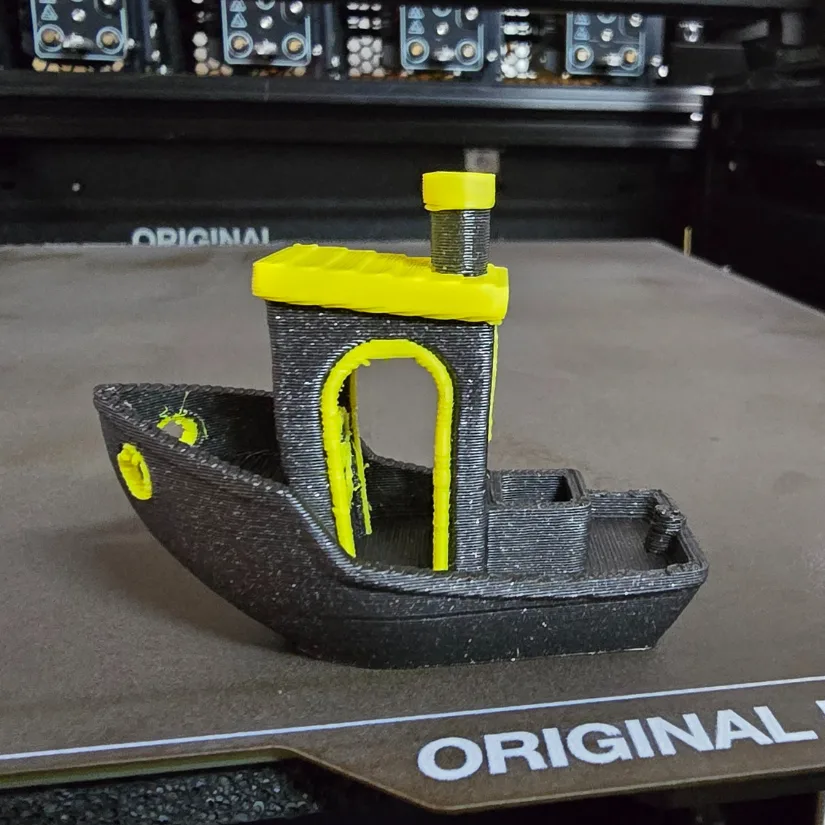
Test Print 1: Benchy
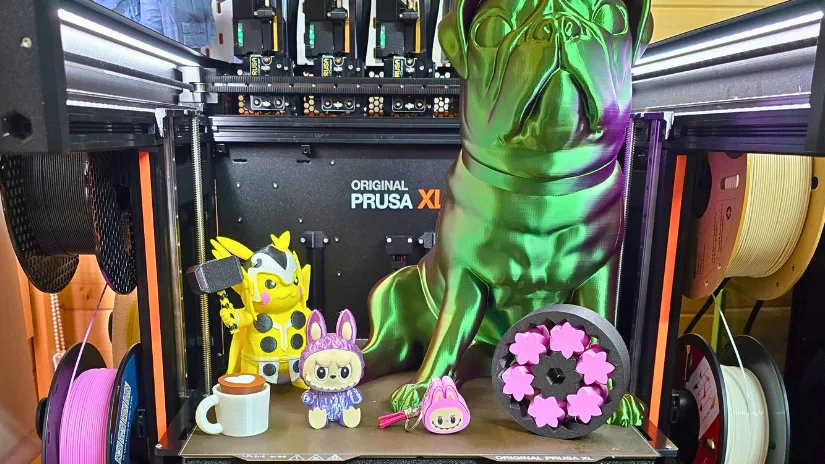
I kicked off the first print test using the classic Benchy file found on the included USB stick. It wrapped up in about 25 minutes with very little filament waste. While the print leaned more toward speed than fine detail, the results were solid for a first pass. Visually, the yellow and Prusament Galaxy Black filament combo really popped — especially that shimmering black finish.
©3DWithUs – Print and Photo: Phil Macey
- Filament: Galaxy Black & Yellow
- Duration: ~25 mins
- Result: Solid output, vibrant colors, minimal waste.
This quick Benchy run confirmed that the Prusa XL’s multi-toolhead system can deliver clean color changes and reliable output. A great warm-up before diving into larger and more demanding prints.
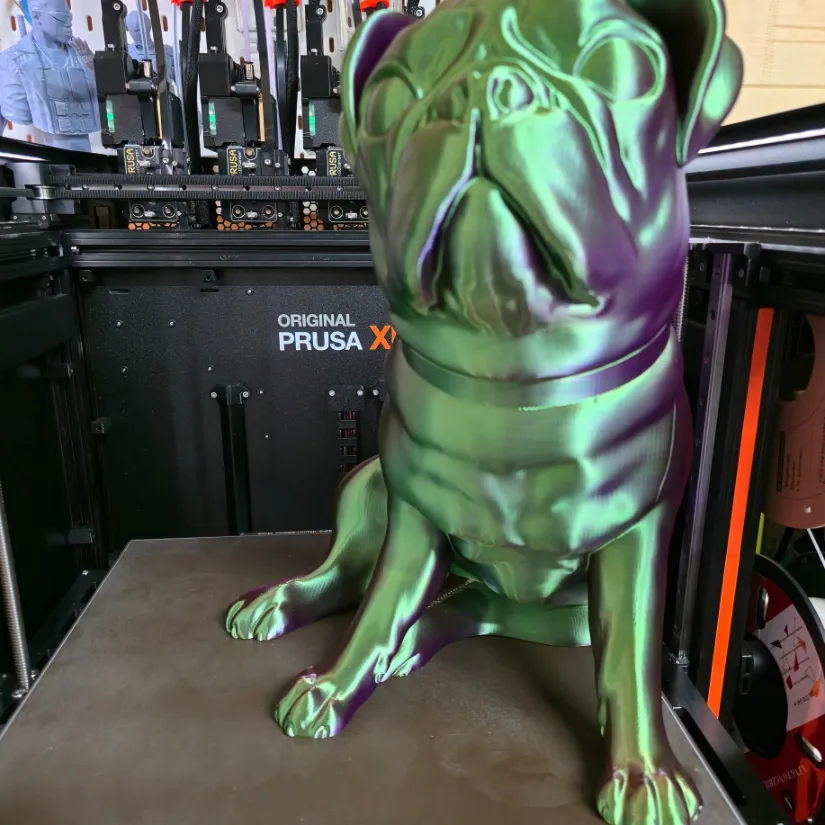
Test Print 2: Large Dog Model
For my second test, I went all in with the massive Dog model to push the printer to its full build volume and assess its performance over extended print durations. The file was conveniently included on the Supplied USB key. This single-color print took approximately 24 hours and turned out beautifully, thanks to Eryone’s dual-color filament from Amazon (Check their awesome dual and tri-color collection). Despite its size, the model felt surprisingly light. Most impressively, the printer completed the job without requiring any intervention.
©3DWithUs – Print and Photo: Phil Macey
- Duration: ~24 hours
- Filament: Eryone dual-color PLA
- Result: Huge size, smooth print, no user intervention required.
This large-scale dog model perfectly showcased the Prusa XL’s ability to handle extended, full-build-volume prints with ease. The consistent quality from start to finish — without any pauses or user intervention — reinforces the XL’s reliability for ambitious, time-intensive projects.
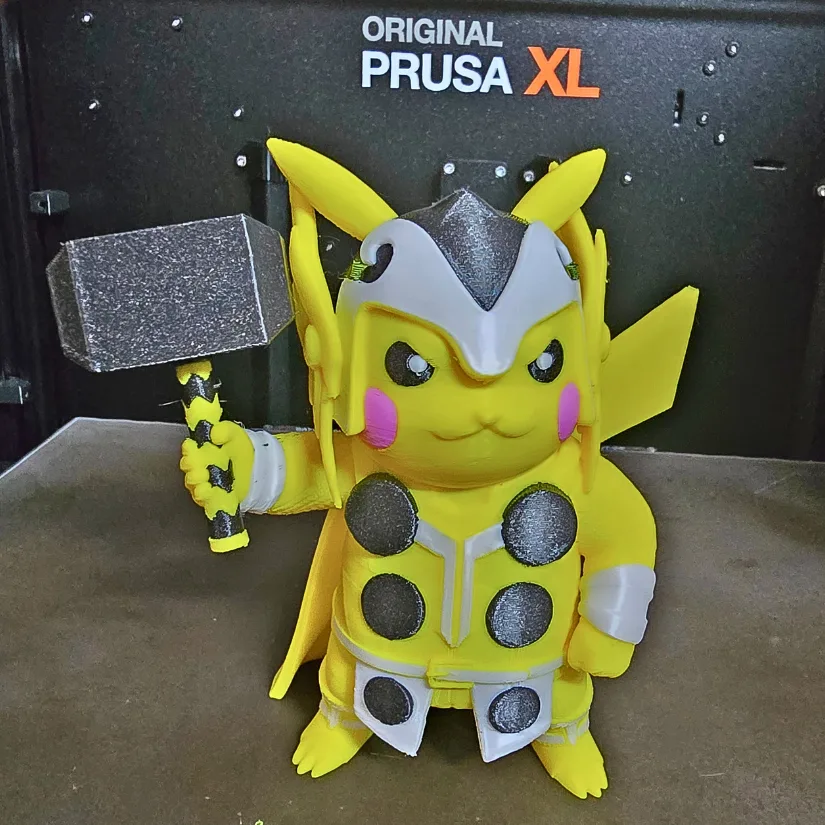
Test Print 3: Pikachu Avengers
For my third test, I wanted to try something fun and detailed, so I turned to one of my go-to Patreon creators, Nostalgic3DModels, and selected the Pikachu Avengers model. I sliced the file using PrusaSlicer at the standard 0.2 mm layer height with tree supports, then used the color selection tool to assign a total of four colors.
©3DWithUs – Print and Photo: Phil Macey
- Filament Colors: Four
- Duration: ~25 hours
- Model: From Nostalgic3DModels (Patreon)
- Result: Minimal purging waste, excellent color separation and quality.
The model printed for approximately 25 hours and stood around 8 inches tall. I was genuinely impressed — the color transitions were clean, purging waste was nearly non-existent, and the overall quality far exceeded my expectations. This print really proved how enjoyable multi-material printing can be when you pair the right model with the right machine.
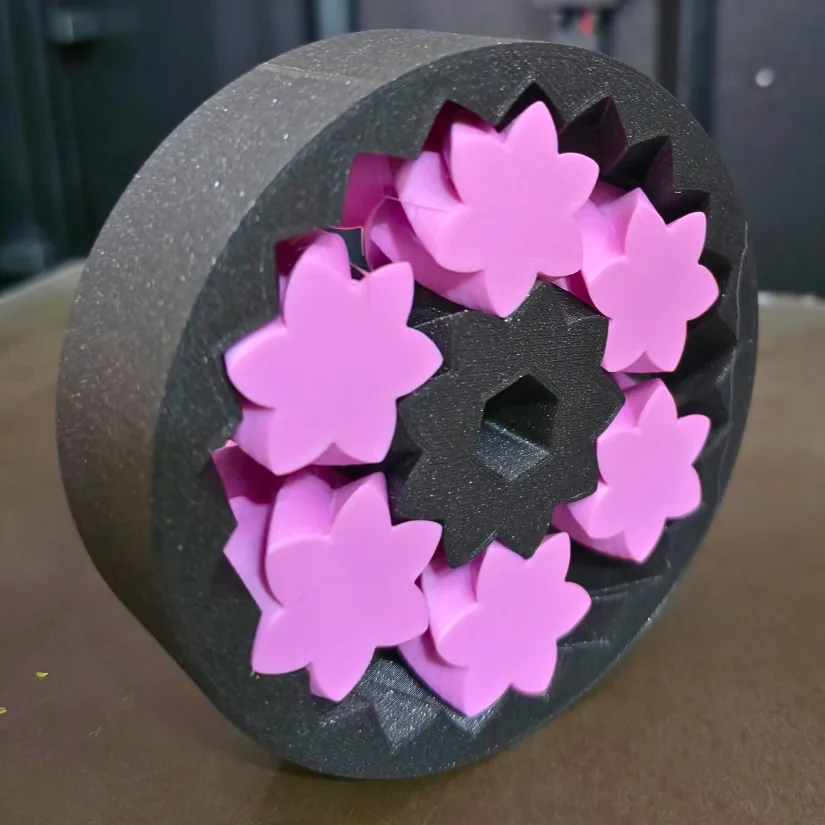
Test Print 4: Multi-Color Cogwheel
For my fourth and final test, I decided to once again use one of the supplied models from the USB card. The cogwheel was a great choice to challenge the printer’s tolerances, especially with multiple color changes. The print took approximately five hours to complete and, once again, produced minimal filament waste.
©3DWithUs – Print and Photo: Phil Macey
- Filament: Galaxy Black & Creality Pink PLA
- Duration: ~5 hours
- Result: Great tolerances; cogwheel worked perfectly.
A total of two colors were used — Prusament Galaxy Black and Creality’s PLA Pink. After completion, I tested the cogwheel, and the parts moved exactly as intended. It performed perfectly.
YouTube Video
To see the Prusa XL in action, including tests and setup, check out the hands-on video walkthrough on my YouTube channel:
Hopefully, the video helps you decide whether this machine deserves a spot on your 3D printing workbench.
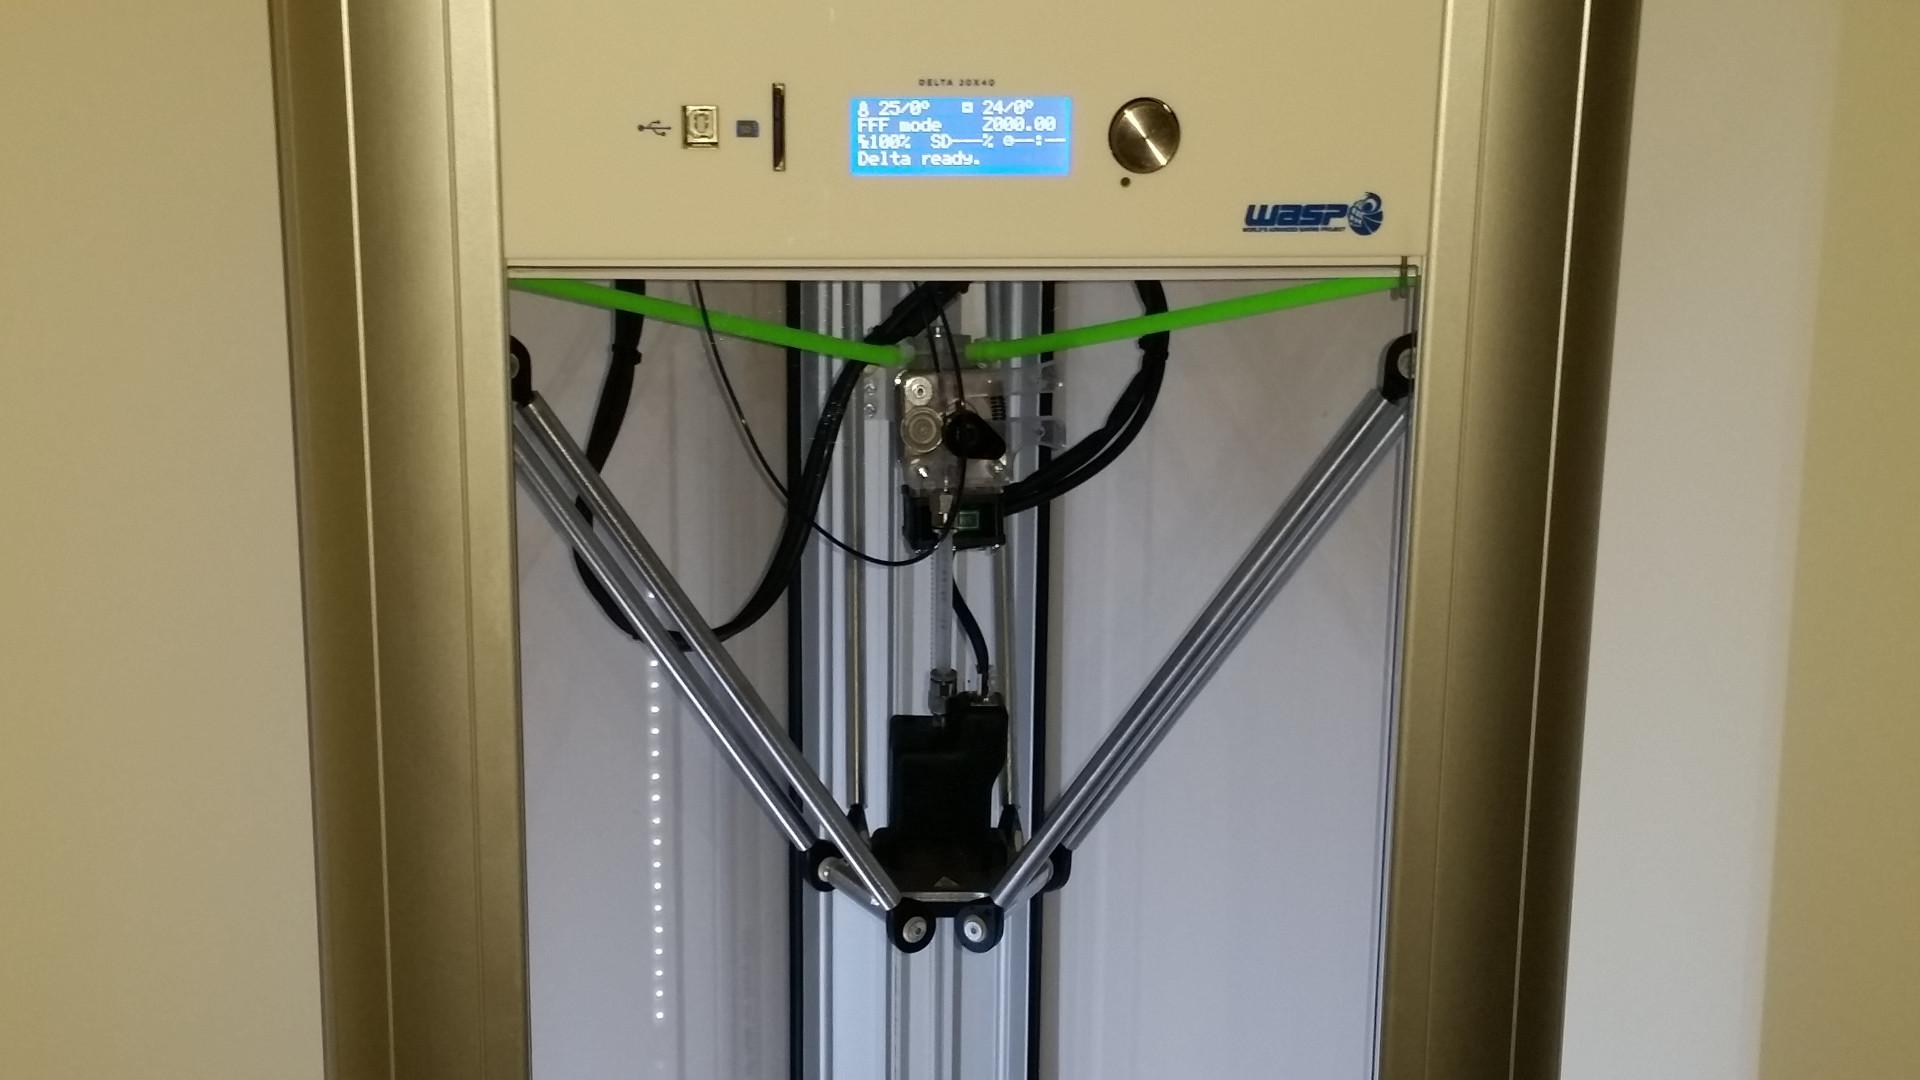
Compare Prusa XL to Other 3D Printers
At 3DWithUs, we’ve tested a variety of machines from Prusa Research — including the Original Prusa MK2 — and published multiple guides that explore their technology in depth. Here are a few articles you may find helpful:
- Upgrades for Original Prusa and Other Mods
- Prusa CORE One (Quick Look)
- Testing Custom Build Plates for Original Prusa
We recommend browsing through these articles — especially the print examples — to gain a more complete picture when considering your next machine.
The Prusa XL stands out in today’s market as the first successful toolchanger system available to consumers. At the time of writing, only the Snapmaker U1 is catching up with a similar approach, while Bambu Lab’s nozzle-switching system is still under development.
Here are some alternative machines worth considering if you’re exploring multi-material or large-format 3D printing:
- Creality K2 Plus (Review) — a large build volume printer with AMS-style multicolor support.
- Snapmaker U1 (Quick Look) — another promising toolchanger-style system.
And if you’re still weighing your options or comparing across budget levels, don’t miss our general guide to the broader landscape of consumer FDM printers:
Budget FDM 3D Printers – Other Builds
©3DWithUs – Print and Photo: Phil Macey
Have questions? Feel free to ask in the comment section below.
For a wider discussion or to share your own Prusa XL prints, join us in the forum:
Conclusion & Final Thoughts
Compare the Prices & Bundles:
Official Store | Amazon
Prusa XL Review
Review Summary
The Original Prusa XL stands as a bold statement from Prusa Research—an ambitious, forward-looking machine that redefines what’s possible in large-format multi-material FDM printing. With its robust Core-XY architecture and up to five independently controlled toolheads, the XL isn’t just a technical showcase; it’s a practical leap toward professional-grade versatility.
As multi-material printing matures across the industry, Prusa’s approach with the XL sets it apart. Rather than iterating on legacy designs, they’ve engineered a platform that’s modular, scalable, and deeply integrated into their ecosystem. Whether outfitted with one or five extruders, the XL adapts to a wide range of user needs, from vibrant prototyping to complex functional builds.
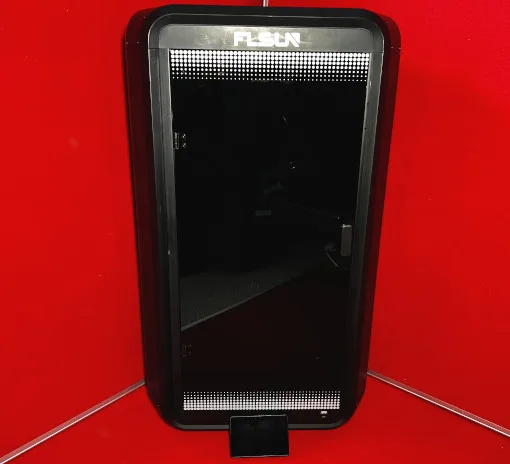
With its generous build volume and optional enclosure, the XL moves confidently beyond the enthusiast space into serious maker territory. It’s not just a printer—it’s a platform built for growth, experimentation, and long-term relevance. For those ready to explore the next frontier of FDM, the Prusa XL delivers a compelling invitation.
Throughout my unboxing, build, calibration, and user experience, I was truly astonished by how amazing this printer performed, given its huge size, the most notable advantage being the reduced filament waste often overlooked when launching multiple colour printers. The XL not only provides this capability, but also has the ability to print huge items, such as multiple-colour cosplay items, such as helmets and armour.
It’s the first time I have had the privilege to use a Prusa printer, and I can truly say it did not disappoint. The easy-to-use visual setup guide on screen made the unboxing a seemingly easy process. The premium quality of the unit makes the price tag worthy, and the overall quality of the final prints makes it a worthwhile purchase.
Some notable things to note: the printer does not print at higher speeds as seen with smaller multi-colour units, but I struggle to find many negatives for this unit. It was a shame I had to give this back to Sam (TheRealSamPrentice), but hopefully in the future I’ll have the opportunity to review for them directly.
Pros
• Easy setup & build
• Premium build quality
• Ability to expand the tool head capabilities from 1 head to 5
• Reduced filament waste printing
Cons
• Speed of printing
• Price


As owner of prusa xl for last year
Bad enginering:
1 Try to replace nozzle after 100 hours of print. Imposible.
2. A lot filament droping during heting the head nozzle
3. No automatic nozzle cleaning
4. One IC driver for two motors. Who design like this?
5. Huge software bugs after 3 years !@.
Try manuly to move head and then ask to auto return it. The head crash.
6. No camera . For this price i expect to get 2.
7. No chamber heating
8. Long time until it actually start to print.