Building on the success of the K1 series 3D printers, Creality has introduced the K2 Plus Combo with CFS, marking the company’s first foray into multicolor 3D printing. The K2 Plus Combo comes equipped with a four-spool CFS system, and the capability to connect up to three additional boxes, expanding the multicolor potential to as many as 16 colors. Another standout feature is its size; while last year’s K1 Max offered the largest build volume in its price range among fully enclosed CoreXY printers, the K2 Plus boasts an even larger build volume. In this review, we’ll explore the features and CFS capabilities of the Creality K2 Plus Combo and assess the print quality. As usual, we’ll wrap up with final thoughts and a list of pros and cons.
Table Of Contents (Jump to a Section)
- Specifications
- Unboxing – What’s Included
- Setup, Design and Features
- CFS – Setup and Features
- Software
- CrealityCloud App
- Errors and Workarounds
- Testing and Results
- RFID Materials
- Compare to Other 3D Printers
- Conclusion and Pros & Cons
Where to Buy the Creality K2 Plus Combo
Price: $1,249.00 – $1,649.00
Compare the Prices & Bundles:
Official Website | AliExpress | Amazon
Creality K2 Plus Combo Specifications
Build Volume: 350*350*350mm (13.78*13.78*13.78inches)
K2 Plus Combo Dimensions: 495*515*916mm (19.49*20.28*36.06 inches)
Net Weight: 35Kg
Printing Speed: up to 600mm/s
Acceleration: 30000mm/s²
Layer Height: 0.05-0.3mm
Extruder: Dual-gear direct drive extruder
Nozzle Temperature: up to 350°C
Heatbed Temperature: up to 120°C
Chamber Temperature: up to 60°C
Build Plate: Flexible build plate
Leveling Mode: Full-auto Leveling and Calibration
Connectivity: USB Drive/Ethernet/WiFi
RFID Sensor in Printer: Included
Display Screen: 4.3″
Supported Filaments: PLA/ABS/PETG/PA-CF/ PLA-CF/ PET/ASA/PPA-CF
Al Camera: Yes
CFS Compatibility: Yes
Number of CFS Extensions: ≤4
Slicing Software: Creality Print 5.0 or newer versions
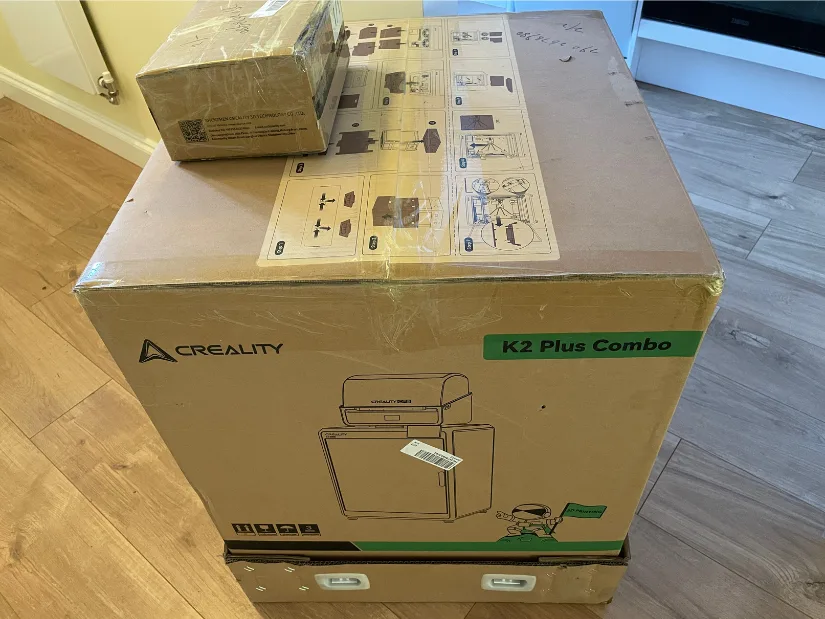
What’s in the Box
The machine, CFS, 4 spools and parts arrived in one big box. The box is very heavy, the delivery man called me twice to make sure I could meet him and help bring the delivery inside. If the net weight of the machine is 35 kg, the shipping weight is 54 kg. A small box included the extruder and sensors’ spare parts.
©3DWithUs – Photo: Max Funkner
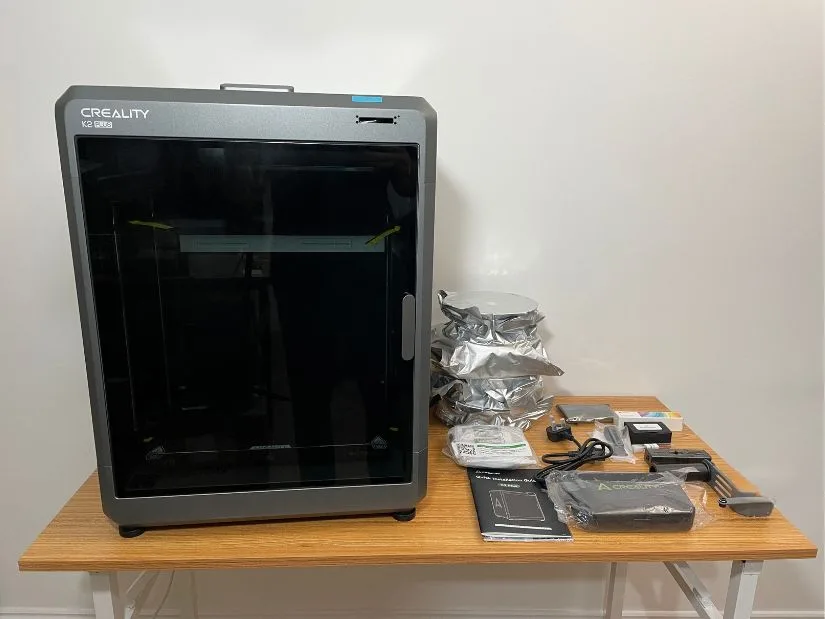
Creality K2 Plus • CFS 4 color unit • Power cable • Box of Accessories • 4 color hub • 4 Filament Spools • Spool holder • Spare parts • Spare Bowden Tubes • Spare Build Plate • Assembly screws • Allen wrenches • User manual • Quick start guide
©3DWithUs – Photo: Max Funkner
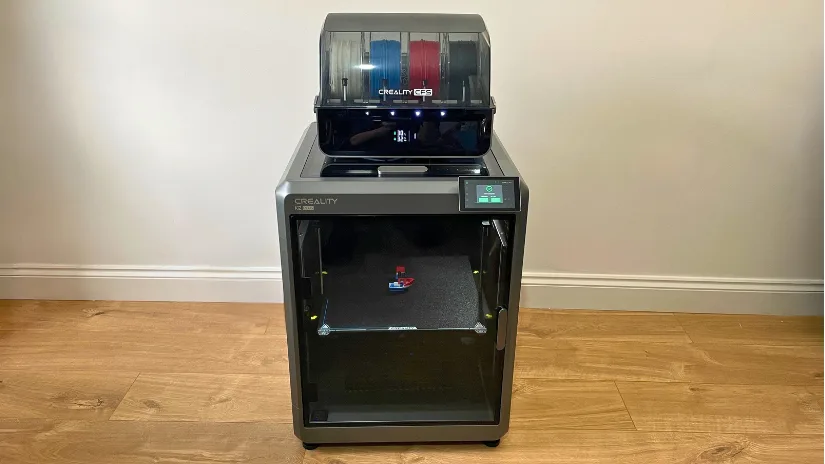
This would be the best example to compare the size. In the image below, the K2 Plus Combo is positioned in comparison to the K1, the first in the Creality K series. And I also added the Benchy for scale.

©3DWithUs – Photo: Max Funkner
The K2 Plus Combo has the biggest build volume, 350*350*350mm, CoreXY fully enclosed multicolor desktop 3D FDM printer on the market. After the initial Benchy print, I decided to keep the machine on the floor because my table felt flimsy. Just to be safe.
Setup, Design and Features
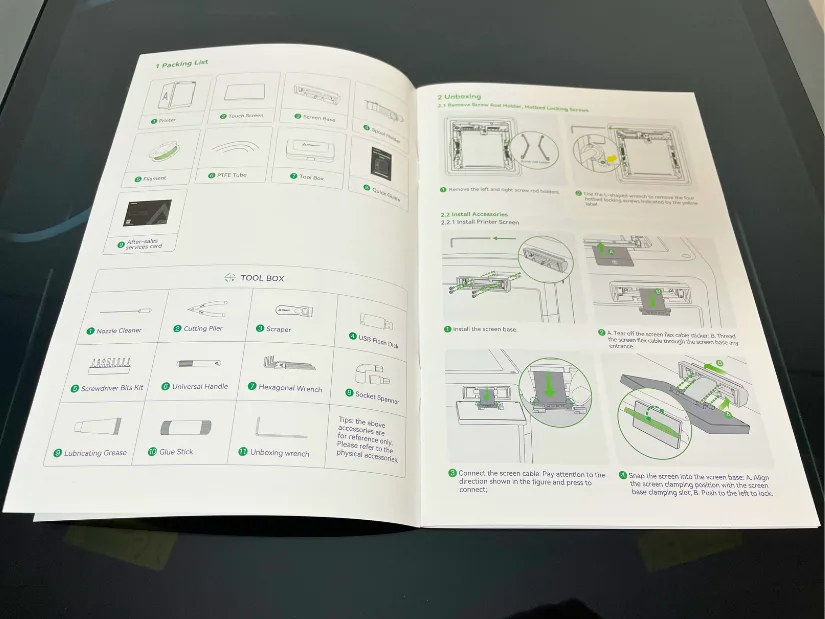
The printer arrived pre-assembled. Following the quick start guide, I installed the screen and the single spool filament holder on the side. After removing all shipping blockers marked with yellow sticker labels, I was ready to power on the 3D printer.
©3DWithUs – Photo: Max Funkner
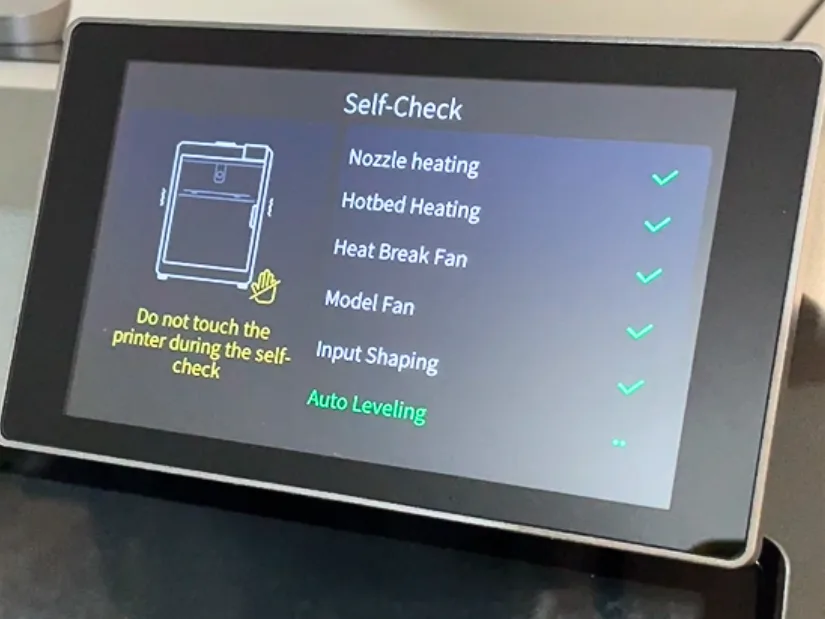
– Auto-leveling and Calibration. As promised, the complete auto-leveling process started immediately after powering on. Self-check is a powerful feature that I have appreciated since my experience with the Creality K1.
©3DWithUs – Photo: Max Funkner
– WiFi and Firmware Update. After connecting to Wi-Fi, the machine recommended a firmware update. It also offered an option to connect to CrealityCloud, which I skipped to take things slowly. After the firmware update, I had to perform the self-check again.

©3DWithUs – Photo: Max Funkner
– Screen. The small yet colorful screen is more than enough to comfortably operate the machine both independently and with the Creality Filament System (CFS). The menu layout is straightforward. The color assignments may feel intimidating initially, but they become pretty understandable after a few prints. It’s very helpful that models processed through the CrealityPrint slicer retain their assigned colors on the screen as well.
©3DWithUs – Photo: Max Funkner
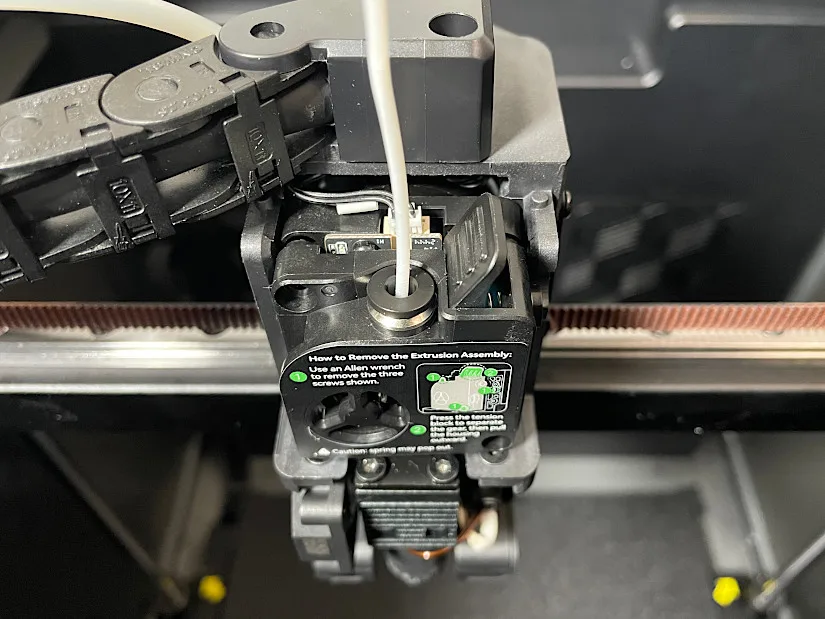
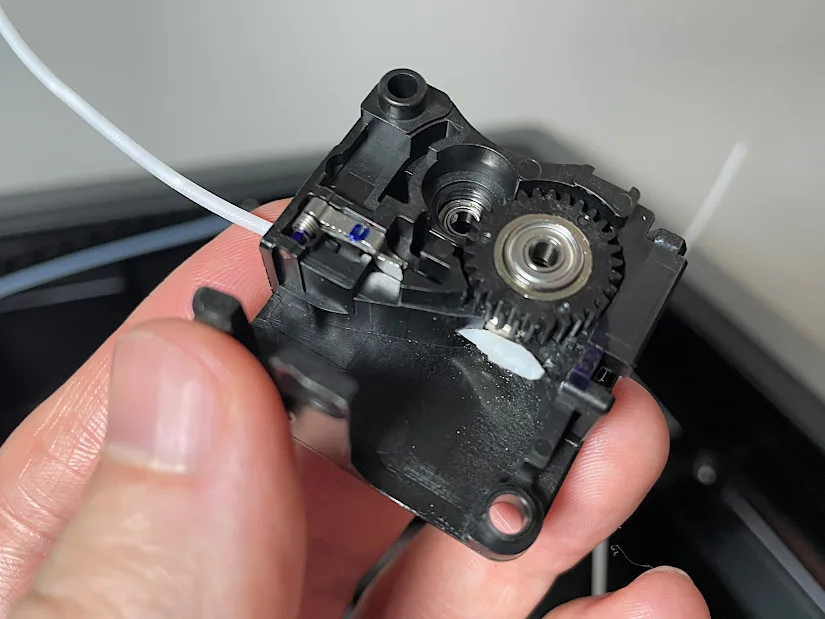
– Extruder. The powerful dual-gear direct drive extruder and nozzle system can print at temperatures up to 350°C. After many hours of testing, I didn’t need to change the nozzle. However, I had to disassemble the upper part of the extruder a few times. Access to the filament pushing gears and the cutter is just three screws away. In due course, I encountered a few errors, which I will discuss in more detail below.
After my initial test of the K2 Plus by printing the included Benchy file, I disassembled the side single spool holder and set up the CFS.
CFS – Setup and Features
Creality Filament System
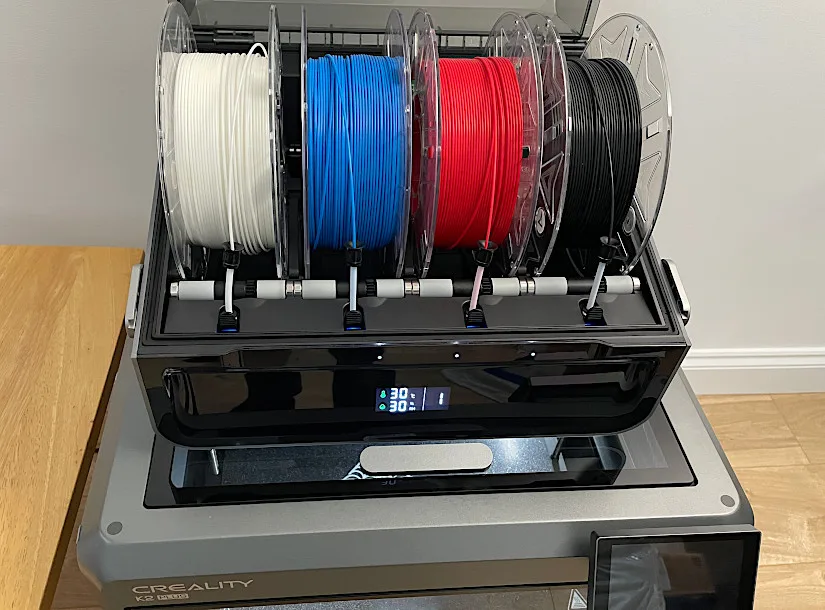
After carefully removing CFS from K2 Plus as they were shipped one in another, installation on top of the machine was straightforward by following the quick guide. All PTFE tubes were connected to the Filament Buffer behind the K2 Plus. This is the spot where it is possible to connect three more CFSs and increase the total color options up to 16.
– 16 Colors. Initially, I thought that the 16 colors feature was more of a marketing trick rather than practical feature. However, after testing a few quick multi-color prints, I realized the full potential of the system. I was able to switch colors effortlesly, without going back to slicer software, via the screen only.

©3DWithUs – Photo: Max Funkner
In the case of the themed note holders, I was pleasantly surprised by the ease of assigning colors – no slicer software or changes to spool positions were needed. I simply swapped white for black and black for red directly on the screen. If the 16-color setup operates in the same manner, it’s incredibly convenient for quick, customized printing on demand.
– Dry Box. As CFS has a Humidity Display and Desiccant Storage Pockets, the device can be used as a filament dry storage box. There is no extra heating feature in the box.
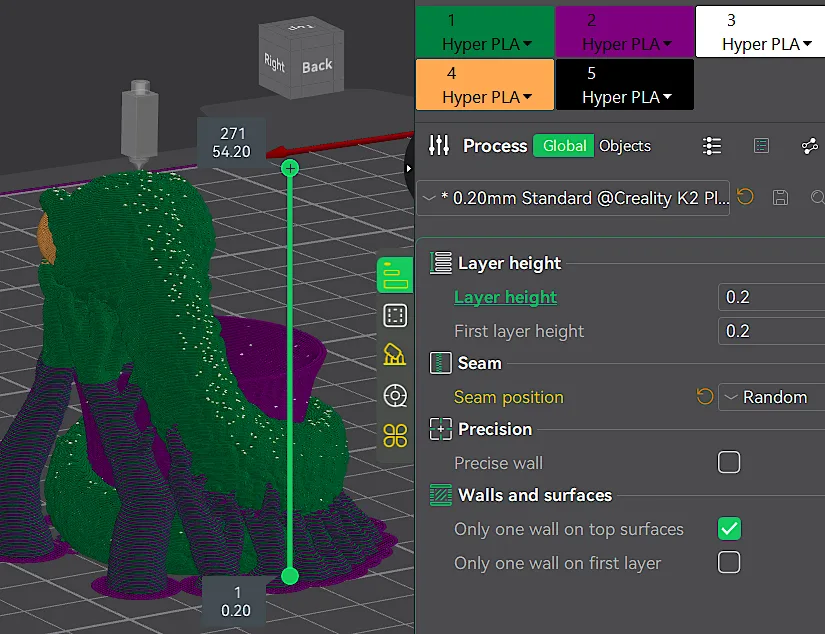
Software – CrealityPrint
CrealityPrint is based on the Orca slicer, which in turn draws from other slicers. Thanks to the open-source movement, slicer software has improved drastically in recent years. As a result, we can find many sophisticated features in the latest CrealityPrint slicer software.
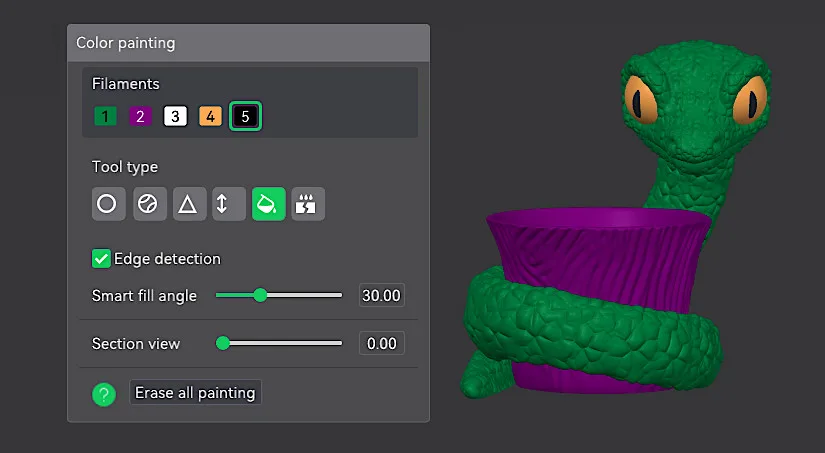
– Color Panting. A few projects involving color painting and printing provide a clear understanding of how the system functions. This includes adjustments like tuning the Flush Multiplier, which helps adjust contrast colors from black to white, among other settings.
– Custom Supports and Seams. All these features are easily accessible via CrealityCloud. As the Orca slicer is very popular in the community, finding tips or tutorials on a particular feature is easy by searching on Google.
Even though my overall experience with the slicer software has been positive, I’ve encountered several issues. Below, I outline all the errors I’ve come across and the workarounds for each.
Errors and Workarounds
– IDLE Device. Every second or third time sending a file from CrealityPrint to the device incorrectly shows the K2 Plus as IDLE, which is not the case. The workaround is either to restart the printer and the slicer software – a lengthy process – or to save the file as GCode and then IMPORT it directly from the Klipper/Fluidd machine screen area.

– Error FB2849. ‘Retraction issue, filament cannot be returned to CFS hub.’ Another issue occurred when I attempted to slice an object in the original Orca slicer and then print it on the K2 Plus. At the first color change, the CFS showed a red light, and the filament became extremely tense. This tension was noticeable even in the PTFE tubes, which became springy. As a result, the end of the filament swelled and could neither advance nor retract. I had to disassemble the upper extruder (removing three screws) to clear the blockage. I still can’t explain why this happened.
©3DWithUs – Photo: Max Funkner
– Error FB2844. ‘PTFE tube may have detached from the pneumatic fitting.’ I’m not entirely sure why this occurred, but it happened 6-7 times during a specific print, regardless of how well I fitted the tube. The PTFE end showed visible damage, so I trimmed 2mm off it and reinserted it. Surprisingly, I was able to complete the print without any extra filament waste since I always retracted the filament and restarted the print without issues.

©3DWithUs – Photo: Max Funkner
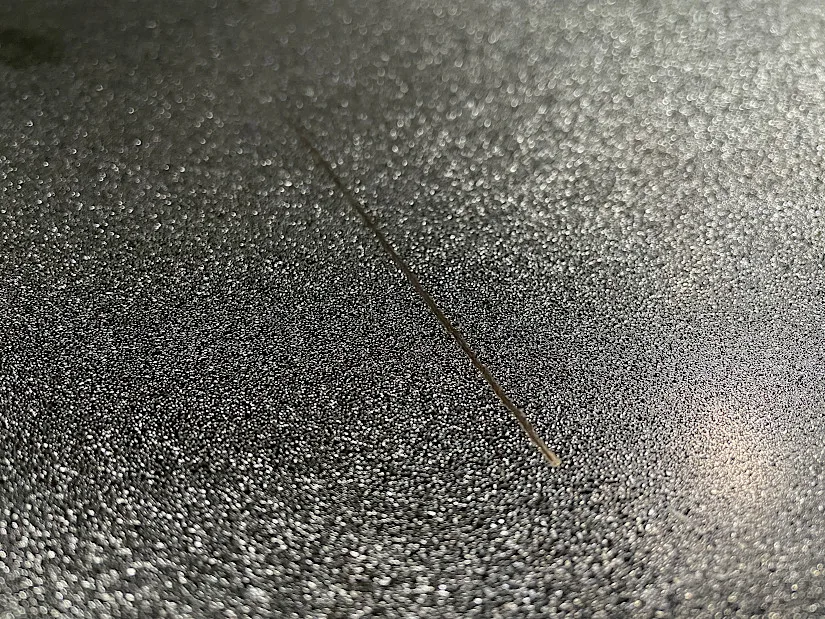
– Damaged Build Plate. When I tried to print an existing 3MF file and sliced the build plate, I forgot to switch the printer to K2 Plus in the upper left corner. As a result, the nozzle made an 80mm scratch on the build plate. The plate is still usable for many projects but doesn’t look nice. Good news is that Creality K2 Plus Combo package comes with the spare build plate. Also, a build plate replacement is just $25 on the Official Website. But, I wish CrealityPrint could recognize that I was trying to print the project on the wrong printer and not allow it in the first place.
©3DWithUs – Photo: Max Funkner
My general suspicion is that the imported filament and model preset 3MF files disrupt the CrealityPrint settings, leading to incorrect filament feed and other issues. After I reset the default profiles and began manually setting and painting STL files, I stopped encountering filament feeding problems.
CrealityCloud App
I printed several items before installing the CrealityCloud App and was generally satisfied without it. However, I soon realized that I couldn’t retrieve timelapse videos of my prints. I love this feature, and occasionally, remotely monitoring long prints is a good idea.
– Live Camera. A great feature for monitoring 3D printing live and recording timelapse. After the print successful or unsuccessful completion, there is an option to watch and download the video. Nice feature, worked well on K1 as well.
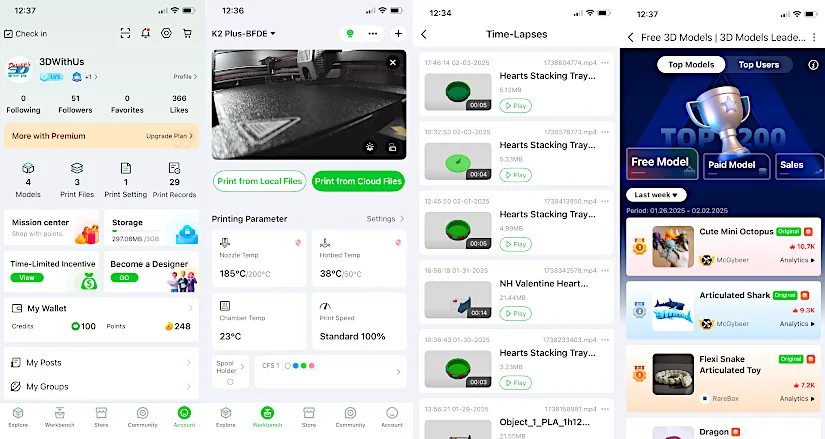
Account, Workbench and Community Tabs
– AI Detection. The Creality K2 Plus features AI Detection, an intriguing new capability. I haven’t had the opportunity to test this feature yet.
– CrealityCloud. It’s noticeable that the CrealityCloud website is improving and expanding. The Creality community is growing, and we’re seeing popular designers like McGyBeer and others join with their vast, high-quality model collections. After a few attempts, I managed to get one of the 3DWithUs models submitted and approved as a paid model. I anticipate that the community will continue to grow, especially as Creality’s multicolor printers become more widely available. There is a clear demand for existing, flawlessly working GCode files.
Test Printing Settings and Results
Volume Test Printing
After I had test-printed a few single-color projects, I was happy with the result and could see why the K2 Plus, even without CFS, could be in demand. It is the largest available CoreXY 3D printer on the market in this price range, built on the K1 Max machine we reviewed on 3DWithUs last year. My bigger mask or helmet-size multicolour prints are yet to come, but here are some models featuring the volume of the machine.
3D Model by Scratch 3DPrinting on CrealityCloud
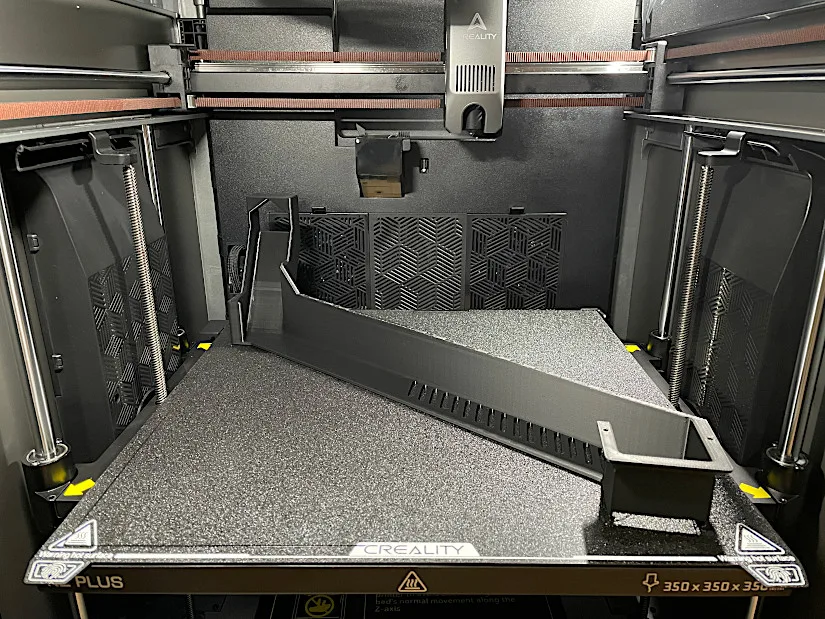
©3DWithUs – Print and Photo: Max Funkner
Creality K2 Plus poop chute slide is a great design and a very convenient functional feature. Even though it is recommended to be printed in PETG or ABS (especially when the K2 is planned to be used for high-temperature projects), I printed it in SUNLU PLA plus, and so far, it has performed well, guiding purged filament bits to the side of the printer. It made collecting the ‘poop’ much more comfortable. It was a quick print with a little bit of help for bed adhesion in the form of Magigoo from Amazon. ‘Mouse Ear’ brims were not enough to hold from warping thin features on the side of the build plate.

3D Model by 3DWithUs on Cults
©3DWithUs – Print and Photo: Max Funkner
I quickly printed a stackable model of a Giant Redwood tree scan texture in vase mode to test the capabilities of the K2 Plus. It was an easy print. Using a bigger or wider nozzle, such a basket could be quite functional. The 350mm height makes it quite large.
– Basket Lid. Another large yet quickly printed object was the lid to an artisan wooden basket. We’ve had this basket for more than ten years now, and it seems like we will have to throw it away soon. Thanks to 3D scanning with the Revopoint MetroX, I managed to preserve it in digital form and 3D print it as well.

©3DWithUs – Print and Photo: Max Funkner
To preserve certain features on the lid, I had to position the lid at 45 degrees and activate the Organic Support feature and Top Surface Pattern ‘Archimedean Chords‘. The Creality K2 Plus did an excellent job printing such a volumetric object very quickly – it took only 9 hours to print it.
Custom Painted Multicolor Printing Test
Next, I tested the custom color painting feature of CrealityPrint along with the performance of the CFS. Thanks to open-source contributions to Orca slicer developments, color painting has become incredibly user-friendly. This intuitive feature allows for effortless application of color to tiny elements.

3D Model by 3DWithUs on CrealityPrint
©3DWithUs – Print and Photo: Max Funkner
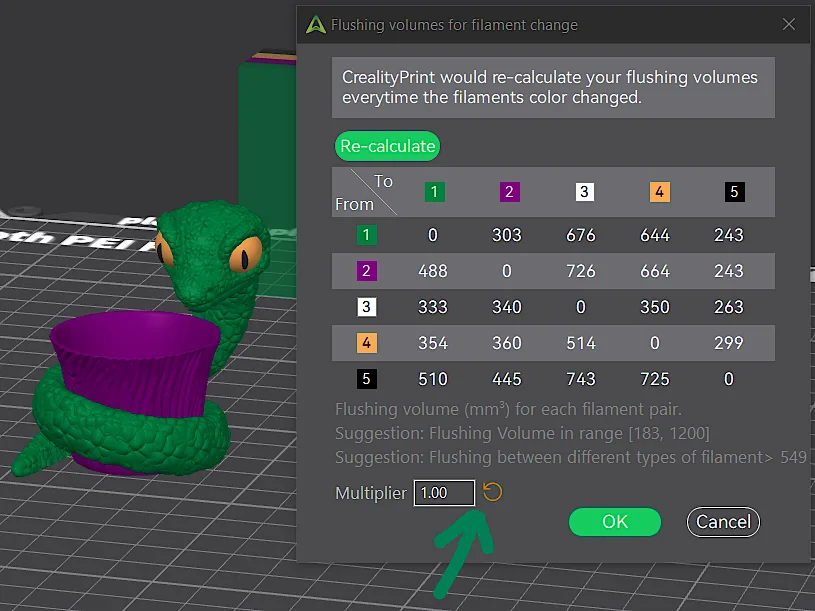
– Tip – What to Watch. Transitions from black to lighter colors should be more extensive to prevent visible smudges or shadows. Initially, I overlooked this setting, and my 50% scaled Snake had a slightly visible smudge. CrealityPrint issues a warning that the flush multiplier needs adjustment and will automatically adjust it when the reset icon is clicked.
– Purge Waste. Another important aspect to consider is the filament ‘poop’ waste and purge towers. The amount of waste increases with more color changes. At 3DWithUs, we’ve dedicated a guide to ‘Upcycling 3D Printing Waste in Artistic and Practical Ways’ and continue to explore functional or creative uses for these ‘poops’ and purge towers. The image above showcases a 50% scaled model alongside the waste from a 7-hour print.
Multicolored String Art
Since Natalie Cheesmond, known as 3DPrintBunny, received a multicolor printer, she has been designing with colors in mind. Her designs and prints often serve as rigorous tests for both slicer software and 3D printers.

3D Model by 3DPrintBunny on Twitter/X
©3DWithUs – Print and Photo: Max Funkner
– Tips. This print was a nightmare for me and a good lesson. First, as I mentioned in the Errors area after importing and uploading an existing 3MF file with all filament presets, I forgot to switch the Printer (current device, in upper left corner) back to K2 Plus. I sliced it in CrealityPrint and started the print, which damaged my build plate. Then, Error FB2844 occurred 6-7 times with the PTFE tube ripped out. See the images above. After this, I came to the conclusion not to use 3MF files anymore but to use STL instead and apply paint and settings myself.
Amazingly, I managed to complete the print nevertheless. Apart from long strings, this model also tests your printer with excessive retractions. For extremely long strings, have a look at 3DPrintBunny’s K2 Plus video on Twitter/X.
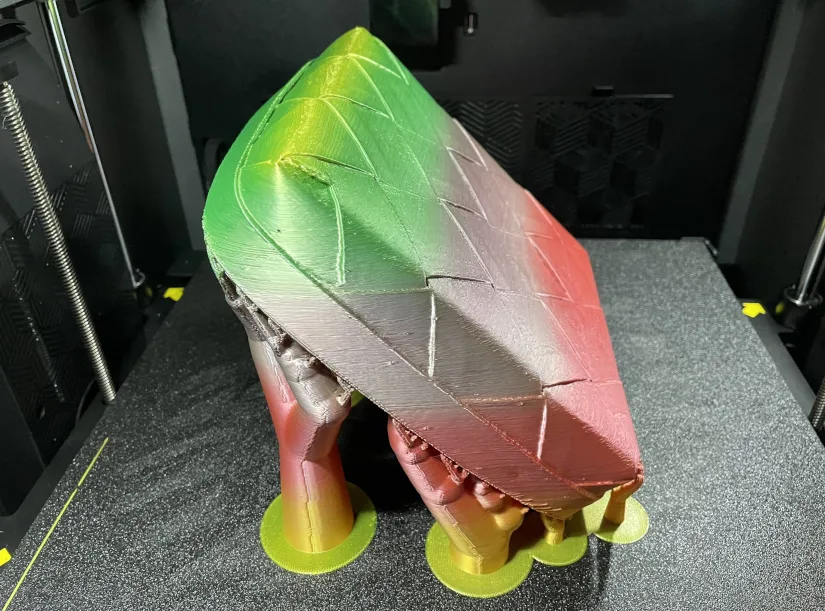
Multicolor Print in Pastel Colors
Another 7-hour multicolor print was produced using a model designed by Abby Brown, AbbyMath. Abby has an extensive collection of themed models on Cults, characterized by their mathematical precision. Compared to sculpted models, applying color in CrealityPrint to these designs is remarkably straightforward – it literally took just one click per heart to apply the color.

3D Model by AbbyMath on Cults
©3DWithUs – Print and Photo: Max Funkner
– Top/Bottom Surfaces. This is my cleanest print so far on the Creality K2 Plus Combo. Not only did the colors work very well, but the custom-applied top and bottom surfaces to ‘Archimedean Chords‘ made its surfaces super clean.
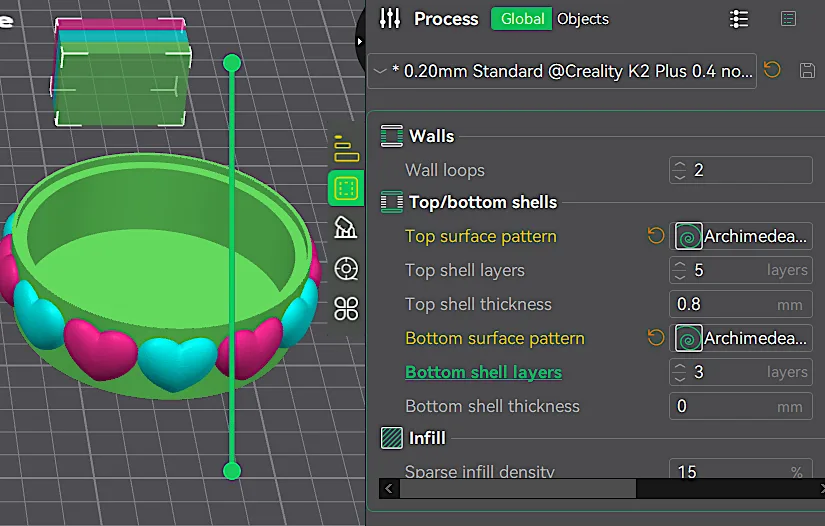
CrealityPrint Preview

©3DWithUs – Print and Photo: Max Funkner
Pastel color filaments from third-party brands like SUNLU and Sovol performed very well and didn’t require excessive purging. Nevertheless, due to the multiple color changes in each layer, the amount of filament ‘poop’ was noticeable. Can’t wait to find a creative or functional solution for such vibrant waste, because multicolor 3D printing quickly wins our hearts.
Quick Multicolor Prints
In the past, when multicolor systems were not available, a lot of creators used ‘pause on layer change‘ techniques to make the prints colorful. Such designs are very easily color painted upon. Another bonus is that such prints are quick and require fewer color changes. Here is what I experimented with our Note Holders, and the results came out great.

3D Model by 3DWithUs on Cults
©3DWithUs – Print and Photo: Max Funkner
As I’ve mentioned before, this is where 16-color systems can shine, as custom color orders can be initiated immediately without needing to open slicer software. Simply select the model, whether it’s a name tag or a specific decorative plaque. Assign the colors on the K2 Plus, and the finished product could be in your hands in one hour or less.

©3DWithUs – Print and Photo: Max Funkner
The timing of my review coincided with the Valentine’s Day season, an occasion that holds a special place in the 3D printing and other DIY communities. This event provides designers with an opportunity to showcase their creativity through original and often state-of-the-art themed designs. Read more and explore Valentine’s Day 3D print ideas on 3DWithUs.
RFID Materials
Radio Frequency Identification
3D printing companies are introducing RFID-enabled materials to improve user convenience and precision. RFID chips in filament spools allow printers to automatically recognize material types and adjust settings, reducing errors and saving time. This technology also helps manufacturers collect usage data to enhance future products and personalize user experiences.
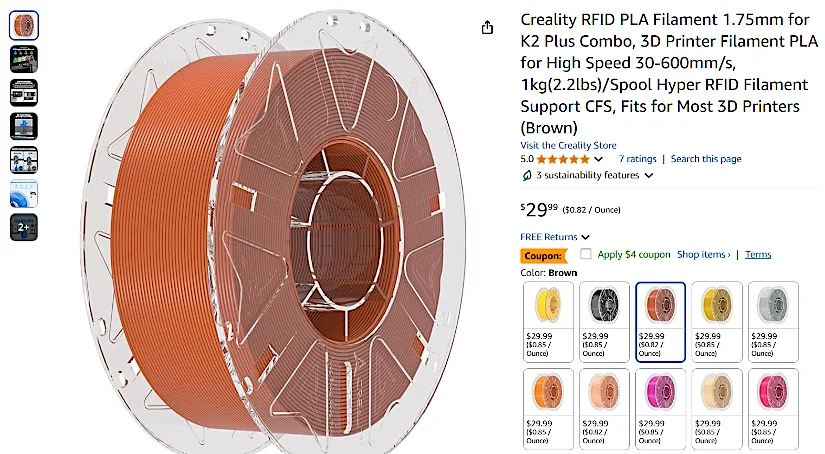
As you can see from my testing, I was able to use third-party filament without any issues. Creality has its own RFID-compatible filament collection on Amazon and the Official Website, which we recommend checking out.
Compare Creality K2 Plus Combo to Other 3D Printers
The Creality K2 Plus builds on the Creality K1 Max, and on 3DWithUs, we offer multiple high-quality guides featuring this machine. Additionally, we expect the multicolor Creality Hi Combo to hit the market soon, which we will also cover on our website.
Compare to similar builds, volume and price range, FDM 3D printers on 3DWithUs.
In terms of price, build, and features, the Creality K2 Plus Combo presents serious competition to products like the Bambu Lab P1S Combo and the Anycubic Kobra S 1 Combo. While these machines may be cheaper, the Creality K2 Plus offers a larger build volume, accommodating bigger projects. QIDI has yet to deliver the color system for their machines.
Have questions? Feel free to ask in the comment section below.
For a wider discussion or to share your own K2 Plus prints, join us in the forum:
Conclusion and Pros & Cons
Price: $1,249.00 – $1,649.00
Official Website | AliExpress | Amazon
Creality K2 Plus Combo Review
Review Summary
Creality has finally delivered on its promises with the release of the K2 Plus Combo, a remarkable fully enclosed CoreXY machine capable of multicolor printing with up to 16 colors. Our extensive testing, which included a variety of projects of varying complexity, helped us evaluate this product thoroughly.
While the final print quality and the results of the multicolored prints were impressive, the overall experience could have been better, leading us to give the machine a lower-than-expected rating. We encountered a number of errors during testing, which we managed to resolve through online research and troubleshooting.
Users of multicolor 3D printers should be prepared to find creative or functional solutions for managing filament waste, often referred to as ‘poops’ and purge blocks. Multicolor 3D printing is becoming increasingly popular and addictive.
Despite these issues, the Creality K2 Plus Combo remains competitive in the market, particularly because of its large build volume, which is unmatched in its price range, and its 16-color CFS system.
Overall, we are pleased to see healthy competition in the market, which benefits users with more affordable prices and innovative technologies.
Pros
• Large Build Volume
• Fully Enclosed CoreXY
• Fast up to 600 mm/s
• CFS Multicolor up to 16
• CrealityCloud App
• Orca Based CrealityPrint
Cons
• Random Errors (Listed)
• CFS Learning Curve
• Overall Size – Big and Heavy