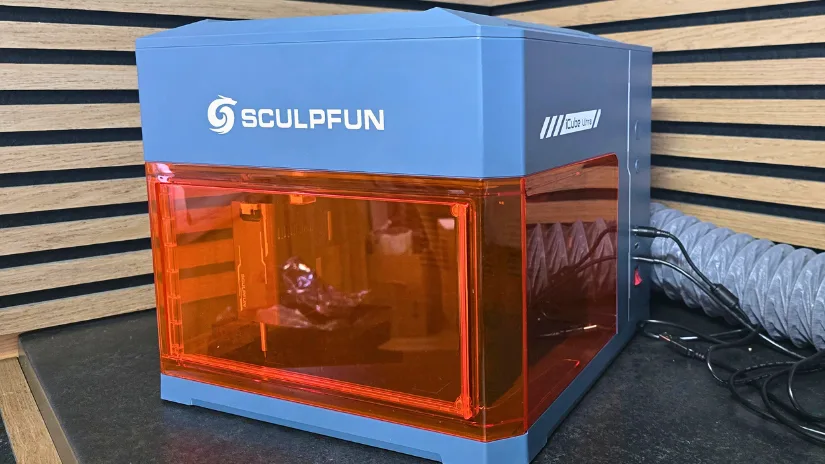
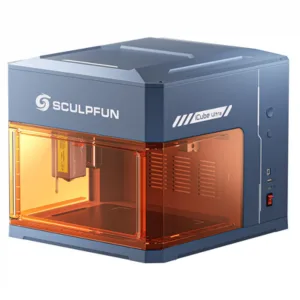
I recently spent time with the Sculpfun iCube Ultra, a smart, fully enclosed laser engraver aimed at hobbyists and small workshop users. As someone who values user-friendly design, safe operation, and solid engineering, I found the Ultra to be a surprisingly capable machine. It is smooth to work with, thoughtfully built, and only held back by a few small quirks along the way.
In this hands-on review, I will look at the Sculpfun iCube Ultra specifications, setup, safety features, software connection, and real engraving and cutting results using both the 12W diode laser and the optional 1.2W IR laser module. Finally, as always, I will finish with a list of pros and cons.
Table of Contents (Jump to a Section)
Where to Buy the Sculpfun iCube Ultra
Price: $359-599
Compare the Prices & Bundles:
Official Store | Amazon | AliExpress
Sculpfun iCube Ultra Laser Specifications
- Diode Laser: 12W diode
- IR Laser: 1.2W IR option
- Maximum Working Area: 12W diode: 150 x 150mm; IR: 150 x 135mm
- Maximum Speed: High-speed engraving up to 10,000 mm/min
- Supported Software: LightBurn, LaserGRBL, and Sculpfun app
- Connectivity: USB for computer control and Bluetooth
- Mobile App: Sculpfun self-developed mobile app
- Enclosed Design: Class 1 safety enclosure
- Focus: One-button auto-focus
- Emergency Stop: Emergency stop button included
- Isolation USB Key: Physical USB key prevents unauthorized use
- Integrated Camera Upgrade: Optional camera for easier design placement
- Air Purification: Built-in air purifier and exhaust pipe
What’s in the Box
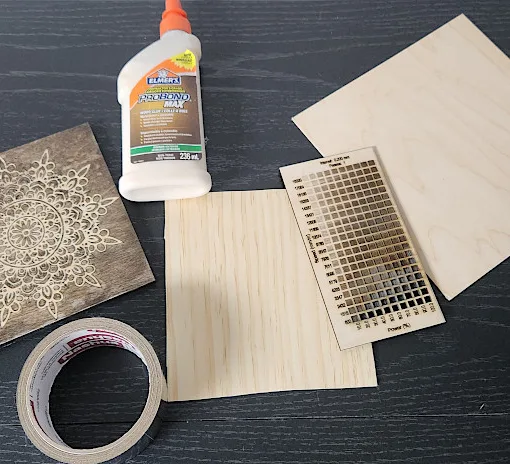
Inside the standard package, the iCube Ultra includes the main laser body, 12W 455nm diode laser module, 1.2W 1064nm IR laser module with the dual version, data cable, power adaptor, tool kit, laser repair kit, protective goggles, plywood sample, MDF sample, smoke exhaust pipe, flange, and hose clip.

©3DWithUs – Photo: Phil Macey
Laser Module Choice
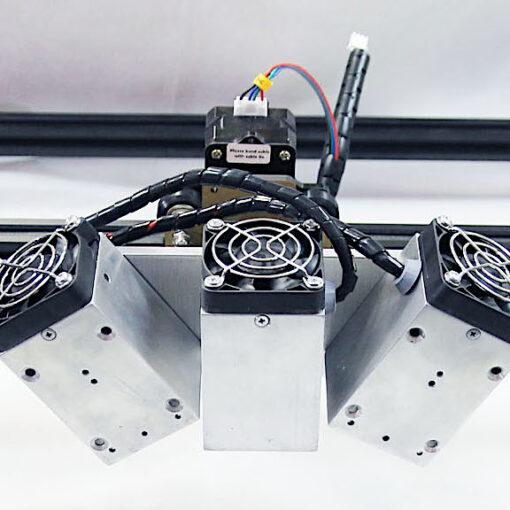
The iCube Ultra can be used with the standard 12W diode laser module or the dual version with the additional 1.2W IR laser module. The diode laser is the main option for wood, leather, slate, coated surfaces, and general hobby projects, while the IR module expands the machine into metal marking and similar materials.


Setup and Calibration
The Sculpfun line has earned a solid reputation as a compact, beginner-friendly laser engraver range, especially for its cutting performance and built-in safety features. The fully enclosed design and the option to swap between diode and infrared laser modules give the iCube Ultra impressive versatility for a hobby-grade machine. It feels like a noticeable step up from earlier iCube models in both capability and refinement.
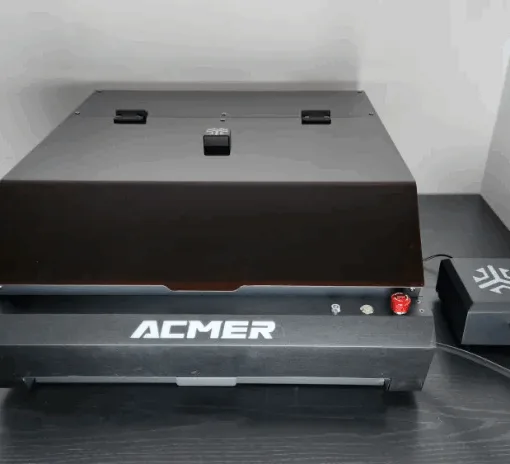
Safety was one of the first things that stood out to me. The enclosure is already reassuring, but the extra safety features really won me over. It has an emergency stop button and an interlock door, which cuts the laser out if the door is opened during operation.

©3DWithUs – Photo: Phil Macey

Right out of the box, the build quality is immediately apparent. Unlike open-frame designs, this is a fully enclosed unit, and it felt sturdy rather than toy-like. Assembly was surprisingly straightforward and mostly plug-and-play, with only a few screws needed to connect the extraction hose.

©3DWithUs – Photo: Phil Macey

The pre-wound belts meant I did not have to fight with belt tensioning, which is a big win for beginners. Tension can still be adjusted if needed, but it was good to see the machine arrive in a state that made setup feel simple.
The dual-module capability is a genuine highlight. The iCube Ultra works with the standard blue diode laser for materials such as wood and acrylic, but it can also take the optional 1.2W infrared module for metal engraving. I had a lot of fun using the IR module on stainless steel, where it produced clean, professional-looking results.
The optional built-in camera is also a useful upgrade. If purchased, it helps with positioning and makes placing designs much more accurate, which can reduce material waste.

The laser module is straightforward to install, but it is easiest if you first lay the machine on its side. Remove the two screws securing the laser bed, then tilt the unit over for better access. Once the bed is off, slide the laser module into the guide rail and secure it using the two bolts included in the tool kit. After that, connect the power cable and the module is ready to go.
Next, install the front protective cover. This updated cover is noticeably more rigid than the one on the previous iCube, which felt more flimsy and awkward to fit. It also now features an interlocked door, so you no longer need to remove the whole cover every time you swap materials. That is a much more practical design.
Design Features and Software Connection
With engraving speeds reaching up to 10,000 mm/min, the Ultra delivers genuinely fast performance. It is powered by a self-developed 32-bit high-speed engraving motherboard, which helps maintain smooth motion and consistent quality even at higher speeds.
The iCube Ultra offers a 150 x 150mm working area, which is plenty for many hobby-level projects. However, it does not include a reversible bed with a honeycomb surface. That would have improved airflow and made cutting wood or other materials more efficient.

©3DWithUs – Photo: Phil Macey
SCULPFUN has introduced a built-in smoke filtration system on the iCube Ultra, which captures and filters smoke produced during everyday engraving tasks. For heavier cutting jobs, the machine also supports connecting an external higher-capacity air purifier to further improve filtration performance.
You can also add the optional internal camera, with its mounting position already pre-aligned inside the machine for easier installation. The Ultra also supports a rotary roller attachment, giving you the flexibility to engrave cylindrical items and expand the overall crafting capability.
The laser features a bright status indicator on the top front panel, giving an at-a-glance view of what the machine is doing. The colours are easy to understand: red indicates a malfunction, yellow signals that engraving has finished, blue shows the laser is actively running, and green means the machine is in standby. It is a simple but genuinely useful way to keep track of the laser’s current state.

The machine also includes a USB locking key that acts as a physical safety lock. Removing it instantly disables the unit, preventing anyone from operating the laser without the key. It is simple, but effective.

©3DWithUs – Photo: Phil Macey
The final feature I want to highlight is the automatic focus button. Simply place your material on the workspace, lower the laser head to the correct height, and press the auto-focus button. This can be done with the door open, as it is not tied to the interlock shutdown system. After that, make any fine adjustments if needed.

Software connection is straightforward. Plug the USB-C to USB-A data cable into your computer and launch your preferred engraving software. The iCube Ultra is compatible with LightBurn, LaserGRBL, and the Sculpfun app. For this review, I used LightBurn, which recognised the machine without any issues.
The steps I used to connect the iCube Ultra to LightBurn were simple. Open the Devices tab, choose Create Manually, select GRBL, and name the machine “Sculpfun iCube Ultra.” Set the working area to 150 x 150mm and choose Diode Laser as the device type. Make sure the homing position is set to front-left, which LightBurn usually highlights by default.
Once saved, the new device appears in the list. Select it and set it as the default if you plan to use it regularly. LightBurn should then automatically connect, and the laser module should home to its starting position. If it does not, follow the LightBurn troubleshooting guide to track down any connection issues.
12W Diode Laser Test Results
– 3mm Plywood. For the first test, I ran both an engraving and a cut. The engraving was set to 60% power at 6000 mm/min using a fill pattern, followed by a cut at 100% power and 500 mm/min. The 12W diode handled both tasks impressively, producing a clean engrave and a precise cut. I would expect performance to improve even further with a honeycomb bed, especially for airflow during cutting.

©3DWithUs – Photo: Phil Macey
– 5mm Plywood. For the second test, I moved on to a thicker 5mm wood sample to see how the 12W diode handled a more demanding cut. I set the engraving to 80% power at 6000 mm/min, then switched to 100% power at 200 mm/min for the cut. Once again, it cut cleanly and without hesitation, showing that this laser is capable of handling thicker materials with ease.

– Leather Keyring. For the third test, I switched to engraving a leather keyring. This one required a bit more care, not because of the laser’s capability, but because the curved shape of the keyring can throw off the focus. A few small magnets would easily solve that by holding it flat. Even so, the engraving came out beautifully and makes a great personalised gift idea. For this test, I used 50% power at 6000 mm/min.

©3DWithUs – Photo: Phil Macey
– Aluminium Business Card. For the fourth test, I engraved an aluminium business card. This was a very quick engrave, but it still shows that the machine is capable of handling detailed images or wording. The settings I used were 50% power and 6000 mm/min speed.

– Scratch Paper. For the fifth test, I tried engraving a scratch card. These cards work by removing the top coating to reveal a rainbow-coloured layer underneath. For this test, I chose to engrave an image of my late Chihuahua, Teddy, who passed away a few years ago. The result came out beautifully and really highlights how creative you can get with this material. For this engraving, I used 20% power at 7000 mm/min.

©3DWithUs – Photo: Phil Macey
– Slate Coaster. For the sixth and final diode-laser test, I chose to engrave a piece of slate. Slate consistently produces a beautiful finish and can capture fine detail in both images and text. Slowing the engrave can also create a deeper mark, giving the artwork a subtle 3D effect. Once again, I engraved an image of my Chihuahua, Teddy, and the result came out brilliantly. For this test, I used 80% power at 6000 mm/min, opting for a lighter pass due to the complexity of the design.

1.2W IR Laser Test Results
– Stainless Steel Dog Tag. For this test, I only ran the IR laser on a single item, as no dedicated IR-compatible consumables were included. I had a metal dog tag available, which still provided a good indication of the IR module’s performance. I used 100% power at 4000 mm/min, and the result was excellent. Some light cleanup is needed afterward, as the process leaves a bit of debris around the engraved area, but the overall finish was spot-on.

©3DWithUs – Photo: Phil Macey
YouTube Video
To see the iCube Ultra in action, including material tests and the rotary setup, check out the hands-on video walkthrough on our YouTube channel:
This video is a detailed review of the Sculpfun iCube Ultra, a compact desktop laser engraver that features both a 12W diode laser and a 1.2W IR laser. I evaluate the unit’s features, setup, and performance across various materials.
Compare Sculpfun iCube Ultra to Other Compact Laser Engravers
The Sculpfun iCube Ultra joins the growing category of compact, enclosed diode laser engravers designed for makers and hobbyists. With its 12W diode laser, optional 1.2W IR module, built-in enclosure, auto focus, safety features, and plug-and-play setup, the iCube Ultra is well suited for small-scale projects in tight spaces, home workshops, classrooms, and craft environments.
One of the closest comparisons we have tested is the Genmitsu Kiosk 10W. Both machines follow a similar compact, enclosed desktop format, but the iCube Ultra adds extra versatility with its swappable 12W diode and 1.2W IR laser modules. This makes it more flexible for users who want to move beyond wood, leather, slate, and coated cards into metal marking and other IR-friendly materials.
Another compact machine worth comparing is the AlgoLaser Pixi 5W. The Pixi is especially interesting because of its very approachable smart-laser workflow and independent operation, while the Sculpfun iCube Ultra focuses more on extra laser power, a stronger enclosed desktop format, and the option to work with both diode and IR modules. For users prioritising portability and simplicity, the Pixi remains attractive; for users wanting more cutting power and material flexibility, the iCube Ultra has clear advantages.
In this compact category, the main trade-off is usually between portability, laser power, working area, and upgrade options. The iCube Ultra’s 150 × 150mm workspace is not large, but its enclosed design, auto focus, filtration system, safety lock, interlock door, optional camera, and rotary support make it a capable all-rounder for smaller personalised projects, gifts, tags, coasters, cards, and workshop tests.
For a broader overview of other small diode lasers we have tested, explore our Laser Cutters and Engravers Guide and such machines as:

©3DWithUs – Photo: Phil Macey
Have questions? Feel free to ask in the comment section below.
For a wider discussion or to share your own Sculpfun iCube Ultra projects, join us in the forum:
Conclusion and Pros & Cons
Compare the Prices & Bundles:
Official Store | Amazon | AliExpress
Sculpfun iCube Ultra Review
Review Summary
The Sculpfun iCube Ultra stands out as a compact, fully enclosed laser engraver with impressive versatility from its dual-module system. The 12W diode laser handled engraving and cutting across wood, leather, slate, coated surfaces, and scratch paper very well, while the 1.2W IR laser module adds the ability to mark stainless steel and similar materials. Features like automatic focusing, the multi-colour status indicator, physical USB safety key, optional camera support, and LightBurn compatibility all contribute to a user-friendly and safety-focused workflow.
That said, there are a few limitations. The 150 x 150mm working area is relatively small, and I would have liked to see a reversible honeycomb bed included for better airflow and cutting performance. Uneven objects may need extra help from magnets or similar accessories to keep them flat, and the IR module would have been easier to test more fully if dedicated IR-compatible samples had been included in the box. Deeper or more complex engravings may also require slower speeds or multiple passes.
You can expand the iCube Ultra with optional add-ons like the rotary roller and internal camera module, both of which enhance its versatility and precision. As a final takeaway, I found the Sculpfun iCube Ultra to be a smooth and enjoyable machine to work with, from the straightforward setup process to the ease of swapping between the 12W diode and 1.2W IR laser modules.
Connecting to both the Sculpfun app and LightBurn was quick and hassle-free, and throughout all of my tests the machine delivered consistently clean and reliable results. The overall experience was genuinely pleasant, and the combination of user-friendly features, solid performance, and versatile material compatibility makes the iCube Ultra a very capable laser engraver for hobbyists and small workshop users.
Pros
- Auto-focus feature
- Built-in air filtration
- Solid build quality
- Fast engraving performance
- Good safety features, including interlock door and emergency stop
- Dual-module capability with diode and IR laser options
- Works well with LightBurn
Cons
- No touchscreen
- Small working area
- No reversible honeycomb bed included
- IR-specific test consumables were not included
- Curved or uneven materials may need magnets or extra holding support