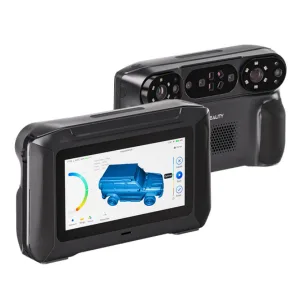
The Creality Sermoon P1 is a standalone blue laser 3D scanner designed for makers, engineers, educators, and professionals who want to capture, process, and prepare 3D models without relying on a computer. Combining blue laser and infrared scanning technologies with onboard processing and a 6-inch HD touchscreen, it aims to deliver a complete scan-to-mesh workflow in a single portable device.
In this hands-on review, I test the Sermoon P1 across a range of projects to evaluate its scanning accuracy, speed, software, and overall user experience. Although Creality supplied the review unit, all testing, photographs, and opinions are entirely my own. As usual, the article concludes with a review summary and a Pros and Cons section.
Table Of Contents (Jump to a Section)
Where to Buy
Price: $2,999 – $3,299

Compare the Prices & Bundles:
Official Website | Amazon
What’s Included – Accessories
©3DWithUs – Print and Photo: Max Funkner
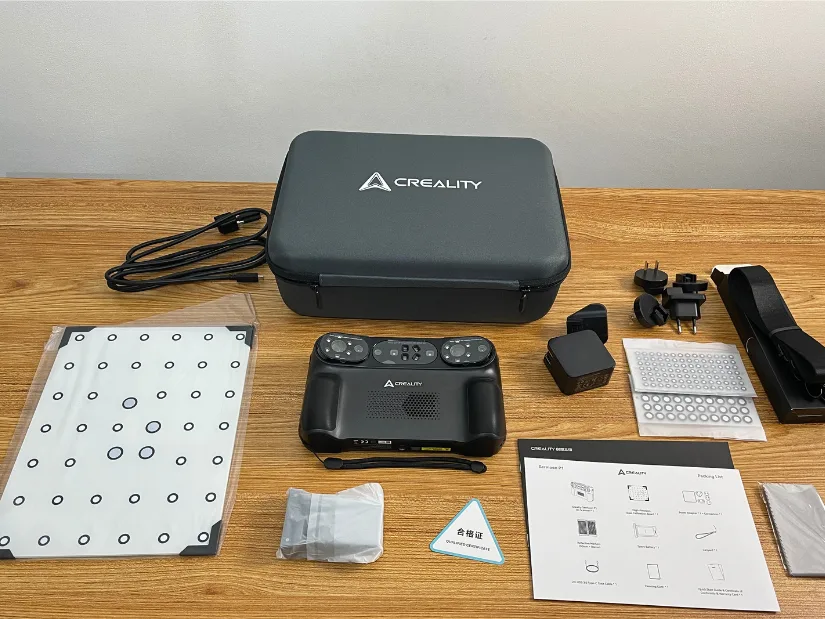
The Creality Sermoon P1 comes with everything needed to get started straight out of the box. Alongside the scanner itself, the package includes the essential calibration and tracking accessories, a protective carrying case, international power adapters, and a spare battery for longer scanning sessions. A quick start guide and warranty documentation are also provided, making the initial setup straightforward whether you’re scanning at your desk or taking the scanner on-site.
Specifications
- Scanning Modes: Single Blue Laser, 7 Parallel Blue Laser Lines, 22 Cross Blue Laser Lines, Close-Range Infrared Structured Light, and Long-Range Infrared Structured Light
- Accuracy: Up to 0.02 mm with Blue Laser and up to 0.075 mm with Infrared
- 3D Resolution: 0.05–2 mm with Blue Laser and 0.1–2 mm with Infrared
- Maximum Scan Speed: Up to 100 FPS in wired PC mode
- Maximum Scan Rate: Up to 6.88 million points per second
- Working Distance: 160–1,200 mm, depending on the scanning mode
- Minimum Scan Volume: 5 × 5 × 5 mm
- Color Mapping: Supported
- Built-in Display: 6-inch HD touchscreen
- Memory and Storage: 24 GB LPDDR5X RAM and 256 GB UFS 4.0 storage
- Battery: Two 3,300 mAh rechargeable batteries, with one installed and one spare included
- Wireless Connectivity: Wi-Fi 7 with standalone, wireless PC, and wired PC operating modes
- Weight: 830 g
- Dimensions: 209 × 129 × 53 mm
- PC Compatibility: Windows and macOS
For the full list of specifications, please visit the official product page.
Setup, Design and Features
The biggest advantage of a standalone 3D scanner is that the entire workflow can be completed on the device itself. From scanning and cleaning unwanted geometry to aligning scan passes and processing the final mesh, there’s often no need to connect to a computer until you’re ready to export the model. This can make the workflow much more convenient, especially when working on-site or away from your desk.
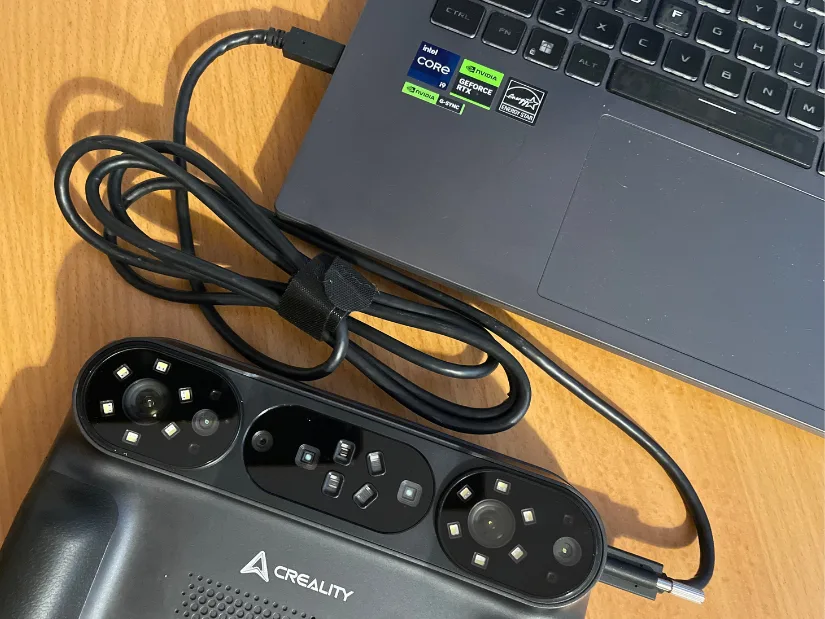
There is, however, a trade-off. Standalone scanners are typically heavier because they contain a powerful processor, battery, touchscreen, and onboard storage. The Creality Sermoon P1 weighs 830 g, compared to 508 g for its sibling, the Creality Sermoon S1. Despite the extra weight, I found the P1 comfortable to hold during normal scanning sessions.
Speed
Although the additional weight of a standalone scanner can become noticeable during longer scanning sessions, the Sermoon P1 compensates with its impressive scanning speed. This is where the Creality team has done an excellent job. The 22 Cross Blue Laser Lines mode captures data remarkably quickly while maintaining a high level of detail.
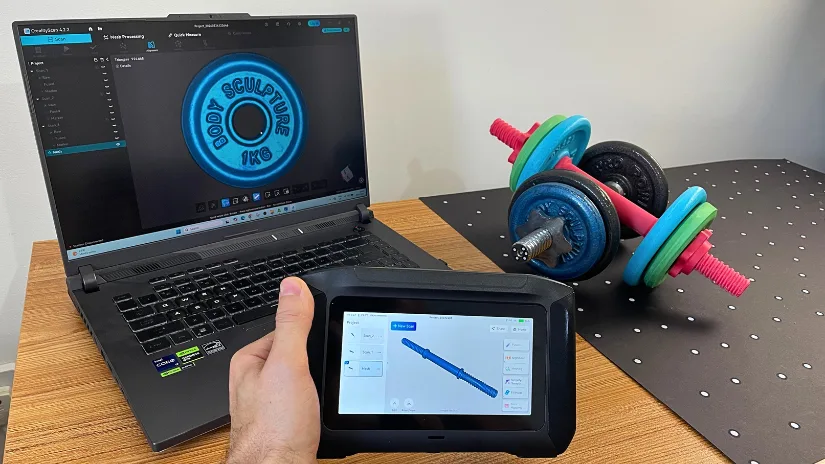
I experienced this first-hand when scanning the adjustable dumbbell bar. Despite its long, detailed shape and knurled grip, each side took less than a minute to capture in a single pass. Without using a turntable, projects like this proved to be both quick and straightforward, making the Cross Blue Laser mode one of my favourite scanning modes on the Sermoon P1.
6-inch HD Touchscreen
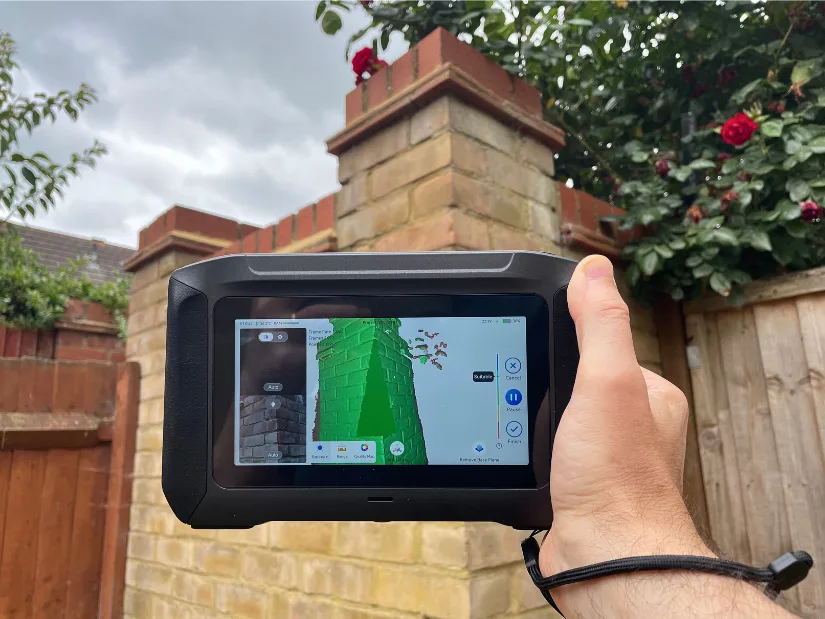
One of the biggest advantages of the Sermoon P1 is being able to scan away from a computer. During my outdoor testing, I found the 6-inch HD touchscreen to be bright, responsive, and easy to read, making it simple to check whether the scanner was capturing enough detail for a clean result. The screen brightness can also be adjusted to suit different lighting conditions.
©3DWithUs – Photo: Max Funkner
Despite having relatively large hands, I found the touchscreen interface comfortable to use. The buttons and menus are well laid out, making it easy to access scanning and editing functions without feeling cramped. Overall, the display was just the right size for comfortable standalone scanning.
Battery
My Sermoon P1 package included a spare rechargeable battery, which is a welcome addition for longer scanning sessions. The spare battery can be charged directly using the supplied USB cable. The same one used to connect the scanner to a laptop. One improvement I’d like to see is a small charging LED on the battery itself. A simple red/green indicator would make it easy to know when charging is complete without having to install the battery in the scanner.
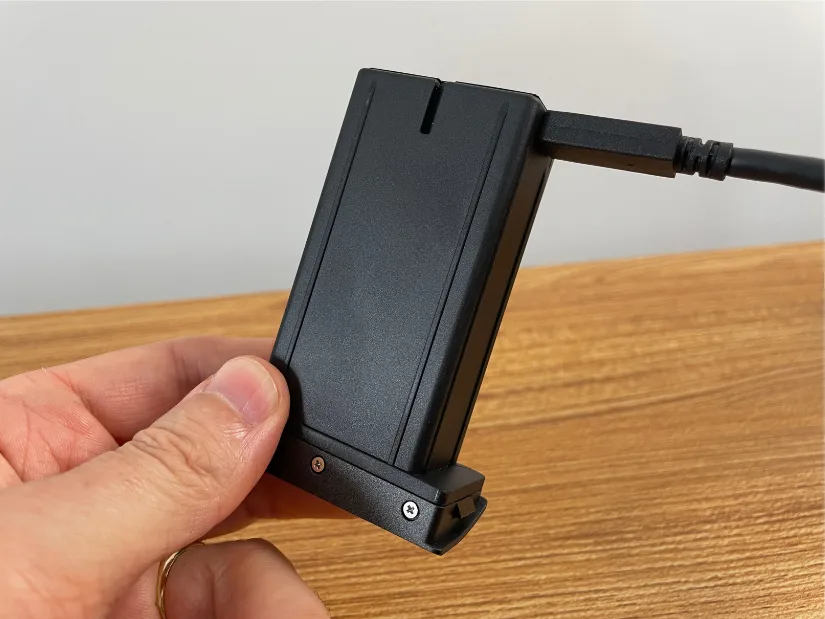
It’s difficult to estimate the battery life, as it depends heavily on the type and length of each scanning job. During my outdoor testing, however, I never encountered any battery-related issues. My usual workflow is to complete all scanning first, even if it takes several attempts, and then perform the mesh processing once the scanner is plugged in. For most users, the included spare battery should provide more than enough power for a full day of scanning.
CrealityScan Software and Workflow
While testing the Creality Sermoon P1, I had the opportunity to use both the scanner’s built-in standalone software and the desktop CrealityScan application. Both are well-designed and complement each other, allowing users to choose the workflow that best suits their project. For quick scans and basic editing, the standalone software is surprisingly capable, while CrealityScan offers more advanced processing and a seamless connection with a PC.
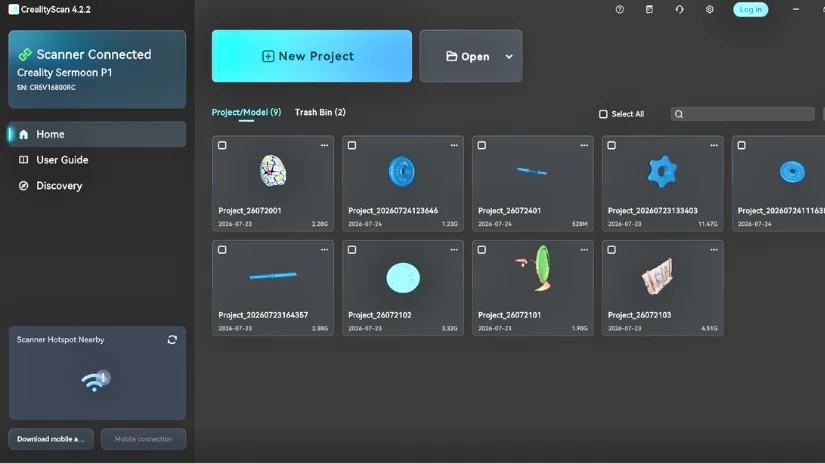
The CrealityScan Home screen is clean and intuitive. It displays the connected scanner, recently completed projects, and quick shortcuts for creating or opening scans. During my testing, I ended up with several projects covering different scanning modes and workflows, and navigating between them was quick and straightforward. For users working on multiple reverse-engineering or replication projects, having everything organized in one place is a welcome feature.
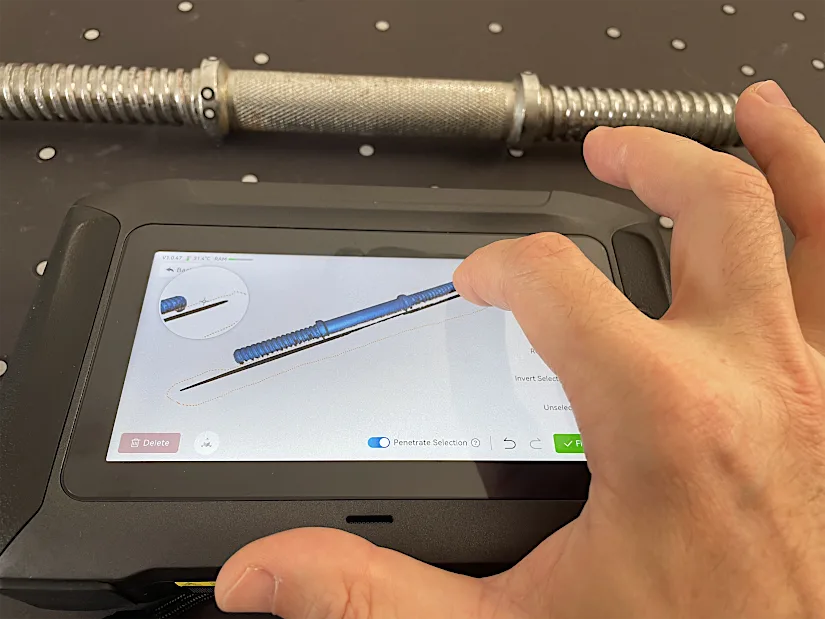
For most of my projects, the Lasso Selection, Invert Selection, and Delete tools became my primary workflow for cleaning scans. They made it quick and easy to remove unwanted background geometry before processing the final mesh.
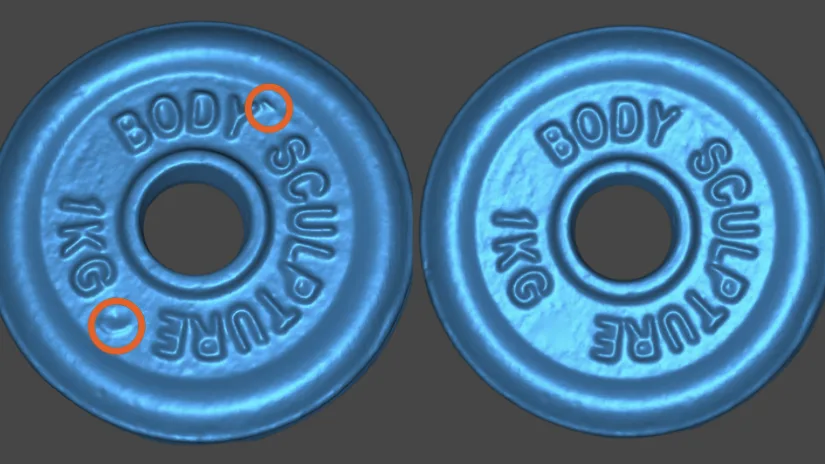
I also found the Lasso Selection tool useful for correcting small imperfections on scanned objects. For example, some of the cast-iron dumbbell weights had tiny casting defects protruding from the surface. By selecting and deleting those areas, then using the Fill Holes function, I was able to produce a much cleaner model without resorting to third-party software.
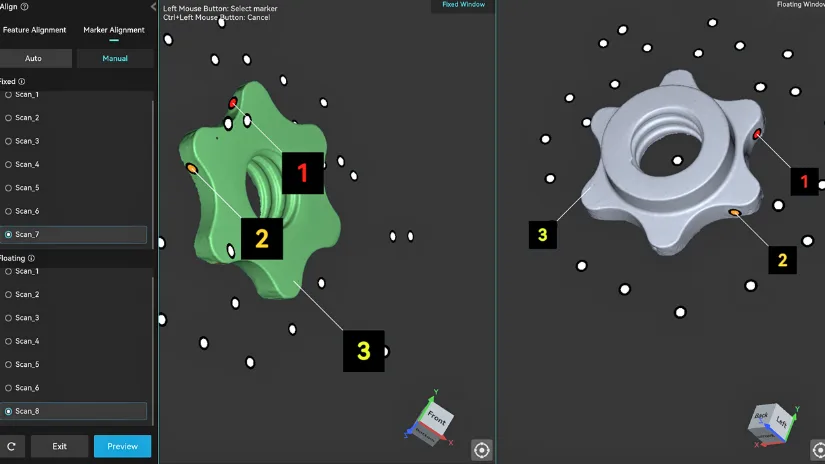
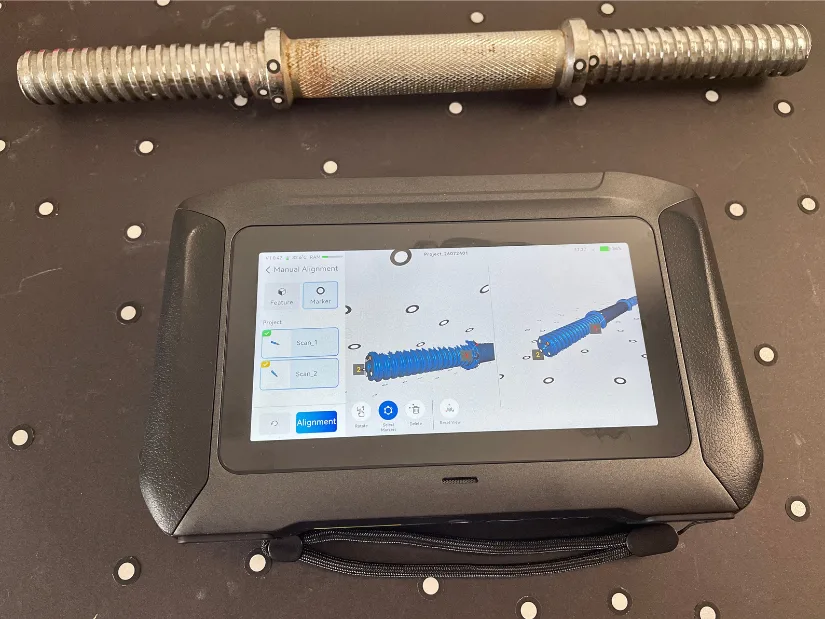
Another feature I found particularly useful, available both in CrealityScan and on the Sermoon P1 itself, is Manual Marker Alignment. It proved invaluable when scanning symmetrical parts that automatic alignment could struggle with. The process is straightforward and only requires a small number of reflective markers. In most cases, three well-placed markers visible in both scan passes are sufficient to accurately align and merge the datasets. Based on my testing, I highly recommend using this feature whenever you are scanning symmetrical or otherwise challenging objects.
Calibration
©3DWithUs – Photo: Max Funkner
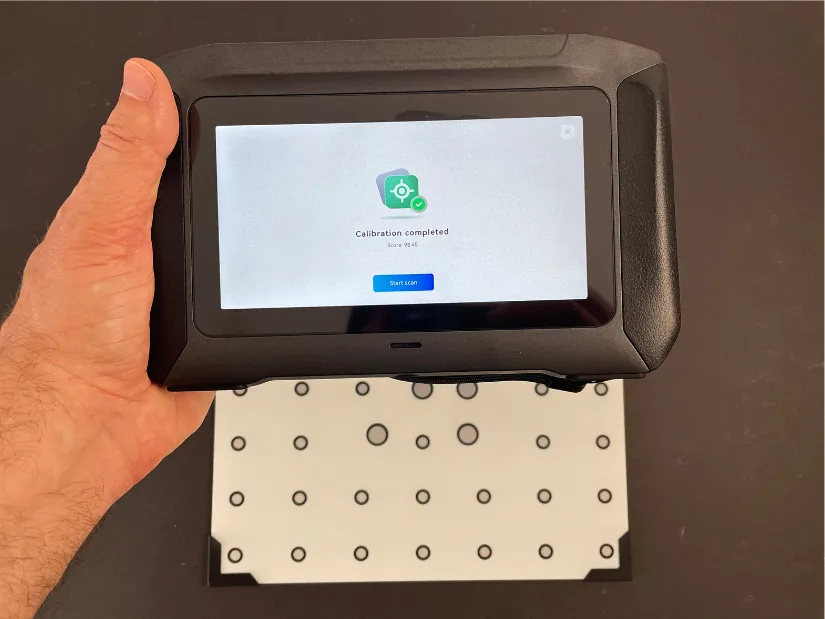
Although the Sermoon P1 arrived ready to use, I decided to perform a full recalibration after noticing a slight drop in scanning quality. Whether this was caused by the recent UK heatwave, transportation, or simply the scanner having been unused for some time, the recalibration made a noticeable difference. The process isn’t the simplest I’ve experienced and requires a bit of patience. After spending sometime working through the calibration routine, the scanner was back to performing flawlessly. In my opinion, the time invested was absolutely worth it.
Testing and Results
To test all three blue laser modes, I decided to fully replicate a simple yet surprisingly challenging object: an adjustable dumbbell set. These metal dumbbells are several decades old and show plenty of wear, including scratches, rust, and uneven surfaces. At the same time, the main handles and locking collars are made from shiny silver metal, which can be difficult for many old generations of 3D scanners to capture reliably.
Each part of the dumbbell set also has a different shape, so this was a useful test of both surface tracking and geometric detail. I was surprised by how easily the Creality Sermoon P1 handled the entire set, including the reflective areas.
©3DWithUs – Scan, Print and Photo: Max Funkner
Dumbbell Spinlock: Single Blue Laser Mode
The testing process became even more interesting because I used several products from the Creality ecosystem to complete the project. The parts were scanned with the Sermoon P1, filament was dried using the Creality SpacePi X4, and printed on the Creality K2 Pro using PLA in different colors. You can read more about the K2 Pro 3D printing setup, hands-on testing, and print examples on 3DWithUs.
The finished plastic replica can work as a fun prank or display piece, especially when printed in grey and black or spray-painted in silver, bronze, or another metallic finish. It could also be used as a lightweight training or demonstration object. For comparison, the original assembled dumbbell weighs 6kg, while the complete printed replica weighs 420g. One unexpected advantage of the plastic version is that it is much quieter than the original metal adjustable dumbbell set when handled or placed on the floor.
©3DWithUs – Scan, Print and Photo: Max Funkner
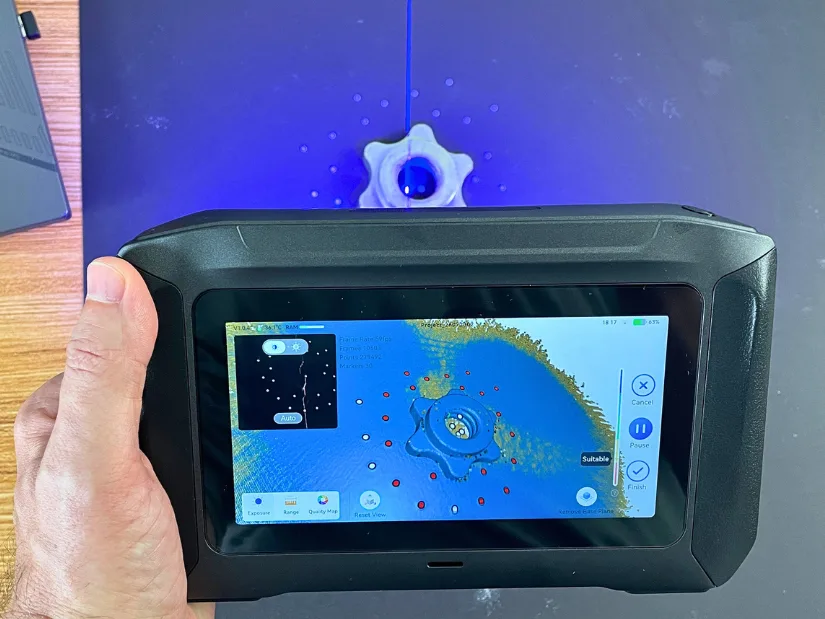
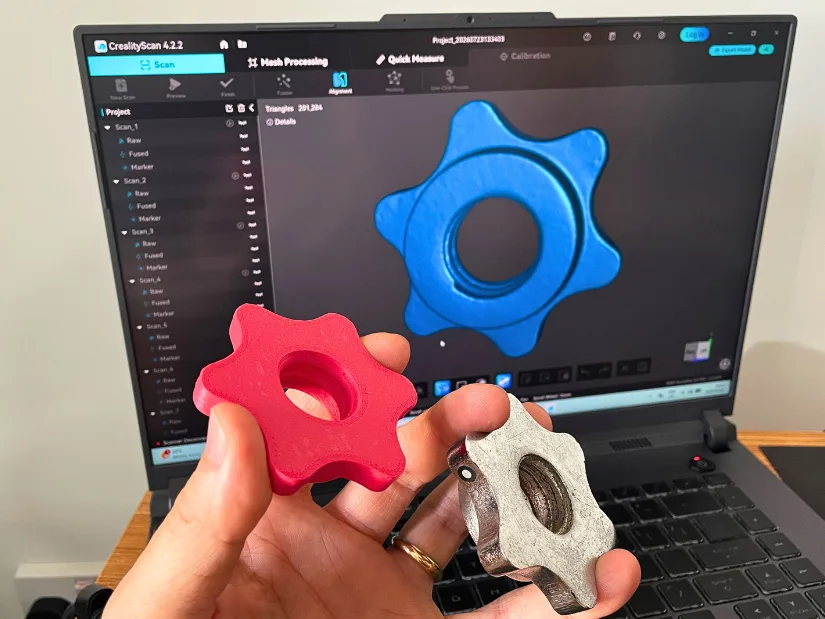
The dumbbell spinlock proved the most challenging part of this project because aligning scans of such a symmetrical object is difficult. Capturing the geometry itself was straightforward using a combination of Cross Blue Laser and Single Blue Laser for the internal thread modes. The real challenge came when merging two separate scans into a single solid model.
– Alignment. Manual Marker Alignment was the key to solving this. The feature requires at least three matching markers that are visible in both scans, so they need to be placed carefully before scanning. In my case, I positioned all three markers on the side of the spinlock handle, ensuring they were captured in both scan passes. This allowed CrealityScan to accurately align and merge the datasets into a complete, functional model.
– Tip. Printing this object on the Creality K2 Pro was a quick and straightforward task. In Creality Print, I slightly lowered the model below the build plate to eliminate small unsupported islands that would otherwise appear in the first layer. This ensured the print started with a completely flat base, resulting in a cleaner and more reliable print.
Metal Dumbbell Bar: Cross Lines Blue Laser Mode
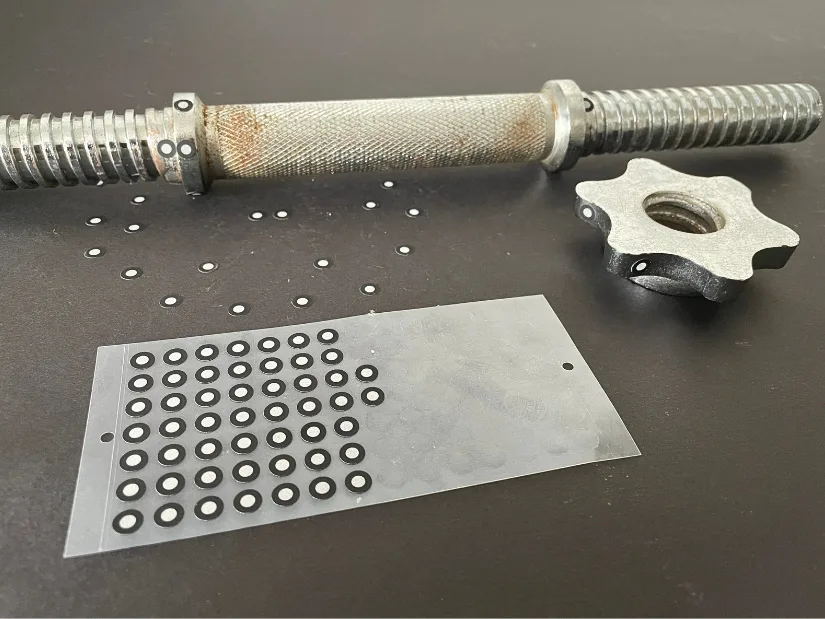
– Markers. The small reflective marker stickers included with the Creality Sermoon P1 were just the right size for these parts. Better still, I only needed a handful of them, which helped speed up the entire workflow. The rusty yet shiny dumbbell bar was the next object to scan, and my goal was to create a complete 3D model in just two scan passes. To my delight, both passes were completed entirely in the ultra-fast Cross-line Blue mode. Each side of the bar took less than a minute to scan.
©3DWithUs – Scan and Photo: Max Funkner
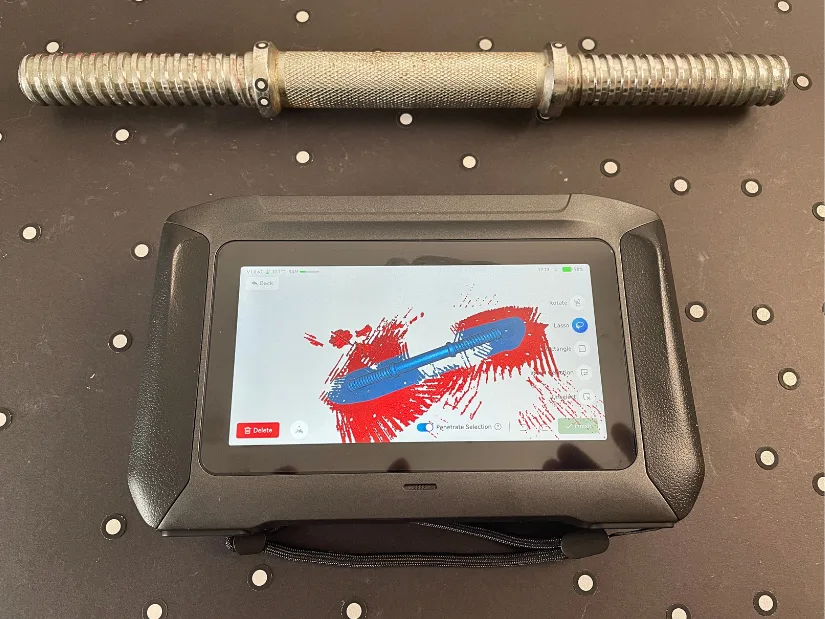
– Clean up. As I mentioned earlier, one of the biggest advantages of a standalone 3D scanner is that almost the entire workflow can be completed directly on the device. In many cases, there is no need for a powerful computer, as the scan can be cleaned up, trimmed, and reduced to a much lighter model before it is ever transferred to a PC. As shown in the images above, I am removing unwanted scan data directly on the Sermoon P1 before aligning the scan passes and generating the final mesh. This not only speeds up the workflow but also reduces the amount of processing required.
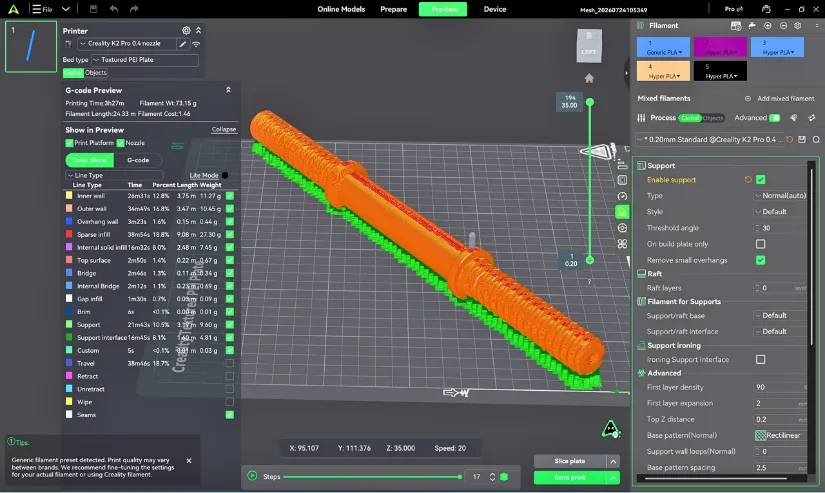
To print the model quickly, I used the default Creality Print profile with automatically generated supports. While this worked well overall, it wasn’t the ideal setup for this particular part. The biggest challenge was removing the support material from the threaded sections. For the best results, I would recommend printing the bar using a second material such as PETG for the supports.
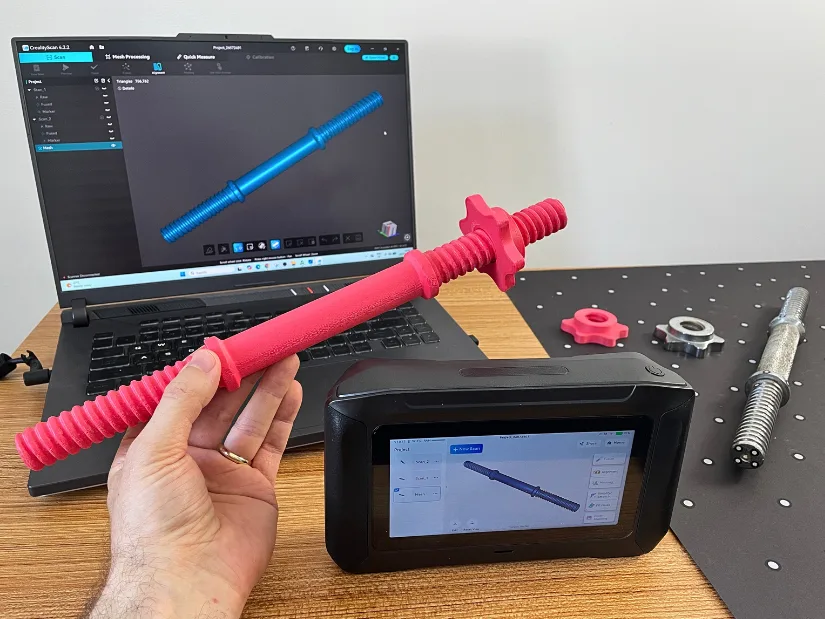
©3DWithUs – Scan, Print and Photo: Max Funkner
Weight Plates: Parallel Lines Blue Laser in Wired & Wireless PC Modes
The dumbbell weight was the final and easiest component to scan. This time I tested the 7 Parallel Blue Laser Lines together with Wireless PC Mode, which streams scan data directly to CrealityScan over Wi-Fi. As shown in the image below, when connected to a computer, whether wired or wirelessly, the Sermoon P1’s display turns black and shows the message: “PC connection in progress, please do not disconnect.” This allows the computer to take over the scanning workflow while the scanner acts as the capture device.
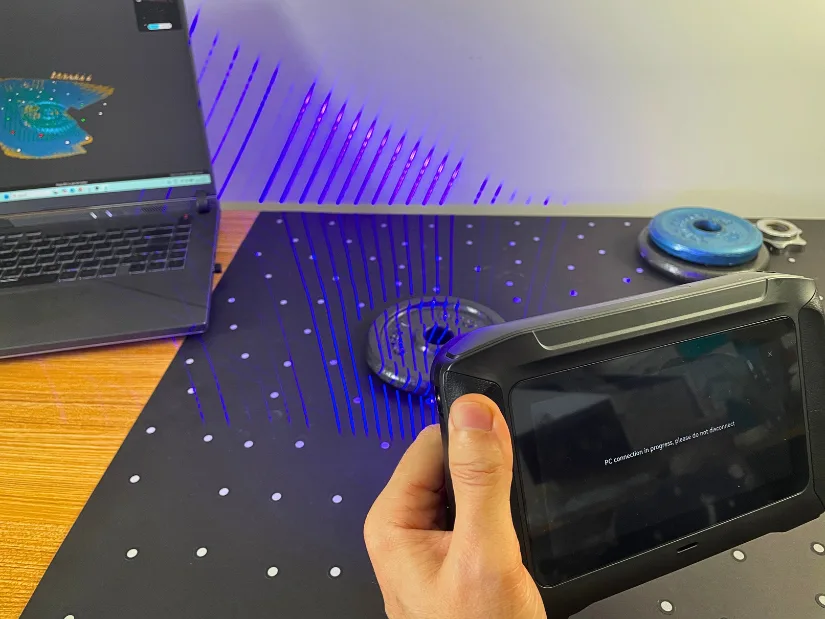
For this project, I actually preferred using Wired PC Mode. Since the scan data was streamed directly to my laptop, I could clean the model, process the mesh, and send it to the Creality K2 Pro almost immediately. For a straightforward reverse-engineering project like this, that made the workflow extremely fast. While the standalone mode is excellent for scanning and editing without a computer, the wired connection proved to be the quickest option when the goal was to scan a part and get it printed as soon as possible.
One feature I would like to see added to CrealityScan is a simple Smooth Brush. It would further reduce the need to rely on third-party software such as Blender for minor mesh cleanup. For this project, however, I found an effective workaround. The original cast-iron weight had a couple of small casting imperfections protruding from the surface. Using the Lasso Selection tool, I simply selected and deleted those areas, then used the Fill Holes function to restore the surface. As the comparison above shows, this produced a much cleaner model while keeping all of the embossed lettering and other important details intact.
Outdoor Scanning: Infrared Structured Light
Although my main focus was testing the blue laser modes for accuracy, I also wanted to see how the Sermoon P1 performed outdoors using its Infrared Structured Light mode. Blue lasers are good at capturing fine details on mechanical parts, but infrared scanning is often the more practical choice for larger objects and outdoor environments. During my testing, I scanned a brick pillar in my garden, allowing me to evaluate both the standalone workflow and the screen visibility in natural daylight.
The Sermoon P1 handled the task well. The 6-inch HD touchscreen remained easy to read outdoors, making it simple to monitor scan coverage in real time. For larger objects such as statues, walls, or architectural details, the infrared mode provides a fast and convenient way to capture geometry without needing to set up a laptop nearby.
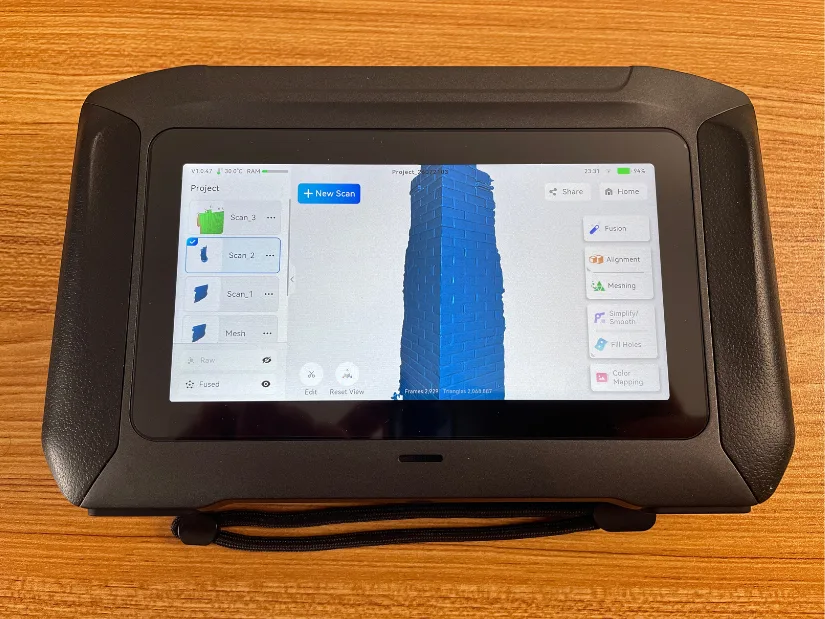
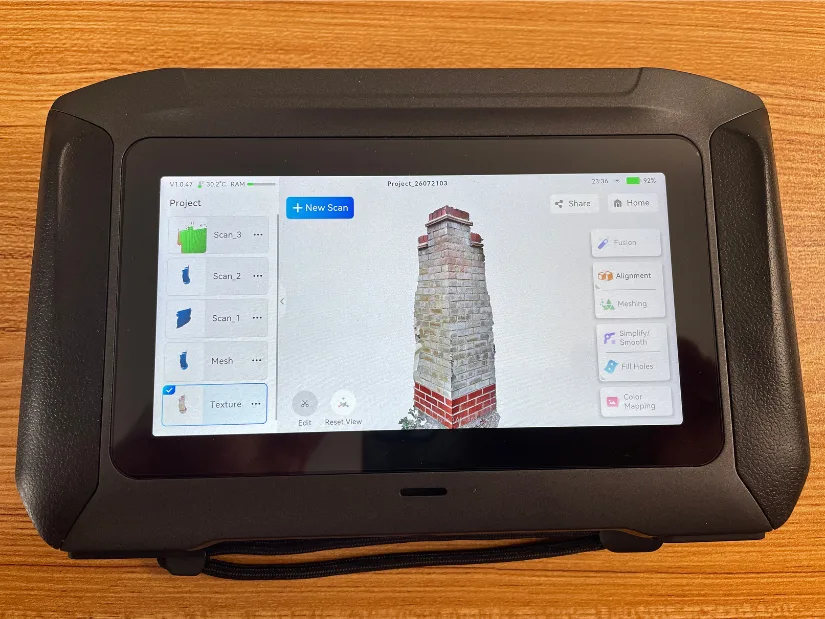
After generating the mesh, I also tested the Color Mapping feature. Although the Sermoon P1 is primarily designed for geometry capture rather than photorealistic textures, the color information adds useful context and makes scanned objects easier to inspect and identify.
Compare to Other 3D Scanners
Over the past few years, Creality has invested heavily in building an ecosystem. Alongside its extensive range of 3D printers, the company now offers 3D scanners, laser engravers, filament makers and dryers, Creality Cloud for storing and sharing 3D models. From my hands-on testing, the company’s 3D scanning lineup has matured significantly, ranging from budget-friendly scanners such as the Ferret and Otter series to the high-performance Raptor and Sermoon families.
The Sermoon P1 is based on the existing Sermoon platform, joining the Sermoon S1 and flagship Sermoon X1. The biggest difference is that the P1 is a true standalone 3D scanner, capable of scanning, editing, aligning, and processing meshes without requiring a computer. In terms of pricing, it sits between the more affordable Sermoon S1 and the significantly more expensive Sermoon X1, making it an attractive option for users who want the convenience of a standalone workflow without stepping up to the flagship model.
Rather than comparing every specification of Creality scanners, it is more useful to look at who each Creality 3D scanner is designed for:
- Creality Ferret: Entry-level hobby users looking for an affordable introduction to 3D scanning. On 3DWithUs, Richard Hirst hands-on tested the Ferret Pro, showcasing its capabilities with scan and 3D print examples. Read the Ferret Pro review.
- Creality Otter: Enthusiasts who need a larger scanning range and more flexibility across different object sizes.
- Creality Raptor: Engineering and reverse-engineering applications that benefit from high-detail blue laser scanning.
- Creality Sermoon S1: Users who want a portable blue laser scanner and are comfortable working with a connected computer.
- Creality Sermoon P1: Users who want a standalone blue laser scanner with onboard scanning, editing, alignment, and mesh processing.
- Creality Sermoon X1: A flagship standalone solution aimed at demanding professional and industrial workflows.
Compared to Standalone 3D Scanners
The standalone 3D scanner market is growing rapidly, and on 3DWithUs we’ve had the opportunity to hands-on test several models. The 3DMakerpro Toucan stands out as a compact and affordable standalone scanner, while the Revopoint Miraco offers excellent portability and ease of use. The EINSTAR VEGA is another capable all-in-one solution aimed at professional users.
Compared to these scanners, the Creality Sermoon P1 distinguishes itself with its combination of blue laser and infrared scanning technologies, a mature standalone workflow, and deep integration with the wider Creality ecosystem. During my testing, its scanning speed, onboard processing, and flexibility made it one of the most capable standalone 3D scanners I’ve used to date.
Find more 3D scanners via our major 3D scanners guide.
Have questions? Feel free to ask in the comment section below.
For a wider discussion or to share your own Creality Sermoon P1 scans, join us in the forum:
Conclusion and Pros & Cons
Price: $2,999 – $3,299
Compare the Prices & Bundles:
Official Website | Amazon
Creality Sermoon P1 Review
Review Summary
After several weeks of testing, the Creality Sermoon P1 proved to be a capable and well-rounded standalone 3D scanner. I tested every major scanning mode, including Cross, Single, and Parallel Blue Laser modes, Infrared Structured Light, as well as standalone, wired PC, and wireless PC workflows. Projects ranged from reverse engineering metal dumbbell components and creating functional 3D printed replicas to outdoor scanning, giving me a good understanding of where the scanner performs best.
One of the Sermoon P1’s biggest strengths is its standalone workflow. Being able to scan, clean unwanted geometry, align scans, generate meshes, and even apply colour mapping directly on the device makes it a practical tool for both workshop and field use. Combined with fast blue laser scanning and intuitive software, it significantly reduces the time between capturing an object and producing a printable model.
The Sermoon P1 also benefits from being part of Creality’s rapidly expanding ecosystem. CrealityScan integrates naturally with the company’s growing range of 3D printers, scanners, laser engravers, filament-making solutions, Creality Cloud, and other software tools. For users already using Creality products and platforms, the workflow feels intuitive and integrates seamlessly.
Creality provided the Sermoon P1 for evaluation, but all testing, scanning projects, observations, and opinions in this review are entirely my own. Based on my hands-on experience, I can confidently recommend the Creality Sermoon P1 to makers, engineers, educators, and professionals looking for a powerful standalone 3D scanner that combines speed, flexibility, and an efficient end-to-end workflow.
Pros
- Excellent standalone workflow with onboard scanning, alignment, mesh processing, and color mapping.
- Fast and accurate Blue Laser scanning with Cross, Single, and Parallel modes.
- Intuitive 6-inch HD touchscreen that makes standalone scanning practical and enjoyable.
- Flexible workflows with standalone, wired PC, and wireless PC modes to suit different projects.
- Strong integration with the wider Creality ecosystem, including CrealityScan, Creality Print, Creality Cloud, and Creality 3D printers.
Cons
- At 830 g, the scanner is heavier than usual handheld 3D scanners.
- The calibration process takes time and requires patience.
- The spare battery would benefit from a simple charging-status LED or a charging dock.
- CrealityScan could be improved with a Smooth Brush for quicker mesh cleanup.
- Higher price than entry-level and mid-range 3D scanners.