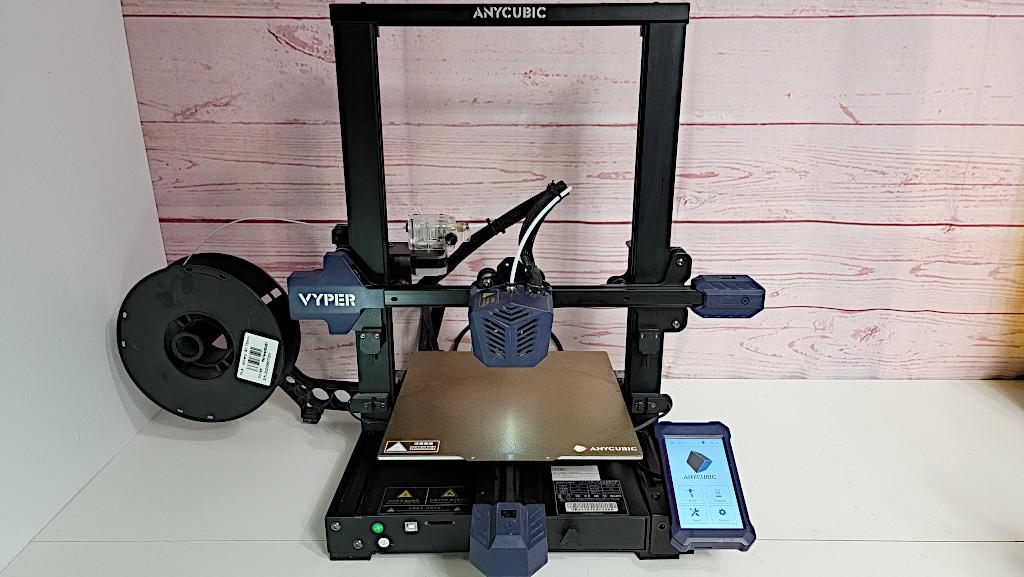
The Anycubic Vyper is a beginner-friendly 3D printer that is easy to set up and use within 30 minutes from the box opening. Let’s review the machine, list Pros and Cons, test some tricky filaments and check the firmware.
3D Printer Specifications
16 point auto-levelling system
Mainboard: 32-bit
Build Volume: 245 x 245 x 260 mm
Layer Height: .05mm to .3mm
Print Speed: Recommended 80-100mm/s
Materials: PLA, TPU, ABS, PETG, other
Build Platform: Spring steel magnetic build plate
Interface: 4.3” colour touch screen
Connectivity: MicroSD Card
Price: $299 – $359
Affiliate Links:
Amazon
Official Website
Vyper Review – Unboxing and Initial Setup
Inside the box, there were: Power cord, Filament holder, Sample Filament, Spatula tool, Display screen, Extra Nozzles, Pre-assembled printer frame, Pre-assembled base with electronics and bed, SD card and USB reader, Small drawer with side cutters, wrenches, and Allen keys, USB cable for connecting printer to PC, User manual.
The initial setup takes only about 10 minutes. There are only 7 screws in total that are needed to put the Vyper together: 4 in the frame and 3 for the LCD screen. Once you have the printer set up, install the plugs from the ribbon cables into the breakout board. Be sure to follow the instructions and remove all the pre-installed zip ties.

(Photo: Will Zoobkoff)
From opening the box to printing your first test print, it takes less than a half-hour, and if you’ve put together and set up these types of printers before, it’s even quicker. I had assembled the printer in 10 min and spent another 5 or so doing the first auto-leveling.
16 Point Auto-levelling
By selecting ‘Auto-levelling’ you’ll start the process. The Vyper carefully probes 16 different locations on the printer bed, making gentle contact on the surface with the nozzle using a pressure sensor. This takes less than three minutes to complete, and this calibration is saved, eliminating the need to make frequent adjustments. I generally do level at the start of my printing day or if I have to remove the build plate to clean or remove a print for good measure. The automatic leveling feature is easy to find on the interface, clearly labeled on the home screen alongside the options to prepare and preheat your filament of choice.
Heated Bed – Removable Flexible Spring-Steel Build Plate
The heated bed and flexible spring-steel build plate are also exceptional on the Vyper. These features make removing projects easy, and the textured surface didn’t seem to pick up any fingerprints. I have also printed on the smooth side of the build plate using TPU and PLA. The results were like using a glass bed. Yet, another plus to the Vyper.
32-bit Motherboard and Noise Levels
The 32-bit motherboard and an ARM Cortex-M3 GD32F103 chip ensure that the Vyper is capable of high-speed prints while staying relatively quiet. Most of the noise comes from the powerful dual 4010 blower fan and the motherboard fan rather than from the movement of the printer itself, and while it’s far from silent, the levels are low enough to not be an issue.

(Photo: Will Zoobkoff)
The noise was measured at around 59 dB when fans were at 100%. Turning the fans down would cut that noise out a bit. But, while the fans may be the noisiest part of the unit, once you leave the room, you can barely hear the Vyper.
Filament Choices
It’s also nice to see a wide variety of filament choices that you can use for this printer. I generally do most printing with PLA but tested TPU and PETG with no problem. You can also print in ABS which is a popular choice.
Vyper Settings for TPU Filament
When working with TPU, you will need to make sure to adjust the tension on the extruder arm so you don’t crush and pinch the TPU. The TPU I printed with was 94a hardness flexible but not as soft as, say, Ninja Flex that is 85a. You will also need to lower your retraction to between 2 and 3mm with the TPU and print slower at 45 to 50mms. I do the majority of my TPU printing on my Vyper on the smooth side of the build plate. I find it leaves a nice smooth glass-like finish on the bottom.

(Photo: Will Zoobkoff)
Vyper Settings for PETG Filament
For PETG, I had a little problem adjusting to print. The PETG filament I used printed at 230°C on the hotend and 80°C on the bed with no adhesion issues. You will also need to print slower with PETG. I print mine at 50mms and have the fan speed dropped down to 40%. PETG also benefits from a lower retraction distance, I settled on 3mm for the spool I was using.

(Photo: Will Zoobkoff)
I did several test prints and the AnyCubic Vyper is a very impressive printer straight out of the box. I didn’t have any failed prints during testing despite minimal adjustments to the provided settings and Cura profile, the Vyper prints were very clean.

(Photo: Will Zoobkoff)
Updated Custom Firmware
Anycubic has released the sources for the Vyper firmware allowing users to adjust some firmware settings. The first thing I did was to enable the stepper drivers in 2209_Standalone mode, liner advance, and junction deviation. These changes made a significant change in printing quality since updating. Linear advance works to keep the pressure in the nozzle steady leading to cleaner corners and edges free of bulging. Junction deviation is a replacement for the Classic Jerk system in Marlin. What it does, is uses a single setting to let the printer know how much it can deviate from the intended path by controlling the speed going into and out of corners.
The custom changes have made a great improvement in printing quality over the original firmware, and I recommend, if you are familiar with the original firmware, to try a linear advance enabled version to see the benefits.
Vyper Calibration
Check my video about Anycubic Vyper calibration. I cover the belt tension, V wheel adjustment, Esteps, flow, and liner advance calibrations. Please find my full 3D printer extruder calibration guide here.
Pros and Cons
PROS
– Easy to use for beginners
– Large print volume
– Build quality and print quality
– Auto-levelling out of the box
– Filament run-out sensor
CONS
– Airflow for part cooling needs attention
– Needs more on-screen options for calibration
Conclusion
I printed nonstop for weeks during my review, and nothing seemed to be having any issues or strain at all. Belts and motors are all working fine after easily 1000+ hours of printing. Only slight adjustments have been needed, along with the standard wearing down of print nozzles.
So is the Anycubic Vyper worth it? Absolutely, Anycubic has made it easy for anybody to get into the 3D printing world with great prints out of the box, with minimal calibration and adjustments.
Read more: Best Budget FDM 3D Printers
After testing and reviewing various FDM 3D printers through the years, we are putting together a detailed guide about the Best Budget 3D Printers. Here we will list a number of the FDM machines that are cheap to buy, in around the $300 price range, but at the same time, are user-friendly.
Anycubic Vyper Star Rating
Review Summary
I printed nonstop for weeks during my review, and nothing seemed to be having any issues or strain at all. Belts and motors are all working fine after easily 1000+ hours of printing. Only slight adjustments have been needed, along with the standard wearing down of print nozzles.
PROS:
– Easy to use for beginners
– Large print volume
– Build quality and print quality
– Auto-levelling out of the box
– Filament run-out sensor
CONS:
– Airflow for part cooling needs attention
– Needs more on-screen options for calibration

Hi there,
Just found your website as I have issues with my Vyper that I have to resolve. Firstly, when drawing straight lines of filament, it can produce a slightly dotted line of rather than a smooth line of PLA, which the next lay catches on and screws up the print. Usually this happens, at the beginning of printing the border or when the head moves from one object to another.
I thought I would go over all of your recommendations from scratch but have fallen on the first hurdle. “The first thing I did was to enable the stepper drivers in 2209_Standalone mode, liner advance, and junction deviation” – How do I do this ???
Determined to get this working as re-printing small objects is fine but I have a huge print, so it needs to be right!
Many thanks
🙂