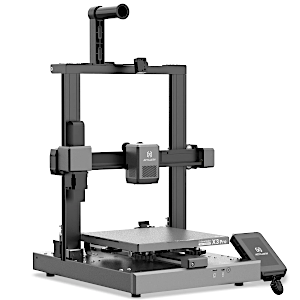
I had an opportunity to evaluate the Artillery Sidewinder X3 PRO, a new machine in the Sidewinder X series. Artillery managed to include many nice features at a surprisingly affordable price. A high-temperature all-metal, dual-gear direct-drive extruder, an automatic leveling system, and a decent build volume can be the decision-making factors for many buyers. In this review, I will examine the machine, check the slicer software, 3D print some models, and outline the Pros and Cons.
Table Of Contents
- Specifications
- Unboxing and assembly
- Bed Leveling
- Features and Hardware
- Slicer Software
- Test Printing
- Comparison
- Conclusion and Pros & Cons
Artillery Sidewinder X3 PRO Specifications
· Printing Size – 240*240*260mm
· 4.3-inch Full Colour Touchscreen
· Cable Design – Integrated FFC
· PEI Magnetic Platform
· Auto Bed Levelling (49-Point)
· Dual-Gear Direct Extruder
· Top LED Light
· Z-axis Dual Lead Screw + Dual Motor
· 300°C High-temp Nozzle
Price: $219-299
Product affiliate links: 3DWithUs is supported by its audience. Purchases via some links may earn us a small commission at no extra cost to you. This helps us to continue bringing you high-quality content. Our guides and reviews remain unbiased and independent.
Amazon
Official Website
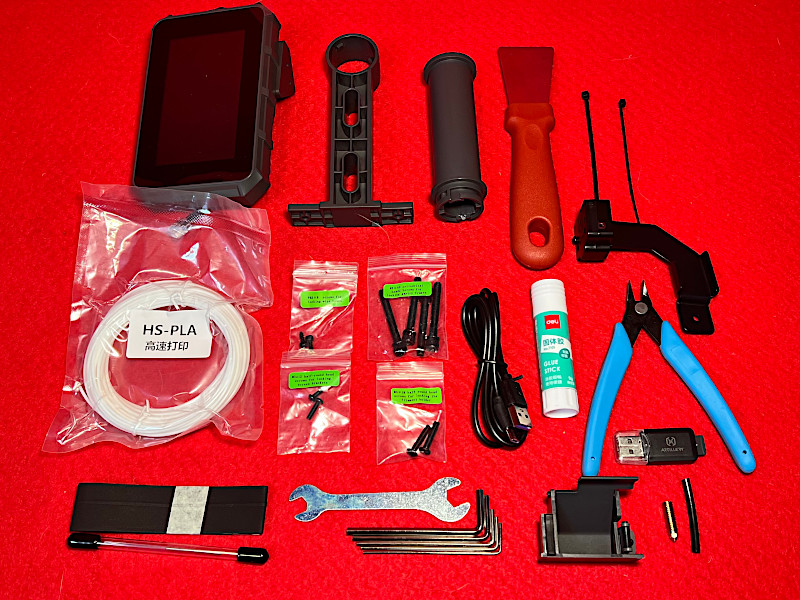
Unboxing and Assembly
Recently, I had the incredible opportunity to assemble and set up the impressive Artillery X3 Pro 3D printer. From the moment I unboxed the printer, it was clear that Artillery had put a great deal of thought into making the setup process as seamless as possible.
©3DWithUs – Photo: Richard Hirst
To my delight, the Artillery X3 Pro arrived almost fully assembled, which made the initial setup remarkably easy and straightforward plus with a comprehensive toolkit and excellent instructions.

©3DWithUs – Photo: Richard Hirst
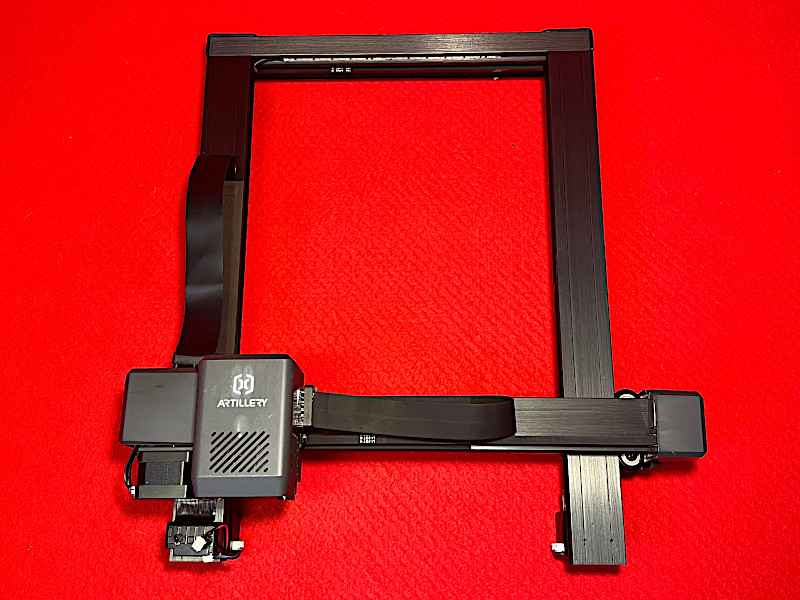
With just eight screws to attach – four for the uprights, two for the filament sensor and filament spool holder, and two for the screen bracket – I had the sturdy framework in place within minutes. Connecting the stepper motor cables, the light bar cable, and the filament sensor cable was a breeze, followed by plugging in the detachable 4.3-inch touch screen UI. In just around 10 minutes, I had assembled the printer, from start to finish.
49 Point Bed Levelling System
When it comes to bed levelling, the Artillery X3 Pro makes the process a breeze. In line with standard practice for printers of this kind, the initial step involves manually levelling the bed and setting the Z Offset. However, what sets the X3 Pro apart is its exceptional 49-point bed levelling system.
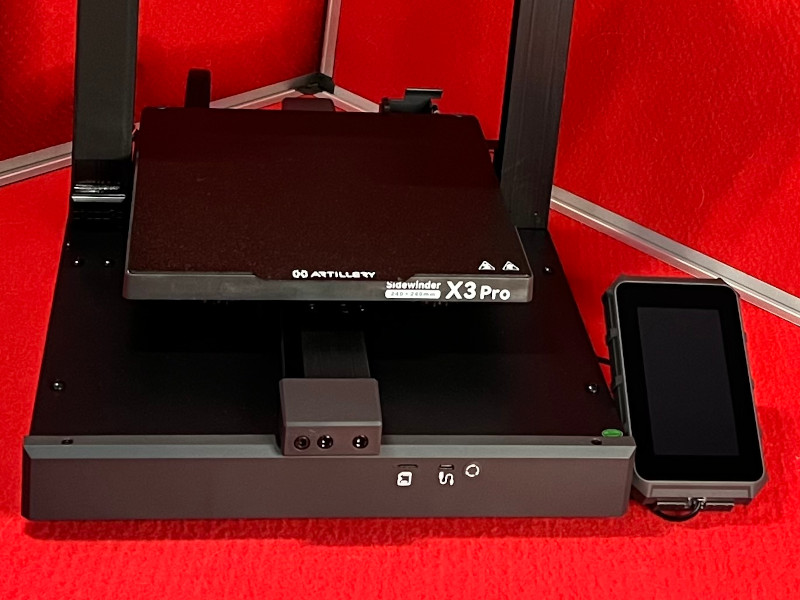
Once the manual bed levelling is complete and the Z Offset is set, you can initiate the auto bed levelling process. This ingenious feature allows the printer to meticulously scan and map out the bed surface, creating a bed level mesh that is then stored in the printer’s memory. With 49 points checked and the mesh precisely established, you can have confidence that your prints will adhere flawlessly to the bed.
I must admit, the bed levelling experience on the Artillery X3 Pro exceeded my expectations. The printer consistently delivered exceptional levelling results across the entire bed surface. Gone were the days of worrying about uneven bed levels or struggling to achieve optimal adhesion. With the X3 Pro’s thorough 49-point bed levelling, my prints consistently adhered flawlessly from corner to corner.
Sidewinder X3 PRO Features and Hardware
When it comes to specifications, the Artillery Sidewinder X3 Pro leaves an impression. Its impressive features and performance make it a standout possibility in the world of 3D printers.
– Speed. One of the key highlights of the Sidewinder X3 Pro is its remarkable speed. With a whopping 300mm/s speed, using the dual gear direct drive all metal extruder capable of 300 degrees this printer runs with exceptional efficiency and allows for swift production of your designs. Whether you are working on a time-sensitive project or simply want to maximize your productivity, the Sidewinder X3 Pro delivers impressive speed without compromising on quality.
©3DWithUs – Photo: Richard Hirst
– Automatic Bed Leveling. Moreover, the 49-point bed levelling system ensures an impeccably level surface for your prints. This meticulous approach guarantees consistent adhesion and precise results, no matter where you position your designs on the bed.
– Bed Adhesion. Another notable aspect of the Sidewinder X3 Pro is its dual-sided PEI bed. This innovative addition provides versatility and convenience, allowing you to print on either side of the bed. The presence of locator points at the back of the base simplifies the process of fitting the build plate back onto the bed in the exact same position every time. This thoughtful design consideration ensures consistency in print placement and saves valuable time and effort.
– Touch Screen. In terms of user experience, the Sidewinder X3 Pro offers several noteworthy features. The detachable 4-3inch touch screen allows for easy navigation and control. Its tactile interface provides access to various functions, including liner advance, shake compensation, LED light control, and fan control.
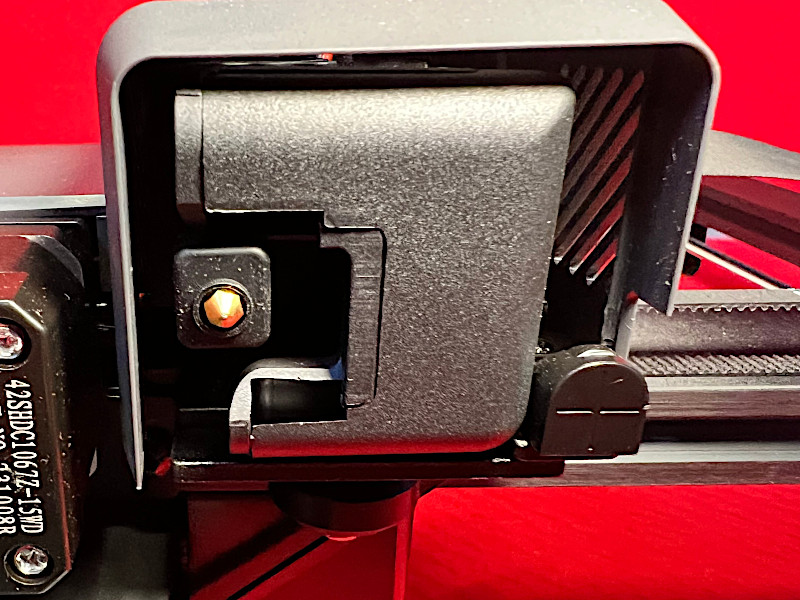
– Automatic Nozzle Cleaning. Additionally, the inclusion of an automatic nozzle cleaning function, equipped with a nozzle wiping system found at the printer’s rear corner, highlights Artillery’s commitment to ensuring hassle-free maintenance and best print quality.
– LED Light Bar. One of the standout features of the Sidewinder X3 Pro is the strategically placed LED light bar positioned on the top beam. This addition offers ample illumination, allowing for clear visibility of the printing process. A well-lit workspace is essential for monitoring prints and detecting any issues that may arise. This feature has become a must-have for me, and I believe it should be a standard inclusion in all printers.
Slicing Software
During our testing and review of the Artillery Sidewinder X3 Pro, we were provided with the slicer software on a USB drive. This custom version of Cura slicer, specifically designed for this printer, made the transition seamless for someone like me who has been accustomed to using Cura. The pre-configured settings already present in the slicer allowed for a straightforward and user-friendly experience, particularly for beginners or those looking for simplicity.
Screenshot: Artillery Cura
For our review, I intentionally refrained from making any adjustments to the slicer settings. This approach provided an accurate representation of the printer’s capabilities straight out of the box. By using the default settings, I was able to evaluate the Sidewinder X3 Pro based on its performance without any modifications. This is a practice I personally find valuable, as it allows me to assess the printer’s out-of-the-box performance and gauge its potential for users who prefer a plug-and-play experience.
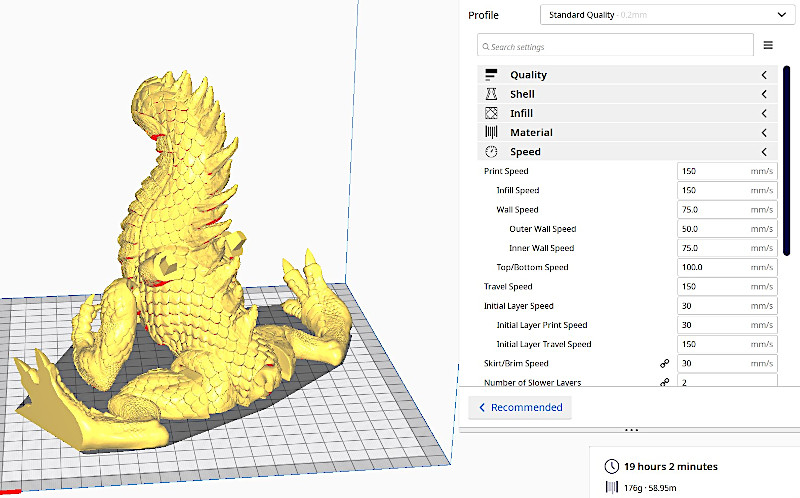
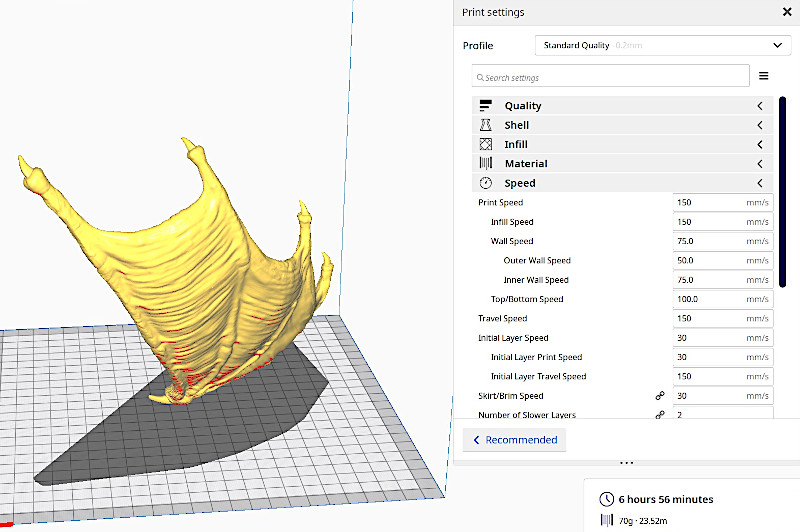
Test Prints and Other Model Prints
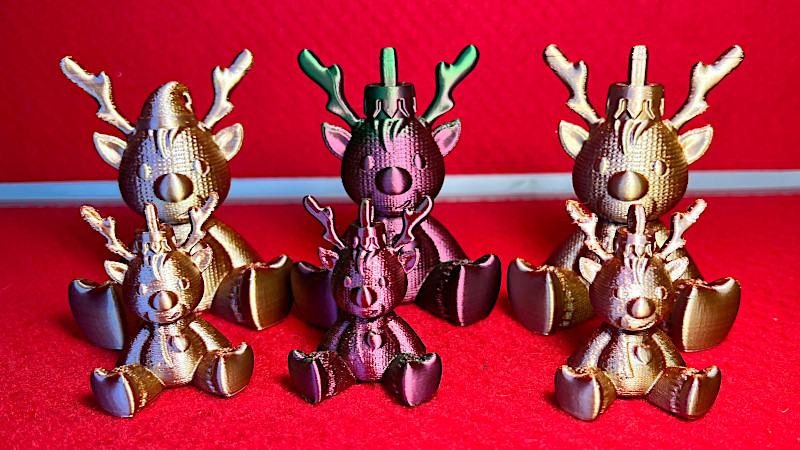
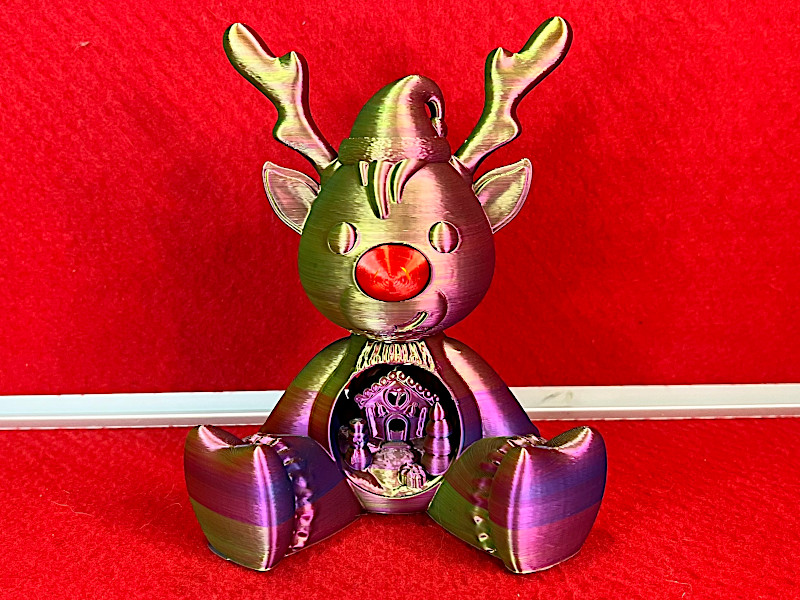
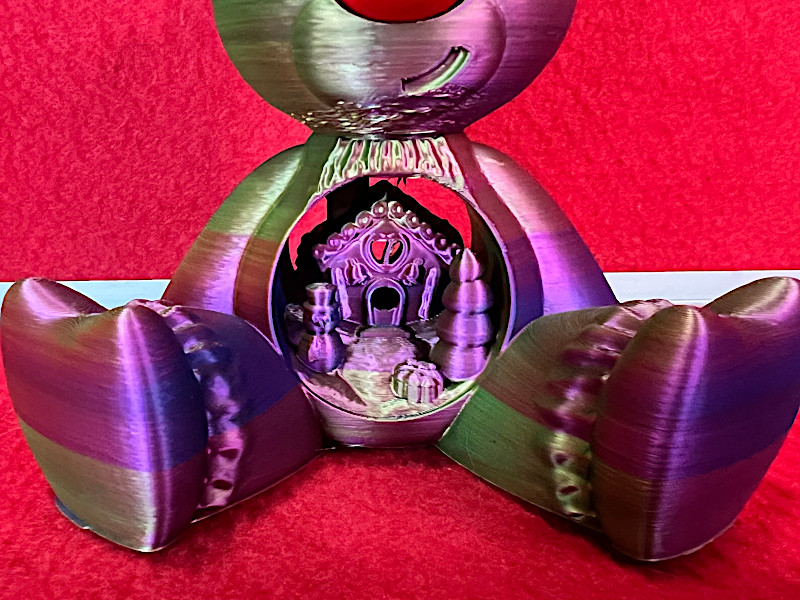
One aspect that I particularly enjoy during the review process is testing the Artillery Sidewinder X3 Pro’s capabilities by printing various models sourced from different platforms. For this evaluation, I carefully selected models from two trusted sources: Koza Designs and STLFLIX. These platforms offer a diverse range of prints, with Koza Designs catering to family-friendly models while STLFLIX offers more intricate and complex designs. Both are printed using Yousu TRI and dual-colour silk filaments which I like to use for more colourful prints.
During the testing phase, I was delighted by the exceptional print quality and impressive speed showed by the Artillery Sidewinder X3 Pro. The printer delivered outstanding results, successfully handling both large prints and intricate designs with finesse. I am confident that the prints speak for themselves, as they exemplify the printer’s remarkable performance in terms of achieving both elevated levels of detail and excellent overall print quality.
3D Model by StlFlix
©3DWithUs – Print and Photo: Richard Hirst
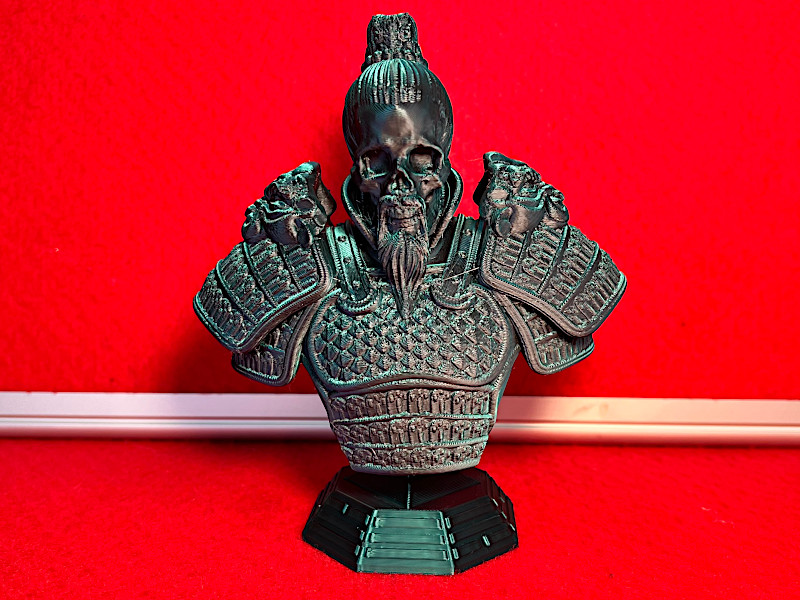
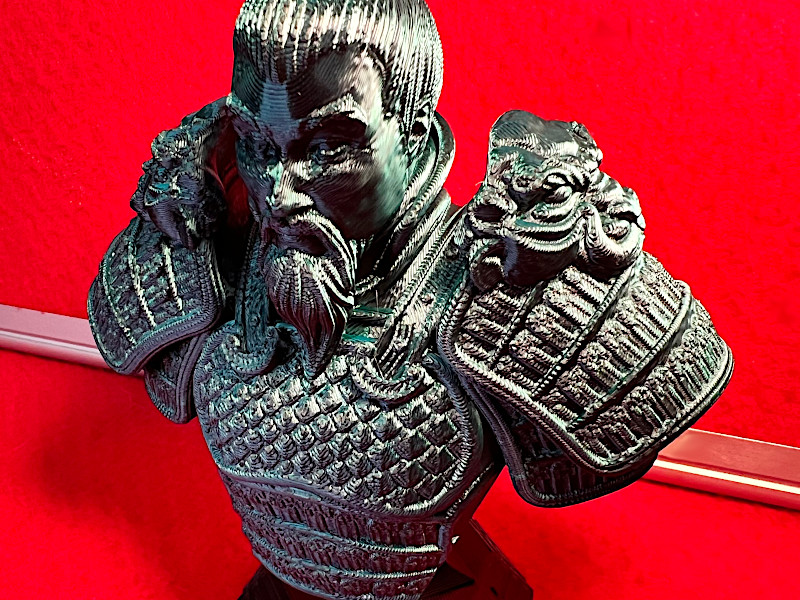
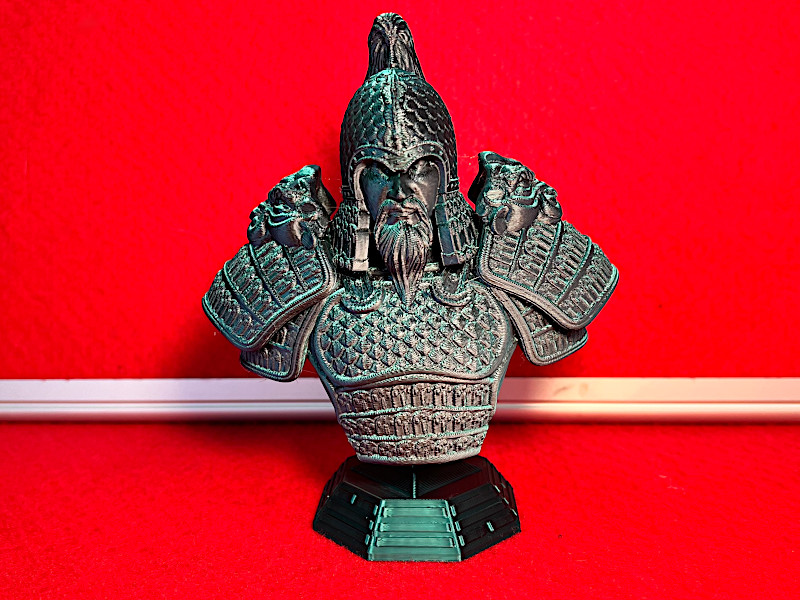
3D Model by KOZA Designs on Patreon
©3DWithUs – Print and Photo: Richard Hirst
3D Model by KOZA Designs on Cults3D
©3DWithUs – Print and Photo: Richard Hirst
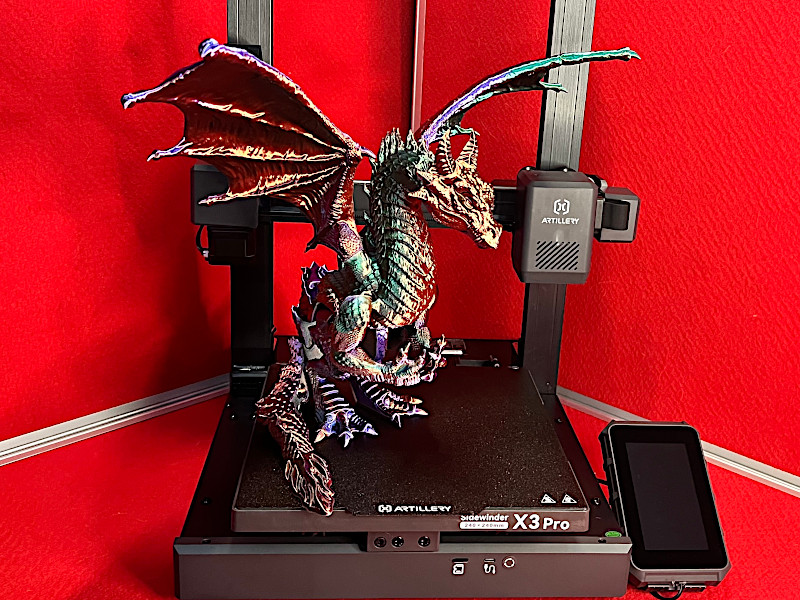
3D Model by StlFlix
©3DWithUs – Print and Photo: Richard Hirst

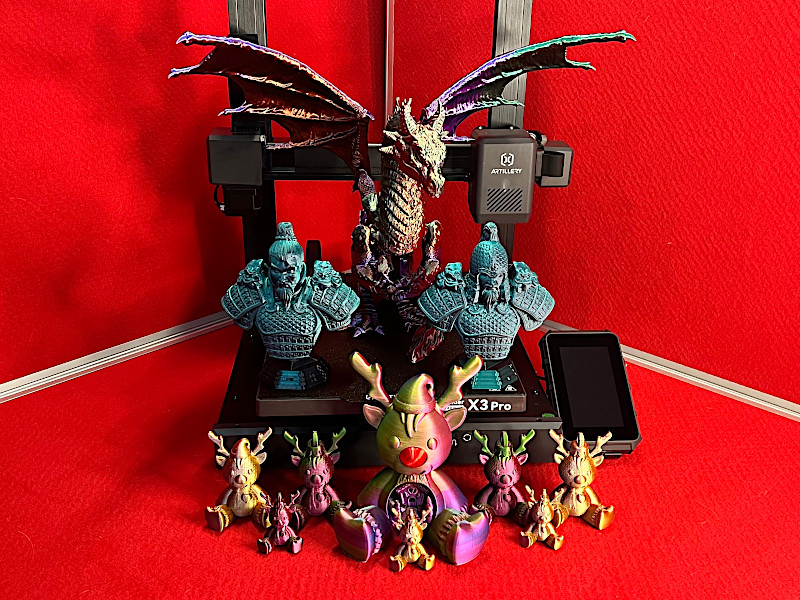
©3DWithUs – Prints and Photo: Richard Hirst
In terms of print quality, the Artillery Sidewinder X3 PRO delivered excellent results. While the printing speed was average compared to some models utilizing Klipper, like their next model, the Sidewinder X4 Pro, it still performed admirably. The build quality of the printer was solid, and all parts fit together seamlessly. One minor issue I met was that the printer tended to be slightly noisy during movements. However, I remain optimistic that with more usage, it will settle in and become quieter over time.
Compare to Other Artillery Printers
Sidewinder X3 Pro vs Sidewinder X3 Plus
The Sidewinder X3 Pro and the Sidewinder X3 Plus are the latest additions to the Artillery3D family show a remarkable balance between simplicity and functionality, catering to the needs of both beginners and experienced users.
The Sidewinder X3 Plus and the Sidewinder X3 Pro both run on Fused Deposition Modelling (FDM) technology and share several similarities. However, the primary distinction lies in their respective sizes, with the Plus model boasting a larger build volume of 300 x 300 x 400 mm, while the Pro model offers a still impressive 240 x 240 x 260 mm build volume.
Artillery3D aims to impress users with exceptional print speeds, asserting that both the Sidewinder Plus and Pro models can achieve speeds of up to 300 mm/s, accompanied by a rapid acceleration capability of 3000 mm/s^2. Furthermore, these printers feature “automatic cleaning” nozzles capable of printing at elevated temperatures of up to 300 °C. The incorporation of dual-gear direct drive extruders, all-metal guide rails, magnetic PEI build plates, and 49-point auto-levelling further emphasize Artillery3D’s commitment to top-notch performance.

Managing and using the Sidewinder X3 Plus and Pro is a breeze, thanks to the user-friendly 4.3-inch colour touchscreen interface. Artillery3D’s integration of an “integrated FFC cable design” ensures a tidy appearance and simplifies maintenance tasks. Additionally, the printers come equipped with a top-mounted LED light, which helps printing even in dimly lit environments.
Epic Articulated Dragon 3D Printed on Sidewinder X3 Pro
©3DWithUs – MP4: Richard Hirst
Artillery3D’s Sidewinder X3 Plus and Sidewinder X3 Pro models, with their blend of enhanced performance and user-friendly features, are indeed noteworthy additions to the 3D printing market. Whether you are a newcomer or an experienced user seeking reliability and efficiency, these printers offer an ideal balance of functionality and convenience. With Artillery3D’s commitment to innovation, these models are poised to leave an impression on the 3D printing community.
Sidewinder X2 3D Printer, SW-X2
The Artillery previously made a large build volume Sidewinder X2 3D Printer, SW-X2, which also received good reviews and an overall rating on Amazon.
Sidewinder X4 Pro Series
The Artillery Sidewinder X4 Pro is the latest machine. As it runs on Klipper firmware, such features as Pressure Advance and Input Shaping are enabled. It is Artillery’s entry for the ‘race for speed’ competition, as this machine has a max printing speed of 500mm/s.
Read Artillery Sidewinder X4 Pro Review by Richard Hirst (Hirsty3D) on 3DWithUs.
Read Artillery Sidewinder X4 Plus Review by Max Funkner on 3DWithUs.
On 3DWithUs, we have a comprehensive comparison guide covering FDM 3D printers. Artillery Sidewinder X3 and X4 series machines, both price and quality-wise, is highly comparable to other machines.
Conclusion and Pros & Cons
Artillery Sidewinder X3 Pro Review
Review Summary
Reviewing the Artillery Sidewinder X3 PRO has truly been an enjoyable experience. As someone who has had an interest in Artillery’s printers for quite some time, I was eager to finally could test and review one myself. The printers from Artillery have always caught my eye due to their well-designed appearance, but there has been a lack of comprehensive information and reviews available. Therefore, I was delighted when I got the chance to put the Artillery Sidewinder X3 PRO to the test, and it certainly did not disappoint.
Setting up the printer was a breeze, and the levelling process was straightforward. The printer’s speed was commendable, and I was impressed by the user-friendly interface screen, which offered some fantastic features. The Artillery Sidewinder X3 PRO also incorporated some thoughtful touches, such as the nozzle wipe system and the LED top light. Considering its price bracket, this printer is one worth considering.
PROS
Price
Excellent build quality
All metal hot end
Excellent UI and screen
Nozzle wipe
CONS
Micro SD slot
Bit on the nosey side on motors