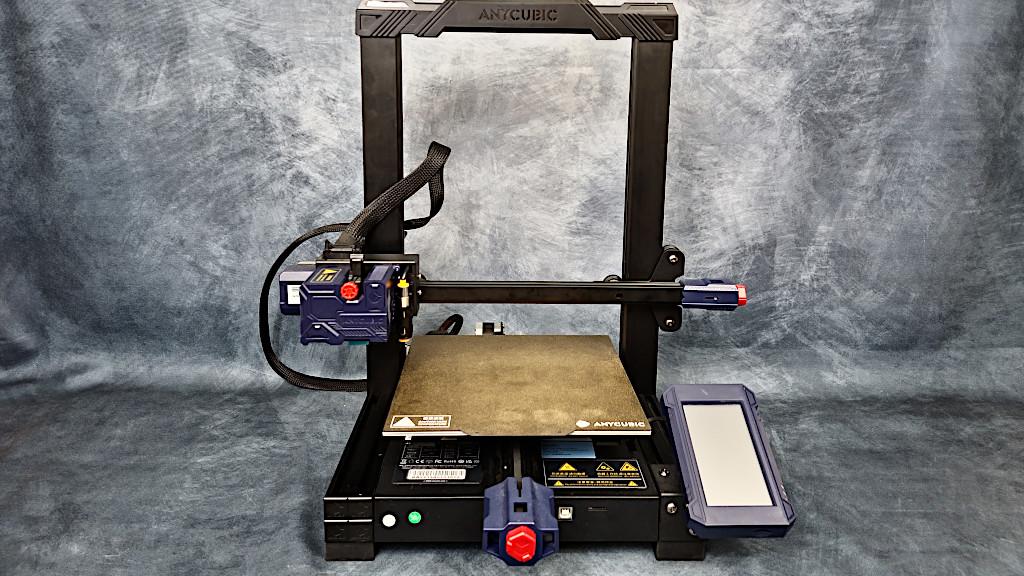
The Anycubic Kobra is the company’s newest FDM model. The Kobra is a user-friendly 3D printer that can be set up and used in less than 30 minutes after opening the box. Let’s have a look at the machine, weigh in on the benefits and drawbacks, put some difficult filaments to the test, and see what the new Kobra’s firmware has to offer.
3D Printer Specifications
25 point Anycubic LeviQ auto-leveling system
Mainboard: 32-bit
Build Volume: 222 x 222 x 252 mm
Layer Height: .1mm to .3mm (0.4mm nozzle)
Print Speed: Recommended 40-55mm/s
Materials: PLA, TPU, ABS, PETG, other
Build Platform: Spring steel magnetic build plate
Interface: 4.3” colour touch screen
Connectivity: MicroSD Card, USB
Comparison Table
Affiliate links:
Amazon
AliExpress
Official Website

© 3DWithUs – Photo: Will Zoobkoff
Kobra Review – Unboxing and Initial Setup
Inside the box, there were: Power cord, Filament holder, Sample Filament, Spatula tool, Display screen, Extra Nozzle, Extra Bowden tube, Pre-assembled printer frame, Pre-assembled base with electronics and bed, SD card and USB reader, side cutters, wrenches, and Allen keys, USB cable for connecting printer to PC, User manual.

© 3DWithUs – Photo: Will Zoobkoff
It only requires around 15 minutes to get everything set up. To assemble the Kobra, only seven screws are required: four in the frame and three in the LCD screen. Install the ribbon cable plug into the printhead assembly after you’ve set up the printer. Before starting, be careful to take out the foam pieces from beneath the heated bed.
From opening the box to printing your first test print, it takes less than a half-hour, and if you’ve put together and set up these types of printers before, it’s even quicker. I had assembled the printer in 10 min and spent another 5 or so doing the first auto-leveling and adjusting the Z-Offset.

© 3DWithUs – Photo: Will Zoobkoff
25 Point Anycubic LeviQ Auto-levelling
You can begin the process by selecting ‘Auto-levelling.’ The Kobra probes 25 distinct spots on the printer bed, and it can identify the metal bed from 5mm away thanks to the innovative ABL sensor. Once complete It will return to the levelling menu, click on Z-offset, and adjust the distance between the nozzle and the bed with a piece of standard paper, you will feel the nozzle starts to grab the paper, move the paperback and forth until there is slight resistance on the paper as you move it.

© 3DWithUs – Photo: Will Zoobkoff
Once done, this calibration is saved, eliminating the need to make frequent adjustments. I generally do level at the start of my printing day or if I have to remove the build plate to clean or remove a print for good measure.
The automatic levelling feature is easy to find on the interface, clearly labelled on the home screen alongside the options to prepare and preheat your filament of choice.

© 3DWithUs – Photo: Will Zoobkoff
Heated Bed – Removable Flexible Spring-Steel Build Plate
The Kobra’s heated bed and flexible spring-steel build plate are especially noteworthy. These characteristics made it simple to remove projects, and the textured surface didn’t pick up any fingerprints.
TPU and PLA were also used to print on the smooth surface of the build plate. The findings were similar to those of a glass bed. Another point in Kobra’s favour.

© 3DWithUs – Photo: Will Zoobkoff
32-bit Motherboard and Noise Levels
The Kobra’s 32-bit motherboard and HDSC ARM Cortex-M4 HC32F460 CPU allow for high-quality prints while remaining relatively quiet. The 4010 blower fan and the motherboard fan generate the majority of the noise, rather than the movement of the printer itself.

© 3DWithUs – Photo: Will Zoobkoff
With the 2209 drivers in full SPI/UART mode, the stepper motors are entirely silent. You can modify the stepper motor voltage and switch between stealthchop and spreadcycle modes with the Kobra. Even when working in the same room as the Kobra, the noise levels are low enough to not be an issue.
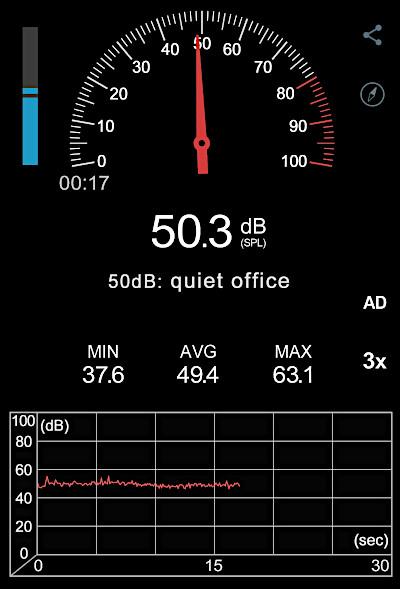
When the fans were turned on 100%, the noise level was roughly 50 decibels. Turning the fans down would help to reduce the noise. While the fans are the loudest element of the machine, the Kobra printing is scarcely audible once you leave the room.
Direct Drive
The Anycubic Kobra now comes with a direct drive-hotend combination. This all-in-one unit makes loading and unloading filament a breeze. It also makes it a lot easier to load flexible filaments like TPU. Another benefit of the direct-drive system is that only a small amount of retraction is required (0.5mm to 1.5mm in my experience with the Kobra).

© 3DWithUs – Photo: Will Zoobkoff
TPU and PETG may require a bit extra. If the linear advance was enabled in the firmware, the retraction settings would be extremely low, virtually zero if calibrated properly. Let’s hope that this function, along with junction deviation, will be added in the future.

© 3DWithUs – Photo: Will Zoobkoff
Filament Choices
It’s also nice that this printer has such a wide selection of filament possibilities. I normally print with PLA, but TPU and PETG have also worked well for me. The direct drive system makes loading and unloading a breeze. You can also print in ABS, which is a widely used material.
Kobra Settings for TPU Filament
When dealing with TPU, make sure to adjust the tension on the extruder arm to avoid crushing and pinching the material. The TPU I used had 94a hardness, so it wasn’t as soft as, for instance, Ninja Flex, which is 85a. You’ll also need to print at 45 to 50mms with the TPU and drop your retraction to between 0.5 and 1.5mm. On my Kobra, I conduct the majority of my TPU printing on the smooth side of the build plate. It leaves a wonderful smooth glass-like gloss on the bottom, in my opinion.

© 3DWithUs – Photo: Will Zoobkoff
Kobra Settings for PETG Filament
I had a little trouble adjusting to print PETG. The PETG filament I used printed at 230°C on the hotend and 80°C on the bed with no adhesion difficulties. With PETG, you’ll also need to print slower. My printer is set to 45mms and the fan speed is set to 40 percent. PETG will have a shorter retraction distance, therefore I went with 1.5mm to 2mm for the spool I was using.

© 3DWithUs – Photo: Will Zoobkoff
I printed several test prints and found the AnyCubic Kobra to be a very capable printer right out of the box. After minor tweaks to the provided settings and Cura profile, I had no failed prints throughout testing, and the Kobra prints were very clean.
Pros and Cons
PROS
– Easy to set up and use for beginners
– Build quality and print quality
– Auto bed levelling out of the box
– Direct drive setup
– 2209 drivers in SPI/UART mode
– stepper motors silent
– Part cooling duct
– Tension adjuster on X and Y-Axis
CONS
– Needs more on-screen options for calibration

Conclusion
During my evaluation, I printed nonstop for weeks, and nothing seemed to be experiencing any issues or strain. After easily 500+ hours of printing, the belts and motors are all in good operating order. Only minor adjustments were required, as well as the normal wear and tear on print nozzles.

© 3DWithUs – Photo: Will Zoobkoff
Is the Anycubic Kobra a good investment? Absolutely. Anycubic has made it simple for anyone to enter the world of 3D printing by producing excellent prints right out of the box with little calibration and tweaks.
Other 3D Prints
Easter-themed Dragon designed by Cinderwing3D.

Print & Photo: Will Zoobkoff
Anycubic Kobra, Anycubic Kobra Plus, and Anycubic Kobra Max Comparison
Anycubic has released three printers in the Kobra line: the Anycubic Kobra, the Anycubic Kobra Plus, and the Anycubic Kobra Max. Please compare the machines in the table below.
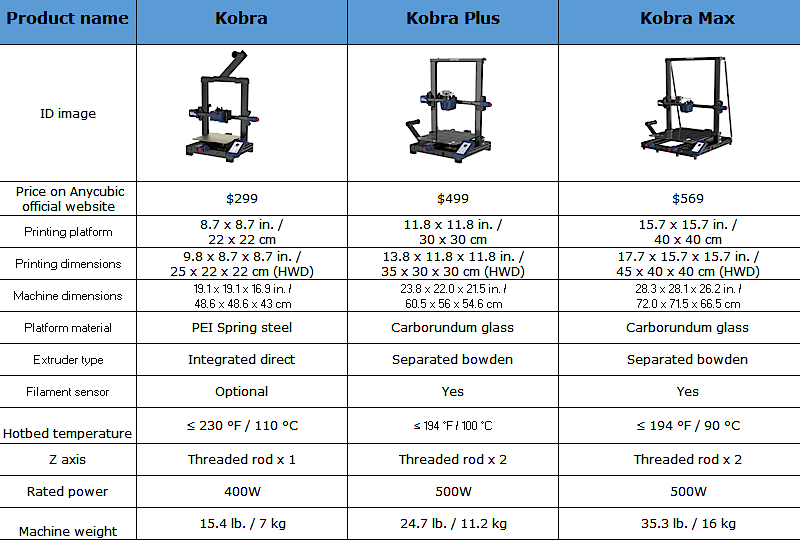
- Read more: Kobra Plus Review
- Read more: Kobra Max Review
The Kobra stands alone as the sole direct-drive machine in the lineup with a PEI spring steel build platform, while both the Kobra Plus and the Kobra Max use a Bowden style extruder with a Carborundum glass build platform and the LeviQ 25 point automatic bed leveling system.
Amazon
AliExpress
Official Website
Anycubic Kobra Star Rating
Review Summary
During my evaluation, I printed nonstop for weeks, and nothing seemed to be experiencing any issues or strain. After easily 500+ hours of printing, the belts and motors are all in good operating order. Only minor adjustments were required, as well as the normal wear and tear on print nozzles.
PROS:
– Easy to set up and use for beginners
– Build quality and print quality
– Auto bed levelling out of the box
– Direct drive setup
– 2209 drivers in SPI/UART mode
– stepper motors silent
– Part cooling duct
– Tension adjuster on X and Y-Axis
CONS
– Needs more on-screen options for calibration

Great stuff! I was new to 3d printing and started with the Anycubic Vyper. It was hard to find tutorials for this model. But sir you have stepped up and lead the way in my book! Thanks for your time and please keep the videos rolling!