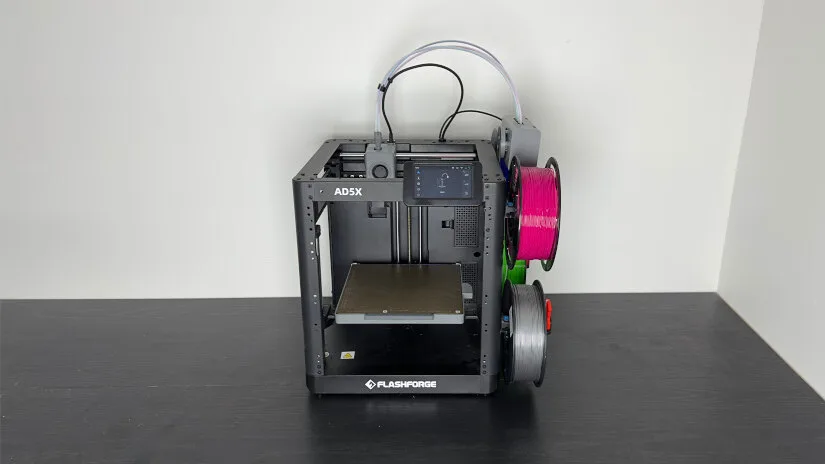
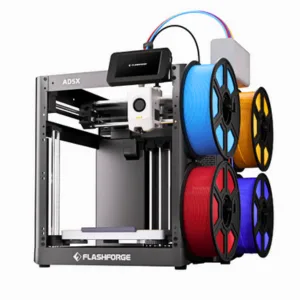
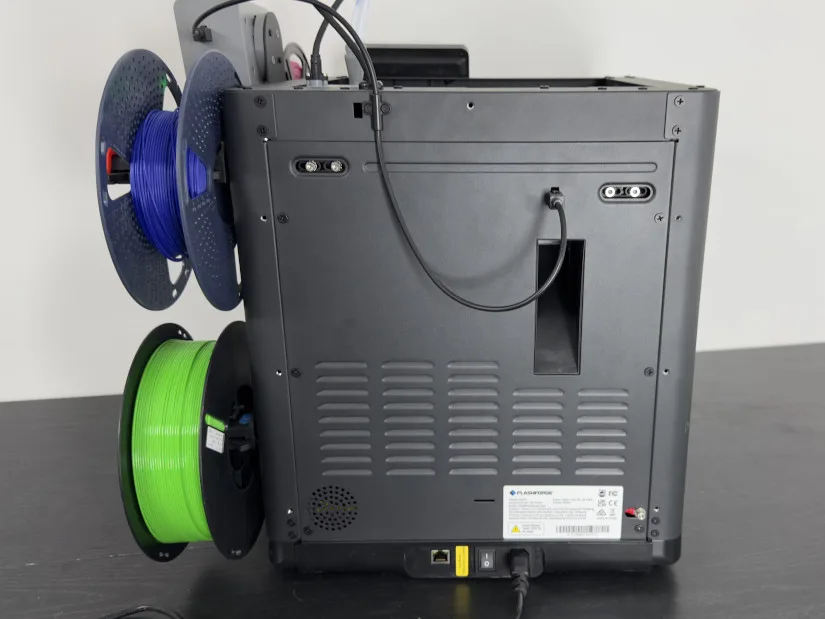
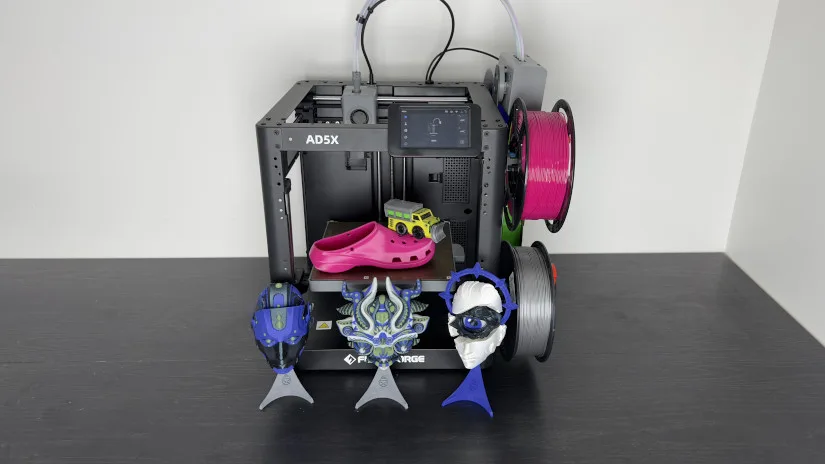
The Flashforge AD5X, the newest model in the Adventurer lineup, adds multi-color printing – specifically, multi-color printing with TPU 95A support right out of the box. This is a significant step forward for flexible multi-color printing. Built on the success of the AD5MP, the AD5X retains the same ease of use and solid foundation as its predecessor, while introducing the new 4-color IFS (Intelligent Filament System) with four spools mounted on the side of the printer. This space-saving design also makes filament changes quick and easy.
We’ll examine the AD5X and its IFS system in greater detail in this review to assess how well it manages multi-color TPU printing. To evaluate print quality and spot any problems that may come up, we’ll also test it on prints that have a lot of colour changes. As usual, we’ll wrap up with final thoughts and a list of pros and cons.
Table of Contents (Jump to a Section)
- Specifications
- Unboxing – What’s Included
- Setup and Design
- Orca Flashforge Software
- Testing and Results
- Compare to Other 3D Printers
- Conclusion and Pros & Cons
Where to Buy the Flashforge AD5X
Price: $399-$549
Compare the Prices & Bundles & Parts:
Official Store | Amazon | AliExpress
Flashforge AD5X Specifications
• Printing technology: FDM (Fused Deposition Modeling)
• Print volume: 220 x 220 x 220 mm (8.66 × 8.66 × 8.66 inches)
• Maximum nozzle temperature: 300°C (572°F)
• Maximum bed temperature: 110°C (230°F)
• Printing speed: Up to 600 mm/s, standard 300 mm/s
• Extruder type: Direct drive
• Nozzle diameter: Standard 0.4 mm
• Filament diameter: 1.75 mm
• Construction: CoreXY
• Z-axis configuration: Single motor with 3 Linear rods
• Bed leveling: Automatic print bed leveling
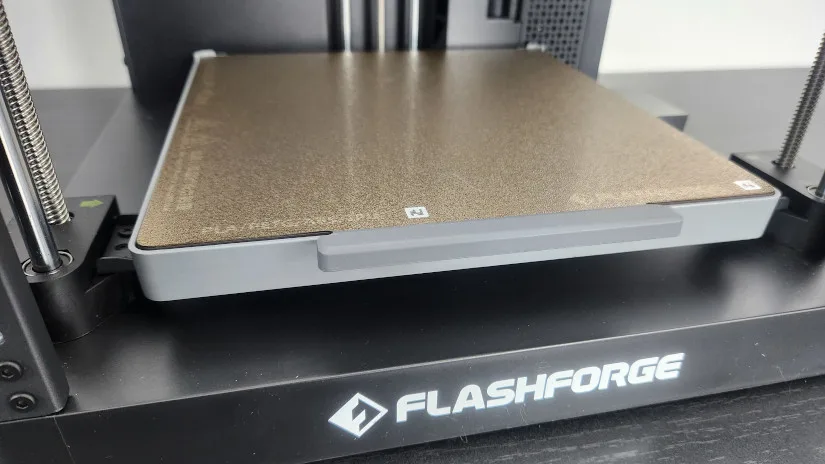
• Heating bed: Dual-sided PEI magnetic printing bed, flexible
• Operation: 4.3-inch touchscreen, color
• Connectivity: USB, WLAN
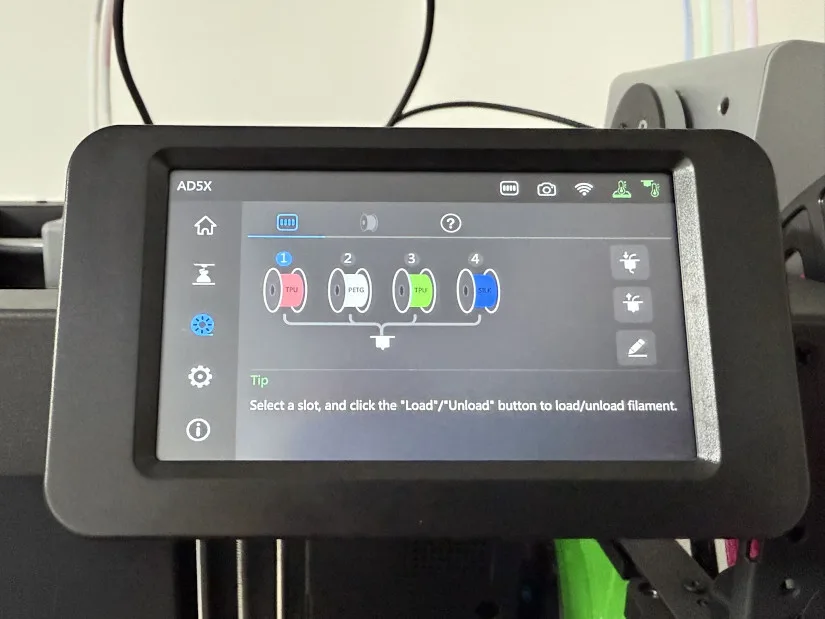
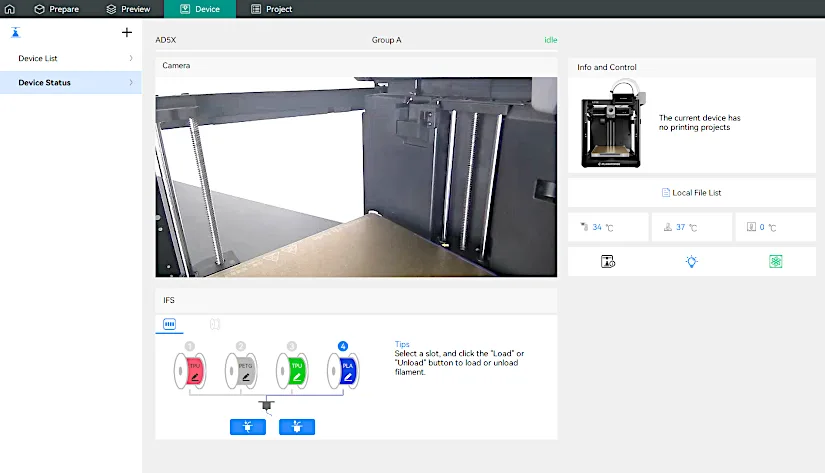
• Multi-Color: IFS (Intelligent Filament System) 4 color TPU 95A compatable
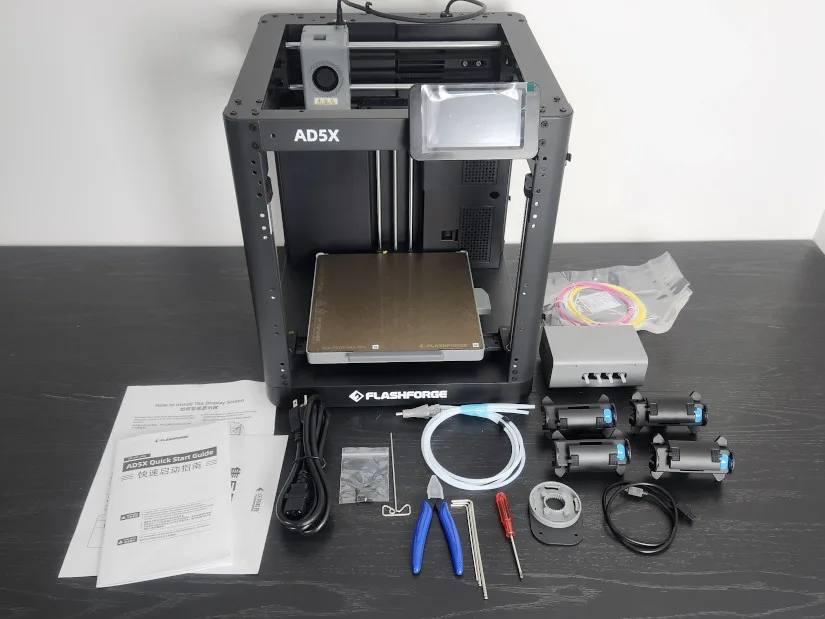
What’s in the Box
• AD5X • IFS module • Mounting plate • Spool holder x4 • 4.3” Touch screen • IFS connection cable • Power cord • Phillips screwdriver • Allen wrenches • Side cutters • Unclogging Pin • Glue stick • Cable clip • Assembly screws • User manual • Grease
Setup and Design
The Flashforge AD5X comes mostly assembled—just remove all the packing materials, attach the touchscreen to the front of the printer, mount the bracket for the IFS, and secure the IFS module to the bracket. Next, connect the Bowden tubes from the IFS to the print head, slide the spool holders into place on the side of the printer, and plug in the IFS control cable, securing it to the rear of the machine with the supplied cable clip.
©3DWithUs – Photo: Will Zoobkoff
Before powering on, be sure to remove the three screws securing the print platform for shipping. These are clearly marked with arrow stickers to make them easy to locate. Once everything is assembled, you’ll be guided through the initial setup process via the touchscreen.
– Design. In terms of design, the AD5X shares the same sturdy frame as the previous AD5MP. An optional enclosure is available, which is especially useful if you work with temperature-sensitive materials. You can also find printable files online to create the enclosure frame yourself, though you’ll need to source acrylic panels separately.
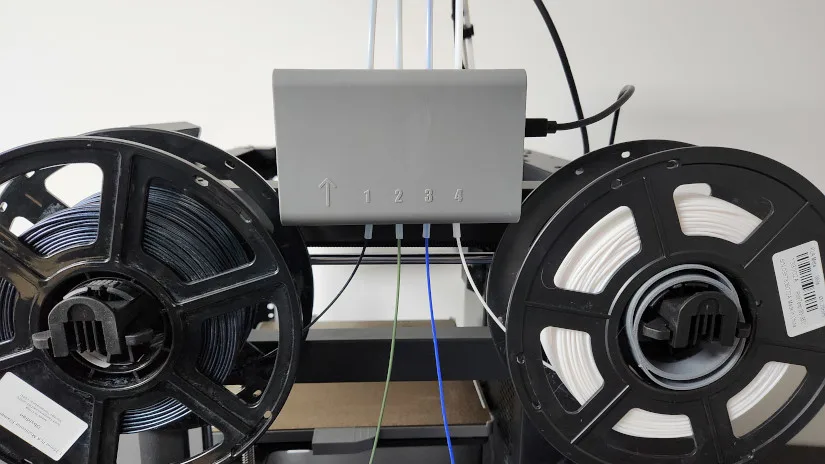
The spool holders feature light recoil tension to help minimize filament slack between the spools and the IFS. Additionally, the AD5X supports an integrated camera (the same model used in previous Adventurer printers), allowing you to monitor prints remotely and capture time-lapse videos.

Thanks to its compact footprint and side-mounted spool system, the AD5X saves space compared to other multi-color printers that rely on bulky external spool-loading setups.
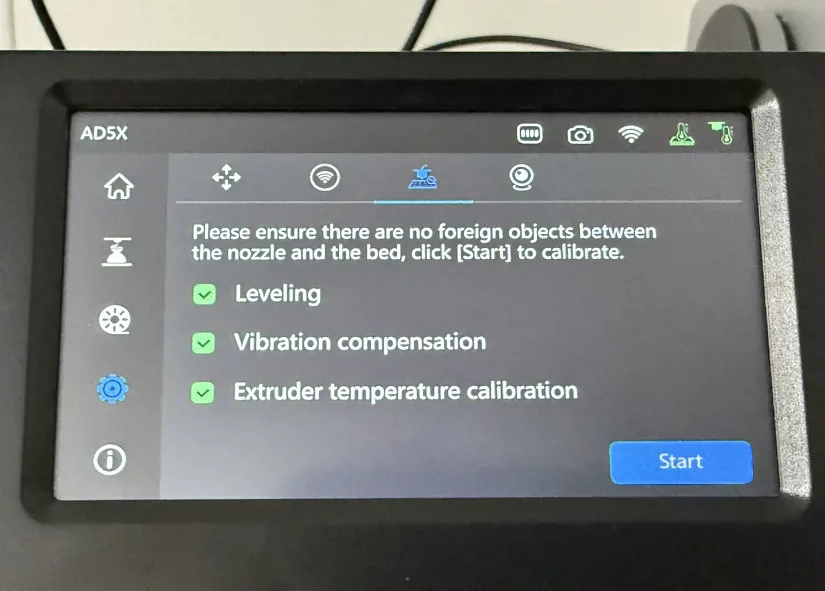
– Display. The menu system of the Flashforge AD5X follows the Adventurer series’ user-friendly design. Its intuitive interface makes it simple to use, even for beginners. You can easily access basic functions like calibrating the printer, changing the filaments you have loaded, and loading and unloading filament.
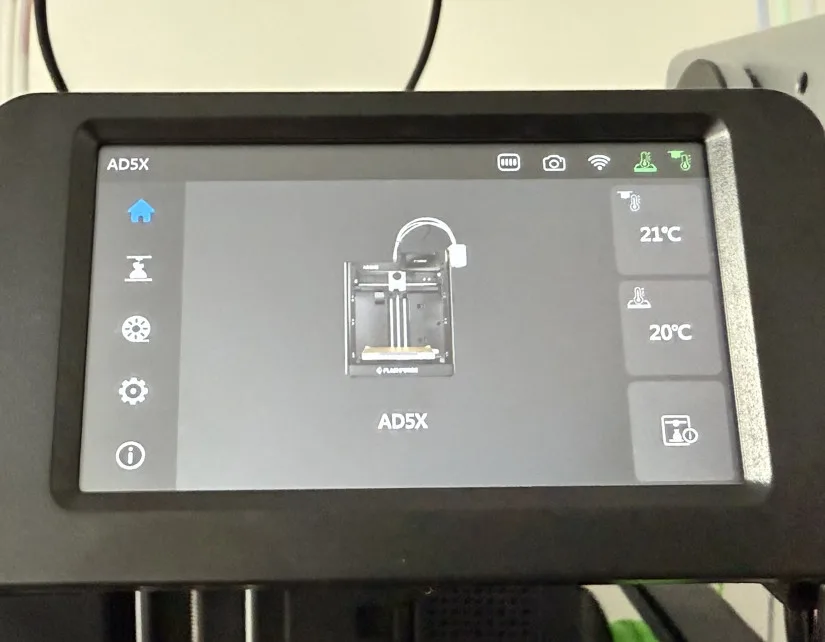
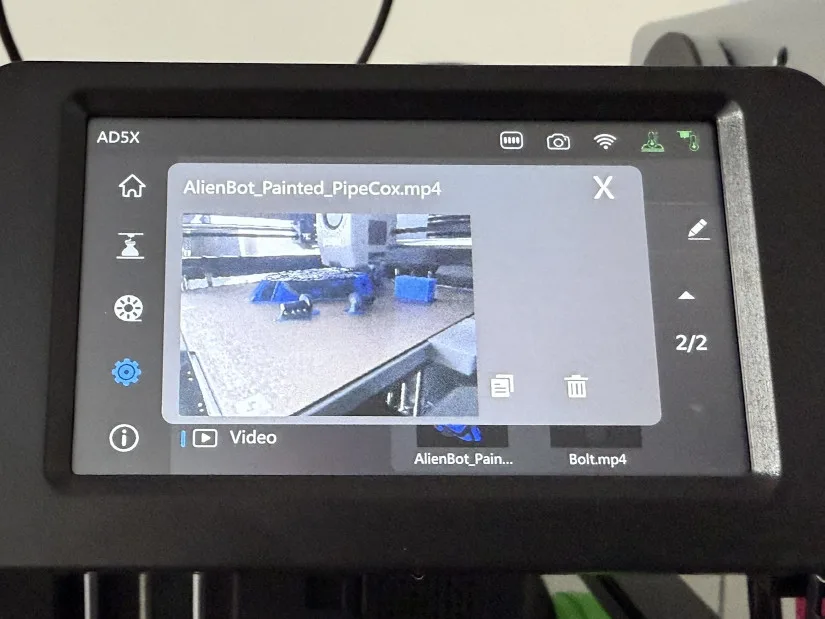
If you have the optional camera installed, you can view time-lapse videos directly on the touchscreen using the menu. This adds a useful way to review completed jobs or monitor your prints. Setting up the printer is easy and doesn’t require navigating complicated submenus because everything is cleanly laid out.
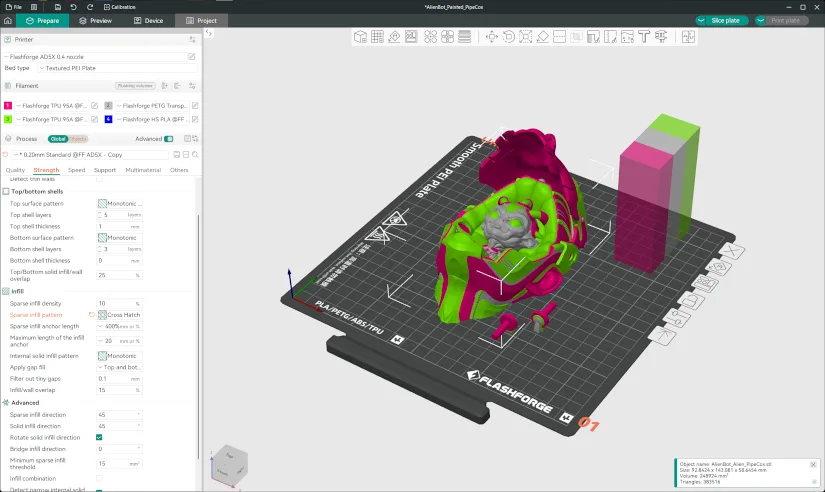
Software – Orca Flashforge Slicer
We used Orca Flashforge, a modified version of the well-known Orca Slicer that many users already depend on for their daily slicing requirements, for all of the slicing that we did during our testing. Anyone who is already familiar with Orca Slicer will find the transition simple because the interface and workflow are still familiar.
We started with the default slicing profiles pre-installed by Flashforge, which are well-optimized for the AD5X at the stock speed of 300 mm/s. To better suit our test prints, we made a few minor adjustments – most notably increasing the number of walls from two to three for added strength.
– Infill Patterns. We also opted to use the crosshatch infill pattern across all prints, as it offers a reliable balance between print speed and structural integrity. We decided to use the crosshatch pattern for infill in all prints because it provides a good balance between speed and strength. Instead of employing a set figure, we modified the infill percentage according to the requirements of every individual model.
We also changed the wall generator setting from the default Classic mode to Archane, which optimizes wall paths for improved surface finish and strength. We did observe some trade-offs, even though Archane produced excellent results on many prints. Slicing times increased dramatically for more complex models, and in some instances, the slicer was unable to finish the process when using Archane. These problems were fixed by switching back to the Classic wall generator.
Test Printing Results
Multicolor TPU – Print in Place – Snowplow
Since the Flashforge AD5X supports TPU right out of the box, we decided to start our testing with a multi-color TPU print. For this first test, we chose a print-in-place snow plow model by Fixum Dude, a fun and mechanically functional design. We used a variety of TPU filaments for the different colors: Flashforge Yellow, Creality Green, Overture Space Grey, and Inslogic Black.

3D Model by fixumdude on Printables
©3DWithUs – Print and Photo: Will Zoobkoff
The print was finished in a little more than 17 hours, and the outcome was amazing. The yellow TPU had one small problem; it was semi-transparent and let some of the underlying colours peek through. Even so, the overall print quality was superb, especially given that TPU’s flexibility makes multi-color printing uncommon.
The fact that the AD5X can handle multi-color TPU printing right out of the box truly sets it apart from the competition. While other printers are beginning to offer TPU support, many still require a stiffer variant of TPU to achieve reliable results. This limits their usefulness in real-world applications where genuine flexibility is essential. In contrast, the AD5X handles standard TPU with ease, making it a strong choice for users looking to expand into flexible, multi-color prints without additional hardware or loss of flexibility.
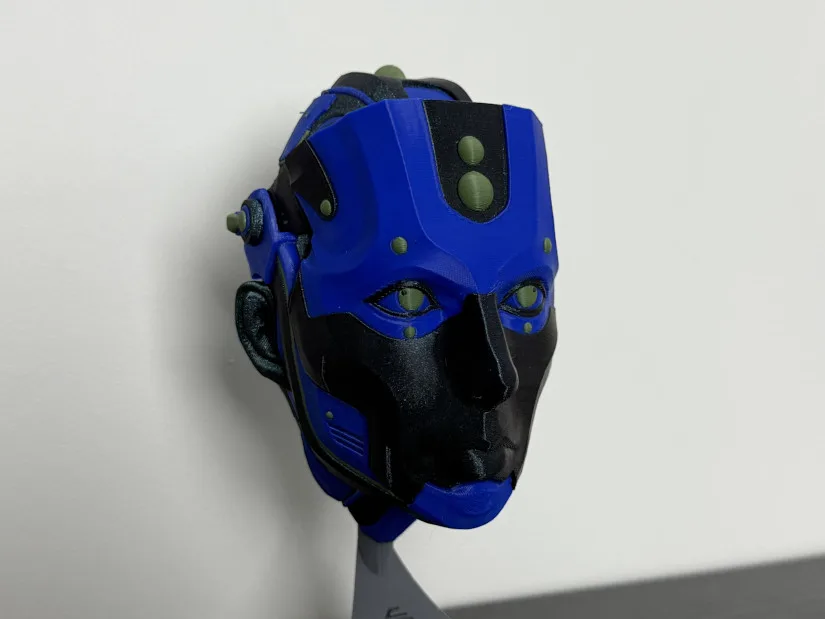
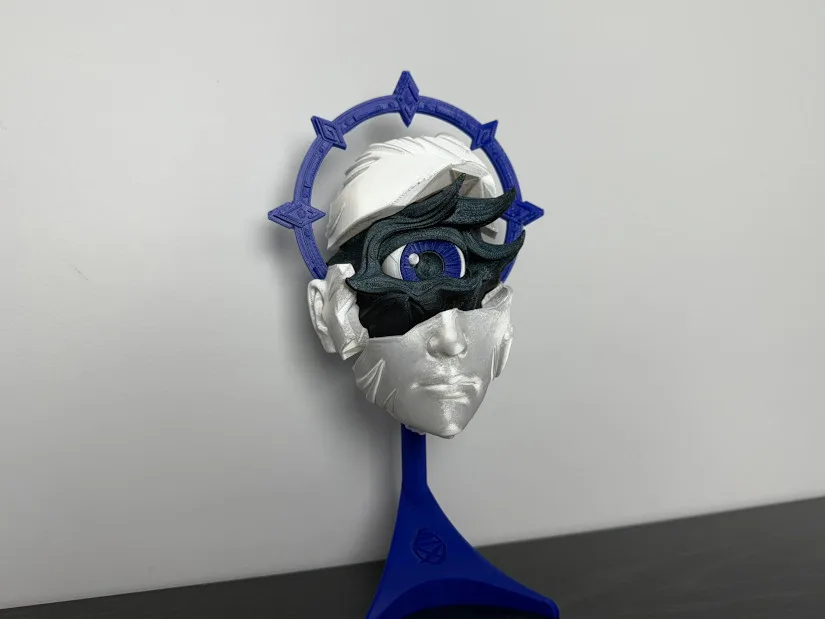
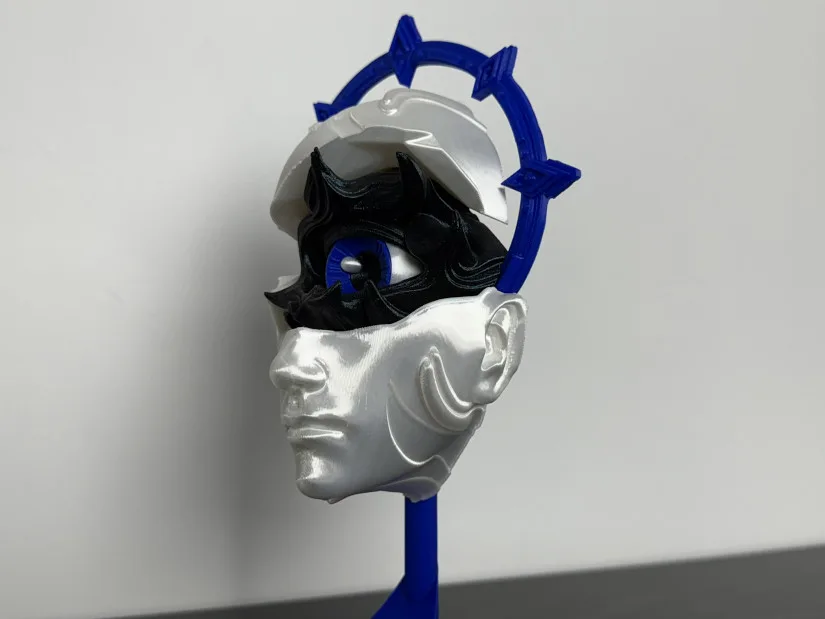
Multicolor PLA – Alienbot by Pipe Cox
For the next print in our testing, we turned to one of our favorite model makers, Pipe Cox, and selected the Alienbot wall mask. For this print, we used a mix of filaments: Flashforge Cobalt PLA, Sunlu Blue PLA Plus 2.0, and Anycubic Green PLA.
3D Model by Pipe Cox on MyMiniFactory
©3DWithUs – Print and Photo: Will Zoobkoff

The print took just under 23 hours to complete, and the results speak for themselves. The colors complement each other beautifully, and the overall print is clean, detailed, and free of any defects. The face mask opens and closes with ease, and the ear pieces locked into place without any issues.
Pipe Cox is well known for a wide range of multi-color wall masks as well as wearable masks. When paired with the right color combinations, these models can result in visually striking and highly displayable prints – and the AD5X handled this complex, multi-material print with impressive precision.
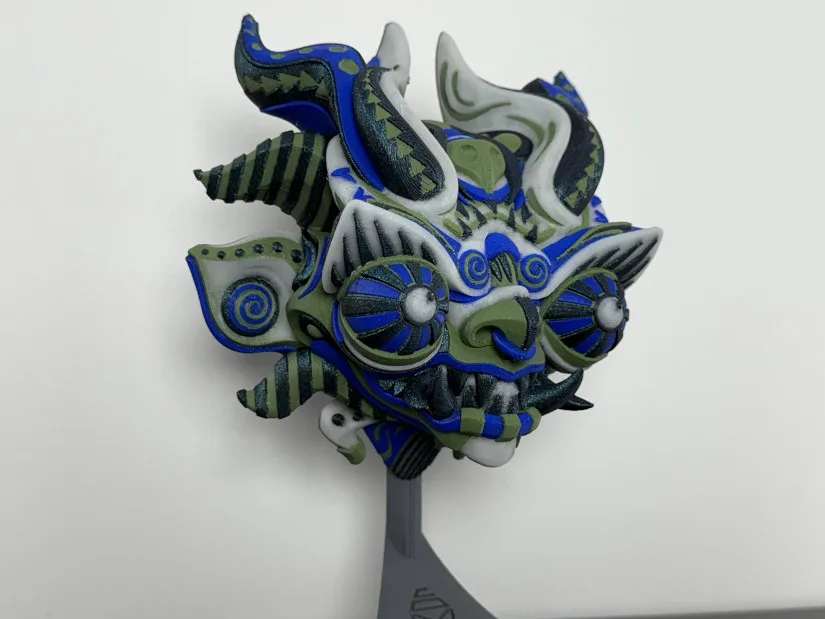
46 Hours Print – Supay
For our next test, we selected the Supay Wall Mask, yet another excellent Pipe Cox design. This specific design is a showcase for multi-color printing with nearly 1,000 colour changes across the print.
3D Model by Pipe Cox on Thangs
©3DWithUs – Print and Photo: Will Zoobkoff
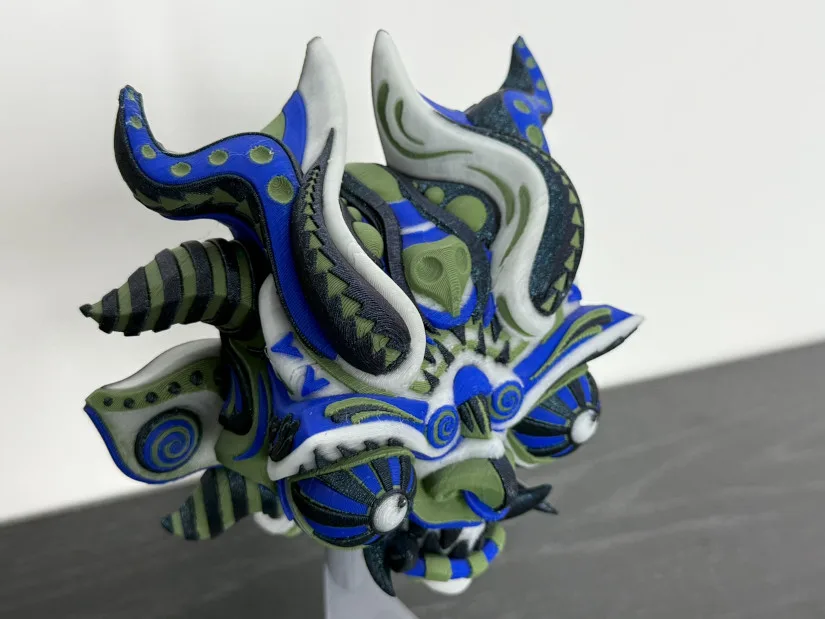
To completely capture the detail of the model, we used a vibrant mix of filaments including Sunlu Glow-in-the-Dark Blue, Flashforge Obsidian PLA, Anycubic Green PLA, and Sunlu Blue PLA Plus 2.0. Due to the complexity of the model and the great number of colour changes, the print took an astonishing 46 hours to complete.
The result produced made the long print time quite worthwhile. Because it is full of clear, vibrant details that really stand out, the model is a perfect example of what an excellent multi-color printer like the Flashforge AD5X can do. Throughout the print, the quality was consistent; the colour transitions were flawless without any problems.
As expected with a model involving numerous color changes, this print generated more filament waste compared to simpler jobs. However, the AD5X offers an advantage here – its waste levels were noticeably lower than those of many other multi-color systems we’ve tested. Still, filament waste remains an issue that can accumulate over time.
Multi Part – Eon
We printed this new multi-piece Eon Mask from Pipe Cox’s always expanding library. We decided to print each component in single colours separately to cut down on filament waste brought on by colour changes. With all the components requiring only 5 hours to finish, this strategy greatly accelerated the procedure. The prints were fast and efficient without the delays brought on by multi-color transitions.
3D Model by Pipe Cox on MyMiniFactory
©3DWithUs – Print and Photo: Will Zoobkoff
For this wall mask, we used Sunlu Silk White PLA, Sunlu Blue PLA Plus 2.0, and Flashforge Obsidian PLA. The parts fit together cleanly and snugly, with no visible flaws, overhang issues, or warping. While the design itself is relatively simple compared to some of Pipe Cox’s more elaborate masks, the strategic use of color really makes the final result stand out.
One crucial piece of advice for printing with silk filaments is to make sure you enable “do not slow down outer walls” in your filament settings under cooling. When working with silk materials, a consistent wall speed contributes to a smoother finish and shine. In contrast to the 220°C we usually use for standard PLA, we raised the printing temperature to 245°C and set the outer wall speed to 100 mm/s for our print. These modifications assisted in giving the silk sections of the print a smooth, glossy surface finish.
Wearable – Crocs Shoes
We decided to go with something a little different for the final print in our testing: a wearable Croc-style shoe. The print took about 7.5 hours to complete using Flashforge Magenta TPU. We reduced the model to 70% of its original size in order to ensure it would fit on the build plate because of the AD5X’s build volume restrictions.
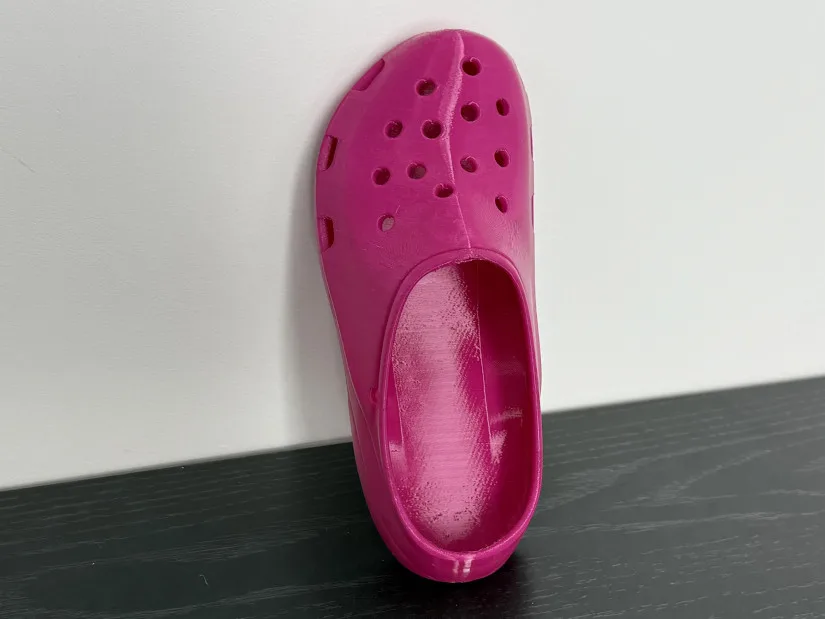
3D Model by MakerVerse Designs on Printables
©3DWithUs – Print and Photo: Will Zoobkoff
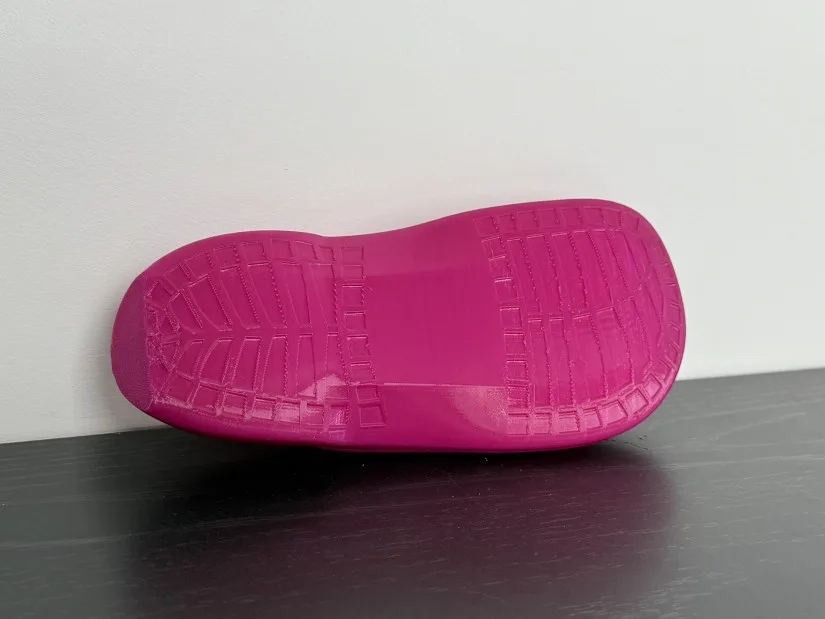
Pre-positioned supports in the model were used to help ensure there were no failures or sepration from the print bed. The outcome was excellent: the shoe printed neatly, with no gaps or stringing between the holes. Even the challenging overhang on the shoe’s top printed beautifully, displaying superb detail and layer adhesion.
Size restrictions may make it impossible to print an adult-sized shoe on the AD5X, but the fact that this intricate TPU model printed flawlessly—despite being held together mostly by a tiny piece at the heel—is a powerful indication of the accuracy and dependability of the Flashforge AD5X.
The AD5X significantly increases your creative potential by supporting TPU, PLA, and other materials. From your first print to your hundredth and beyond, it offers a dependable and consistent printing experience thanks to its linear rods on all axes and the same robust metal frame as the AD5MP.
Compare Flashforge AD5X to Other 3D Printers
The Flashforge Flashforge AD5X is Flashforge’s Core XY printer, building upon its previous Adventurer series machines.
Compare to the Flashforge 3D printers:
Compare to similar builds, volume and price range, FDM 3D printers.
These three machines are close competitors to the Flashforge AD5X in terms of price, CoreXY build, and build volume. What makes the AD5X stand out is its compact design with side-mounted spools, which many users may find convenient because of its smaller footprint. Additionally, its ability to print multi-color TPU is genuinely impressive.
Have questions? Feel free to ask in the comment section below.
For a wider discussion or to share your own Flashforge AD5X prints, join us in the forum:
Conclusion and Pros & Cons
Price: $399-$549
Compare the Prices & Bundles & Parts:
Official Store | Amazon Store | AliExpress
Flashforge AD5X Review
Review Summary
The Flashforge AD5X stands out as a versatile, capable, and user-friendly multi-color 3D printer that delivers on both performance and innovation, especially when it comes to flexible filament printing. Its ability to handle TPU 95A right out of the box, combined with the compact and efficient 4-color IFS system, gives it a significant edge over many competitors in the same category. From complex, multi-material wall masks to functional TPU parts, the AD5X maintained strong layer adhesion, smooth transitions, and consistent print quality across all our tests.
Its intuitive software, solid construction, and thoughtful design choices – such as side-mounted spools and integrated time-lapse camera support – make it a smart choice for hobbyists, makers, and professionals looking to expand their creative potential without jumping through hoops.
While print waste from frequent color changes is something to consider, the AD5X still outperforms many multi-color systems in terms of efficiency and material usage. Whether you’re printing vibrant art pieces or flexible functional parts, the Flashforge AD5X proves itself to be a dependable workhorse with a flair for color.
Pros
• High-speed printing up to 600 mm/s
• Clean and reliable print quality
• Multi-color TPU (95A) support straight out of the box
• User-friendly setup and operation
Cons
• No enclosure included (optional enclosure available or can be 3D printed)
• Filament waste remains an issue, though somewhat reduced compared to other systems


Fine review, thx!
I’ve finished my prints on the ADX5. Out-of-the-box quite good quality, after some unlogical quirks in the setup. First print nearly perfect and FAST, but wrong leveling due to wrong predefined bed type – ok.
First multi-color print on the ADX5 in PLA from different vendors: Kobayashi Fidget Cube, https://www.thingiverse.com/thing:1790624, split with Meshmixer (according to AI, this Orca-Version can’t split for coloring, as it sets all Z-hights to zero).
Slicer calculated 44 grams, print results to 40 grams – and 154 grams color changing waste piling up behind the printer. BIG problem.
Problems with under-extrusion here for 3 of 4 filaments, even small missing areas. Would like to calibrate the printer, but Flashforge obviously removed these features from their version of Orca.
Another annoyance: Each time you switch computers, you have to rebind Orca with your Flashforge account, breaking the other connection.