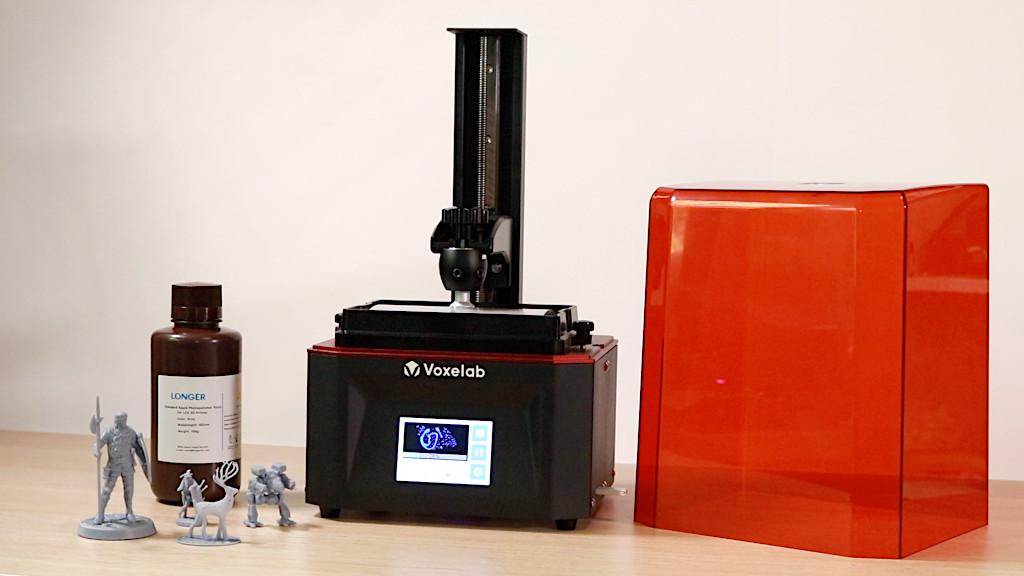
The Voxelab Polaris is an entry-level MSLA resin 3D printer that can be purchased for less than $150, which makes it one of the most budget-friendly 3D printers currently available on the market. Despite this low price tag, I found the Polaris to be a surprisingly capable machine that exceeded my expectations and worked well when printing small, detailed models. If you are interested in resin 3D printing and don’t mind the relatively slow print time of 10 seconds per layer, the Polaris is an excellent way to get started with your first resin 3D printer.
3D Printer Specifications:
Layer Height: .025mm to .1mm
Print Speed: 10 sec/layer
Build Volume: 115 x 65 x 155 mm
Material: 405nm wavelength UV resin
Masking LCD Resolution: 2560 x 1140 px
Masking LCD Size: 5.5” RGB LCD
Connectivity: USB Thumb Drive
Interface: 3.5” Color Touchscreen LCD
Product affiliate links: 3DWithUs is supported by its audience. Purchases via some links may earn us a small commission.
Voxelab Polaris
on Amazon
on AliExpress
Voxelab Polaris Review – Hardware Features
The bent sheet metal enclosure on the base of the Voxelab Polaris feels heavy and sturdy, and doesn’t feel like a budget 3D printer at all. The 3.5-inch LCD interface is bright and responsive, and the side-mounted USB input makes it easy to plug and unplug a thumb drive. The resin vat has a marker on the top to indicate a max fill line and also has slots on the side to mount the vat securely to the base of the Polaris.

(Photo: Andrew Sink)
I removed the case from the Polaris to get a better look at the inside of the machine, and I was impressed with the attention to detail on the wiring of this printer. The terminals were all screwed down securely, and the wiring had been routed in such a way that replacing components would be easy.
As an MSLA 3D printer, the Polaris operates by projecting a UV LED through a masking LCD to cure a single layer of resin at a time. The Polaris uses a standard (or RGB) masking LCD, so each layer takes about 10 seconds to cure.

(Photo: Andrew Sink)
Simple and easy build platform leveling
Leveling the build platform on a resin 3D printer is a critical part of the calibration process, and this requires a build platform that sits flush against the masking LCD to create an evenly-cured layer. This process can be tedious, but the two-bolt leveling system used by the Voxelab Polaris makes this process fast and simple.

(Photo: Andrew Sink)
Just like the platform on the Elegoo Mars 2 Pro, the leveling process consists of a few simple steps. First, loosen the two bolts on the bracket, drop the platform until it is flush with a piece of paper that sits between the masking LCD and the build platform, and finally, retighten the bolts and set the Z = 0.

(Photo: Andrew Sink)
I didn’t run into any calibration-related issues while testing the Polaris, and this simple leveling process ensures that beginners or new users won’t get frustrated trying to figure out why their prints aren’t printing properly.
The build volume of the Polaris is 4.53” x 2.56” x 6.1”, which makes it a little on the small side for a resin 3D printer, but it’s still plenty large enough for printing miniatures and other small models.

Demo Model Print and Review
The Voxelab Polaris includes a demo model on the thumb drive titled ‘Voxelab deer.stl’. The model is a deer with an intricate Voronoi pattern applied to it, which gives it a very delicate appearance. This is the sort of model that would be very difficult to print on an FDM 3D printer like the Fokoos Odin-5 F3 due to the number of retract moves involved.

(Photo: Andrew SInk)
Using the standard resin profile for the Polaris included with Chitubox, the deer printed without any issues, and the Voronoi pattern resulted in a very elaborate and accurate model. Considering how thin the beam elements on the deer were (between .35mm and .45mm when measured with calipers), this model represents an ambitious first test that the Polaris easily accomplished.

(Photo: Andrew Sink)
Chitubox Slicer Software
The Voxelab Polaris uses Chitubox to prepare files for 3D printing, and the included thumb drive ships pre-loaded with the Chitubox app. The current version of Chitubox (V1.9.0 as of the writing of this article) has a built-in profile for the Polaris, so you don’t need to do any tweaking or adjust any settings to get up and printing.
The default profile for the Polaris is set to a 10 second per layer cure time, and a 60 second cure time for the first six bottoms layers. To test out the printing process, I loaded the Madcat Mk II Prime 3D model by Matt Mason, angled it, generated support material, and saved the file to a thumb drive for printing.

(Photo: Andrew Sink)
3D Printing Miniatures on the Voxelab Polaris
Even before removing the support material and rinsing the excess resin, it’s clear that the Voxelab Polaris captured much of the fine detail that was present in the model. The 2K 5.5-inch masking LCD screen of the Polaris gives an X/Y accuracy of 47 microns (0.47mm), which is on par with other 2K LCD 3D printers like the Elegoo Mars 2 Pro.

(Photo: Andrew Sink)
After rinsing the model in a wash station and curing the model fully, the detail really popped out on the sharp edges of the model. The small holes on the shoulder-mounted rockets were crisp and well-defined, and the side paneling looked sharp. I printed several other miniatures using a similar process, and they were equally impressive.

(Photo: Andrew Sink)
Conclusion
To sum up my Voxelab Polaris review, considering the price of the machine, it’s hard to imagine a better one for a beginner interested in resin 3D printing. With similar specifications to other machines that sell for over $250, the Polaris is a printer that has quite a lot to offer. The primary drawback of this printer is the relatively slow per-layer cure time of 10 seconds per layer, which is reduced to 2.5 seconds and below on printers like the Elegoo Mars 2 Pro which use a Mono LCD screen for faster curing.
Voxelab Polaris
on Amazon
(affiliate links)
on AliExpress
If you’re interested in learning more, you can read about the Polaris on the Voxelab site and you can purchase one through Amazon or AliExpress.
Read More: Best Resin 3D Printers
Here you will find the best resin 3D printers. This type of machines is widely used by professionals and hobbyists. Let’s briefly look at the differences between SLA, DLP, and LCD processes, the latest innovations, and see where such machines are used…