The Snapmaker Artisan 3-in-1 is a unique multifunctional fabrication machine. Combining 3D printing, laser engraving, and CNC carving into a single system, it offers versatility that many creators will find invaluable. With its premium metal construction, enhanced and continually upgraded features, and safe, user-friendly design, the Artisan is built to cater to both hobbyists and professionals. In this comprehensive review, we will explore the Snapmaker Artisan Premium, create a variety of impressive projects using different materials, compare it to other 3D printers, lasers, and CNC machines on the market, and outline its Pros and Cons.
Table Of Contents (Jump to a Section)
- Specifications
- Unboxing and Assembly
- Design and Optional Add-Ons
- 3D Printing Mode
- Laser Mode
- CNC Mode – Work In Progress
- Compare to Other 3D Printers, Lasers and CNC
- Conclusion and Pros & Cons
Price: $2,599 – $3,247
Compare the Prices & Bundles:
Official Store | Amazon
Snapmaker Artisan Premium Specifications:
Machine Dimensions: 580 mm × 620 mm × 634 mm
Enclosure Dimensions: 665 mm × 943 mm × 705 mm
3D Printing: Dimensions: 400 mm × 400 mm × 400 mm
3D Printing Module: Dual Extruder, Quick Swap, Direct Drive
Max Temperature: 300°C
Max. Recommended Printing Speed: 180 mm/s
Build Plate: Double-sided PEI-coated Glass
Max. Heated Bed Temperature (Inner Zone): 110°C
Max. Heated Bed Temperature (Outer Zone): 80°C
Laser Module: 40W
CNC Module: 200W
Connectivity: WiFi, USB
Software: Luban, other
External Controller
Screen: 7″Touchscreen
Industrial-Grade Linear Rails
Quick Swap Design
Snapmaker Artisan Premium Unboxing and Assembly
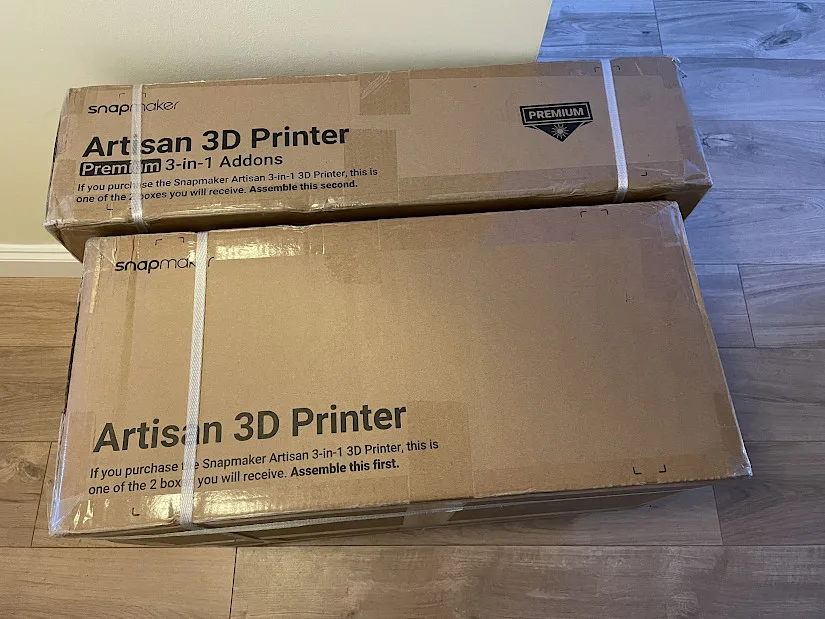
Snapmaker Artisan Premium arrived in two not-too-big but heavy boxes. Other add-ons, like a rotary module and extra nozzle-size hotends, came in different boxes. As this is a ‘assemble-it-yourself’ product, it is recommended to dedicate time and space beforehand.
©3DWithUs – Print and Photo: Max Funkner
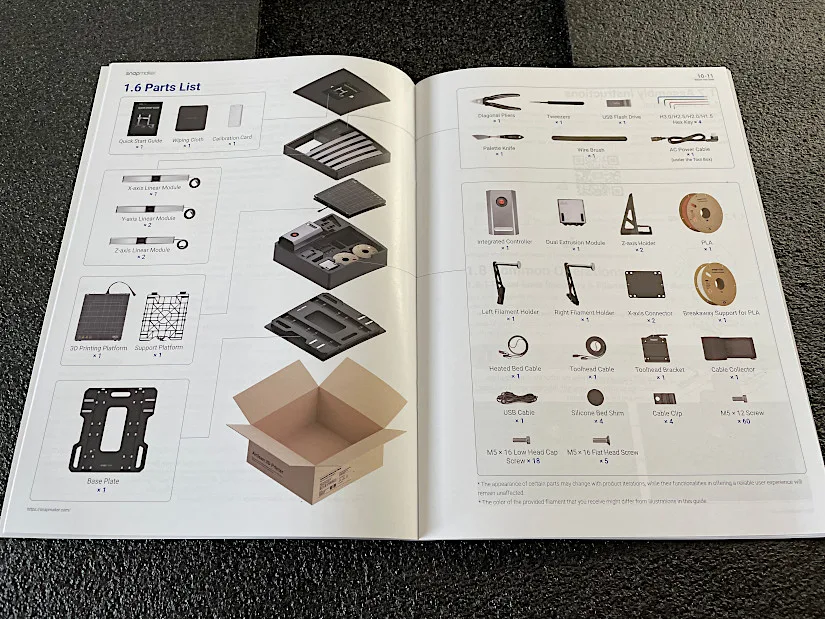
– What’s Included. Both boxes contain numerous parts, which are well outlined in the instructions.
©3DWithUs – Photo: Max Funkner
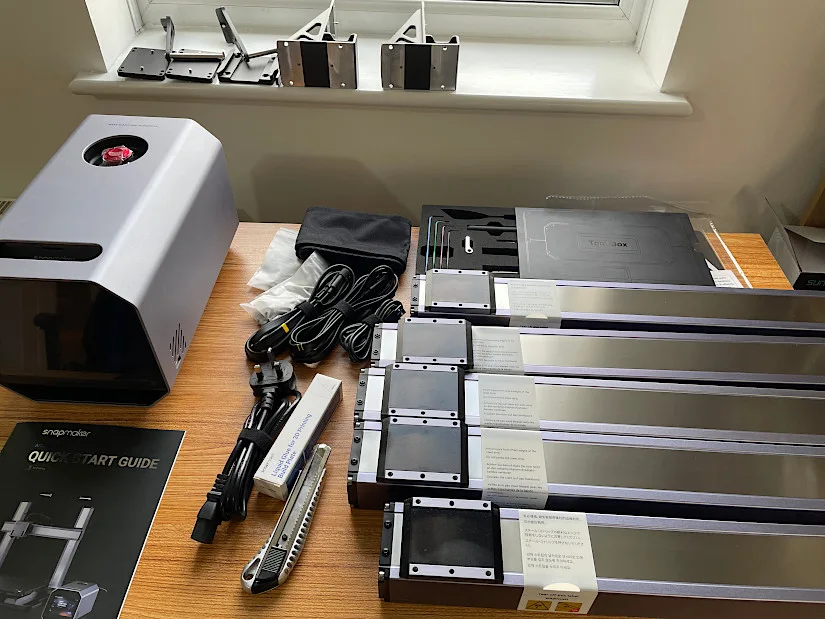
– Instructions. It was tricky to find the instructions using the QR code. They provide a full list of videos dedicated to Snapmaker Artisan assembly and setup, but the video I needed first was the 10th on the list. Here is the link to the machine body assembly. Overall, the video tutorials were very helpful. For example: As the machine parts are bulky and heavy, using the packaging foam as a supporting structure was a helpful trick.
©3DWithUs – Photo: Max Funkner
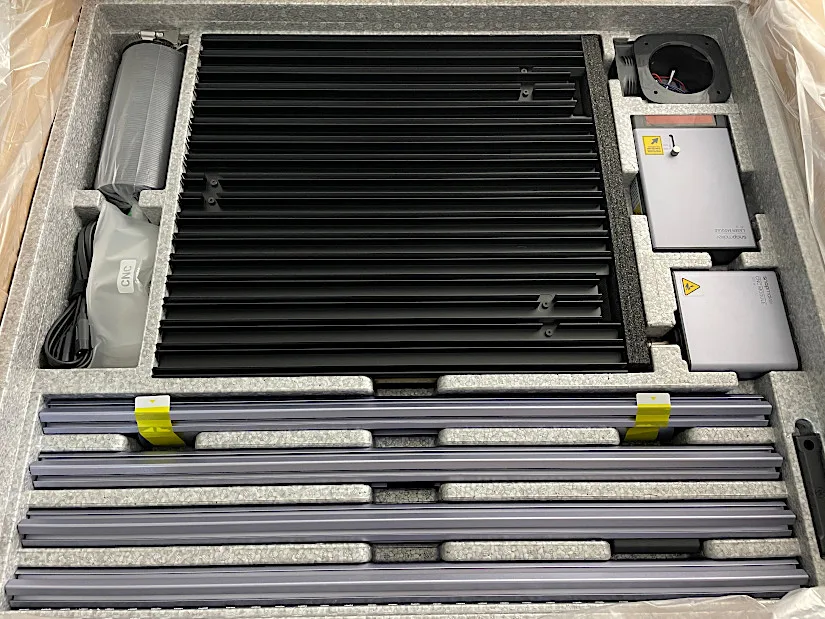
– Included Enclosure. While enclosures for other Snapmaker products are optional and all parts are included in their respective boxes, the Snapmaker Artisan enclosure is shipped by default. Machine parts, such as the laser and CNC modules and work plates, were found in the enclosure box.
©3DWithUs – Photo: Max Funkner
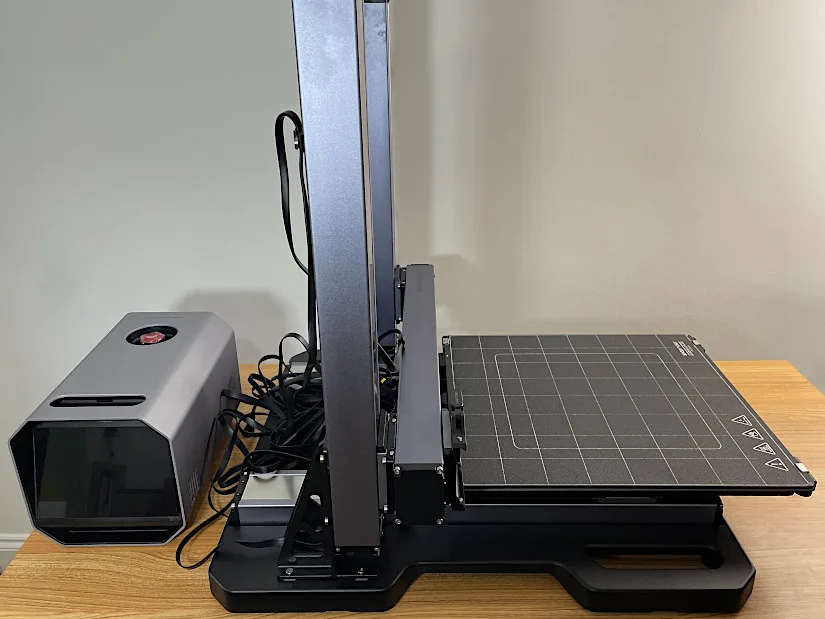
Similar to assembling the Snapmaker A350T, setting up the machine took me less time than assembling the enclosure. I have mixed feelings about fixing the acrylic UV protective screens with sealing strips; I might even prefer the previous A350T assembly method that used screws. However, the final result was neat and sturdy. The assembly process went smoothly, thanks to their paper and video instructions.
©3DWithUs – Photo: Max Funkner
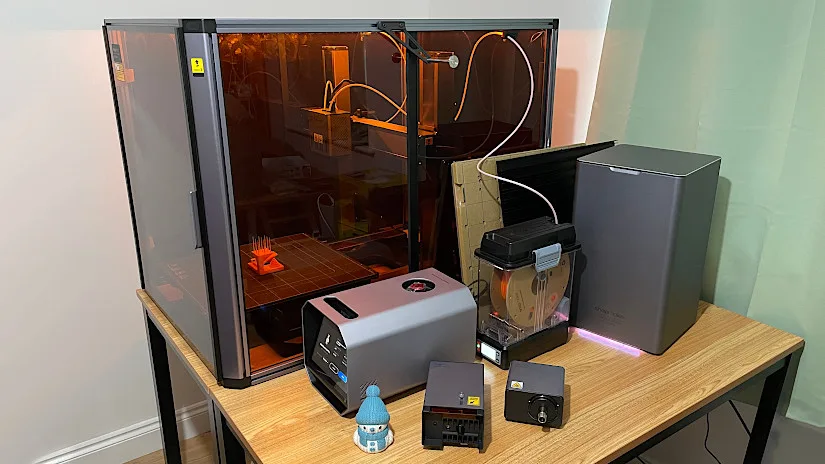
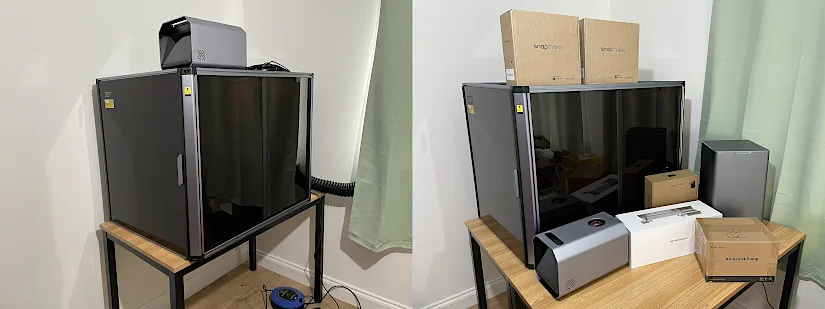
Setting up the enclosure on top of the machine requires two people. Once assembled, we placed the Snapmaker Artisan in a convenient corner of my workshop, close enough to the window for the exhaust pipe. I had hoped to fit everything on one table, but unfortunately, the additional add-ons like the air purifier and air assist required extra space. Also, keeping the controller on top of the enclosure in the long term may require extra support fittings.
It’s important to note that no more than 7 kg should be stored on top of the enclosure. This is worth remembering, as storing many items on top of the machine can be tempting. There is a sticker on top of the enclosure as a reminder.
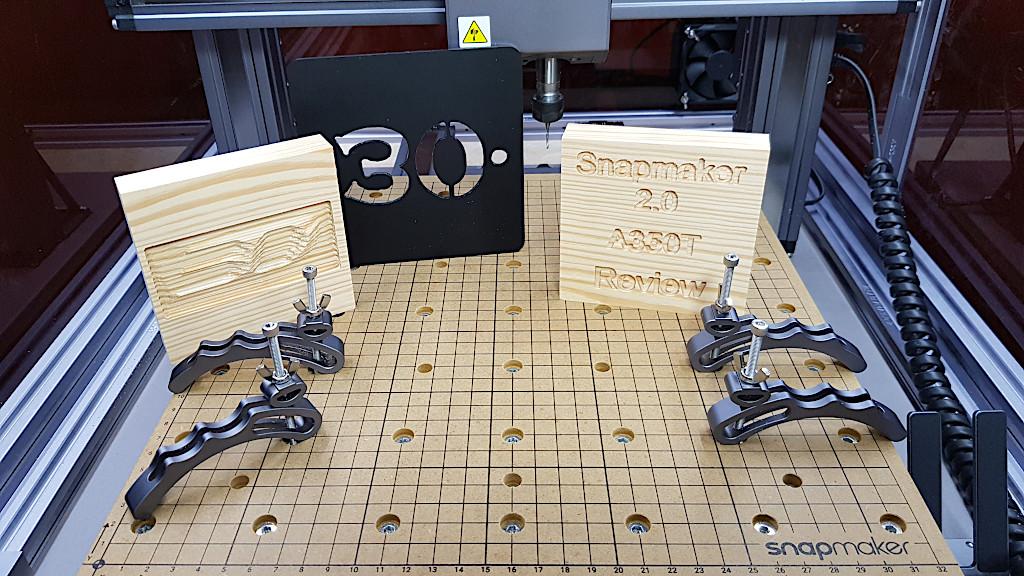
Design and Optional Add-Ons
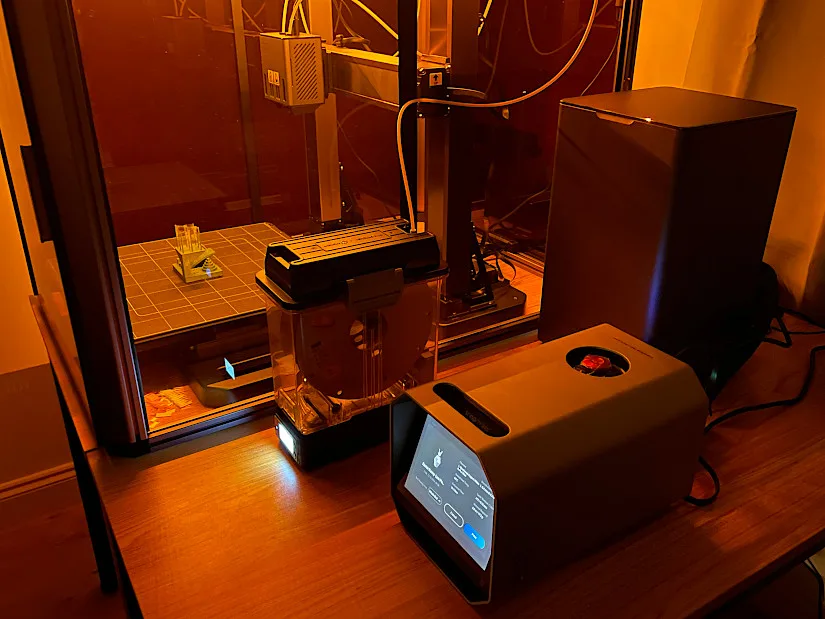
The Snapmaker Artisan Premium boasts a sophisticated and polished design. Most of its components are made from metal, making it feel heavy and sturdy. The enclosure’s LED lights add a cool, modern touch, especially when the 3D printer is operating in the evening with other lights off. The build platform can also double as a photo studio, making it convenient for examining or photographing completed projects.
– Controller. Compared to the controller of the A350T, the Snapmaker Artisan’s controller is much more sophisticated. Its wider and better screen allows for effortless navigation and fine-tuning of settings during operation, making it easier to use. Additionally, its placement outside the enclosure ensures a cleaner and safer environment for the controller, especially during dusty CNC or smoky laser projects.
Snapmaker Artisan Premium, SnapDryer and Air Purifier
©3DWithUs – Photo: Max Funkner
– Stop Button. The controller also features an emergency stop button, which is required by regulations for high-watt lasers. I tested the button once during a print to try the pause-and-resume option. It caused the controller to emit a continuous high-pitched noise – a lesson learned: it’s strictly for emergencies!
– Quick Swap System. Switching between the three disciplines – 3D printing, laser engraving, and CNC – has become significantly easier compared to older Snapmaker versions. What used to take 20–30 minutes and involved extensive screwing now takes less than a minute for module and build platform swaps.
– Optional SnapDryer. Collaborative product by Polymaker and Snapmaker. Solution for drying and storing filament. It has been a significant time-saver for me while operating a dual-extruder 3D printing module. Previously, I had to store filament in plastic bags overnight to protect it from humidity, only to reload it again in the morning. Not anymore! Read more about SnapDryer and Other Filament Drying Solutions for Snapmaker 3D Printers on our website.
– Optional Air Purifier. I haven’t used the Air Purifier during 3D printing, but I always use it for laser engraving and cutting projects. It effectively collects smoke. The only drawback is that replacing the cartridge filter will cost extra. In my case, the air purifier works well. Our occasional custom laser projects and tests haven’t overused the filter yet. Find more details on the official website.
– Optional Rotary Module. Essential for laser engraving and CNC 4-axis projects, this add-on enables the creation of high-precision designs from a variety of materials. I’m excited to try it out during my laser and CNC testing. Find more details on the official website.
– No Camera. In 3D printing, having a camera to monitor progress and review timelapse videos of completed projects is quickly becoming a standard feature. Unfortunately, there is no official Snapmaker add-on available at the moment. However, on the Snapmaker forum, many users have opted for inexpensive third-party cameras, and I must say, some of these options are quite good.
3D Printing Mode
If you are eager to try all three functionalities on any Snapmaker 3D Printer, then the 3D printing mode should be tried first, as it is the cleanest compared to Laser and CNC. Here’s a YouTube video demonstrating the installation of external filament holders and the first filament load. I found the video guide to be more helpful than the paper instructions.
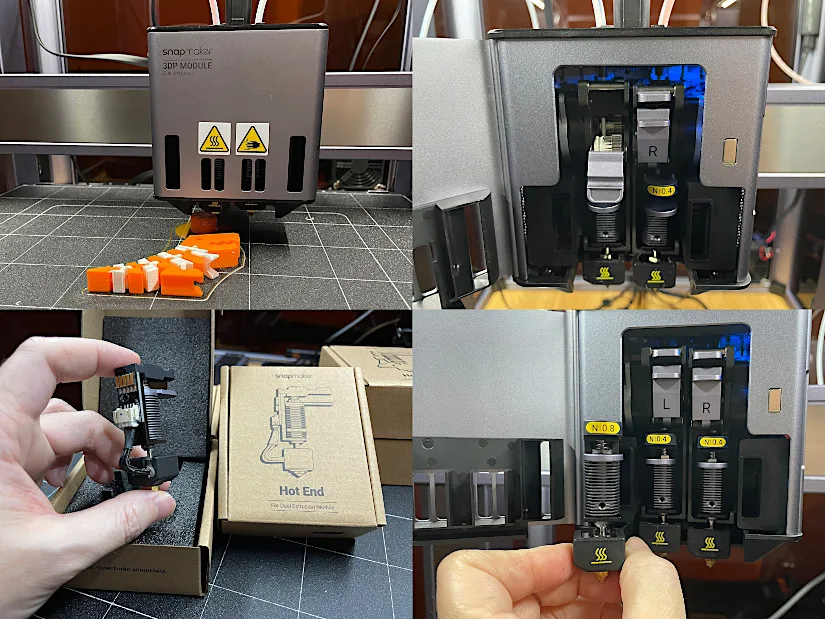
Dual Extruder, Quick Nozzle Swap System and Heated Bed
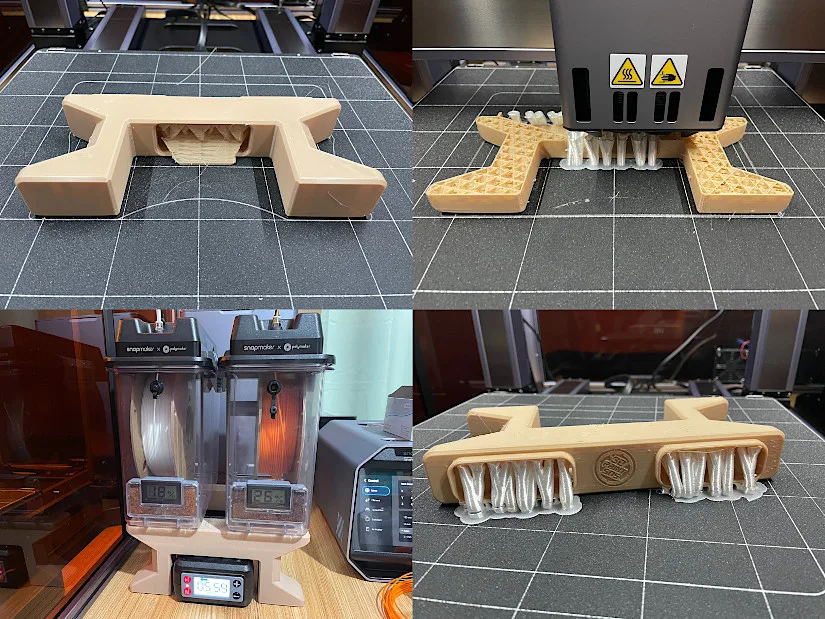
What instantly impressed me was how easy it is to swap hotends in the extruder. During my testing, I effortlessly switched to a larger 0.8mm nozzle and back again. I also appreciated the quick access to the gears, which made it easy to check if the filament had properly entered the hotend.
©3DWithUs – Photo: Max Funkner
What to Watch? – Common Errors. Here are the errors I encountered and their quick fixes.
Error Code 13-8 ‘MAXTEMP Error-Nozzle Rt’. It happened when I was swapping the hotends. Readjusting the hotend fixed the issue.
Error code 13-12 ‘Calibration Sensor Abnormally Triggered – Filament feed issues were detected when I used SnapDryer.

The large enclosures demand lengthy PTFE tubes, so extra precautions must be taken to avoid triggering “Error Code 13-12” by ensuring no excessive filament feeding resistance. In my experience, printing successfully recovered when the filament feeding tension was released. If, in the beginning, I had a few filament feed-related errors, then I started feeling the system. Mind the filament flow!
Luban and Orca Slicer Software
The first time I used Snapmaker’s Luban was a few years ago. Since then, the software has become significantly more stable, faster, and easier to use. While more advanced and constantly evolving slicers like Orca and PrusaSlicer are available for 3D printing, Luban is more than sufficient for beginners. Its simplicity can be an advantage, making it less intimidating and more accessible to those with less experience. The Wi-Fi function makes it convenient to transfer G-code files to the machine using the Luban software.
I printed a few models from the Luban library and was generally satisfied with the results. However, I struggled with the custom support placement and block functions. While Luban offers highly praised organic supports feature, I found it challenging to optimize it. This is where the new Snapmaker Orca performed much better for me. Check out my SnapDryer Double Barrel Mod print in the testing area for more details.

– Snapmaker Orca Slicer. I had the chance to try it – and I liked it. As Orca slicer becomes increasingly popular in the 3D printing community, there are plenty of tutorials available on YouTube. It was easy to find specific functions applicable to my projects while testing the Snapmaker Artisan. The preloaded Snapmaker Artisan presets made my tasks even easier.
Extruder Order Feature – I struggled to find this
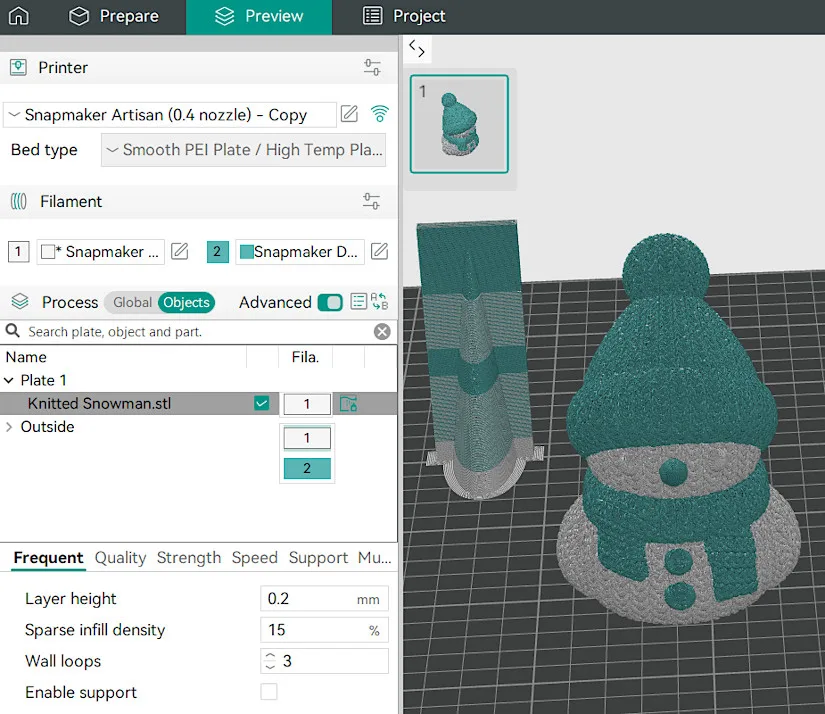
To my delight, I could use an existing .3mf preset originally designed for a different brand of printer. Thus, I didn’t need to manually color-paint the Knitted Snowman print featured above. Many designers are now publishing .3mf presets alongside STL, which is incredibly convenient and time-saving.
I can see why Snapmaker Orca will likely become the preferred option for Snapmaker Artisan users in 3D printer mode. This software is widely used in the 3D printing community, meaning many users are already familiar with it and can easily find features to optimize their settings. The dedicated 3D printing open-source community continually adds fantastic new features for everyone. Big kudos to them!
Testing Dual Color Printing
Initially, I misunderstood the calibration process and significantly misaligned the extruders. The second attempt went much better. The popular dual-color modified XYZ-Cube test print, from Luban’s featured designs, came out with the desired result.
©3DWithUs – Print and Photo: Max Funkner
– Live Tune. I must say, live tuning via the controller offers many more options, including flow rate, compared to the older A350T firmware versions I tried a few years ago. Live Z-tuning is straightforward during printing, making it easy to make adjustments when needed.
– Heated Bed and Bed Adhesion. The Snapmaker Artisan’s heated bed is the first non-flexible build platform I’ve used in years, and I’m pleasantly surprised by its performance. The grip is excellent when the bed is heated, and removing objects is effortless once it cools down. The added ‘Inner Zone/Outer Zone’ feature on the screen is a thoughtful feature.
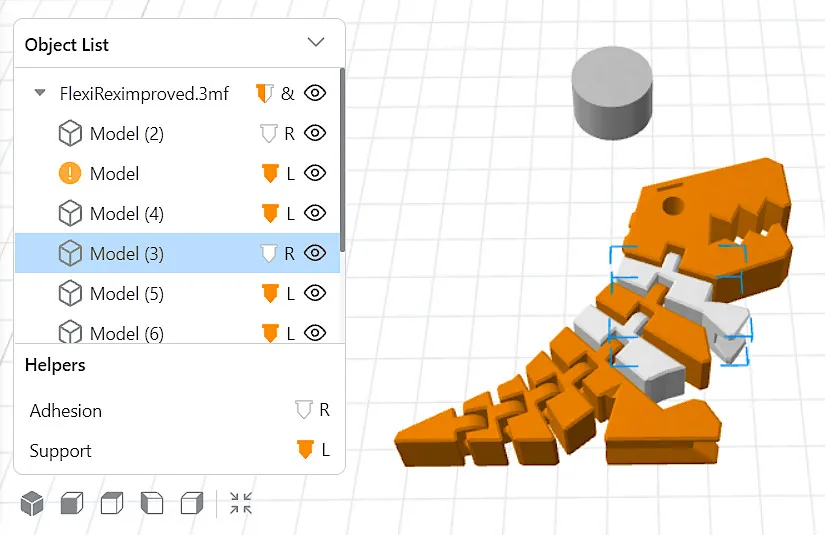
3D Model via Luban by DrLex on Thingiverse
©3DWithUs – Print and Photo: Max Funkner
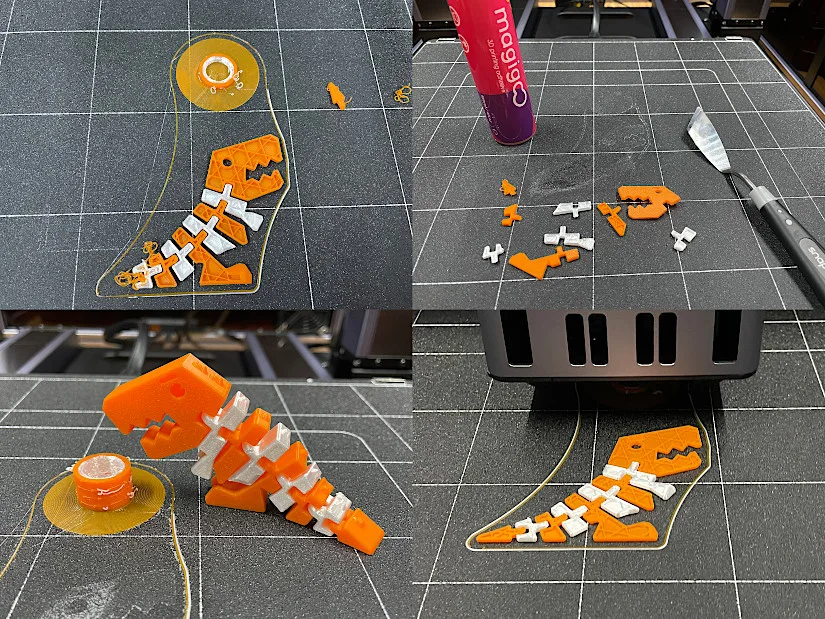
I had to use Magigoo from Amazon once when the tiny tail of a Flexi Rex model got knocked off during printing. Flexi Rex would have worked without glue if I had fine-tuned the settings slightly more. However, I recommend using extra bed adhesion when printing multi-part models with independent bases, such as flexible articulated dragons, for example.
3D Model by Utsav Genesis on Cults
©3DWithUs – Print and Photo: Max Funkner
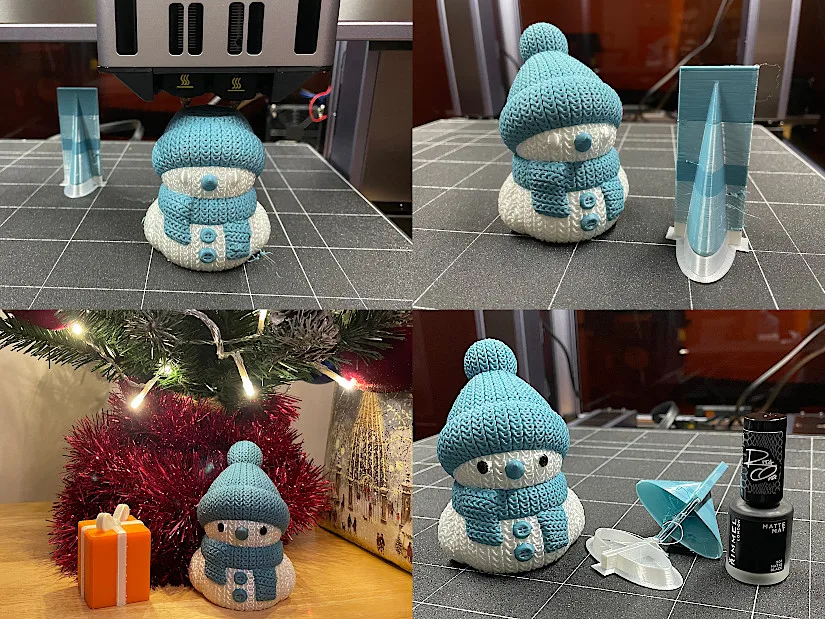
My favorite print so far is the Knitted Snowman by Utsav Genesis, mainly because it turned out beautifully, even though I used a .3mf preset file designed for a different 3D printer. Snapmaker Orca Slicer handled it very well. The only adjustment I made was slightly reducing the purge tower, which was initially twice as large. Filament waste is minimal since the tower is hollow. I think I could have slightly adjusted the retraction settings to minimize random bits and achieve an even cleaner print. It took 7 hours to print on normal settings.
For the eyes, I used black matte nail varnish – though I could have done a better job with finer detailing if I had a smaller brush. This Snowman caught the attention of our friends; the knitted effect is truly captivating.
Testing 0.8mm Nozzle
I tested printing with TPU and wood filaments using a 0.8mm nozzle and found that the quick hotend swap is a very powerful feature. How to change the hotend to 0.8mm – instructions via screen. Larger nozzle sizes are an obvious choice for the Artisan’s large build volume, as they make vase mode prints sturdier and significantly speed up project completion.
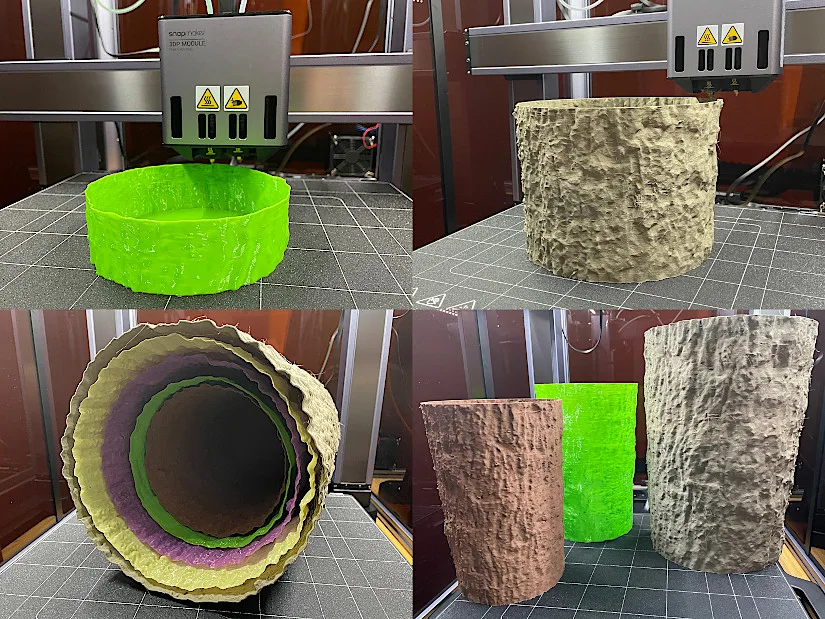
Scanned Tree Trunk Models by 3DWithUs on Cults
©3DWithUs – Print and Photo: Max Funkner
– Wood filament. A wider nozzle allows for experimenting with exotic filaments like wood filament. The wood filament can be tricky to work with – the closer it mimics real wood in texture and smell, the more challenging it is to handle. Using a larger nozzle is highly recommended. I haven’t yet attempted prints that require a lot of retractions, so vase mode was the obvious choice. On 3DWithUs, we have an extensive guide about the wood filament and how to handle it successfully.
– TPU. A quick vase mode print was straightforward. I’ll update this section once I print more objects with this filament.
Other Test Prints
Over time, we will showcase more interesting and challenging prints here, ranging from multicolored designs to flexible articulated models.
3D Model by 3DPrintSOS on Printables
©3DWithUs – Print and Photo: Max Funkner
– PETG. Following the designer’s recommendation, I printed two stands using a sturdier material than PLA – PETG in my case. I was not happy with the results from either slicer software, Luban or Orca. The print from Luban included supports even for the logo, as I failed to block supports in the slicer. Also, I definitely needed to fine-tune the support settings in Snapmaker Orca. Then, I was cheeky and created a file with organic tree supports but without a purge tower – the print result turned out worse than with Luban. While both prints were functional, excessive supports, even in dual-material mode, affected the print quality. Additionally, I used a non-brand PETG, so there’s much more I could do to achieve better results.
Tip. Lowering the nozzle temperature to 200°C significantly reduced oozing.
©3DWithUs – Print and Photo: Max Funkner
After testing various challenging prints, including multi-color and different nozzle sizes, I’m impressed by the significant improvements in 3D printing compared to my previous experience with the single extruder on the A350T. I highly recommend the dual extrusion 3D printing module for other compatible Snapmaker versions as well.
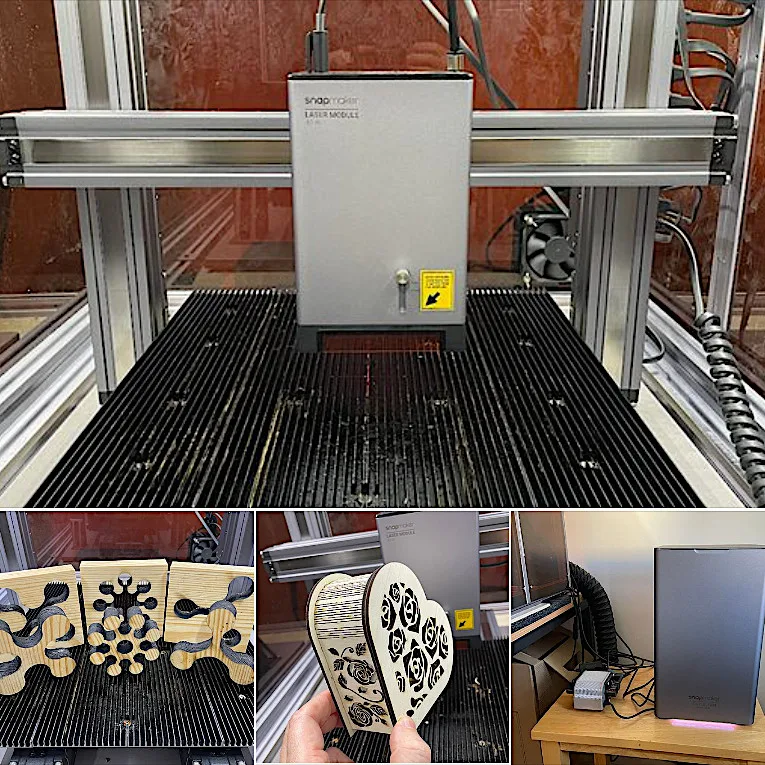
Laser Mode
Disclaimer: Laser cutting and engraving may be hazardous if improperly operated. Please make sure to follow the safety guidelines such as wearing eye-protective goggles and using the machine enclosure while operating.
Luban and LightBurn Software
If Orca (and Snapmaker Orca) slicer is the best software for 3D printing mode, then LightBurn is the best 3rd party software for laser cutting and engraving. I haven’t connected LightBurn directly to my Snapmaker Artisan just yet, as for most of my projects Luban software did the task. However, when it came to modifying the file, I had to turn to LightBurn.
To minimize the waste of the material, at some point one of my projects needed quick editing. In LightBurn, it was easy to select and remove elements and save it as a new file. In my case, it worked well with the .dxf file extension.
Screenshot: Luban
In all other cases, I used Snapmaker Luban. I appreciated the wide variety of fonts available for custom text, as well as the collection of free shapes in their Shape Library.
Optional 2W 1064nm Infrared Laser Module
Price: $399 – 449

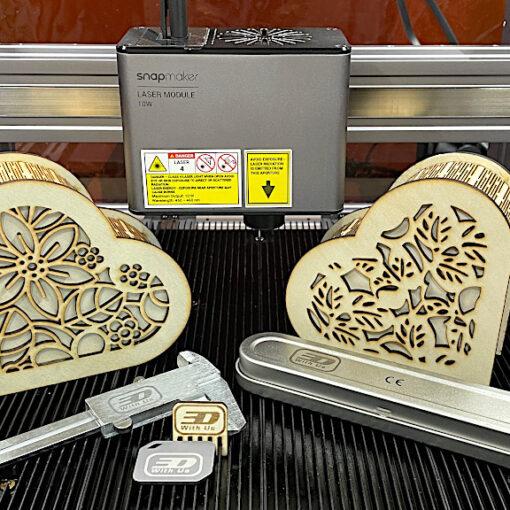
– Metal. While testing the Snapmaker Artisan, one of my favorite materials for testing 2W IR lasers was snap-off blade knife blades. These blades allowed me to experiment with engravings without worrying about wasting material. As a result, I ended up with a collection of blades featuring interesting engravings.
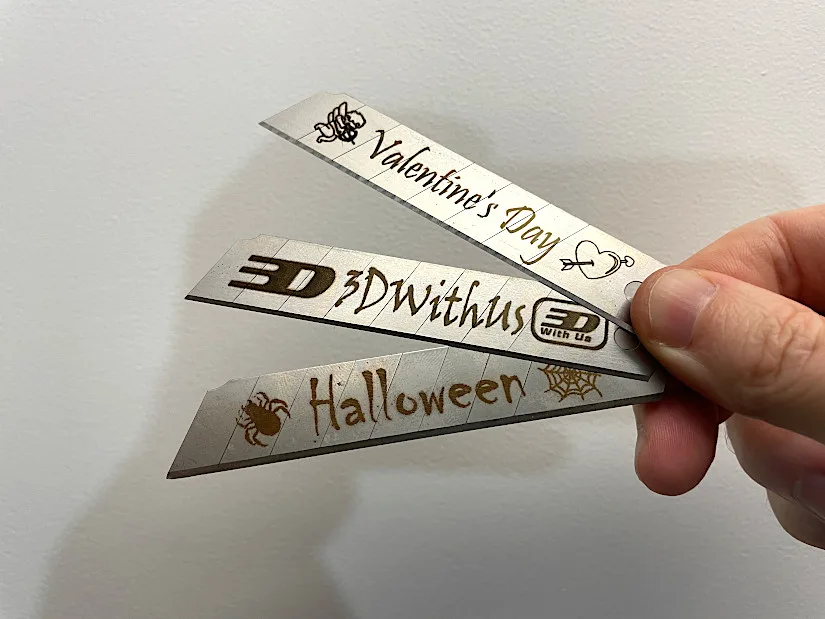
©3DWithUs – Laser Job & Photo: Max Funkner
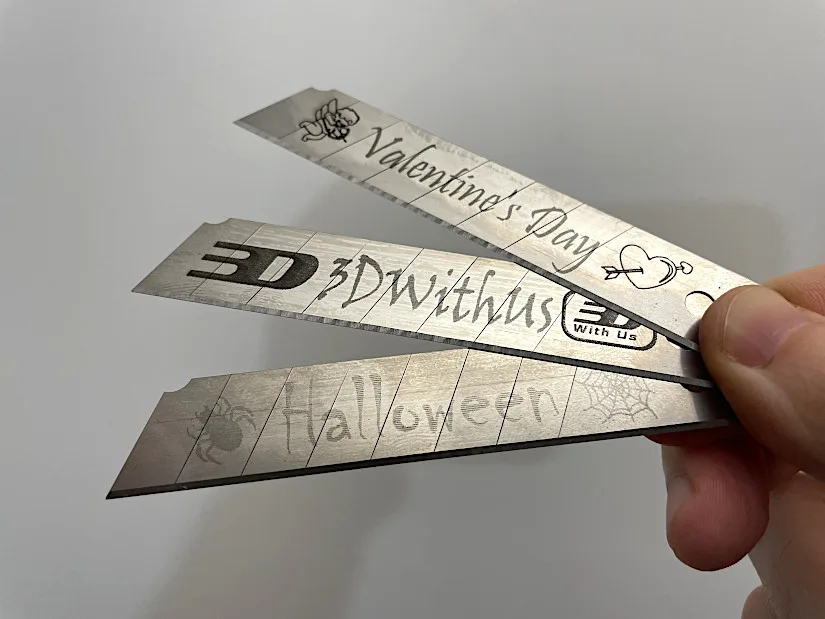
If the brown, rust-like dust is cleaned off, the engraving results become more visible, revealing varying levels of detail – some more pronounced than others. Since different settings were used, the results also varied. Apart from the 3DWithUs logo, I was pleased to explore the extensive collection of fonts for text and elements available in the Luban library.
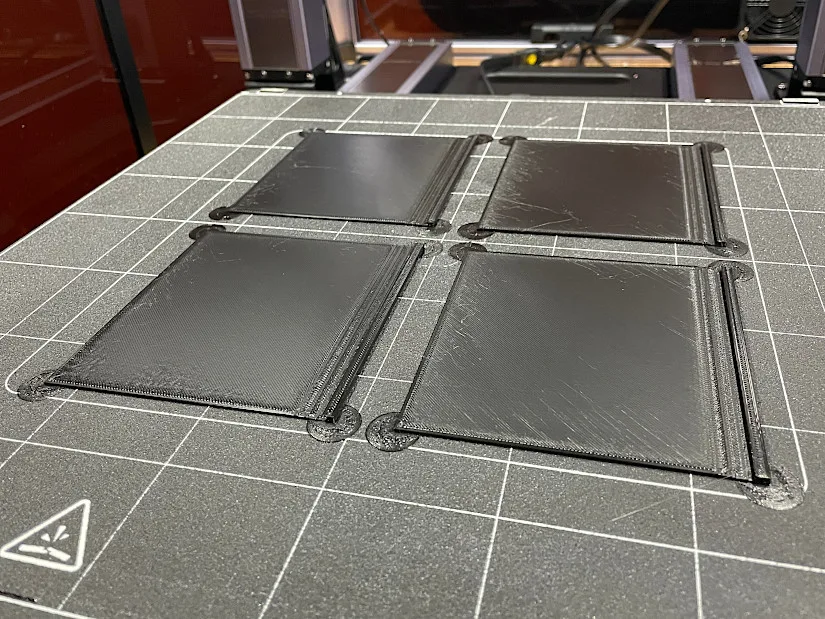
– Black PLA. PLA is one of the most popular materials in the 3D printing community, with dark grey and black filaments widely available. To my delight, a 2W IR laser produces highly precise and visually appealing engravings on this material. For testing, I printed four Flap Vent Blockers – a simple yet functional design that helps reduce drafts and, in turn, lowers energy bills during particularly cold and windy seasons. Here is a short video of the Blocker in action.
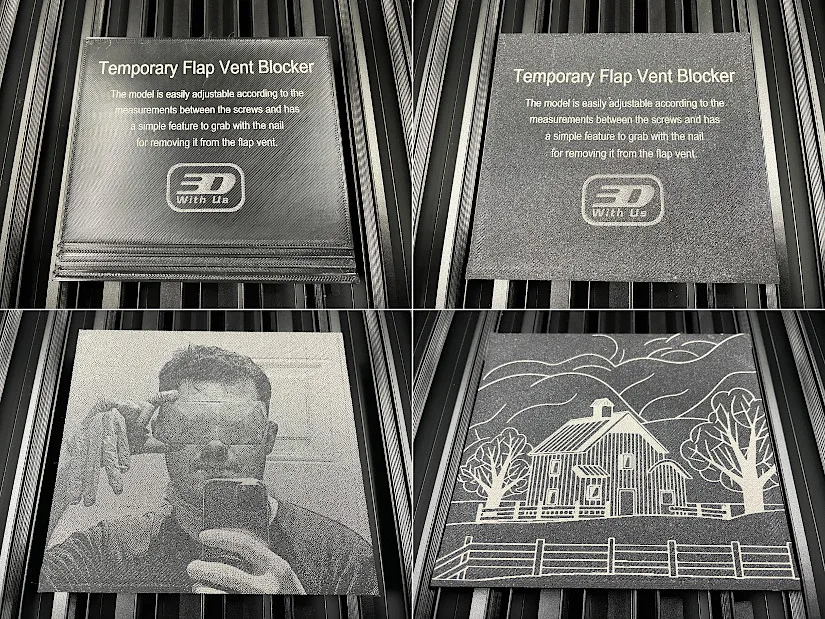
©3DWithUs – Laser Job and Photo: Max Funkner
The Shape Library in Snapmaker Luban offers a selection of basic shapes for engraving and alignment. In addition to using custom text and shapes from the library, I incorporated the 3DWithUs logo and even a previous picture I once used as an avatar. The results are truly astonishing.
3D Model on Cults
©3DWithUs – Print and Photo: Max Funkner
This is a simple yet effective example of how 3D printing and laser engraving can complement each other seamlessly. With the Snapmaker Artisan, projects like this are completed effortlessly, as switching between disciplines takes only seconds. The clean, matte texture on the top and bottom of the prints highlights the machine’s precision and capabilities, showcasing its potential for high-quality results.
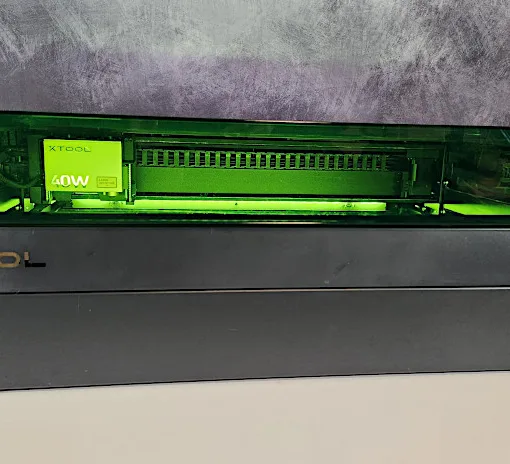
Included 40W Laser Module
Price: $799 – $999
Amazon
Official Website
– 3mm Acrylic and 3mm Plywood. To test the 40W laser module on Snapmaker Artisan, I performed a series of laser jobs on different materials, including plywood, softwood, ceramic, and acrylic. As usual, I will add more examples in due process.
Model: Poly Art Bunny on Cults
©3DWithUs – Laser Job and Photo: Max Funkner
To showcase the versatility of the 3-in-1 combination, I aimed to feature designs that could be both 3D printed and laser engraved/cut on the same machine. Several projects were successful in this regard.
– Sliced 3D Model. One idea is to slice the 3D model in order to laser cut it and glue it together. Such a trick can be quite attention-grabbing. Have a look at Andrew Sink’s Plywood Benchy – his make inspired me to try the same with our own model. Featured above is an existing Low Poly Art Bunny model that was initially designed for 3D printing, then it got sliced in the Autodesk Slicer App for a laser cutting job.
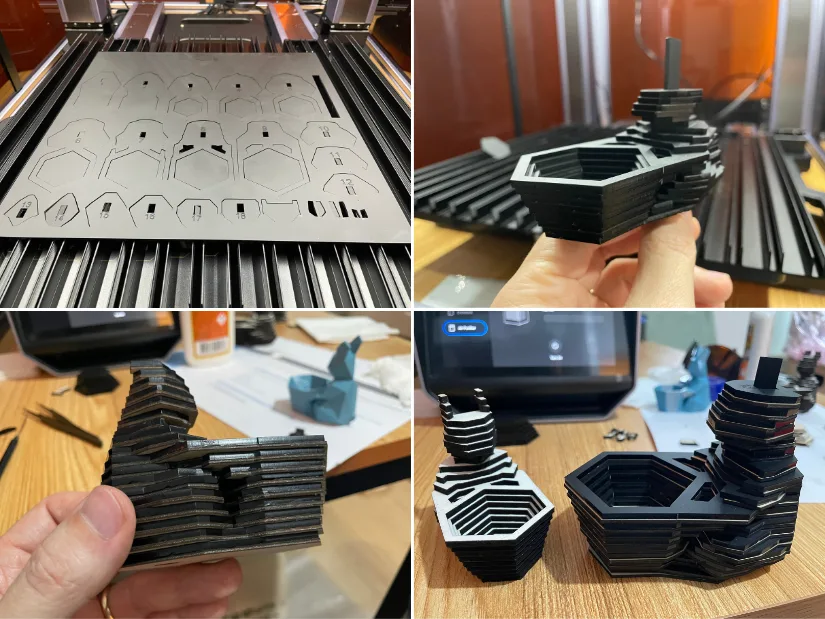
Model: Poly Art Bunny
©3DWithUs – Laser Job and Photo: Max Funkner
– Scaling Tips. It is tricky to scale such an object as the material thickness defines Z in the result anyway. But it is always possible to add an extra material layer to even out Z (model height) as required. Featured above is a combination of 3mm acrylic and 1.5mm plywood laser cut sheets. I glued together wood and acrylic using wood glue.
This model was very easy to cut. Using a 40W laser, it took approximately 30 minutes. It is a good idea to cut the model itself but engrave the numbers in order to not get confused when assembling the model. LightBurn again helped with separating the numbers from the .dxf file, and Luban had all the needed material setting presets.
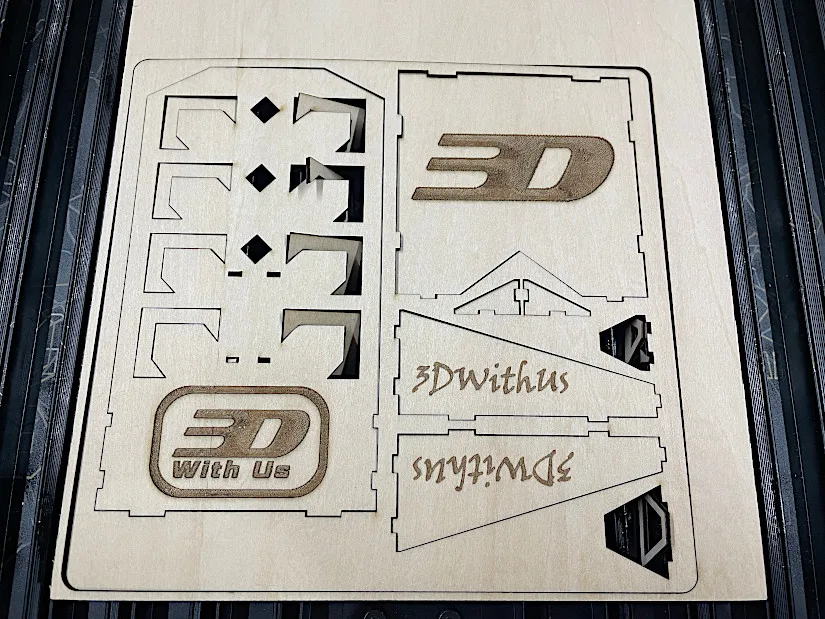
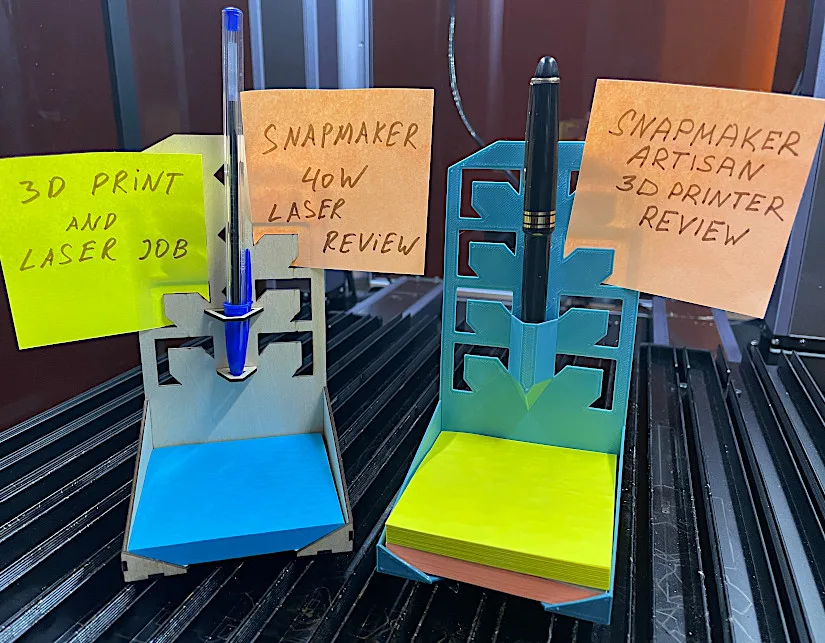
– 1.5mm Plywood. Another model that was initially designed for 3D printing and then got converted for laser cutting and engraving is our Post-It Note Holder. Snapmaker Artisan prints, cuts, and egraves on such an object without issues.
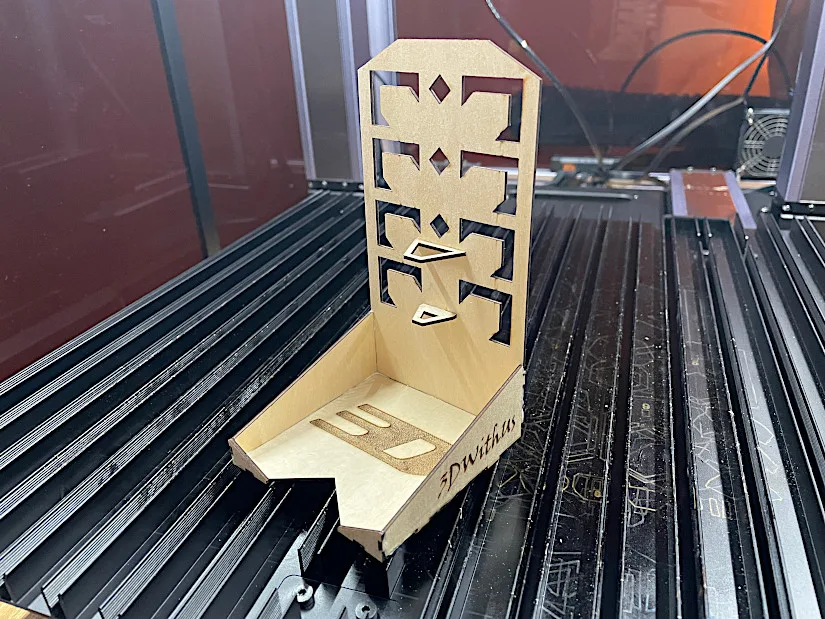
Model: Note Holder on Cults
©3DWithUs – Laser Job and Photo: Max Funkner
Collection on Cults
For this particular design, I had to use 1.5mm plywood in order for notes to stay in the slots. A 40W laser that is capable of cutting up to 20mm softwood is definitely overkill for such thin wood material. Greatly reducing the laser power is recommended. For me, it took less than 5 minutes to engrave and cut such an object.
– Ceramic Tiles. Absolutely loved the way the 40W laser engraved on ceramic green tile. I experimented on a leftover kitchen tile by adding a silly design that I found in the Shape Library via Luban. Without coating, the quick engraving job took only 8 minutes to complete using Luban’s Line-Filled Engraving preset setting.
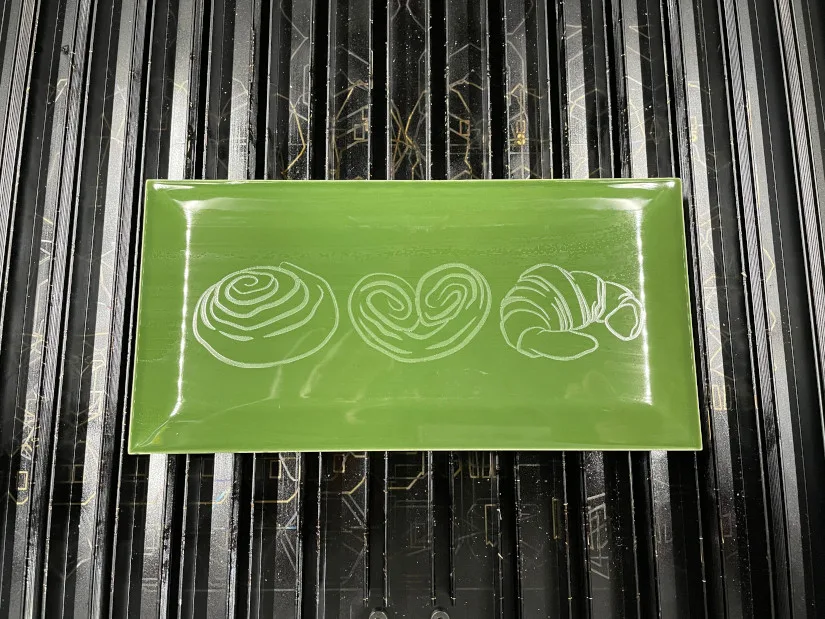
©3DWithUs – Laser Job and Photo: Max Funkner
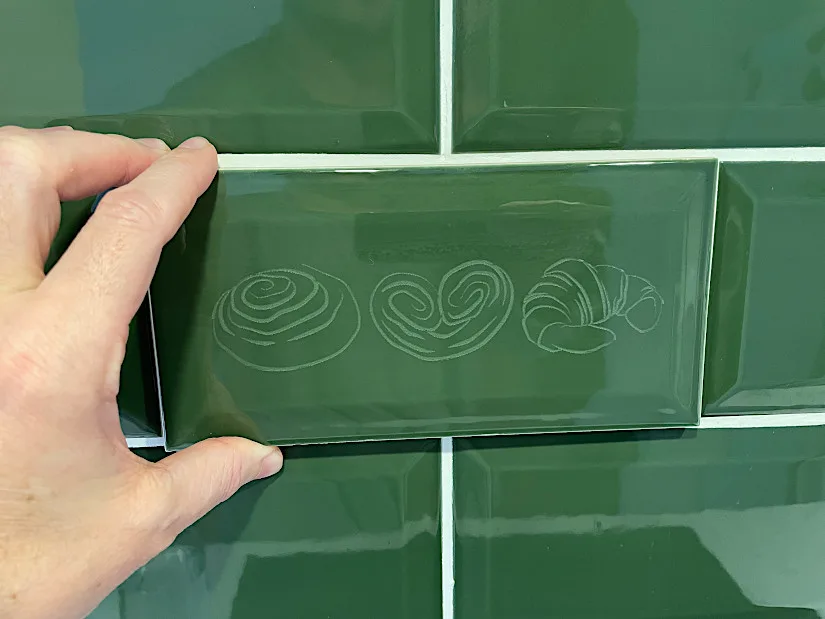
I think there is great potential as plain tiles can be easily customized with all sorts of markings and even logos. The drawback is that such engraving work only on dark-colored tiles. On lighter tone tiles, such etching will be less visible. On the other hand, there are all sorts of coatings available to engrave even on white tiles. Read more about Laser Engraving Stone, Ceramics, and Slate: Techniques and Examples in the guide by Richard Hirst on 3DWithUs.
– 20mm Softwood.
40W is definitely a very powerful laser. I had a chance to test two such laser modules, and they both cut 20mm softwood I had on hand.
©3DWithUs – Laser Job and Photo: Max Funkner
It is tricky to get the settings right though, and even the slightest tree knot will be a problem. Here are my settings for cutting softwood I had on hands: I created multiple G-codes to cut the material in a single pass and single straight line with different settings. One the Pass, Job Speed: 100mm/min, Power: 100%, Initial Cutting Height Offset: -4mm As you may noticed on the image above other cuts were not that clean as Initial Cutting Height Offset was changed to -2 and 0.
– Error 20-6. Unfortunately I could not finish similar projects I had done with A350T (look below) as when the excessive smoke in the chamber a few times triggered Error 20-6 ‘Visible Flames Detected’. I decided to stop stress testing my machine after that in order to presserve laser for the future projects.
©3DWithUs – Laser Job and Photo: Max Funkner
We previously published a detailed review of the Snapmaker 40W laser module. Read more and find the other project examples in the Snapmaker 40W Laser Module Review by Max Funkner
Have questions? Feel free to ask in the comment section below.
For a wider discussion or to share your own Snapmaker laser projects, join us in the forum:
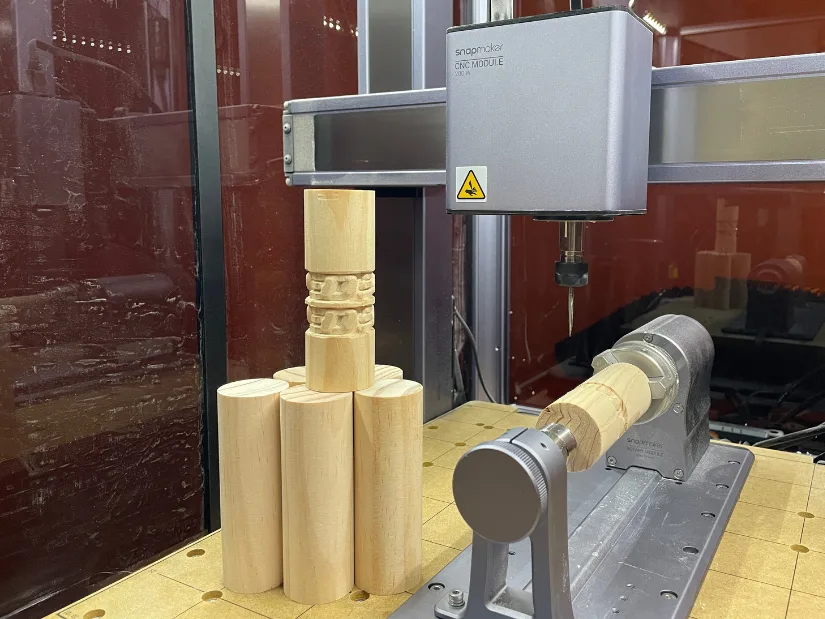
CNC Mode – Work in Progress
4-Axis Module (Optional) Testing
Price: $399-$425
Compare the Prices & Bundles:
Official Store | Amazon
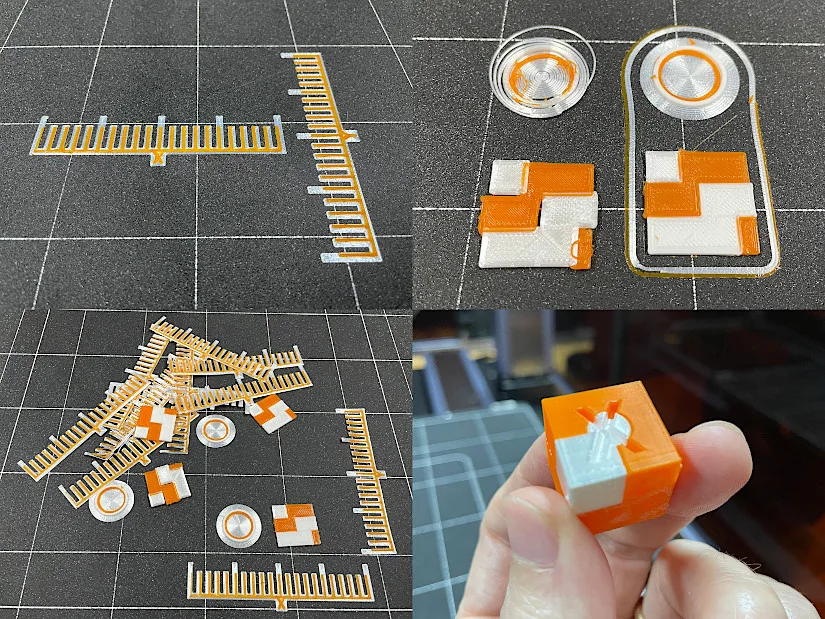
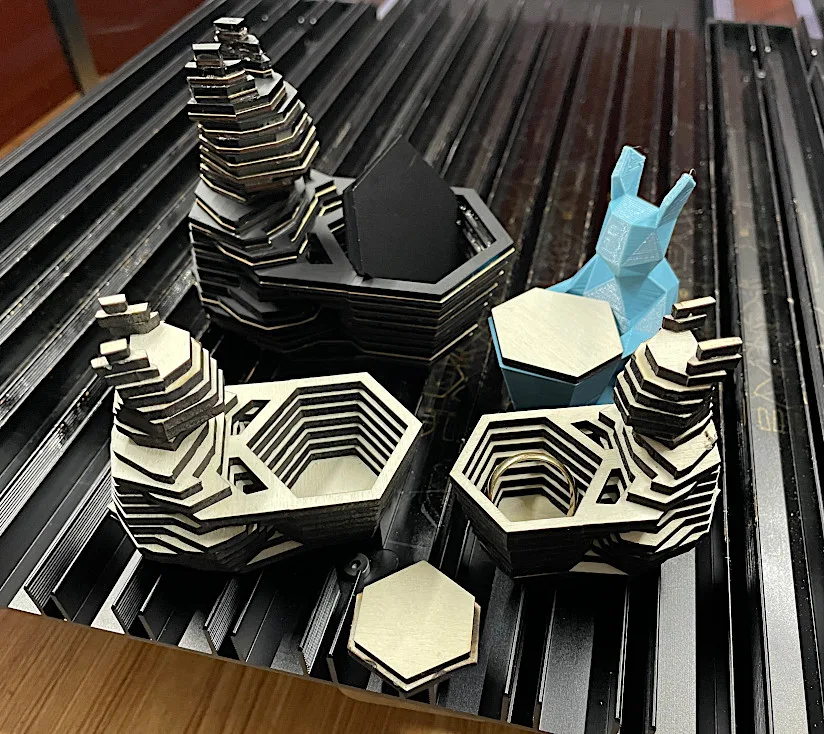
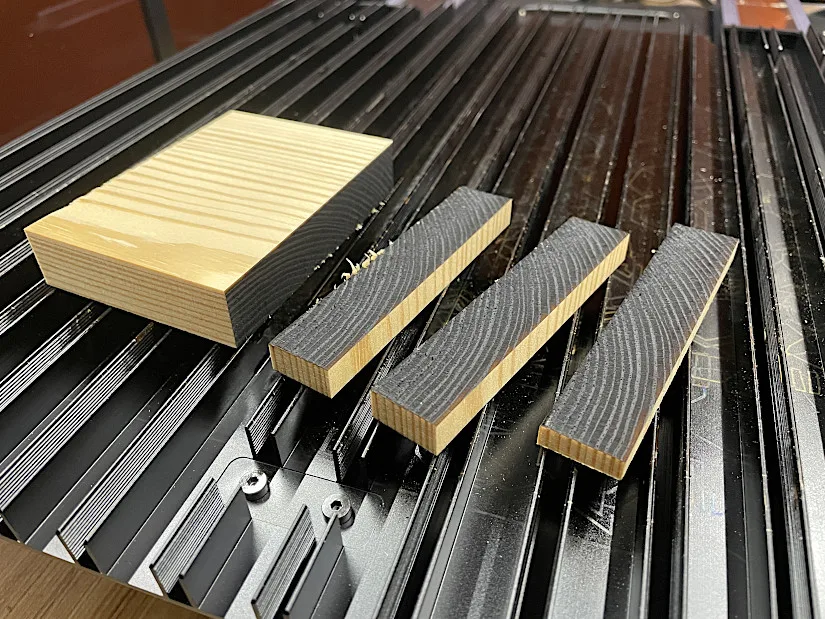
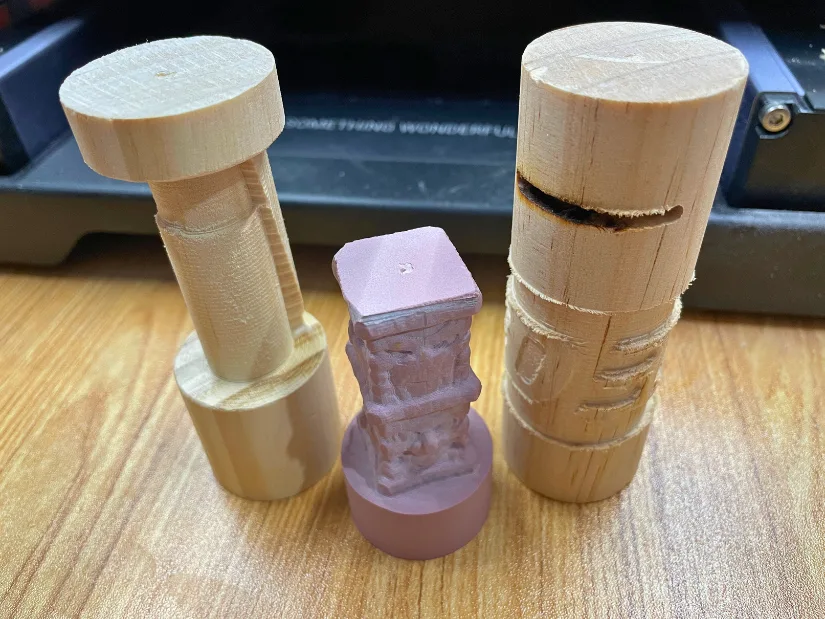
As I already had CNC experience with the Snapmaker A350T, this time I decided to start by testing the optional 4-axis module. Here’s my experience from unboxing to final results.
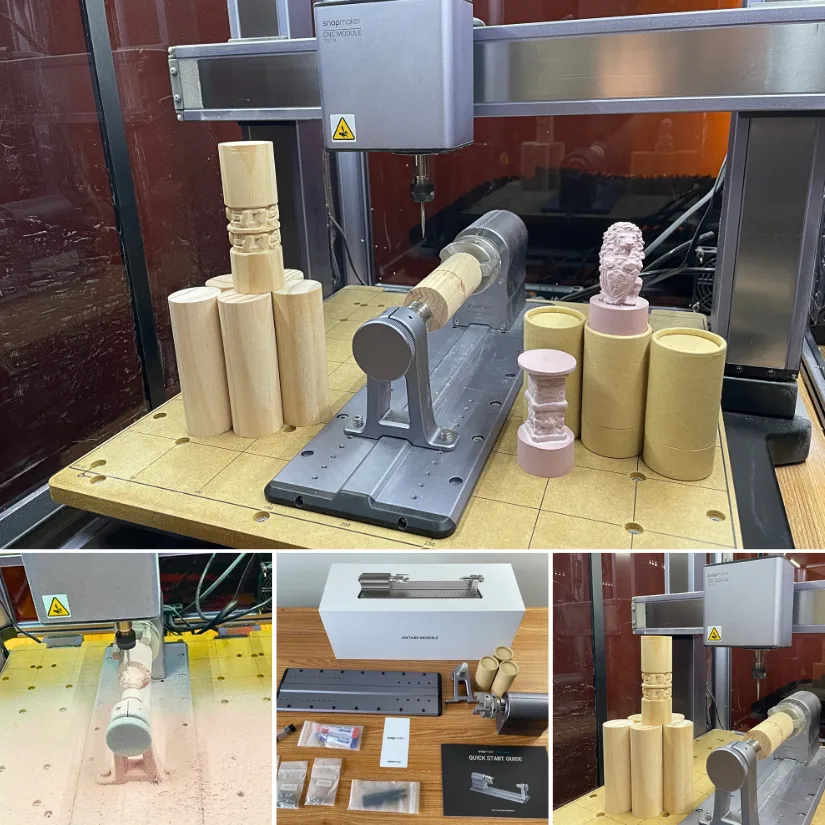
©3DWithUs – Tests and Photo: Max Funkner
As expected, the module arrived in a well-presented, almost luxury box, with three extra bits and three composite wood dowels included. A full list of parts and accessories can be found at the end of the product page on the official website.
Luban and GIMP
Despite having significant experience in the maker space, I still had to spend time learning and wrestling with the Luban software to achieve something close to my desired custom result: wrapping the 3DWithUs logo around a dowel. As you can see, it took several fruitless tests before I made real progress.
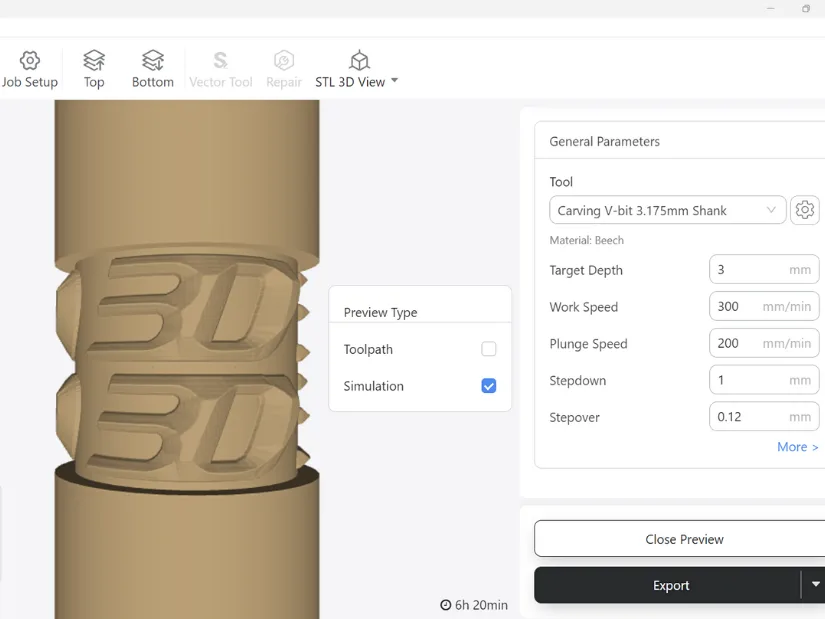
One of the biggest issues I had was Luban’s simulation preview. It was inaccurate, and even the sliced preview wasn’t clear enough to understand how the end result would look. Initially, 3D model prepared in Blender didn’t work as expected. Later, .PNG file prepared with the help of ChatGPT and GIMP produced results closer to what I wanted.
Materials for CNC
Similarly to router bits, some websites offer a wide range of CNC materials to work with. At the same time, we found it very convenient to source the right materials directly from Amazon, which often covers most project needs — from wood blocks and dowels to MDF sheets, acrylic panels, composite boards, and even aluminium stock for cautious soft-metal machining.
©3DWithUs – Photo: Max Funkner
For example, after extensive testing with the 4-axis module, we discovered that the three included material blocks were not enough. By browsing Amazon, we found inexpensive yet high-quality wooden dowel rods that proved ideal for continued testing and practice.
While we continue to work on new projects for the Snapmaker Artisan, please refer to our existing guide, which effectively showcases the capabilities of CNC module.
©3DWithUs – Photo: Max Funkner
Read more:
Snapmaker CNC Mode Review by Max Funkner
Work in Progress …
Compare Snapmaker Artisan to Other Products on the Market
The Snapmaker Artisan is the best 3-in-1 product on the market. In fact, Snapmaker’s 3-in-1 systems are the only ones that combine all three disciplines into a single integrated device.
For a comparison with other FDM 3D printers, please refer to the
detailed budget FDM 3D printers guide.
For a comparison with other laser cutters and engravers, please refer to the
detailed budget laser cutter and engravers guide.
For a comparison with other CNC machines, please refer to the
detailed budget CNC machines guide.
Previously, Snapmaker 2.0 A350T’s strongest feature was its laser cutting and engraving capabilities. However, with the Artisan, I can confidently say that its dual extrusion 3D printing is equally impressive. In terms of filament waste, it even rivals the PrusaXL tool changer, as both machines have no filament poops or excessive purge blocks.
As a multi-disciplinary craft machine, the Snapmaker Artisan stands out with few direct competitors. Another versatile system featured on our website is the xTool M1 Ultra, though it differs significantly in both focus and functionality.
While some products on the market may boast features like wider multicolor systems (3D printing), conveyor and riser systems (laser engraving), or more powerful routers (CNC), Snapmaker’s Quick Swap ecosystem shines. It performs particularly well in situations where all three disciplines – laser cutting, engraving, and 3D printing – are used interchangeably.
©3DWithUs – Photo: Max Funkner
Conclusion and Pros & Cons
Compare the Prices & Bundles:
Official Store | Amazon
Snapmaker Artisan Premium Review
Review Summary
After testing various challenging prints on the Snapmaker Artisan Premium, including multi-color designs and different nozzle sizes, I’m impressed with the significant improvements in 3D printing compared to my previous experience with the single extruder on the Snapmaker A350T. I recommend the dual extrusion 3D printing module for other compatible Snapmaker versions.
While some products on the market may offer advanced multicolor systems (3D printing), conveyor systems (laser engraving), or more powerful routers (CNC), Snapmaker’s Quick Swap ecosystem stands out. It works particularly well in scenarios where all three disciplines – laser cutting, engraving, and 3D printing – are used interchangeably, with product designers and creators in mind.
The Snapmaker Artisan 3-in-1 is a unique multifunctional fabrication machine. Combining 3D printing, laser engraving, and CNC carving into a single system, it offers versatility that many creators will find invaluable. With its premium metal construction, enhanced and continually upgraded features, and safe, user-friendly design, the Artisan is built to cater to both hobbyists and professionals.
Snapmaker Artisan Premium can also be useful for those who have yet to decide which discipline to master and want to start their DIY journey with a blast. I absolutely love where Snapmaker is going with continuously improving its products and software and adding new add-ons to the ecosystem.
Pros
• Versatile 3-in-1
• Quick Swap System
• Dual Extruder Hotend Quick Swap System
• 40W Powerfull Laser
• Add-ons
Cons
• No camera, No App
• Big Footprint
• Price