After a record-breaking fundraising campaign, AnkerMake M5 3D printer developers delivered on their pledge. They are still working to deliver up-to-date software and add-ons for this remarkable product. The default high-speed capability and outstanding design are the main trump cards of this machine. Let’s review the AnkerMake M5, check various slicer software settings and profiles, print a few awesome and challenging models, compare it to other 3D printers, and outline the Pros and Cons.
Table Of Contents
- Specifications
- Unboxing and Assembly
- 7×7 Auto-Leveling and Bed Adhesion
- Printing Included Test Model
- Filament Feed and HotEnd Cleaning
- Wifi, App, and AnkerMake Slicer
- Speed and Noise
- Slicer Software – Profiles and Settings
- Automated Filament Change for Color/Material Switching
- Other Test Prints
- V6 Color Engine and Other Extra Devices
- Compare to Other 3D Printers
- Conclusion and Pros & Cons
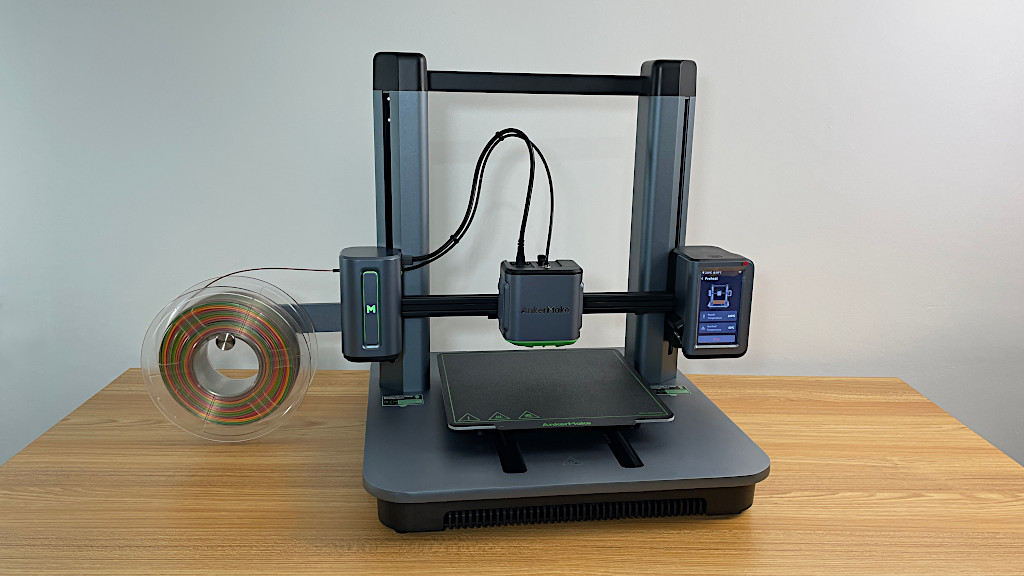
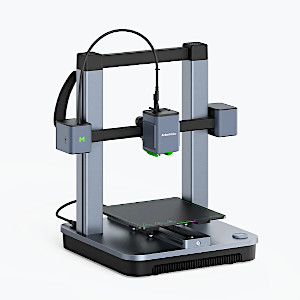
AnkerMake M5 Specifications
Build Volume: 235×235×250 mm³
Max Speed: Up to 500 mm/s (Default Speed in Slicer 250 mm/s)
Max Temp: 500°F (260℃)
Precision: 0.1 mm layer height
Extruder: Ultra Direct Extruder
Bed leveling: 7×7 Auto-Leveling
Build Platform: PEI Soft Magnetic Steel
Connectivity: Wi-fi – AnkerMake App, AnkerMake Slicer, USB-C Flash Drive
Material: PLA, PETG, TPU, ABS
Display: 4.3-inch Touch Screen
Extra: Built-in AI Camera for Monitoring and Timelapses
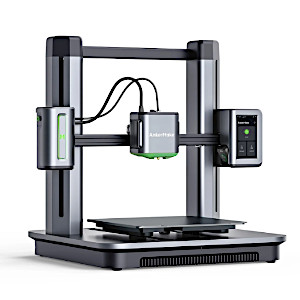
AnkerMake M5
Price: $699-$799
Product affiliate links: 3DWithUs is supported by its audience. Purchases via some links may earn us a small commission at no extra cost to you. This helps us to continue bringing you high-quality content. Our guides and reviews remain unbiased and independent.
11,313 backers pledged $8,881,095 to help bring this project to life.
The record-breaking campaign, the most funded 3D printer on Kickstarter.
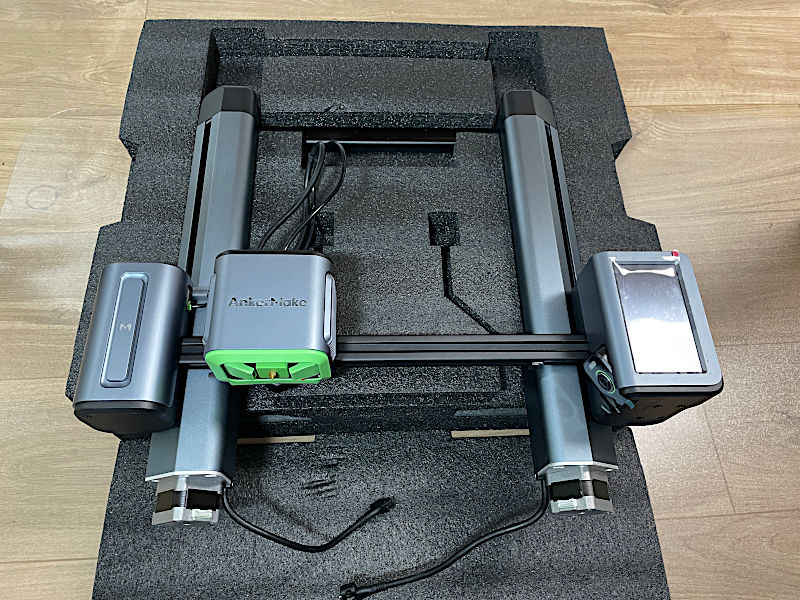
Unboxing and Assembly
AnkerMake M5 comes in a well-packed box, partially assembled. Instructions were clear and the whole procedure took me approximately 20 minutes. Here is the quick official assembly video.”
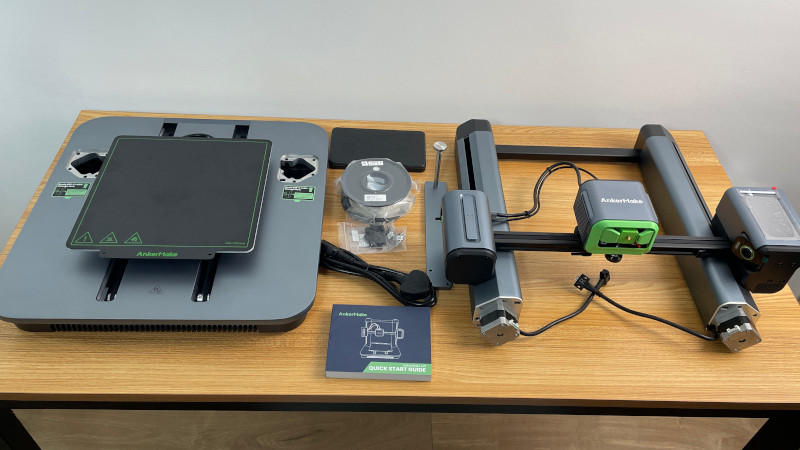
©3DWithUs – Photo: Max Funkner
– Foam. Instructions suggest using protective foam while assembling the printer. It can be done on the floor. However, for those with back problems, this may be a bit uncomfortable. So, I would suggest assembling this printer on a large table, using the protective foam as recommended.
©3DWithUs – Photo: Max Funkner
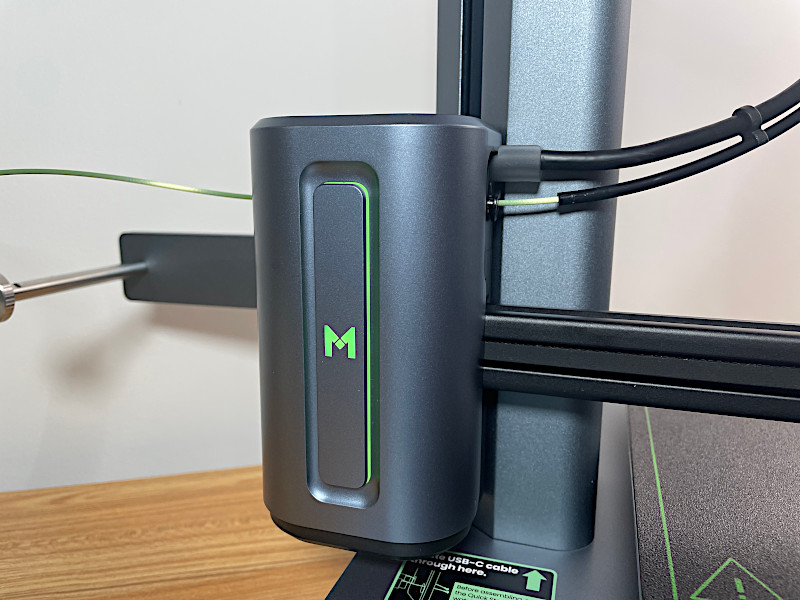
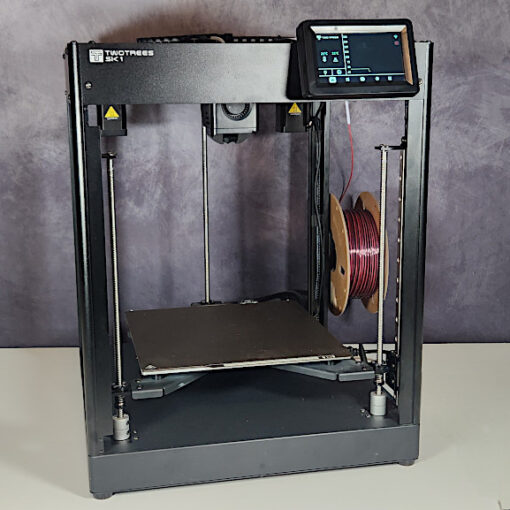
– Build. The 12.6kg printer has an aluminum alloy structure, giving it a solid look and feel. In comparison, the Ender 3 V2 Neo weighs 7.8kg. The overall weight should help with stability, especially when printing at high speeds.
– Design. I believe the machine’s aesthetics are one of the main reasons why this printer became popular and the campaign was successful. All intimidating wires and other elements, which can often bewilder beginners, are neatly hidden, giving the machine a nice aesthetic look. I’ve also seen this machine stand out at trade shows such as Formnext and TCT3Sixty. It looks neat. Many silhouette art vectors and icons featuring 3D printers highlight a similar build.
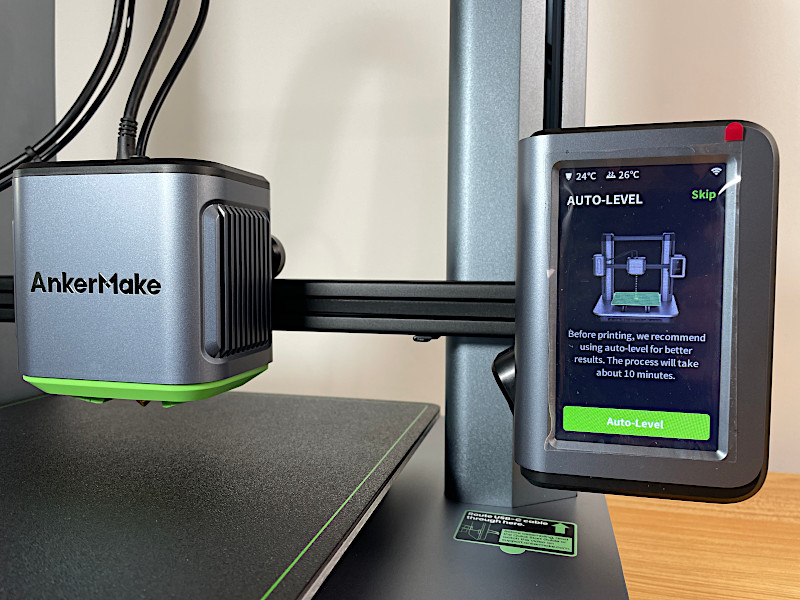
7×7 Auto-Leveling and Bed Adhesion
After assembly, the first thing that needs to be done is to follow the instructions and start the automatic bed leveling. Nowadays, most new desktop 3D printers have both automatic and manual systems in place. However, AnkerMake only has an automatic system, similar to the Prusa i3 MK3. It also performs a quick leveling check and adjustment before every print.
©3DWithUs – Photo: Max Funkner
Since performing my first auto-leveling and executing approximately 20 prints, I am generally pleased with the bed adhesion. In a few instances, I had to use bed adhesion glue, such as Magigoo from Amazon, to support multiple parts including challenging prints.
©3DWithUs – Photo: Max Funkner
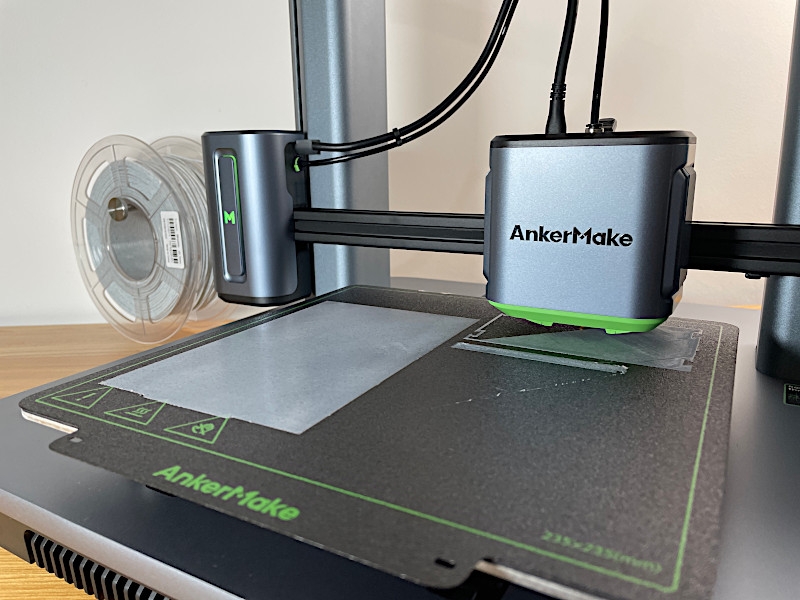
Every now and then, the first layer digs into the bed a bit too much. This proved to be no problem when printing in PLA; I will see if there are any issues when printing in PETG.
Removing all prints was very easy. When the bed cools down, it releases the print itself, leaving a nice texture on the print base. The manufacturers are so confident that they didn’t include a print-removing spatula as an accessory.
Printing Included Test Model
Just before setting up WiFi and the AnkerMake slicer app, I went ahead and printed the included test print. I was surprised to see that the AnkerMake team included a very challenging test model, specifically, the Autodesk x Kickstarter FDM 3D Printer Assessment. Files on GitHub. This choice is a great example of the developers’ confidence in the performance of their machine.
©3DWithUs – Print & Photo: Max Funkner
Why is this print challenging? It tests bridges, cooling, tolerances, and more, all at a very high speed. I printed the same file twice with rainbow and dual-color PLAs; both filaments are different and I achieved slightly different results. There was some sagging on both of the prints, which I believe is an astounding result considering the print was completed in just two hours.
– Firmware Update. The test file and files uploaded by me printed without requiring a firmware update. However, in order to use the recommended model from the Explore area, I had to update the firmware, which was done automatically. Convenient.
Filament Feed and HotEnd Cleaning
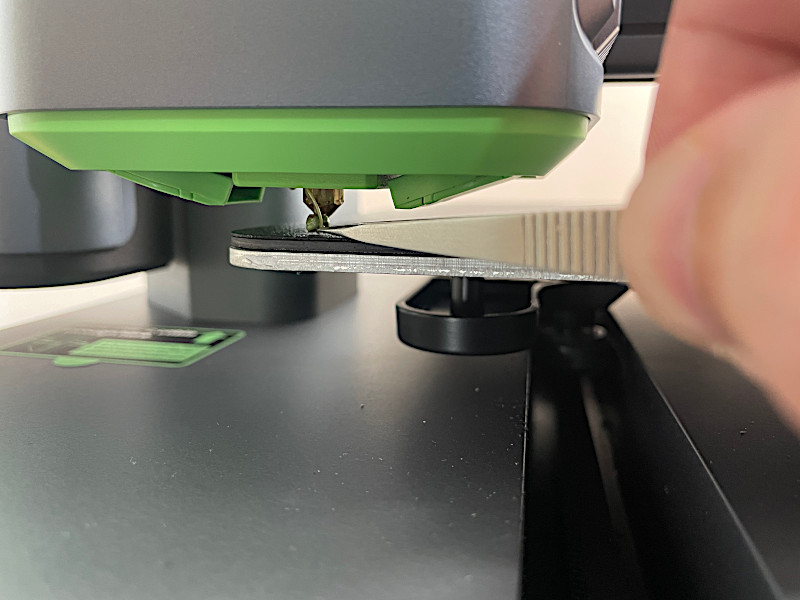
I am a big fan of printing with filament color changes at specific layers. This involves a lot of filament changes in the middle of the print. Now and then, I experienced filament feeding issues in two places: in the beginning, before the filament sensor, and in the extruder before the filament enters the hot end.
©3DWithUs – Photo: Max Funkner
In both cases, my quick fix involved decoupling the long filament tube, as shown in the picture. In a few instances, I resolved the filament sensor feed issue by pushing the filament in from the opposite direction.
Generally, on this machine, I would recommend performing filament changes cautiously to ensure no loose filament bits are left in the upper hotend, which could cause a jam. Additionally, I would advise against using old, brittle, and exotic filaments like wood filament as they pose a higher risk of jamming in the upper hotend. This is particularly important due to the exceptionally high speeds AnkerMake offers for printing on default settings.
©3DWithUs – Photo: Max Funkner
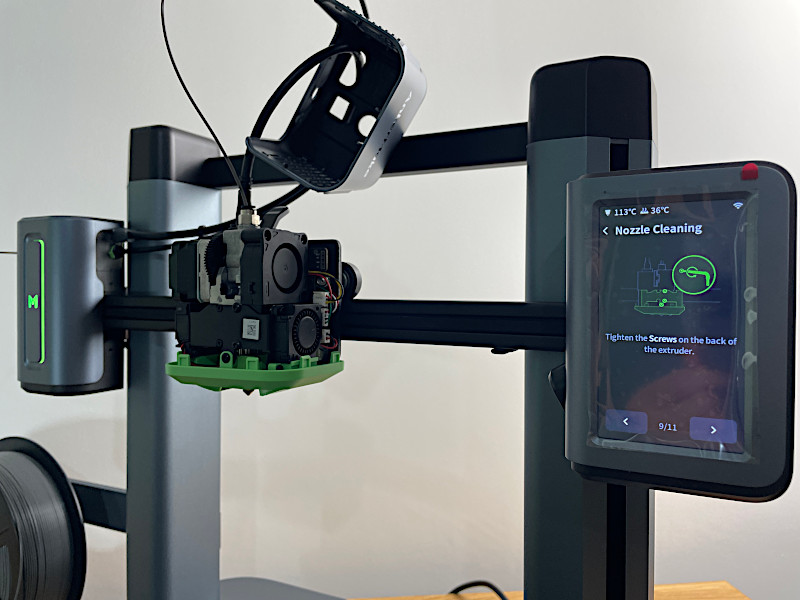
For beginners, disassembling the Ultra Direct Extruder for tasks like nozzle cleaning can be intimidating. However, the on-screen instructions and troubleshooting pages are clear and helpful. I had a minor nozzle clogging issue, but I was able to fix it without needing to go too deep into the extruder. Just in case, here is the link to the troubleshooting pages, which can be quite useful.
Wifi, App, and AnkerMake Slicer
The ability to transfer files using Wi-Fi is very convenient. Before downloading the app, a prominent message confirms that: ‘The Developer Does Not Collect Any Data from This App’. The safety of transferring important objects via Wi-Fi is a long-debated topic that I am not able to comment on. From a consumer perspective, I think it is a very convenient feature.

– App. Monitoring live is a great feature. Usually, I would sit and wait until the first layer is done so I can relax and proceed with my duties. Now I don’t have to; I can have a glimpse of the print at any moment using my phone.
– Timelapse. It wasn’t clear if the timelapse feature worked initially. After switching it OFF and ON again, it is recommended to wait a little bit and restart both the app and machine. Additionally, the timelapse file is not immediately ready after the print completes but will appear shortly. Therefore, I would recommend waiting for a little bit and keeping the machine ON. The quality of the timelapse video could be better, but it still gets the job done. We have a comprehensive guide about timelapses in 3D printing, their benefits, and ways to make them perfect.
AnkerMake M5 printing Easter Bunny Timelapse
Unedited AnkerMake MP4 via App
– Explore. It is a small library of pre-made G-codes. To print a model from this library, I had to perform a firmware update, which is straightforward, and if Wi-Fi is enabled, it is automatic.
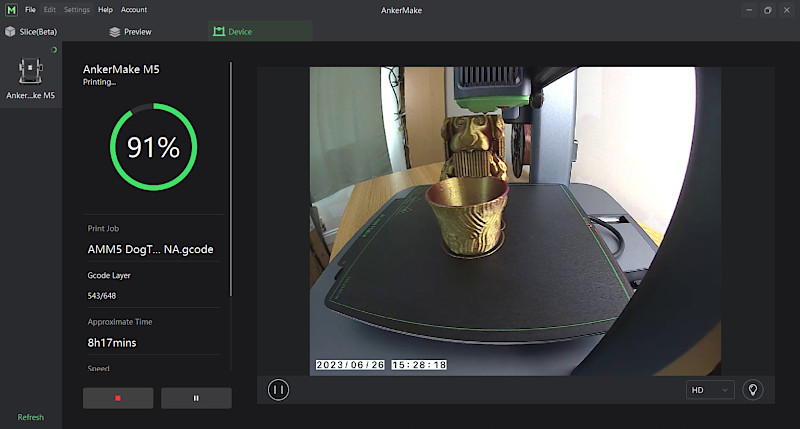
– Hub. The AnkerMake Slicer, apart from slicing capabilities, works as a hub to transfer Gcodes (for example, from other slicers or downloaded from file repositories) to the machine. It also has a feature similar to an app that enables live video streaming.
Speed and Noise
Just before getting deeper into the slicer software settings, I want to mention the speed capabilities of this machine. Up to 500m/s. The campaign was built on speed. All other prints that I produced on this machine for the purpose of the review were done with default settings, and these were printed very quickly.
-Noise. Partially to maintain high speeds, this machine is significantly noisier than the Original Prusa i3 MK3, for example. But it has a similar level of noise when compared to the Creality Ender 5 S1 at high speeds. Protective foam in the base and a custom enclosure can reduce noise levels significantly.
Slicer Software – Profiles and Settings
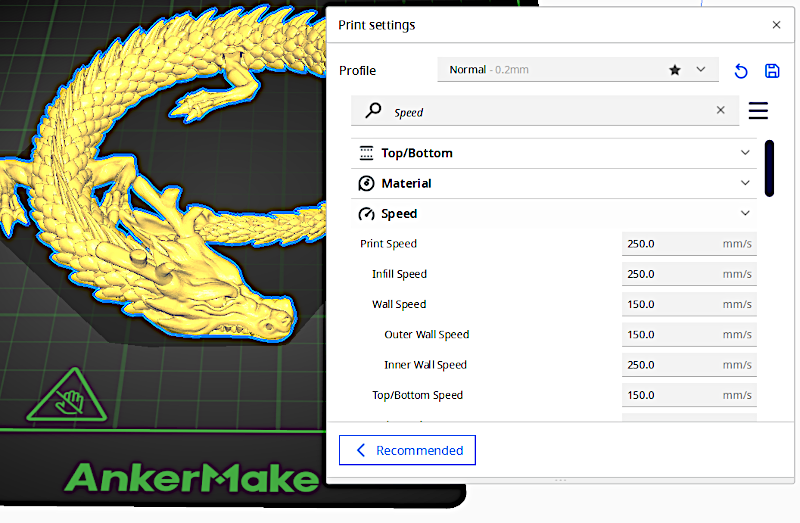
There are many slicer software options available, and I am very pleased that the ones I tried had well-tuned M5 profiles available. For my testing purposes, I tried to print models generated in AnkerMake, Simplify3D, Cura, and PrusaSlicer.
AnkerMake Slicer
Default print speed: 250mm/s
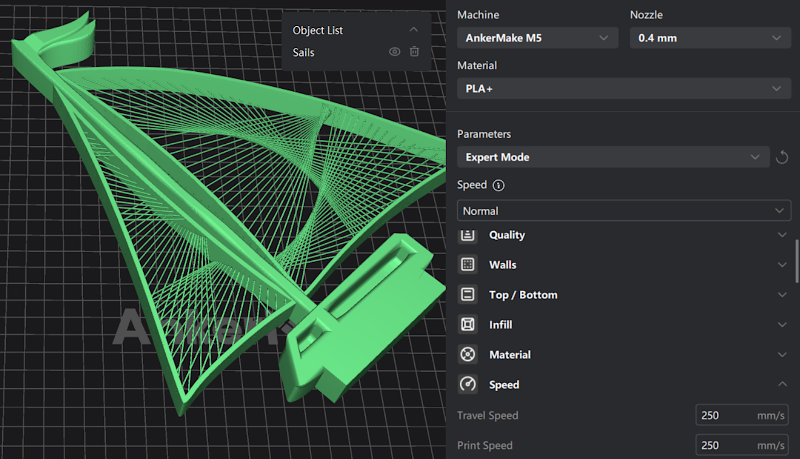
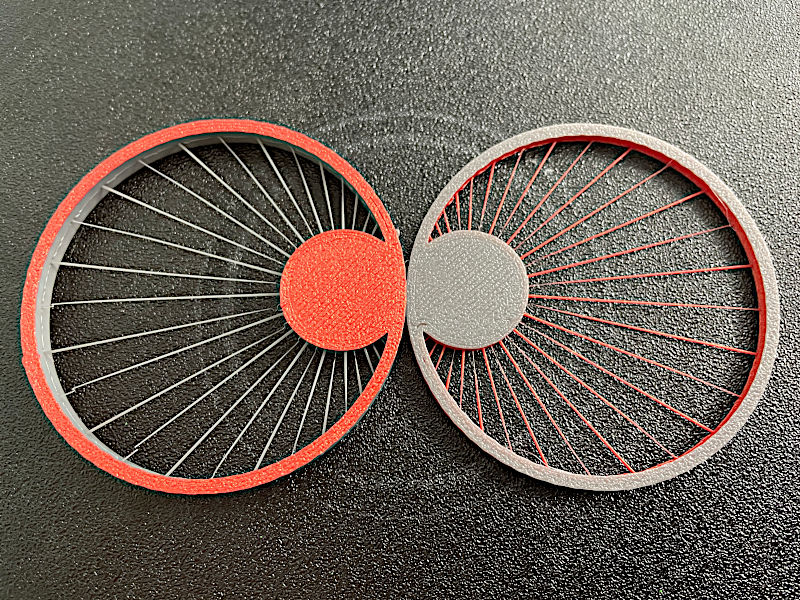
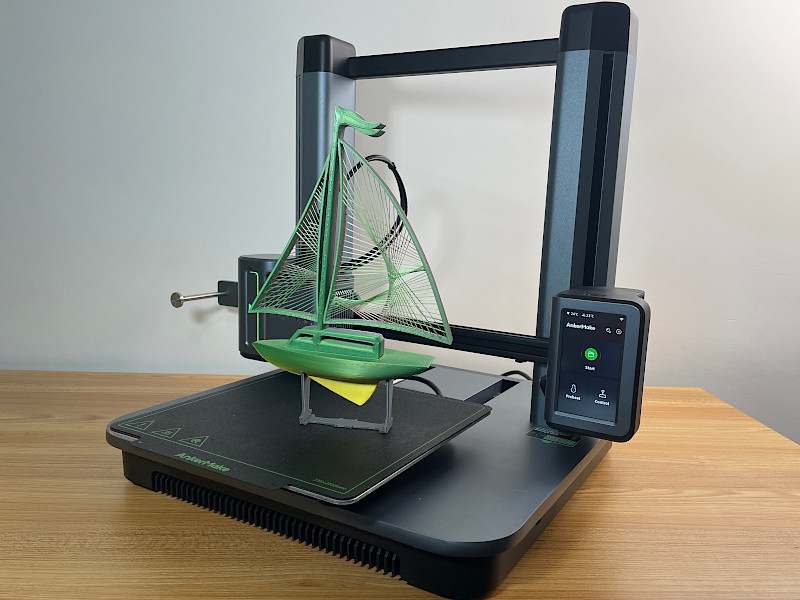
In a few sources, I read that AnkerMake is based on PrusaSlicer. While I cannot compare the codes visually, these software are not identical. The AnkerMake Beta version slicer worked quickly and so far without crashes. I tested a few easy printing models, and challenging ones such as 3DPrintBunny’s Sail model. After completing a model with such challenging strings/bridges, using ooze-rich filament, in just 2 hours, the results astonished me. See the print images below.
Simplify3D AnkerMake M5 Proffile
Default print speed: 100mm/s
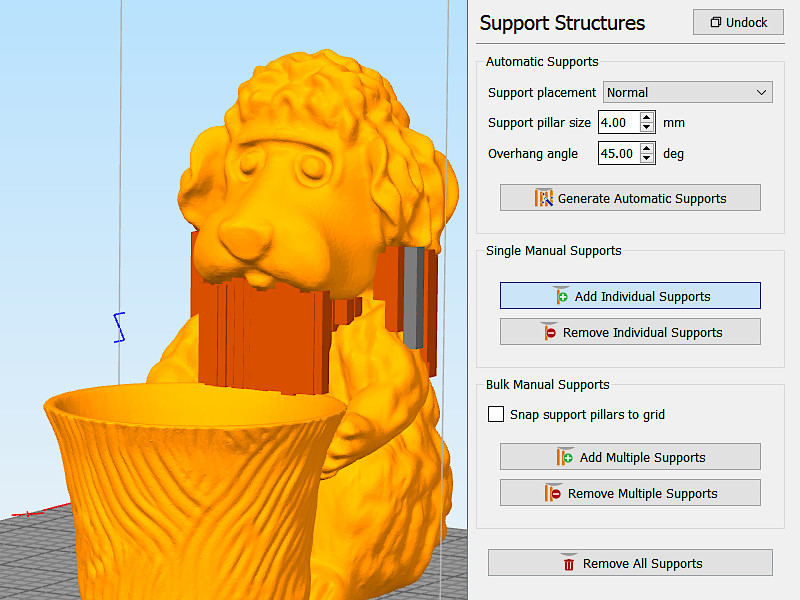
For my Dog model, I had to use Simplify3D as the model required manual support placement in specific areas only. By doing so, I greatly reduced the post-processing of the model. The tree/organic supports from the build plate in the Cura/Prusa slicer would have left extra seams or some oozing, at least. In this case, I also saved material on the support itself. Such custom support placement is also possible to do in the free iDeaMaker slicer, but I am not sure if they have an AnkerMake M5 profile available. Even with slightly slower Simplify3D speeds, the dog model took only 6 hours to print. The result is awesome. See the print images below.
Screenshot: Simplify3D
Cura AnkerMake M5 Proffile
Default print speed: 250mm/s
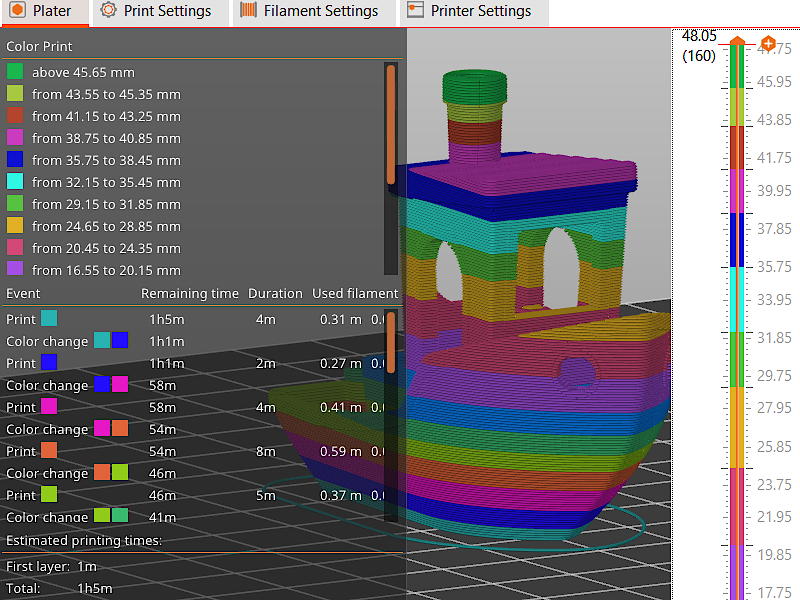
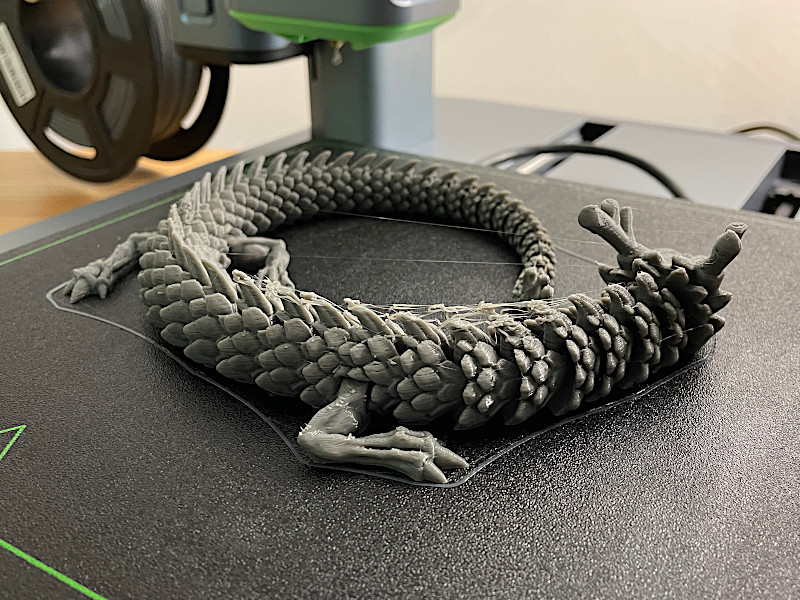
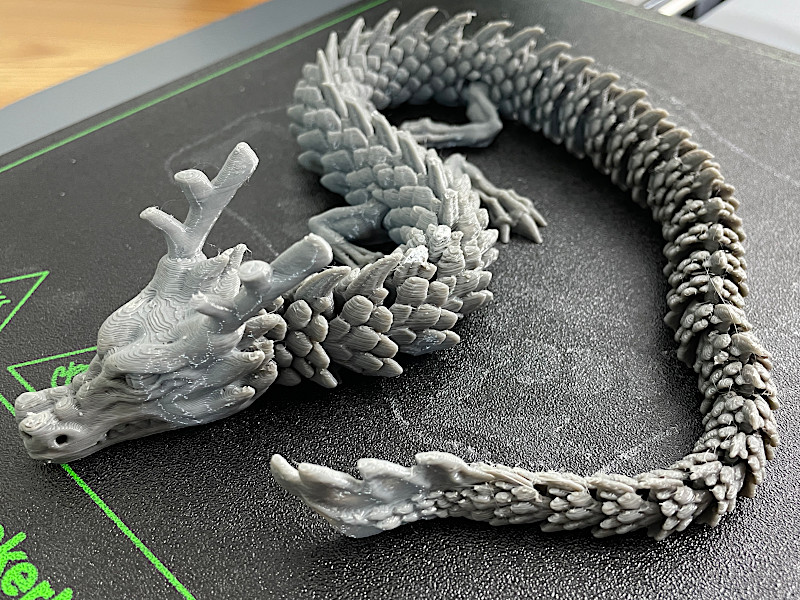
The Cura AnkerMake M5 profile has a distinctive build plate, which is handy. The popular Articulated Dragon was set to print in just 5 hours 30 minutes. I expected that there would be some adhesion issues. Indeed, in the end, four dragon joints lost adhesion, even with the extra glue applied, resulting in four thorns needed to be slightly cleaned. Now, I have a Battle Hardened Dragon. But a 5-hour 30-minute result is simply mind-blowing. See the print images below.
Usually, I would print articulated models with many independent joints using a raft. See my detailed guide about how to print articulated dragons.
PrusaSlicer AnkerMake M5 Proffile
Default print speed: 250mm/s
The PrusaSlicer AnkerMake M5 profile also has a distinctive build plate. When I play with color changes on a specific layer, PrusaSlicer is almost always my ‘go-to’ choice as its preview offers a great picture of how the model will look even before printing.
Read more about color-changing settings and tips and tricks below.
Automatic Pause for the Filament Change on a Specific Layer
It is possible to change the filament and color in the middle of the print by pausing the machine, changing the filament, and then continuing the print. To my delight, implementing this worked using Cura and PrusaSlicer.
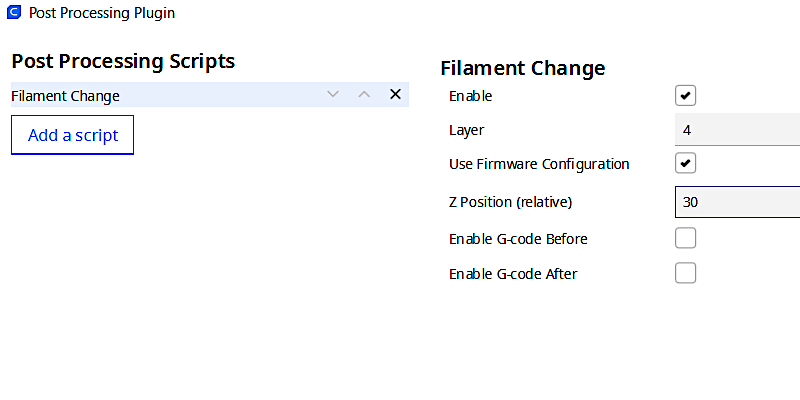
In Cura, to implement such settings, we need to navigate to ‘Extensions > Post Processing > Modify G-Code > Filament Change’. For some reason applied “Z Position (relative) to 30mm” didn’t work. This may cause some issues as when the filament change occurs very close to the printing platform, extruding new filament for purge purposes, for example, can be tricky to perform. You have to stay alert with tweezers and catch any filament that comes out. Check the image below.
©3DWithUs – Photo: Max Funkner
As I mentioned earlier when I play with the color changes my usual software I go for is PrusaSlicer. Mainly bacause of a very comfortable preview window. Low Z Position during the pause happened with PrusaSlicer file as well. Had no time to play with the settings though. I will add the instructions when find the compfortable settings.
Model by 3DPrintBunny on Thangs
©3DWithUs – Print & Photo: Max Funkner
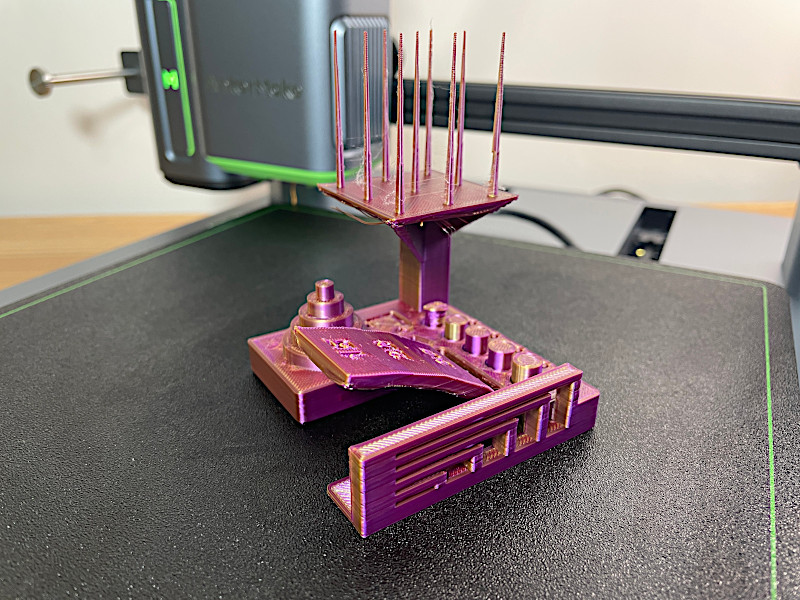
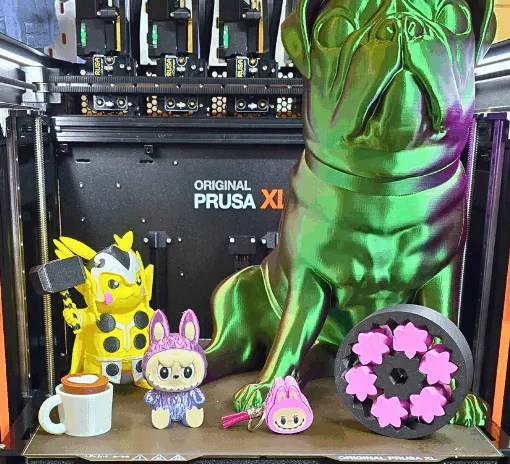
Other Test Prints
To conduct a torture test on the machine for this review, I focused on speed, so most of the prints are made using various types of PLA. I started with simpler models such as the Sandcastle and Frog by Andrew Sink, finishing with complicated prints like the String Sail Boat by 3DPrintBunny and the Articulated Dragon by McGyBeer.
Printing in Dual Color PLA
Sandcastle model on Cults
©3DWithUs – Print & Photo by Max Funkner
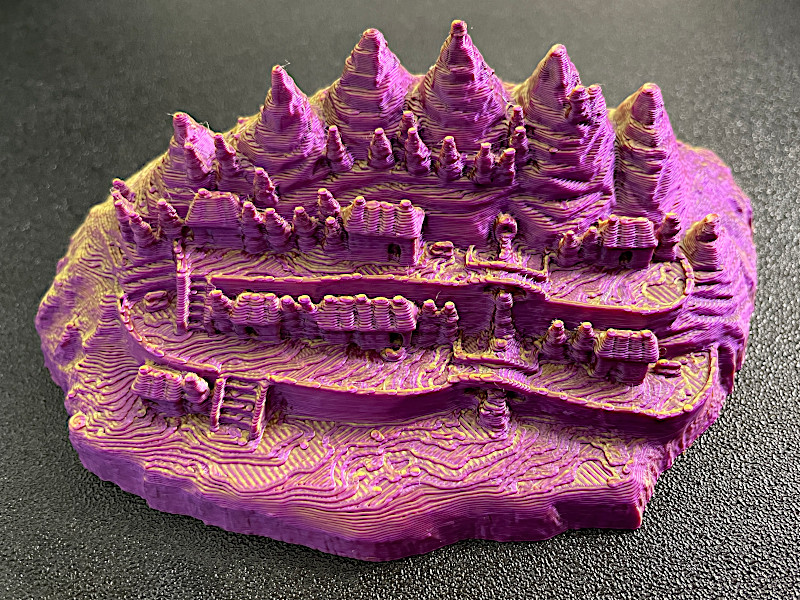
It only took me 2 hours to print a 40mm tall model using the basic AnkerMake slicer software settings. The model, printed with Eryone Dual Color Silk PLA from Amazon, looks awesome. The colors turned out great, with a shade appearing on the back of the model as if it were affected by sunlight. How to capture a sandcastle guide is here.
©3DWithUs – Print & Photo: Max Funkner
Dual color PLA also landed well on Blocky Bored Frog by Andrew Sink. Look at his belly.
3D Models on Cults
©3DWithUs – Photo: Max Funkner
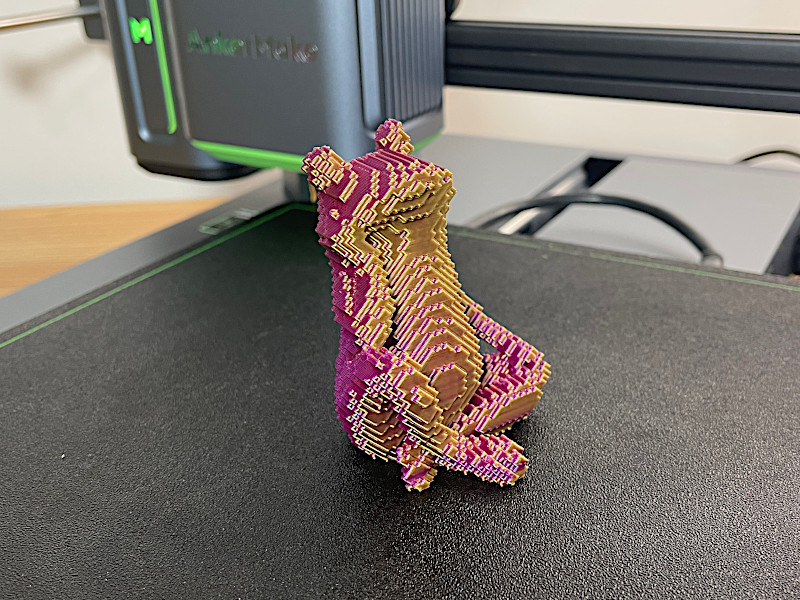
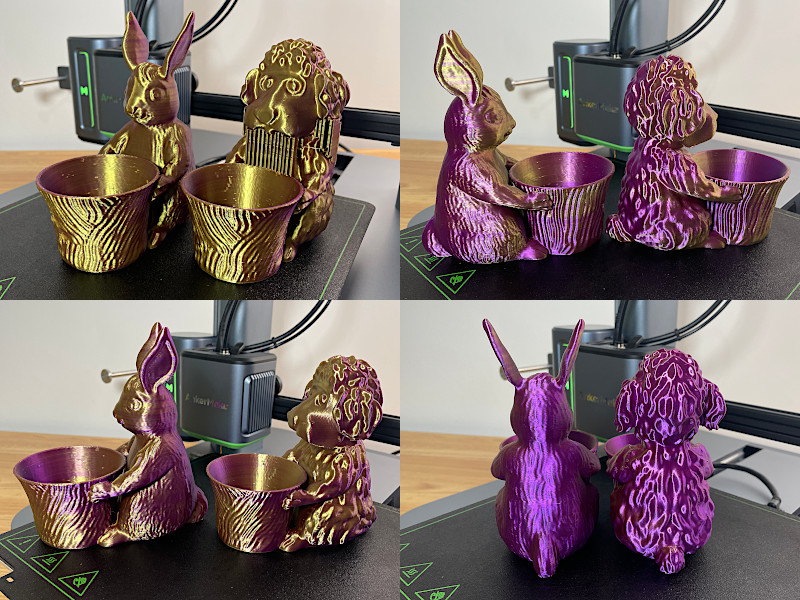
The Dog was printed in 6.5 hours using Simplify3D 100m/s settings while the Bunny was printed in 5 hours using AnkerMake’s 250m/s default settings. I can see a slight difference in the filament. The Dog print is shinier than the Bunny. Overall, I am really happy with how the Dual Color PLA turns on small and medium prints. And of course, the speed is awesome. Usually, on other printers, with tweaked slicer settings, such prints would take at least 8-10 hours.
Printing Long Bridges
One of the most impressive results was the 3DPrintBunny’s Sailboat print. No slicer software tweaking, apart from required 0.3 layer height. Printing time 2h 1min. Impressive!

Model by 3DPrintBunny on Thangs
©3DWithUs – Print & Photo: Max Funkner
©3DWithUs – Print & Photo: Max Funkner
Before attempting to print something like the Sailboat, it is recommended to first test a much smaller String test print I featured above. Not all filament and default settings can keep strings attached to the wall. Rainbow PLA filament is an ooze-rich, springy material; for example, retraction may leave very thin ends. It is also recommended to preview nozzle movement in slicer preview mode, so there are no bridges starting in the middle of the air.
Printing Multiple Parts
For multiple parts testing, the best models are articulated dragons. Now and then, I torture test my printers with McGyBeer’s famous Articulated Dragon. This is a truly challenging test for any printer bed adhesion. And without scaling the model, the print time can be long. When the AnkerMake M5 Cura profile settings offered me a G-Code that would take only 5 hours 30 minutes to print, I decided to take a risk and print it without a raft, but with only Magigoo from Amazon bed adhesion applied. Here is the result. Printed in SUNLU Grey Meta PLA from Amazon.
©3DWithUs – Print & Photo: Max Funkner
Model by McGyBeer on Cults
©3DWithUs – Print & Photo: Max Funkner
Four dragon joints lost adhesion, even with the extra glue applied, resulting in the need to partially remove four thorns. Now, I have a Battle Hardened Dragon. Even though a 5-hour 30-minute result is simply mind-blowing, and I bet I could reprint such a model without failure if I applied the glue slightly better, I would recommend using a raft for such a challenging model.
Model by Three Wu from App Explore Library
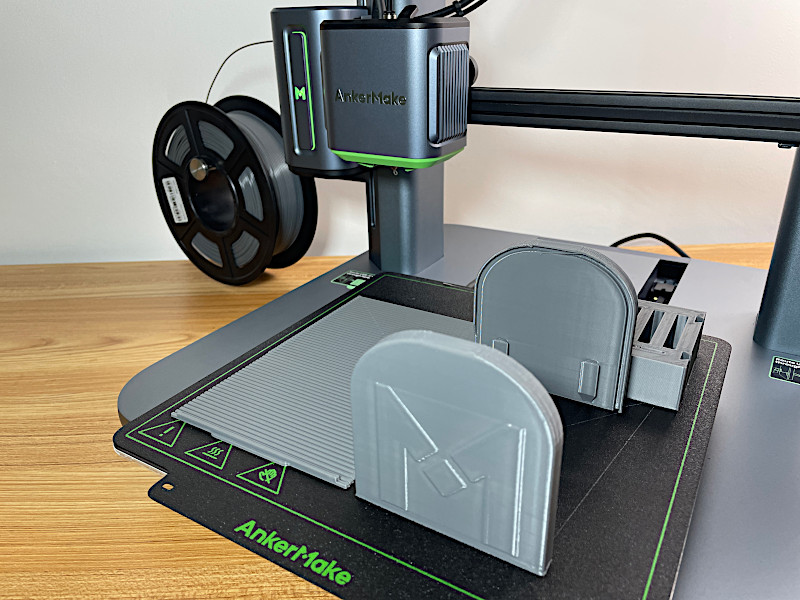
©3DWithUs – Print & Photo: Max Funkner
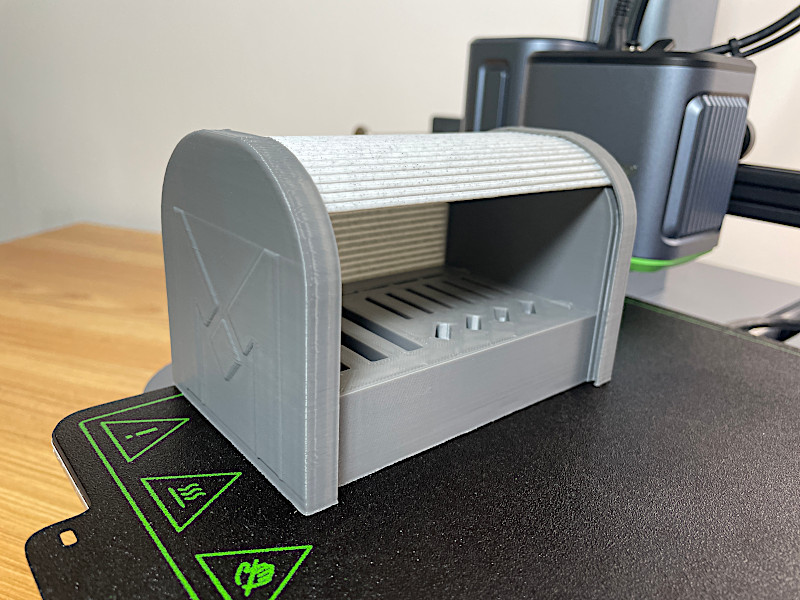
Another multiple parts model I would like to mention is the Memory Card Storage Box by Thee Wu, offered in the AnkerMake App’s Explore tab. The sides lost adhesion when the print had just 5 minutes left to completion. After this failure I started using extra glue for bed adhesion. The second attempt printed without issues. I would recommend to beginners not try this model as one of their first models as it is tricky to assemble, and may require some oil and patience to make the shutter work smoothly. The assembled model looks nice though.
V6 Color Engine and Other Extra Devices
On users’ requests and to stay competitive, AnkerMake developed its own Multi Material system. Looking forward to see the AnkerMake V6 Color Engine Multi-Color and Material Kit in action.
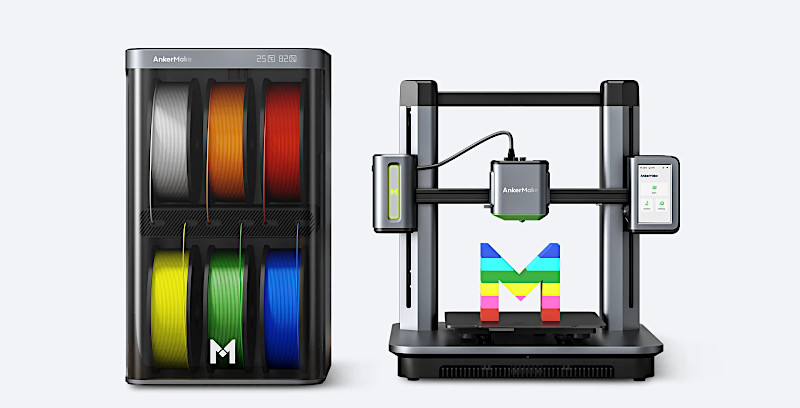
Image: AnkerMake
Learn more on Official Website
Another device that would work well with AnkerMake is a filament dryer. As I mentioned above, I would not recommend using old, brittle filament on this speedy machine in order to avoid jamming in the upper hot end. Such devices can restore and improve filament quality.
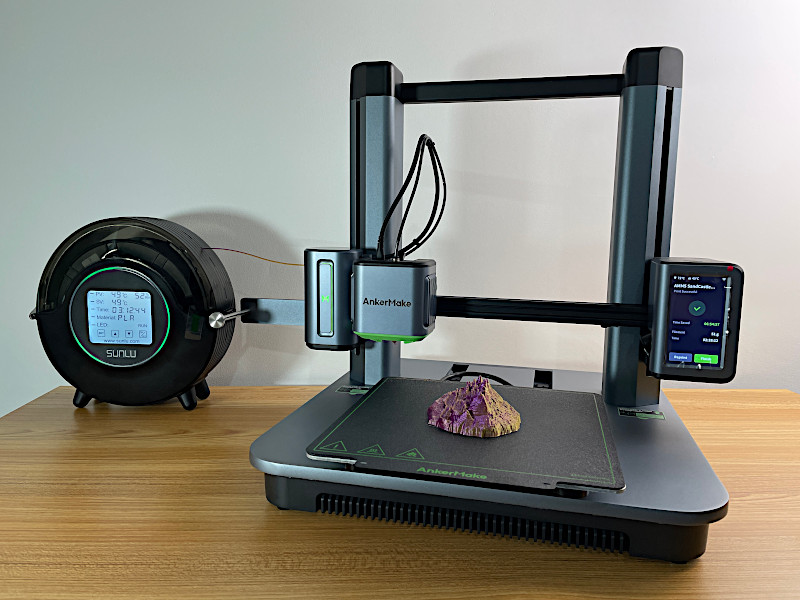
©3DWithUs – Photo: Max Funkner
Compare to Other FDM 3D Printers
On 3DWithUs, we have a comprehensive comparison guide covering the best budget FDM 3D printers. This printer is in a slightly different category, both price and quality wise, and therefore a new comparison guide is coming soon. Compare to the similar build, volume, and the price range FDM 3D printers:
– Speed. With a record-breaking crowdfunding campaign, AnkerMake M5 started a new competition in the consumer 3D printer market. A competition for speed. This was followed by Bambu Lab, and now we even see Creality bringing a competitor in the form of the Speedy K1 3D Printer.
– Price. AnkerMake M5, Bambu Lab P1P, Creality K1 and Prusa i3 MK4 Kit are in the same price range of $600-1000 depending on campaigns.
– Multi Culor Option. With Bambu Lab X1 and Prusa MMU already on the market, the AnkerMake team is working hard to bring their V6 version as well.
In the comparison conclusion, I would say that the four machines mentioned above are in competition at the moment for the same price range.
Compare AnkerMake M5 vs AnkerMake M5C.
The biggest difference is the price. The new machine comes with a greatly reduced price and aims to be a good alternative to other budget 3D printers. After checking the parameters, it turned out that there are a lot more differences between the two machines, and not just downgrading.
Official Website
– $30 Discount Code: ANKERMAKEM5C30
Amazon
Read the full Ankermake M5C review by Richard Hirst.
For example, the M5C doesn’t have a camera and screen; but it received a full metal extruder in comparison to the M5. Here are the major changes:
Build volume: M5 235×235×250 mm vs M5C 220×220×250 mm
No Screen no Camera but One Click Button, which means M5C operates via App only. Wi-Fi, Bluetooth connections.
M5C has an All Metal Extruder, which means it can print with temperatures up to 300℃ in comparison to M5s’ PTFE (Max 260℃). This added extra compatible materials and increased the Extrusion Flow Rate (to 35 mm³/s).
With the major One Click Button simplification and greatly reduced price, AnkerMake tries to reach a different 3D printer user/consumer base. It will be interesting to see how this works out.
Conclusion and Pros & Cons
AnkerMake M5 Review
Review Summary
What struck me the most is that the majority of the models I tried to print didn’t require slicer tuning. I trusted the existing settings of AnkerMake M5 profiles in various slicer software, and it produced great results with default high-speed settings. For me, it’s important not to have a print running into the night time, no matter how quiet the machine is. Quick printing was definitely a good thing. Apart from the speed bonuses, AnkerMake M5 iconically looks very neat. It stands out. The embedded AI camera, well-functioning app, and slicer software made my experience exceptional. I can see this machine being used by both casual users who want to show off the machine and designers who want their prototypes fast.
Pros:
Iconic Look
High Default Speed
Well-Tuned Profiles in Major Slicers
Wi-Fi, App, Slicer Work Well
Cons:
Noisy
Minor Filament Feed Issues

PLA+ is a modified PLA with adding some chemical material to make PLA more strength and impact resistance.