Being someone who started their 3D printing adventure with an Ender 3, I highly appreciate the line’s enduring appeal. Creality has been a reliable option for creators. There have been substantial changes to the Ender 3 line throughout its history. This review focuses on the two most recent models in the line: the Ender-3 V3 SE, which is inexpensive and includes several high-end features, and the Ender-3 V3 KE, which is positioned as a mid-range printer with Klipper integration. With prices under $300 apiece, both printers are well within the reach of the average consumer. This in-depth analysis attempts to break down the distinctive qualities of each model, enabling a thorough comparison of the advantages and disadvantages present in these new Ender-3 versions.
Table Of Contents
- Specifications
- Unboxing – What’s Included
- Setup and Design
- Creality Sonic Pad
- Testing and Results
- Compare to Other 3D Printers
- Conclusion and Pros & Cons
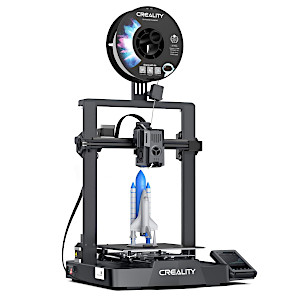
Creality Ender-3 V3 KE Specifications
Build Volume: 220 x 220 x 240 mm (8.6 x 8.6 x 9.5 inches)
Material: PLA/PETG/TPU (up to 300 degrees)
Extruder Type:Direct Drive
Nozzle: 0.4 high flow
Linear rails: X-Axis and Y-Axis
Build Platform: PEI coated spring steel sheet, heated
Bed Leveling: Automatic + Z
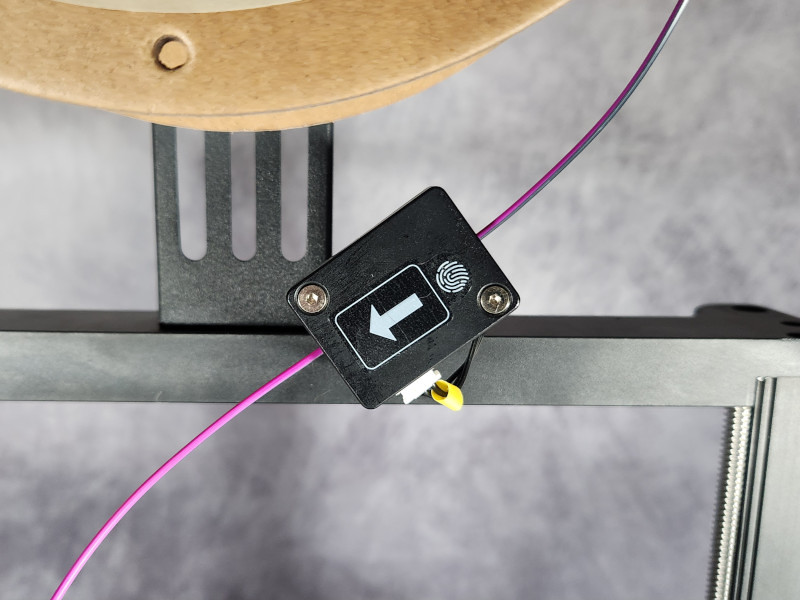
Filament Runout Sensor: Yes
Connectivity: USB, Wi-Fi
Interface: 4.3” Touch Screen
Machine Footprint: 433 x 366 x 490 mm (17 x 14.4 x 19.3in)
Machine Weight: 7.8 KG (17.2 lbs)
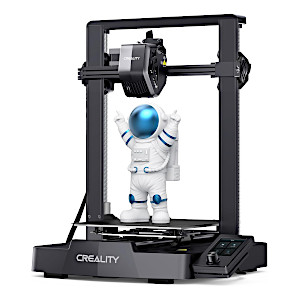
Creality Ender-3 V3 SE Specifications
Build Volume: 220 x 220 x 250 mm (8.6 x 8.6 x 9.8 inches)
Material: PLA/PETG/TPU (up to 260 degrees)
Extruder Type: Direct Drive
Nozzle: 0.4 high flow
Linear rails: Y-Axis
Build Platform: PC spring steel sheet, heated
Bed Leveling: Automatic
Filament Runout Sensor: Yes
Connectivity: SD card
Interface: 3.2″ Color Screen with Knob
Machine Footprint: 349 x 364 x 490 mm (13.7 x 14.3 x 19.3in)
Machine Weight: 7.12 KG (15.7 lbs)
Product affiliate links: 3DWithUs is supported by its audience. Purchases via some links may earn us a small commission at no extra cost to you. This helps us to continue bringing you high-quality content. Our guides and reviews remain unbiased and independent.
Ender-3 v3 KE Price: $279
Ender-3 v3 SE Price: $199
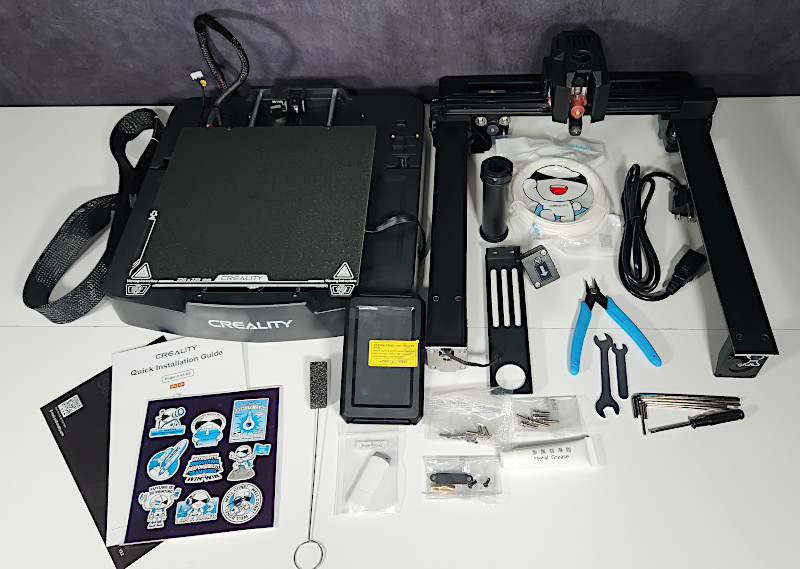
Unboxing and What’s Included
Ender-3 V3 KE
• Ender-3 V3 KE base
• Gantry frame
• 4.3” touchscreen
• Filament rack and spool holder
• Toolkit
• Power cable
• USB Drive
• Spare nozzle
• Nozzle cleaner
• Sidecutters
• FFC clip
• Assembly screws
• Sample filament
©3DWithUs – Photo: Will Zoobkoff
Ender-3 V3 SE
• Ender-3 V3 SE base
• Gantry frame
• Screen w/dial control
• Material rack and spool holder
• Toolkit
• Sidecutters
• Power cable
• USB reader w/ SD card
• Spare Nozzle
• Nozzle cleaner
• Assembly screws
• Sample Filament

©3DWithUs – Photo: Will Zoobkoff
Setup and Design
The setup procedure for the Ender 3 V3 KE and SE is the same. First, use the included screws to secure the gantry frame to the base. Next, attach the screens, the filament spool rack, and the holder. After every part is firmly fastened, make sure every wire is inserted into its appropriate connector. Creality specializes in making things easy to use, as seen by the clearly marked plugs and simple, easy-to-follow directions. Users who are not experienced with 3D printing can confidently assemble and use the Ender 3 V3 KE and SE due to its straightforward assembly process. A smoother user experience is a result of the setup phase’s painstaking attention to detail, which reflects Creality’s dedication to user-friendly design.
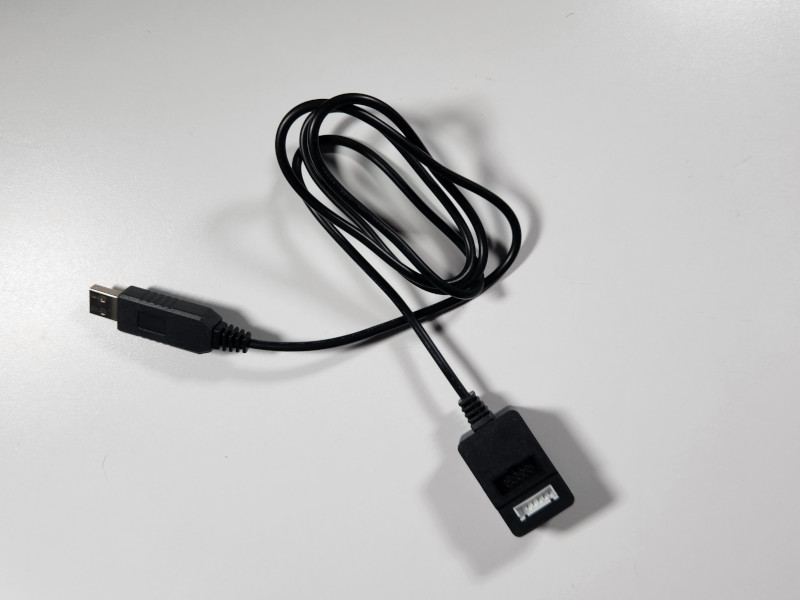
You can choose to start printing with the Ender 3 V3 SE by using the Marlin setup. On the other hand, the Ender 3 V3 SE supports the Creality Sonic pad if you have one. However, a particular cable is needed in order to connect to the Sonic pad.
©3DWithUs – Photo: Will Zoobkoff
Creality Sonic Pad
To create a serial connection between the printer and the Sonic pad, Creality offers a serial to USB converter. With two connectors and support for numerous printers, this adaptable cable works with other printers.
©3DWithUs – Photo: Will Zoobkoff
If users choose to use the Sonic Pad method with the Ender-3 V3 or SE, the Sonic pad comes with an intuitive connection guide that makes the integration process simple. The user experience is improved by this extra flexibility in printing configuration, which enables users to choose the method that best suits their preferences and equipment.
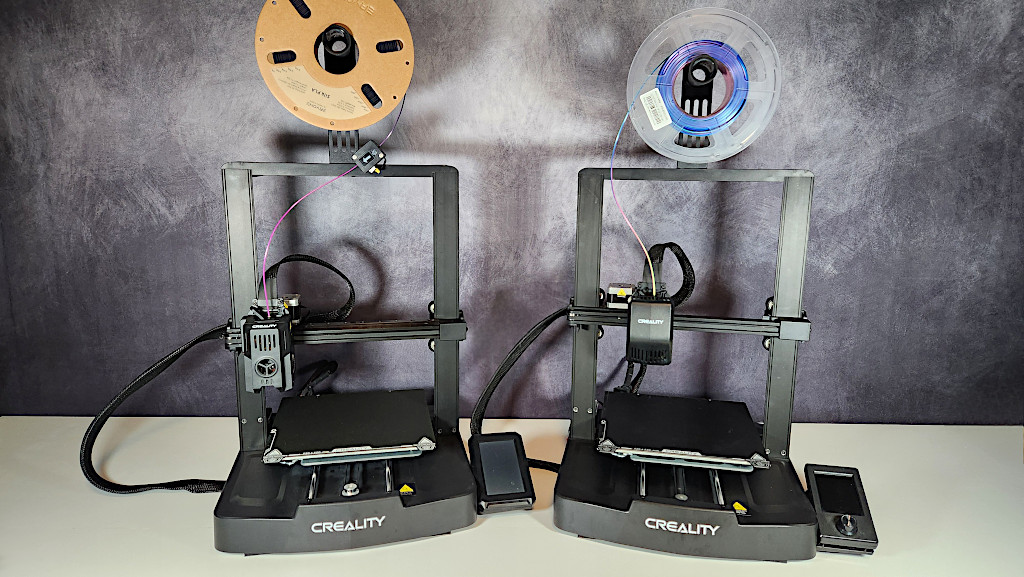
Design
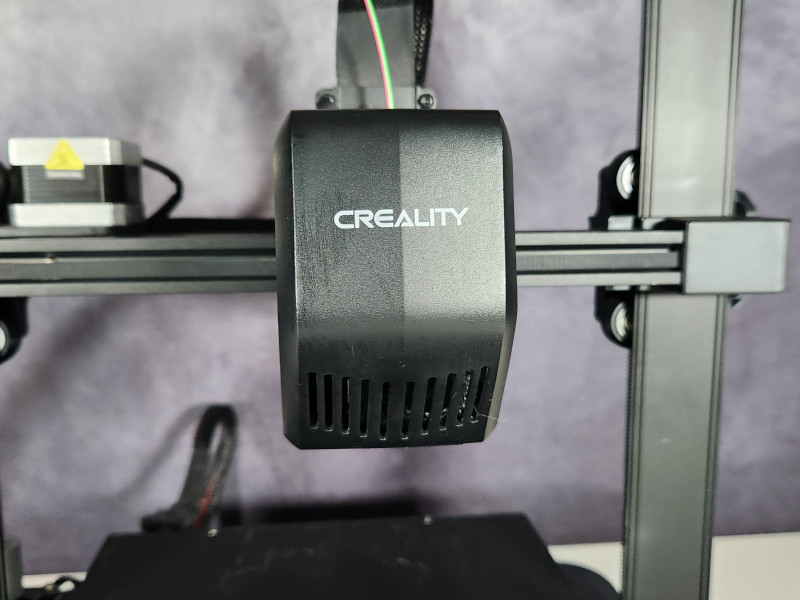
On the design front, both Ender-3 V3 printers have a nearly similar appearance with a few slight differences. The Ender 3 V3 KE includes a filament runout sensor and a full-featured touchscreen.
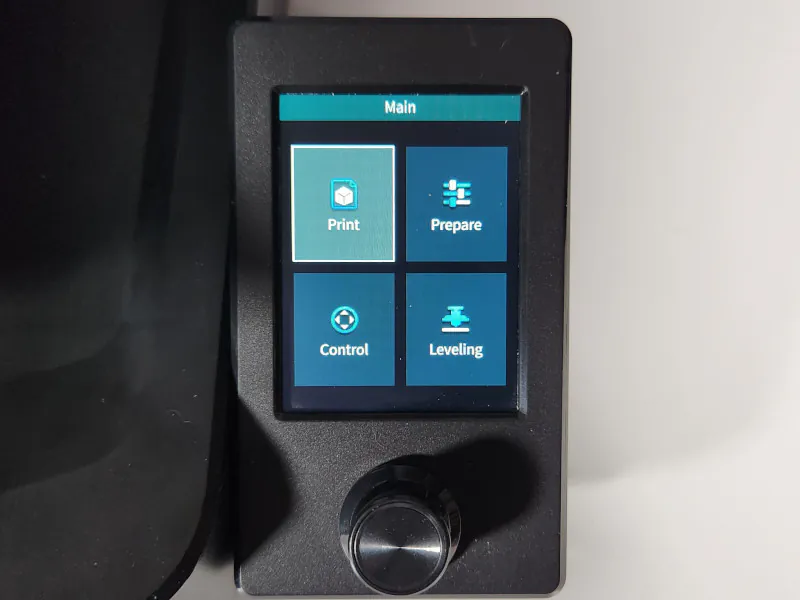
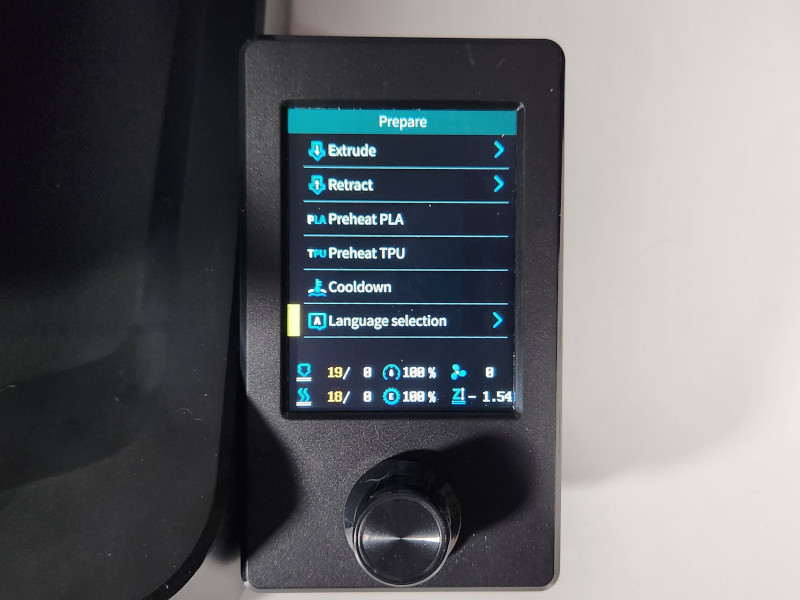
In contrast, the V3 SE does not have a filament runout sensor and instead uses a non-touch colour screen with a dial control, which is evocative of older printer models. Despite the lack of touch functionality, the V3 SE’s colour screen provides a complete menu for adjustments, calibrations, and print initiation.
©3DWithUs – Photo: Will Zoobkoff
©3DWithUs – Photo: Will Zoobkoff
Additional differences are that the V3 KE has linear rails on the X-Axis and Y-Axis, while the V3 SE has a different type of rails, V-slot rollerways.
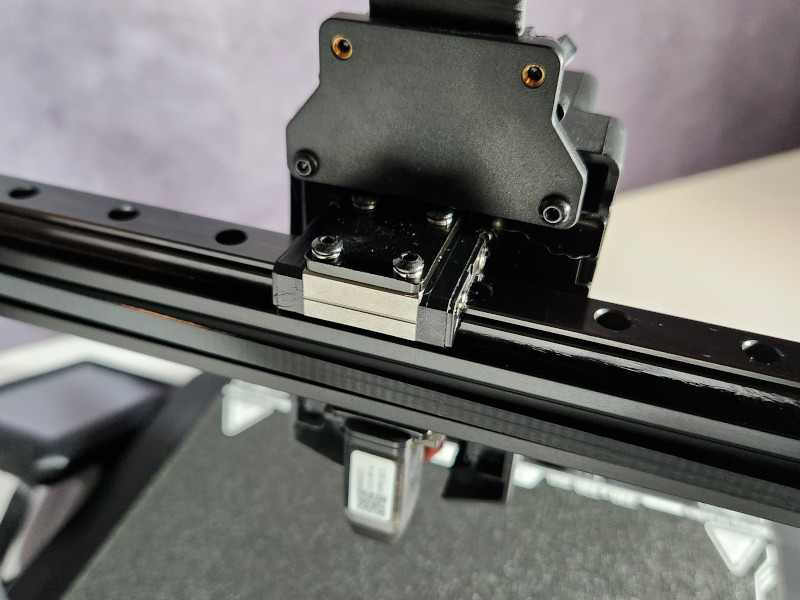
©3DWithUs – Photo: Will Zoobkoff

Upon closer inspection, the dual 4010 blower fans on the V3 KE are fitted for effective part cooling. On the other hand, the V3 SE has a single blower fan that cools the part, which is the main factor that limits the print speeds.
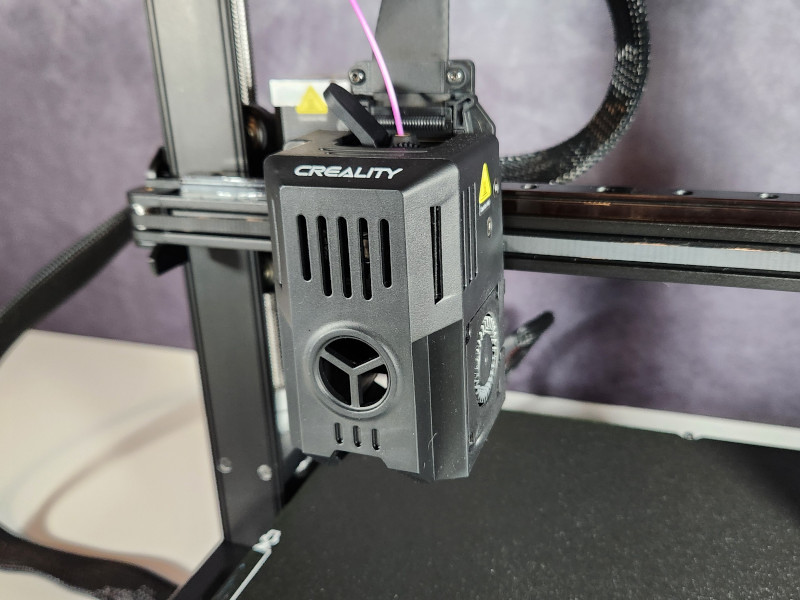
©3DWithUs – Photo: Will Zoobkoff
Thankfully, there are a number of modifications on printables.com Search models: Ender 3 v3 se duct that can be used to improve the Ender 3 V3 SE’s cooling system and offer a valuable boost to overall performance.
Testing and Results
Orca slicer, a slicer that has quickly become one of the best, was used to slice all prints that were completed throughout the review process. Orca, a combination of a Bambu and a Prusa slicer, has several printing features that set it apart from other slicers. Notably, the slicer receives regular upgrades that bring new features and support different printer models.
To ensure uniformity in our experiments, each print was sliced at a 300 mm/s print speed, with 200 mm/s outer walls, utilizing an 8% gyroid infill using three walls. When necessary, supports were applied using Auto supports. We chose to use organic supports since they provide better support than ordinary supports and are easier to remove.
Ender 3 V3 SE Results
For the first print off of the V3 SE, I chose an excellent model from Pipe Cox, the Omega robot model. This particular model is a perfect fit for the 220×220 build platform, making it convenient to complete a multi-piece print in one go. Utilizing Sunlu Grey Meta PLA, the model turned out exceptionally well, and this was achieved using the stock Marlin firmware with print speeds set at 150 mm/s.
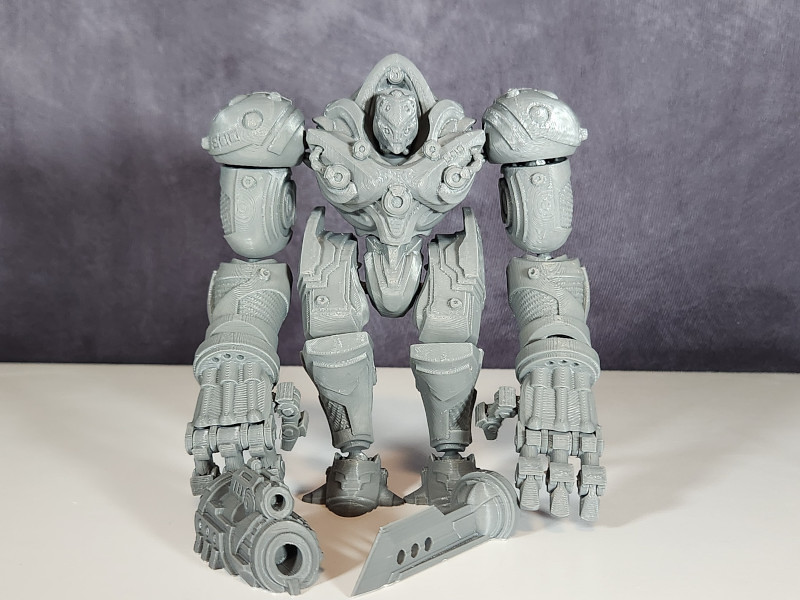
3D Model by Pipe Cox on Cults
©3DWithUs – Print and Photo: Will Zoobkoff
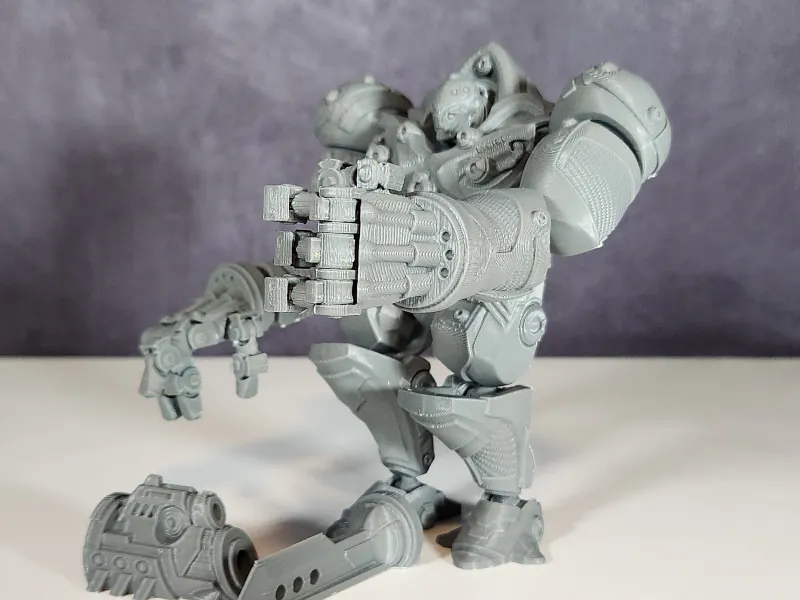
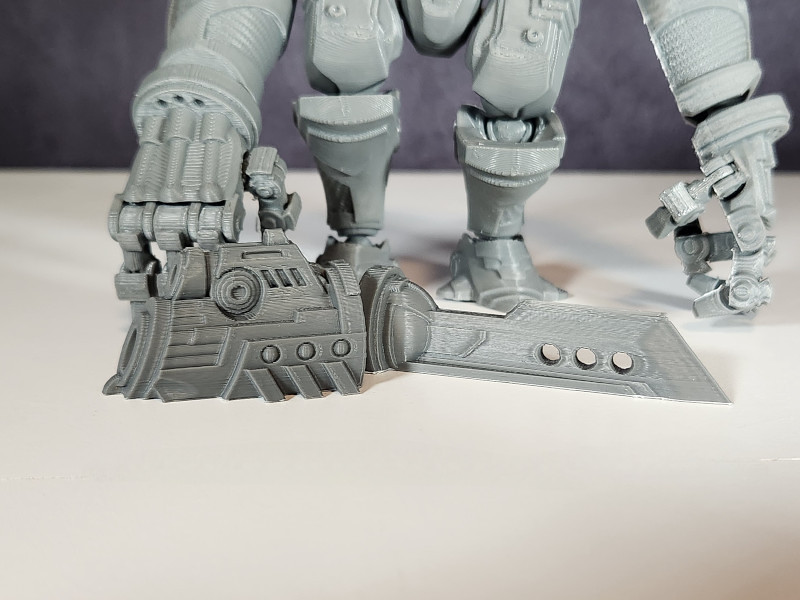
Interestingly, with the same clean results, this print can be executed at 300 mm/s when running Klipper with the Sonic Pad. Throughout the printing process, there were no issues encountered with any of the parts – all pieces fit together snugly, the joints moved seamlessly, and the model maintained its pose without any problems. The entire print was successfully completed in approximately 8 hours. If printed using Klipper, the same print could potentially be done in 5 hours or less.
We chose the Dynamech vase — a beautiful design created by one of our very favourite digital artists, Pipe Cox — for our next printing experiment. We started this colourful project using Sunlu tricolour blue, green, and purple silk PLA from Amazon. The entire sculpture was completed in just over five hours by using Klipper at a fast speed of 300 mm/s.
3D Model by Pipe Cox on Patreon
©3DWithUs – Print and Photo: Will Zoobkoff
The silk PLA’s amazing colour transition in this print was what really caught our attention. While it is not a clean transition, it does give a unique look. The vase’s final appearance was visually enhanced by the harmonious combination of blue, green, and purple. This demonstration of the Ender 3 V3 SE’s capabilities, as well as the adaptability of the selected filament, enhanced the overall aesthetics of the print.
Now let’s take a closer look at the last model we tried for the Ender 3 V3 SE: the fun Flexi Stuffed Dragon from Twisty Prints, a popular Patreon creator renowned for their intricate and unique models. This print is broken up into three sections: the body, the wings, and the head, using the same Sunlu tricolour silk PLA in blue, green, and purple. It took me slightly over nine hours to finish this print.
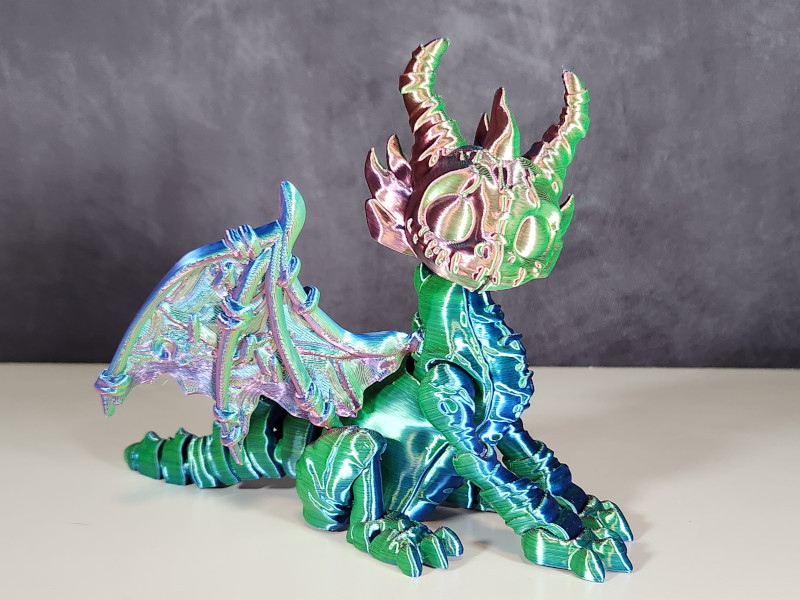
3D Model by Twisty Prints on Patreon
©3DWithUs – Print and Photo: Will Zoobkoff
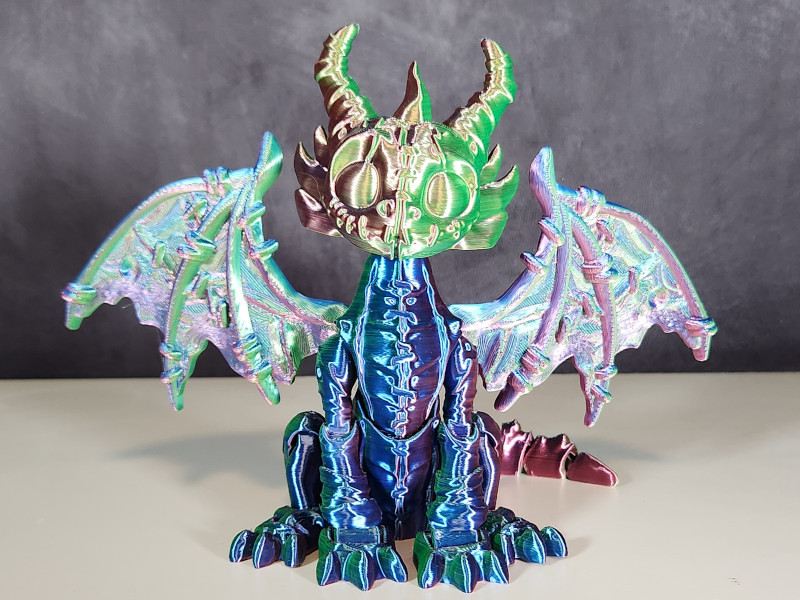
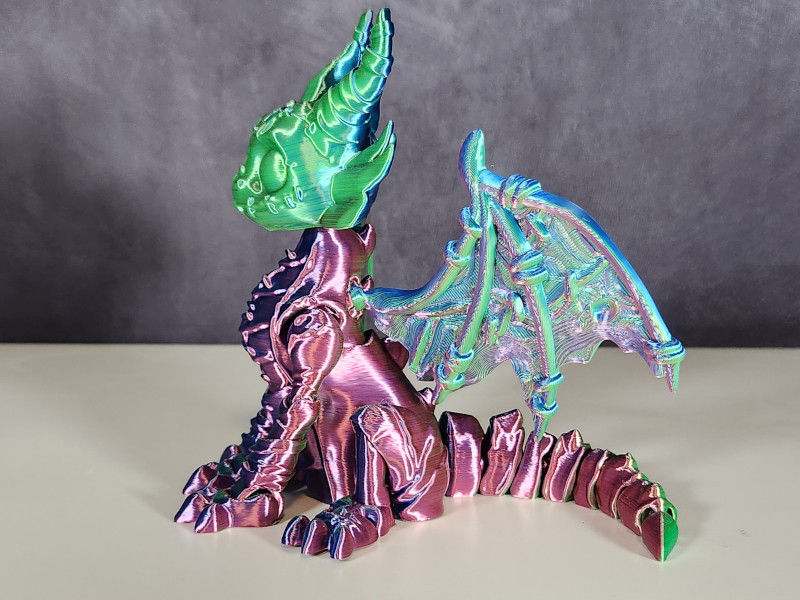
This print was produced with precision and had no overhanging concerns, just like our other prints. All of the joints moved effortlessly, displaying no signs of binding or issues. The wings are precisely fitted into their respective positions. This flexi dragon displays the Ender 3 V3 SE ability to handle intricate parts.
Ender 3 V3 KE Results
We chose to use Blue Creality Hyper PLA to print the same Omega robot that we had produced on the V3 SE for our first print on the Ender 3 V3 KE. This print took slightly more than 6 hours to complete, and although though it was sliced at the same speed as its counterpart on the V3 SE, the V3 KE’s print took less time to complete because of its increased acceleration capabilities. The linear rails on the X and Y axes contribute to this greater acceleration by increasing speed while maintaining stability.
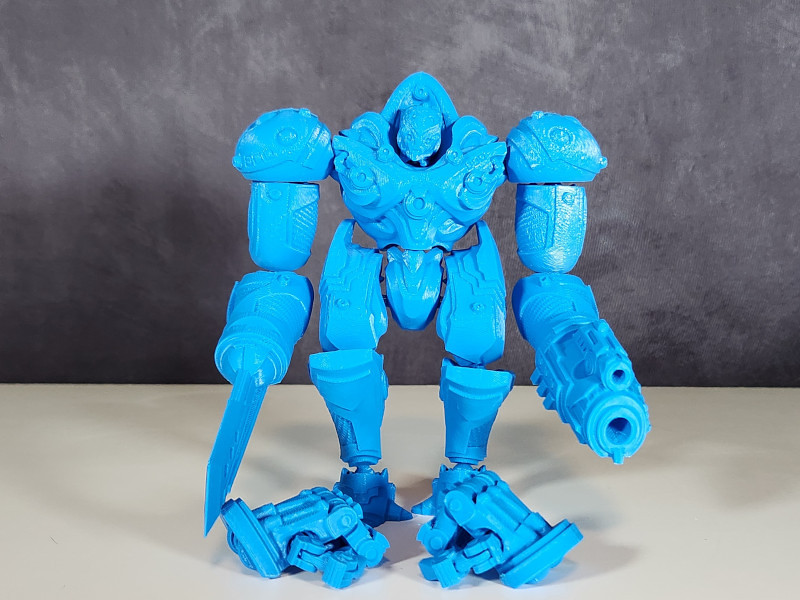
©3DWithUs – Print and Photo: Will Zoobkoff
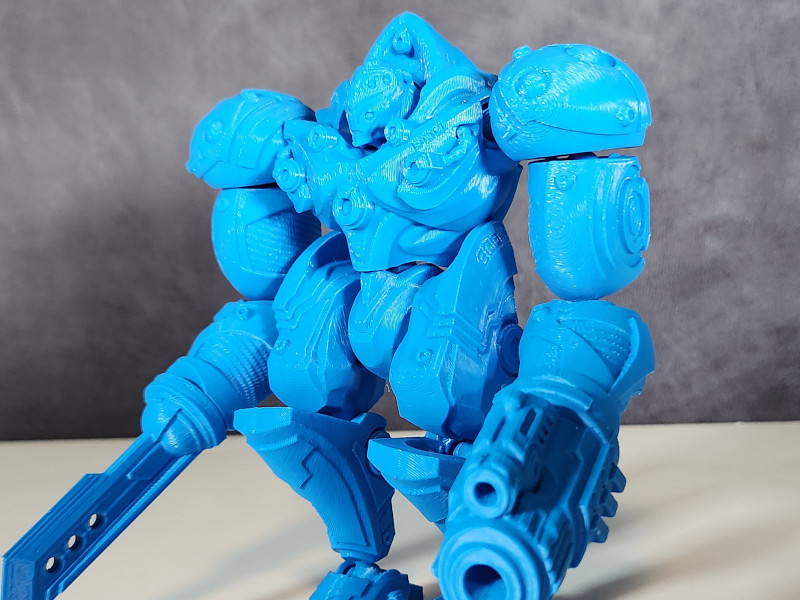

The end print is a flawless print that displays snug fitting parts. The joints move smoothly, and the model holds its position without any problems. This successful version of the Omega droid demonstrates the Ender 3 V3 KE’s ability to produce prints that are quick and cleanly printed.
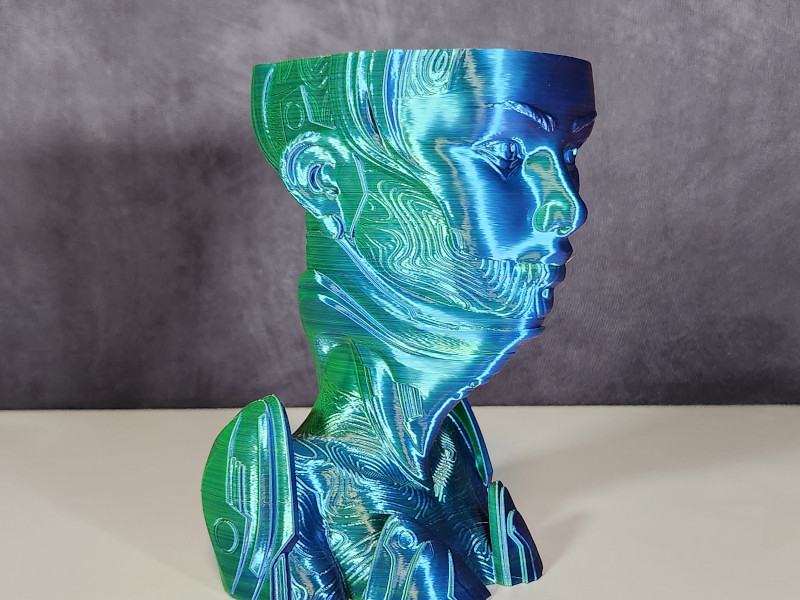
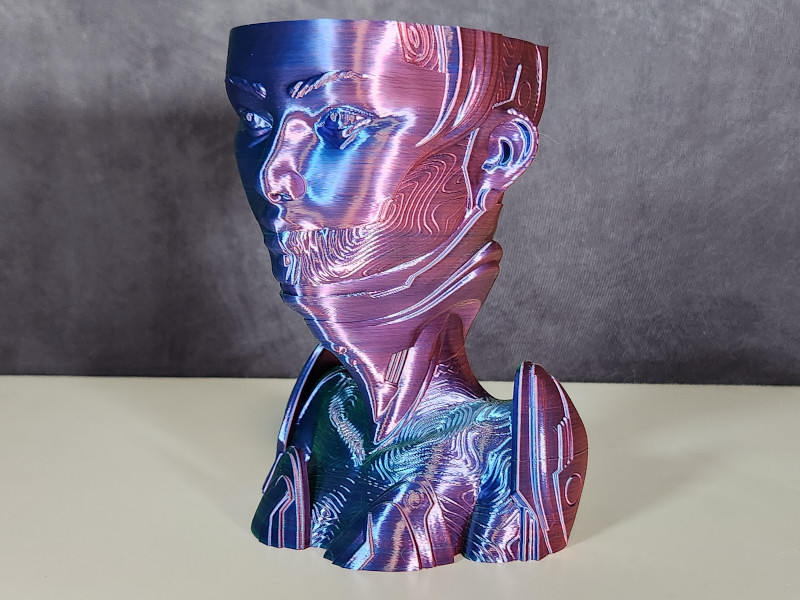
We chose the Honnari Hannya wall mask, another model from the Pipe Cox collection, for our second print. This model, with its hinges and movable sections inside the mask, is a great way to test print-in-place components. This print, like all the previous, was made with Sunlu dual-color black and purple silk PLA at a speed of 300 mm/s.
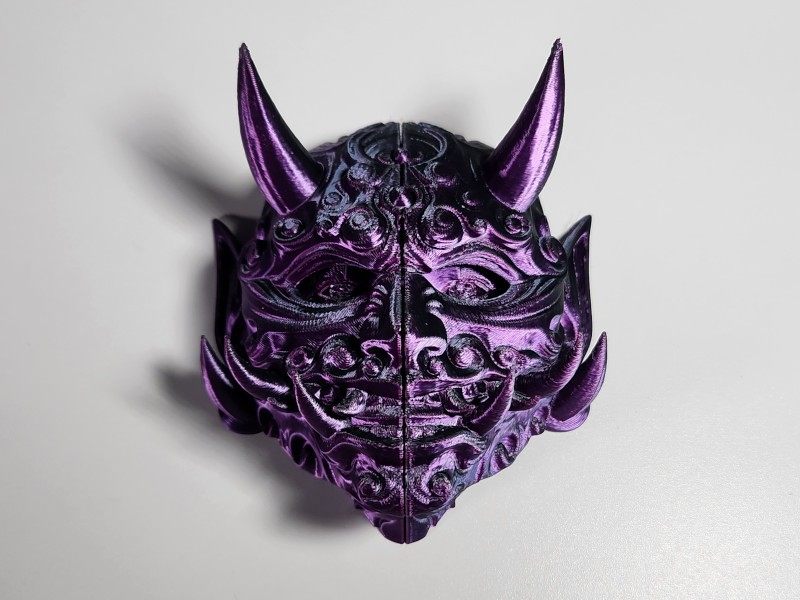
3D Model by Pipe Cox on Patreon
©3DWithUs – Print and Photo: Will Zoobkoff
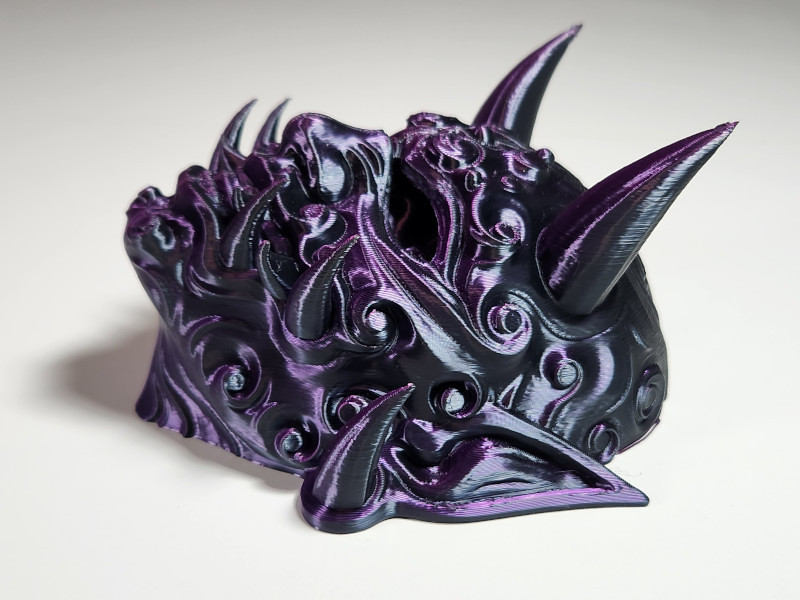
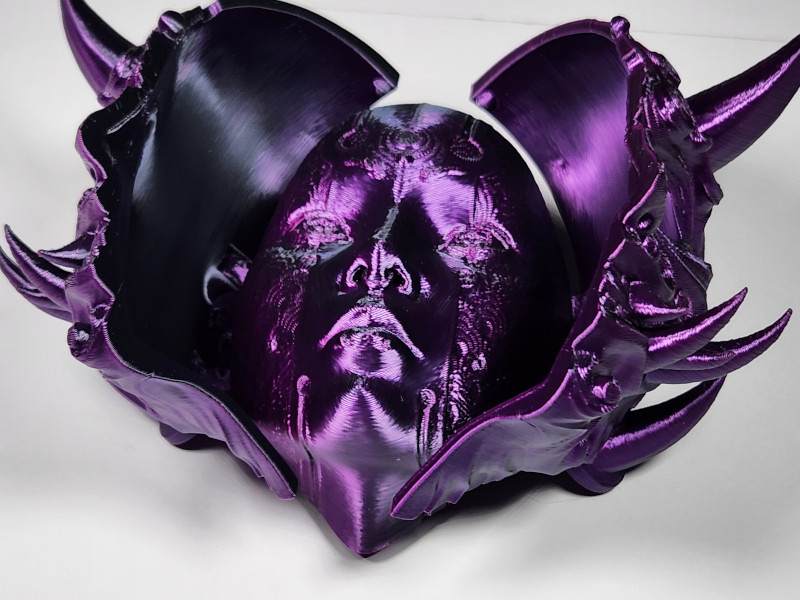
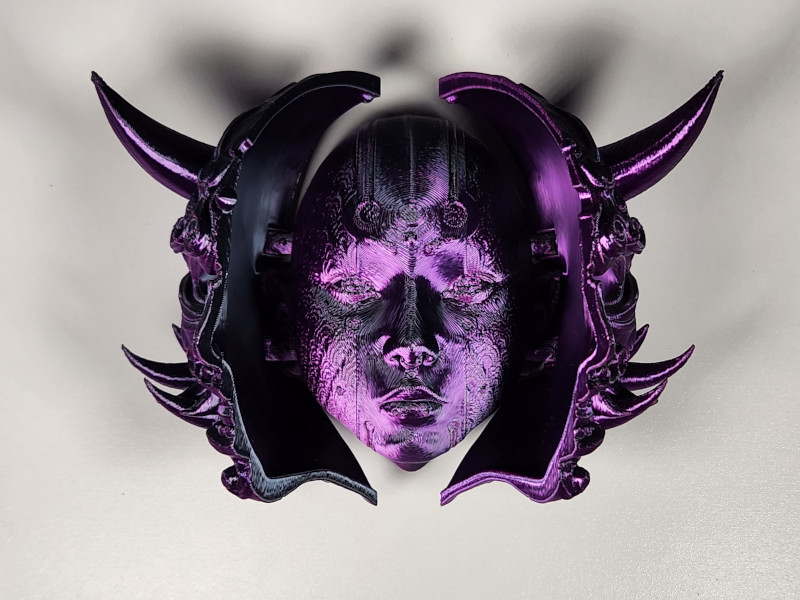
With no issues emerging from the sliding mechanism or the hinges, the results are really stunning. The purple adorned one half of the print elegantly, while the black accentuated the other. The colours blended together well. Particularly when made with silk PLA, this colour contrast extended to the face inside the mask, making for a truly remarkable print.
We chose to use Pipe Cox’s Sacred Tree Vase model for the 3rd and final print in our Ender V3 KE testing. For this specific print, Red Silk PLA and Sunlu Gold were used. The base plate took two hours to print, and the vase took about seven hours. The completed piece has a beautiful appearance with the silk PLA’s shining finish and the print’s detailed design, even though the colour shift is minor with these hues.
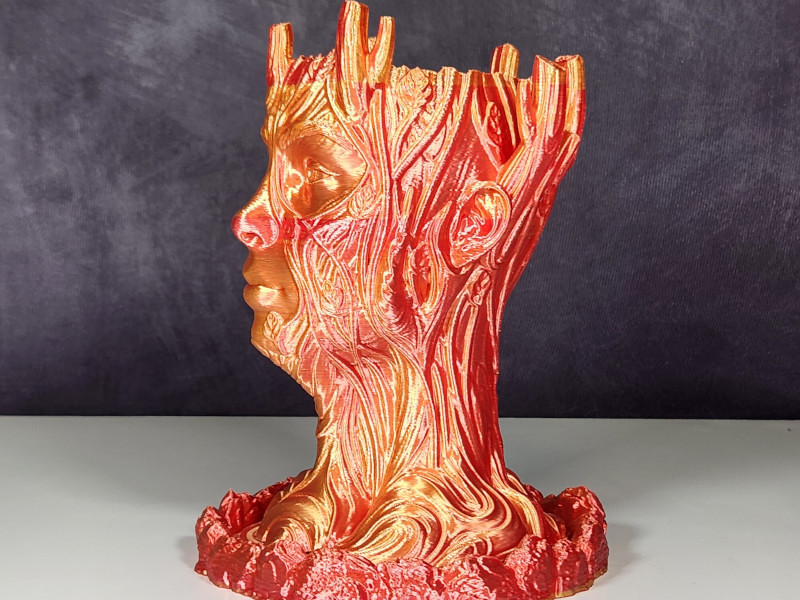
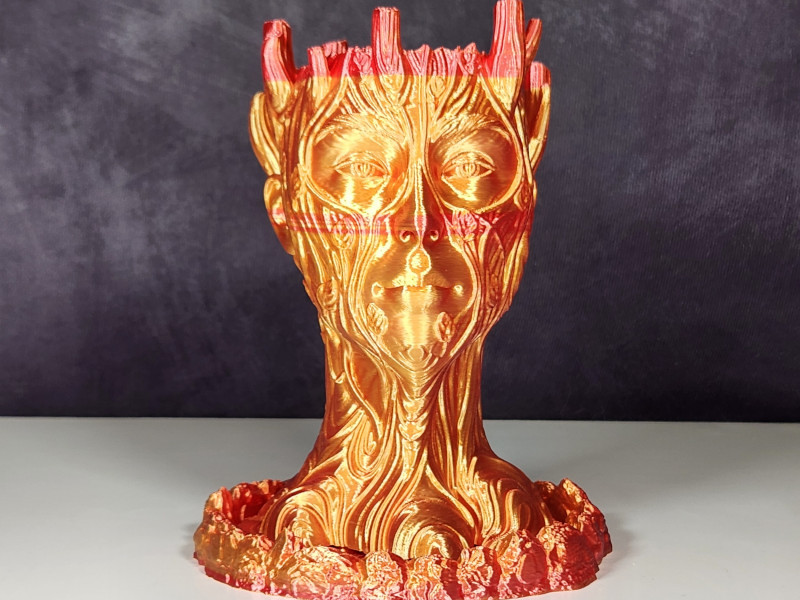
It’s amazing that none of the overhangs gave rise to any problems; the Ender V3 KE’s dual-blower part cooling configuration deserves praise for keeping everything cooling well during the high speed prints.
Compare to Other Creality Printers
Creality is very well known brand for its previous CR and Ender series machines. Over the years, various models have been named as the best 3D printers in budget and other categories.
Compare to Other 3D Printers
On 3DWithUs, we have a comprehensive comparison guide covering the best budget FDM 3D printers. These printers fall into the $300 category.
Conclusion and Pros & Cons
Ender-3 v3 KE Price: $279
Ender-3 v3 SE Price: $199
Creality Ender-3 V3 KE/SE Review and Comparison
Review and Comparison Summary
Reliability-focused Creality offers two affordable options: the intermediate Ender 3 V3 KE and the Ender 3 V3 SE, both under $300. The Ender 3 V3 KE and SE printers have received ratings of 4.7 and 4.6 out of 5, respectively, which indicates their excellent performance.
Principal benefits include auto-leveling, linear rails on both models, and high print rates (KE: up to 500 mm/s, SE: up to 300 mm/s). The printing experience is made more flexible by the integration of Klipper with Sonic Pad support for the SE. Still, the SE has drawbacks: it has a dial screen and lacks an X-Axis linear rail.
Regarding specifications, the build volume, materials supported, and extruder type of both printers are similar. More features like a bigger touchscreen and linear rails on both axes really make the V3 KE stand out. When the box is opened, a well-considered selection of tools is included to facilitate assembly, highlighting Creality’s dedication to user-friendly design. Both models share a similar setup procedure that exhibits painstaking attention to detail and guarantees accessibility even for people who are not familiar with 3D printing.
The Ender-3 V3 KE and SE can be distinguished from each other by subtle design elements such as touchscreen differences and cooling setups. The SE has a dial screen and a single blower fan, which affects print speeds, whereas the KE has a touchscreen and two blower fans for efficient part cooling.
For both printers, testing with the Orca slicer at 300 mm/s produced remarkable results. With models like the Omega robot and the Dynamech vase, the V3 SE demonstrated its capabilities with silk PLA, showcasing crisp prints and brilliant colour transitions. Flexi Stuffed Dragon demonstrated the SE’s proficiency with complex components even more.
The Omega robot print demonstrated enhanced capabilities on the V3 KE because of linear rails, producing perfect results in a shorter amount of time. The Honnari Hannya wall mask print demonstrated how precisely the printer handled components that were print-in-place. With its elaborate intricacies, the Sacred Tree Vase demonstrated the printer’s ability to produce crisp, high-speed prints.
With its own advantages, Creality’s Ender 3 V3 KE and V3 SE are dependable competitors in the low-cost 3D printer market. Whether choosing the feature-rich, affordable SE or the midrange, fully loaded Klipper-enabled KE, users are guaranteed a positive 3D printing experience because to Creality’s dedication to quality and innovation.
Pros
• Linear rails on both models
• Auto level
• Fast print speeds KE: up to 500 mm/s SE: up to 300 mm/s
• Klipper (SE w/Sonic pad support)
• Object exclusion KE (SE w/Sonic pad)
Cons
• SE no linear rail on X
• SE dial screen
• SE no filament sensor


KE does not have linear rails for y axis. They’re linear rods. Only x-axis/extruder has rail.