As an avid 3D printing enthusiast, I couldn’t be more excited about the emergence of the Elegoo Neptune 4 in the 3D printing market. Having closely followed the evolution of various 3D printing technologies, I genuinely believe that the Neptune 4 is a true game-changer in the field. What truly impresses me is its meticulously designed system and high-speed printing capabilities. It uses the new Klipper firmware instead of Marlin, which many printers have used and still do, allowing for the creation of intricate and high-quality 3D parts effortlessly. Let’s review the machine, print a few awesome models, and outline the Pros and Cons.
Table of Contents
- Specifications
- Unboxing and Assembly
- 11×11 Bed Leveling
- Features and Hardware
- Four-Fan Cooling System
- Touch Screen
- Klipper Interface
- Test Printing Demo Models
- Test Printing Other Models
- Compare to Other 3D Printers
- Conclusion and Pros & Cons
Product affiliate links: 3DWithUs is supported by its audience. Purchases via some links may earn us a small commission at no extra cost to you. This helps us to continue bringing you high-quality content. The product featured was provided for an honest detailed review. Our guides and reviews remain unbiased and independent.
Compare the Prices & Bundles:
Official Store | Amazon
Elegoo Neptune 4 Specifications:
Print volume 225*225*265mm
300°C high-temp nozzle
Support PLA/PETG/ABS/TPU/Nylon materials
Detachable screen
LED light bar built-in
Klipper integrated
250m/s max printing speed
Removable touch screen
Extra 4-fan cooling
11 x 11 auto levelling
Connectivity Ethernet /micro-SD /USB- C /USB -2.0
Price: $259-280
What’s great about the Elegoo Neptune series 3D printers is that they cater to the diverse needs of users. In the previous year, the Neptune 3 Pro, Neptune 3 Max (Amazon), and Neptune 3 Plus, along with the newly launched versions, the Neptune 4 and the Neptune 4 Pro, all uphold the renowned Elegoo standard of excellence. Whether you are a beginner just dipping your toes into the world of 3D printing or an experienced professional seeking top-notch performance, this printer has got you covered.
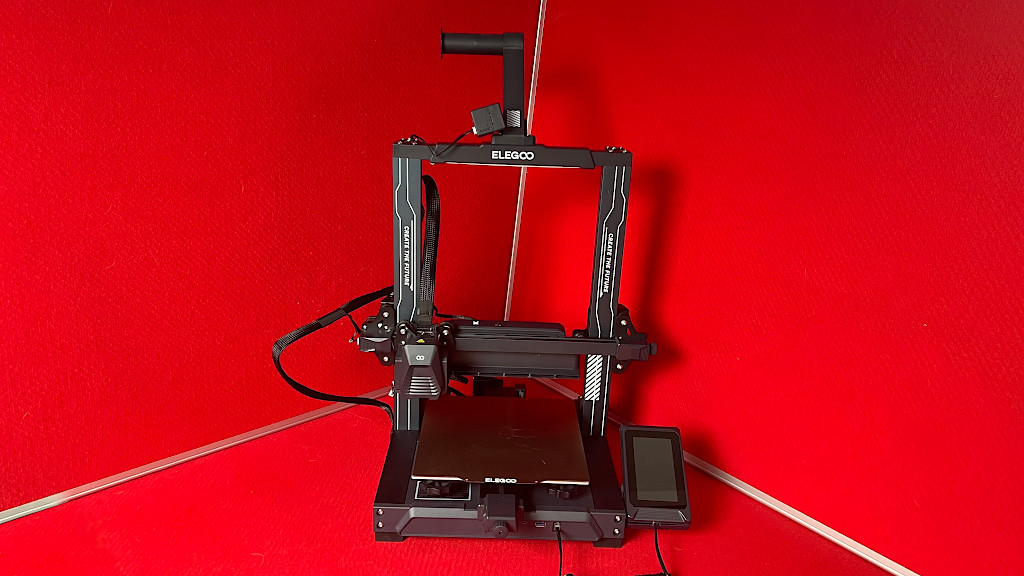
Unboxing and Assembly
When it comes to the Elegoo Neptune 4, you’ll be delighted to know that it arrives almost fully assembled, making your setup process hassle-free and efficient. The bed levelling controls on this printer are both auxiliary and automatic, giving you added convenience and accuracy. With its generous build size of 8.85 x 8.85 x 10.4 inches, this model offers ample space for your printing needs, ensuring precise and reliable mesh calibration.
©3DWithUs – Photo: Richard Hirst

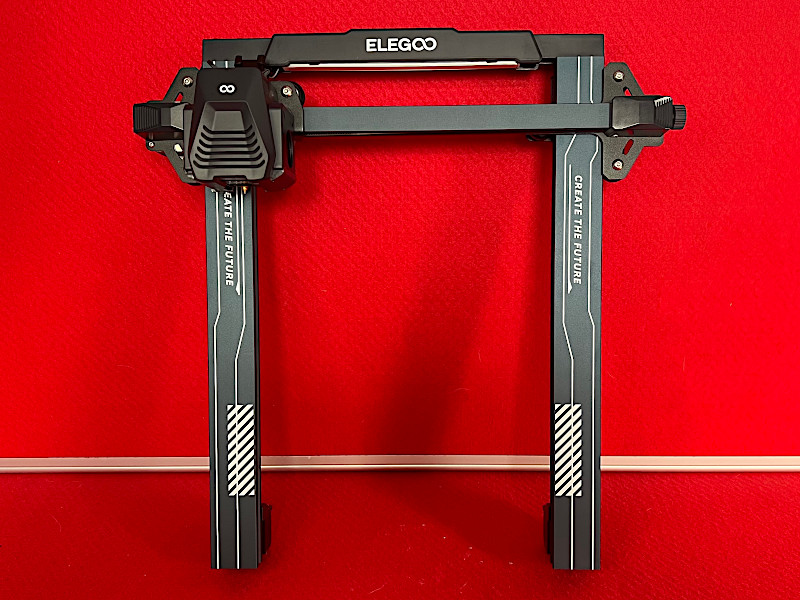
Parts and Accessories
What’s included: Tools and screws for assembly, USB cable, Cable tie, LAN cable, Side cutter for the filament, PLA filament sample, Needle for nozzle cleaning, Plastic spatula, Spare nozzle (2 × 0.4mm), and PTFE tube for the hot end.
USB stick with the instruction manual, test objects, and the slicer software & spare USB stick.
©3DWithUs – Photo: Richard Hirst
11 x 11 Bed Leveling and Bed Adhesion
When it comes to bed levelling, the Neptune 4 offers both manual and automatic options to cater to your preferences. Positioned underneath the print bed are rotary screws located at all four corners. With these screws, you have the flexibility to make coarse adjustments, allowing you to achieve the desired inclination of the print bed for optimal printing conditions. This feature ensures that your prints adhere perfectly to the bed, resulting in exceptional print quality. The only problem I had was the backlash assembly was not installed right from the factory and needed to be fastened correctly causing the gantry to have a lot of movement up and down.
Overall Neptune 4 has precise and efficient build platform levelling capability. The automatic feature ensures that the platform is perfectly levelled, resulting in stable bed adhesion and excellent print quality.
– Flexible magnetic PEI. Additionally, the Elegoo Neptune 4 comes with a PEI magnetic platform. This innovative platform not only provides a secure attachment for your prints but also offers easy removal of finished models. The flexible nature of the platform allows for slight bending, making it effortless to remove printed objects without causing damage or deformation.
This combination of features, including the hand-twist knob for auxiliary levelling and the PEI magnetic platform for easy removal, solidifies the Elegoo Neptune 4 as a user-friendly and professional-grade 3D printer. It”s precise levelling capabilities and convenient print removal make it an excellent choice for both personal and professional use, ensuring high-quality prints with minimal effort.
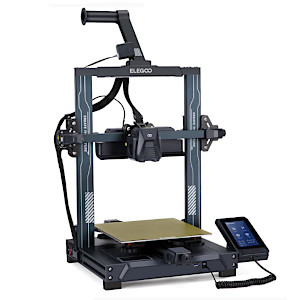
Features and Hardware
The Elegoo Neptune 4 offers an exceptional combination of speed, precision, and versatility, making it a standout choice for personal and professional 3D printing needs. Its impressive printing speed, powered by the latest firmware, Klipper, allows for rapid printing at an astonishing rate of 250mm/s. This significant increase in speed sets a new standard, enabling faster and more efficient printing, ultimately saving valuable time.
– Extruder. The printer’s slimmed-down extruder assembly is another noteworthy feature that contributes to its agility and precision. Weighing 25% of its previous generation, this reduced weight enhances the printer’s overall performance and ensures that the final printed results are of the highest quality. Lighter extruders result in fewer ‘ghosting’ issues on 3D prints.
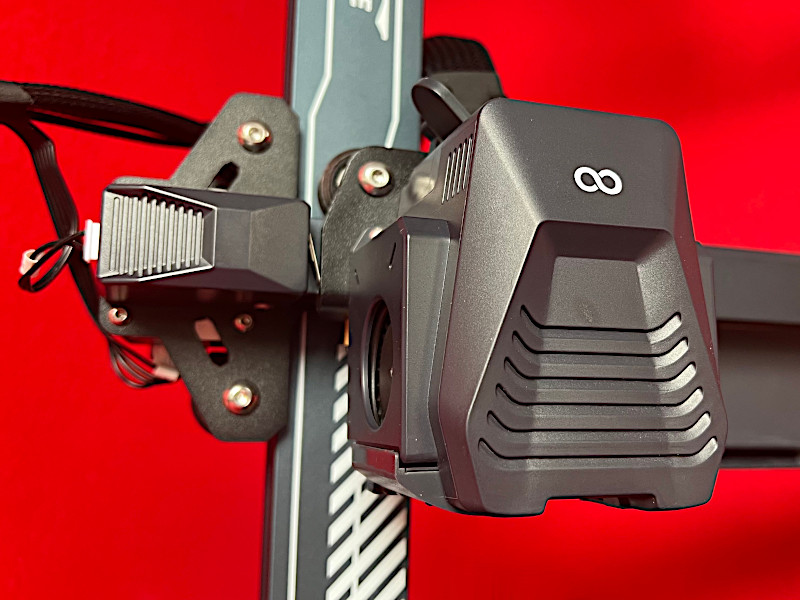
©3DWithUs – Photo: Richard Hirst
Dual-geared direct-drive system. This system ensures efficient filament feeding for consistent and precise extrusion. With this advanced extruder design, you can expect reliable and high-quality 3D prints.
– Temperature. Notably, the nozzle of the Neptune 4 model operates at a higher temperature of 300 degrees Celsius. This is approximately 40 degrees hotter compared to its predecessors, namely the Neptune 3, 3 Pro, 3 Plus, and 3 Max. The elevated temperature range of the Neptune 4 broadens your options of filament materials, allowing for a wider range of printing possibilities.
Four-Fan Cooling System
Elegoo Neptune 4 offers exceptional cooling capabilities with the presence of four additional built-in blowers. These strategically positioned blowers are designed to optimize air circulation across your prints, working in tandem with the conventional fans within the extruder head. The combined cooling system not only ensures superior print quality but also plays a crucial role in maintaining optimal speeds throughout the printing process.
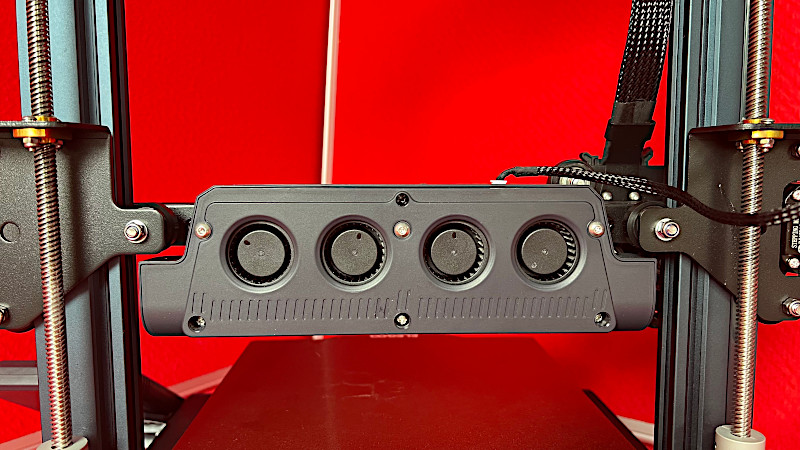
©3DWithUs – Photo: Richard Hirst
In conclusion, the Elegoo Neptune 4 combines advanced cooling features with an elevated nozzle temperature range, making it a versatile and reliable printer. Its additional built-in blowers, working in conjunction with the existing fans, enable optimal air circulation and speed control during printing. The higher nozzle temperature expands your filament choices, while the dual-geared direct-drive system within the extruder head facilitates consistent and precise filament feeding.
Elegoo Neptune 4 Touch Screen
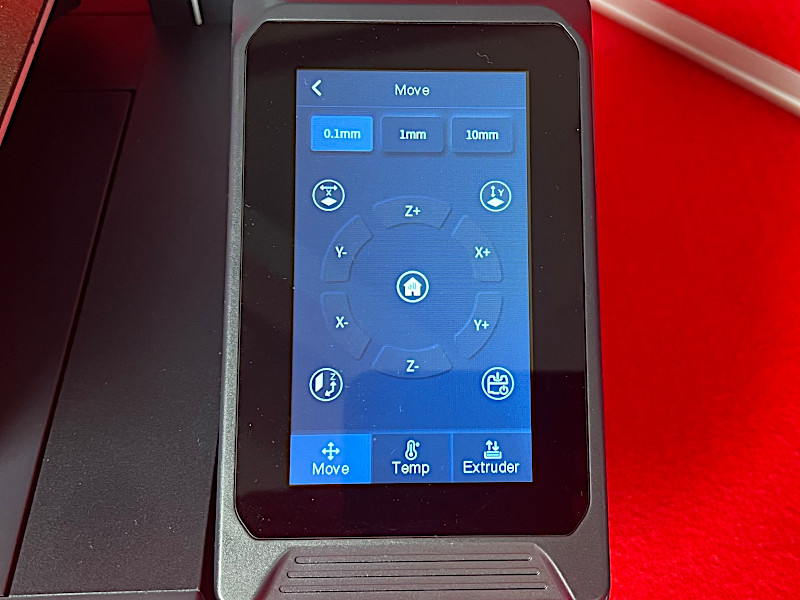
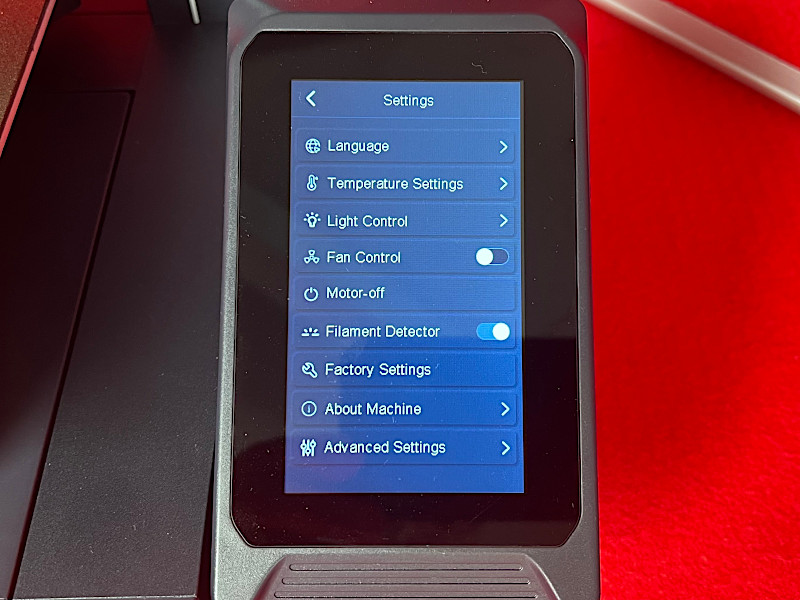
When it comes to the user interface, the Elegoo Neptune 4 3D printer boasts a touchscreen and menu that is like its predecessor, the Neptune 3 series. The touchscreen is connected to the printer base using a lengthy cable, allowing for detached operation like a smartphone.
The menu on the touchscreen is intuitively designed, making it easy to navigate and find all essential functions with just a few clicks.

©3DWithUs – Photo: Richard Hirst
During printing, you can monitor your progress and access important settings directly on the display. This includes the ability to adjust specific settings such as speeds, temperatures, and the Z-offset, lighting, and see the time left for print and time expired.
©3DWithUs – Photo: Richard Hirst
What sets the Elegoo Neptune 4 apart is its suitability for both beginners and professional users. The user-friendly touchscreen interface and intuitive menu make it accessible for those new to 3D printing, allowing them to quickly navigate the settings and start their prints. At the same time, the advanced settings and capabilities cater to the needs of professional users who require precise control over their prints.
©3DWithUs – Photo: Richard Hirst
In conclusion, the Elegoo Neptune 4’s touchscreen and menu provide a seamless user experience. Its detachable operation and intuitive interface make it convenient to use. The ability to adjust settings and monitor progress directly on the display adds to its functionality. Whether you are a beginner or a pro user, the Elegoo Neptune 4 3D printer offers features and ease of use that make it a favorable option for a wide range of users.
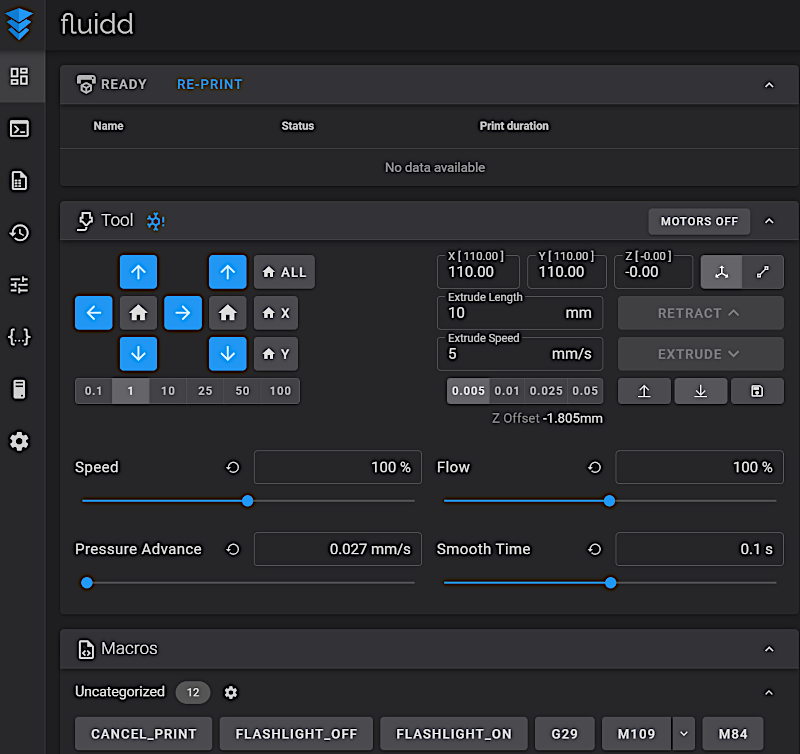
Klipper Interface
The Elegoo Neptune 4 prides itself on its integration of Klipper firmware, revolutionizing the printing experience with its ability to achieve high-speed printing. You can conveniently access Klipper from your computer by simply connecting the Neptune 4 to a network using a LAN cable. Access the Klipper browser window by entering the printer’s IP address in your internet browser. To find the 3D printer’s IP address on the screen, go to Settings -> About Machine -> IP (at the end).
One of the standout features of Klipper is Pressure Advance, which significantly enhances print quality by addressing common printing errors such as under-extrusion and stringing. making it particularly useful when dealing with high print speeds. This feature enhances the overall printing experience by improving print accuracy and reducing errors.
Furthermore, the Neptune 4 incorporates Input Shaping, another innovative feature of Klipper firmware. This feature effectively prevents errors that may occur at high print speeds. By utilizing an acceleration sensor in the print head, the printer detects vibrations during movements. Through the slicing software, users can control print head acceleration to mitigate strong vibrations.
Traditionally, FDM 3D printers have faced challenges with strong accelerations, resulting in compromised print results. However, with the incorporation of Input Shaping, the Neptune 4 sets itself apart by allowing printing speeds of up to 250mm/s, far surpassing the standard range of 40 to 60mm/s. This exceptional capability opens a new realm of possibilities for users, enabling faster and more efficient printing without sacrificing quality.
If needed, Klipper-enabled extruders can also be calibrated similarly to Marlin. Here is the Extruder Calibration Process for Klipper Firmware.
In summary, the Elegoo Neptune 4, equipped with Klipper firmware, combines high-speed printing capabilities with advanced features like Pressure Advance and Input Shaping. This integration ensures superior print quality, a smoother printing experience, and the ability to achieve unprecedented printing speeds. The Neptune 4 truly represents a powerful and professional-grade 3D printer that seamlessly bridges the gap between personal and professional applications.
Test Printing Demo Models
I began my journey with the Elegoo Neptune 4 by installing the Elegoo Cura software from the provided USB stick. I wanted to start by running some test prints, provided by Elegoo, to gauge the printer’s performance. Since the Elegoo brand is very popular in the 3D printing community, Neptune 4 profiles either already exist or will be introduced shortly on other major slicer software.
©3DWithUs – Print and Photo: Richard Hirst
For my first attempt, I selected the 30-minute Benchy print. However, I encountered an issue halfway through the print. Upon further inspection, I realized that the file itself was not correct and the bed temperature had dropped, causing the print to detach from the bed.
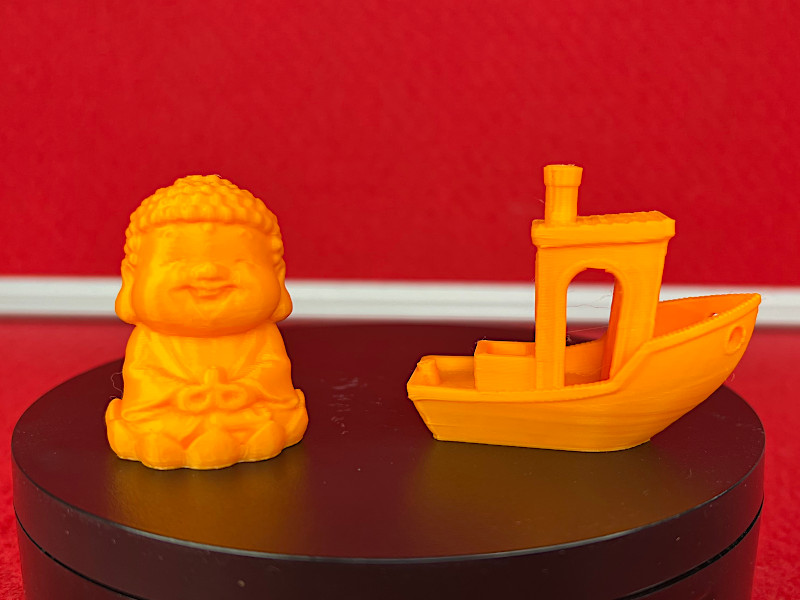
Undeterred, I decided to give it another shot and opted for the 18-minute Benchy print. This time, the print turned out excellent and was completed within the expected time frame. Encouraged by the successful print, I proceeded to test the printer further by attempting the Buda test print, which resulted in a flawless outcome.
Test Printing Other Models
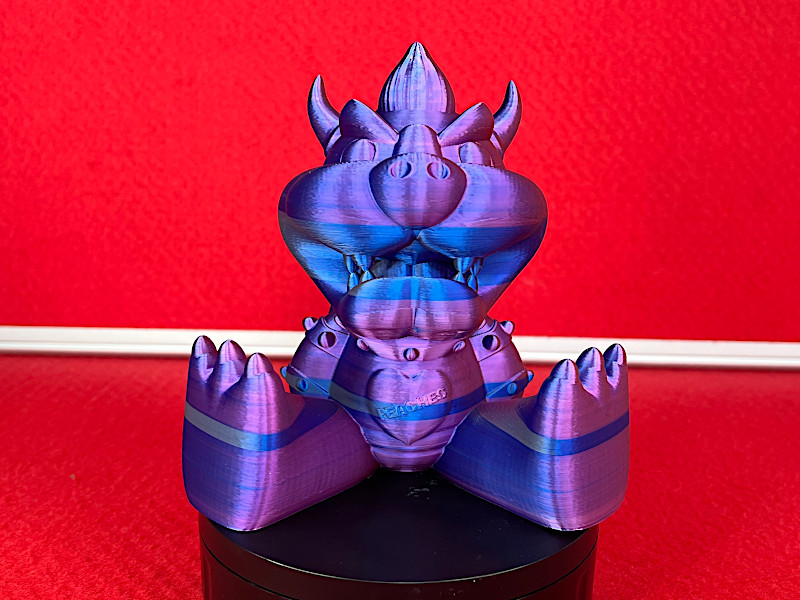
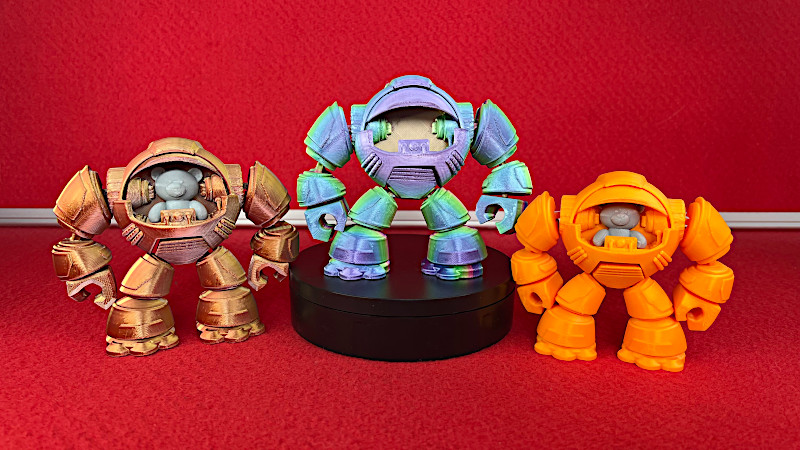
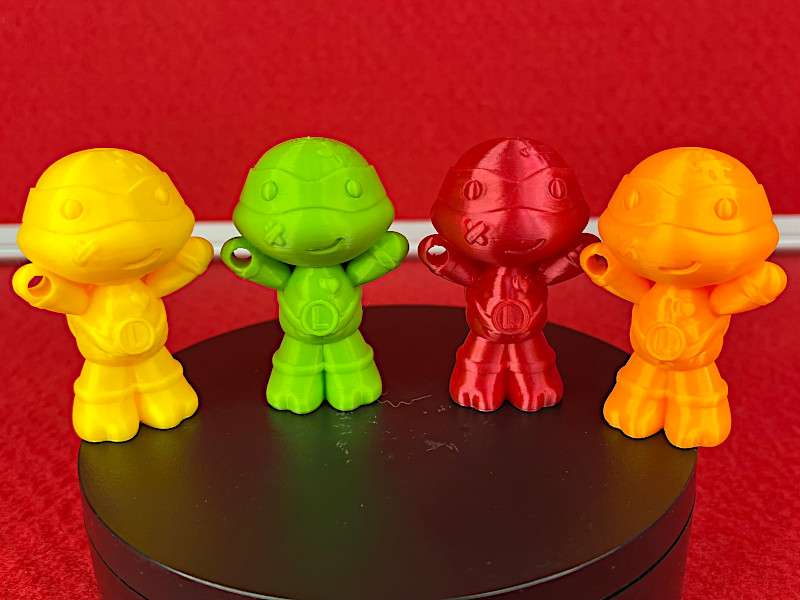
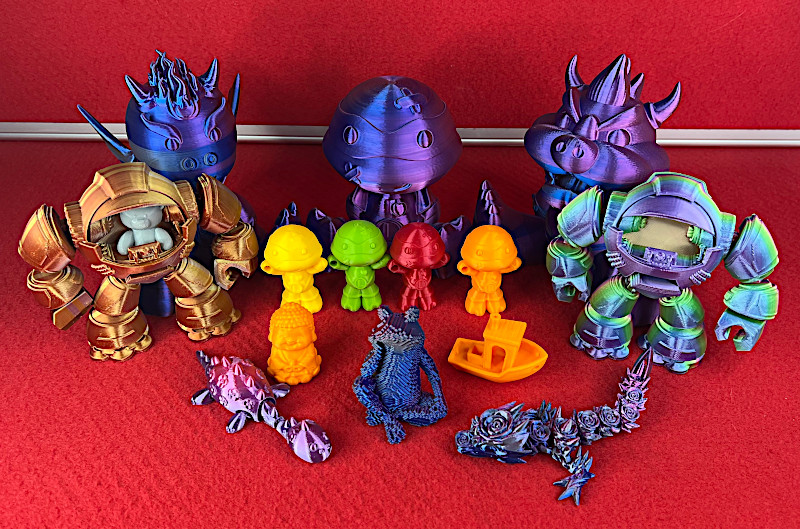
To push the Neptune 4’s capabilities even further, I chose to print some intricate models sourced from Koza Design and Printables. Utilizing tri-color filaments from Grakit and Yousu, I sliced the files using the standard settings in Elegoo Cura. Additionally, I decided to test the same files with Cura for another printer.
©3DWithUs – Print and Photo: Richard Hirst
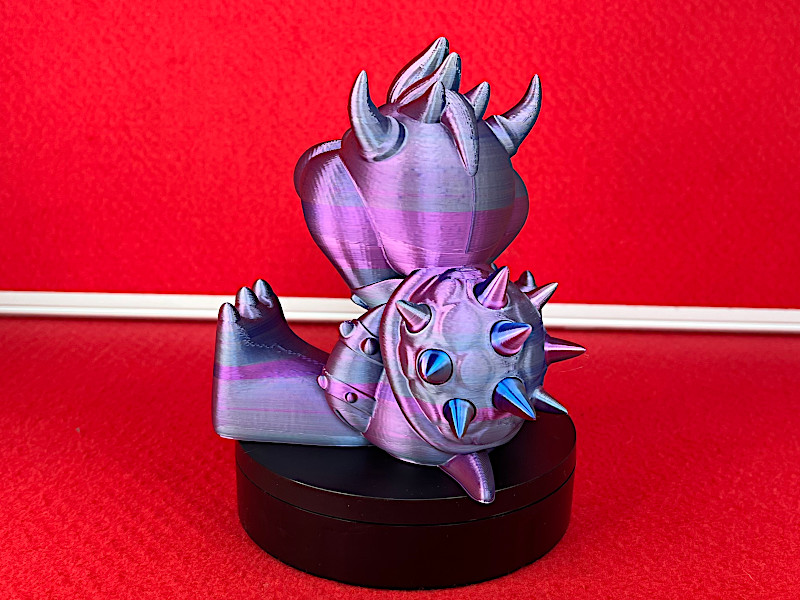
To say I was amazed would be an understatement. The Neptune 4 proved to be a speed demon, completing the prints in a fraction of the time it would take on my normal printer. The print quality across all my prints was impeccable, showcasing the Neptune 4’s ability to capture intricate details with precision.
3D Model by Koza Design on Cults
©3DWithUs – Print and Photo: Richard Hirst
The models I selected from Koza Design not only demonstrated the printer’s capabilities but were also enhanced by the vibrant colors and excellent filament quality. The final prints truly stood out, leaving me in awe of the Neptune 4’s performance.
3D Model by Koza Design on Cults
©3DWithUs – Print and Photo: Richard Hirst

In essence, my experience with the Elegoo Neptune 4, from troubleshooting initial hiccups to witnessing its impressive printing speed and impeccable print quality, has been a testament to its professional-grade capabilities. The Neptune 4 has exceeded my expectations and continues to demonstrate its prowess as a personal but professional 3D printer.
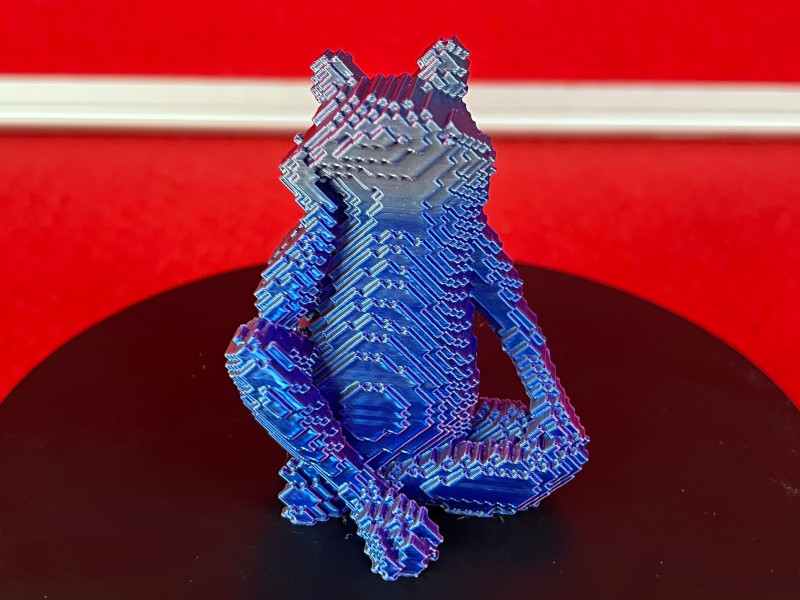
3D Model by Andrew Sink on Printables
©3DWithUs – Print and Photo: Richard Hirst
Featured above is Bored Blocky Frog by Andrew Sink. Andrew wrote a guide on how to turn any 3D model into a blocky version. Models 3D printed in dual and tri-color PLA have interesting results.
Koza Design Model from Patreon
©3DWithUs – Print and Photo: Richard Hirst
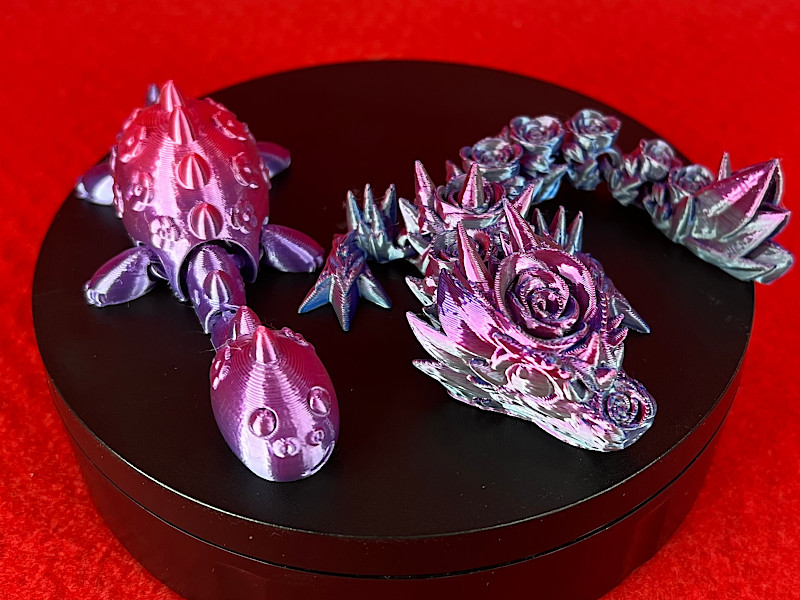
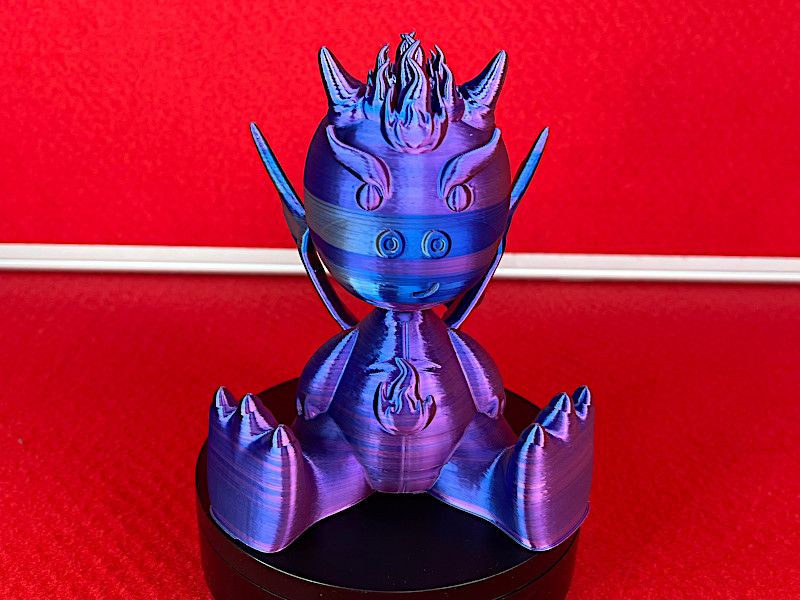
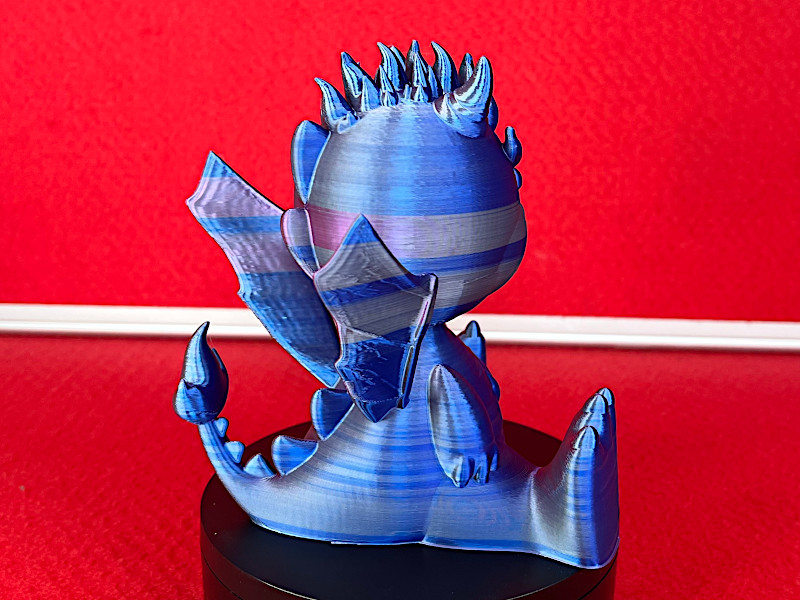
This printer has no problem printing flexible, articulated print-in-place models similar to articulated dragons.
©3DWithUs – Prints and Photo: Richard Hirst
A big thank you to Koza Design for the models, and to Grakit and Eryone filament companies for supplying filaments for review.
Compare to Other 3D Printers
Compare to the similar volume FDM 3D printers in the same $300 price range:
This year, the main competitors for the Elegoo Neptune 4 could be the Creality Ender 3 V2 Neo and the AnkerMake M5C. The Neptune 4 stands on strong ground with its competitive pricing and the benefits of being Klipper-enabled.
Compare to the Elegoo Neptune series 3D printers:
Together, the Elegoo Neptune 4, Neptune 4 Pro, Neptune 4 Plus, and Neptune 4 Max constitute the latest products in the Neptune FDM 3D printer series. If some of the machines haven’t been reviewed on our website yet, you can refer to their primary comparison table in the image below to get a general overview.
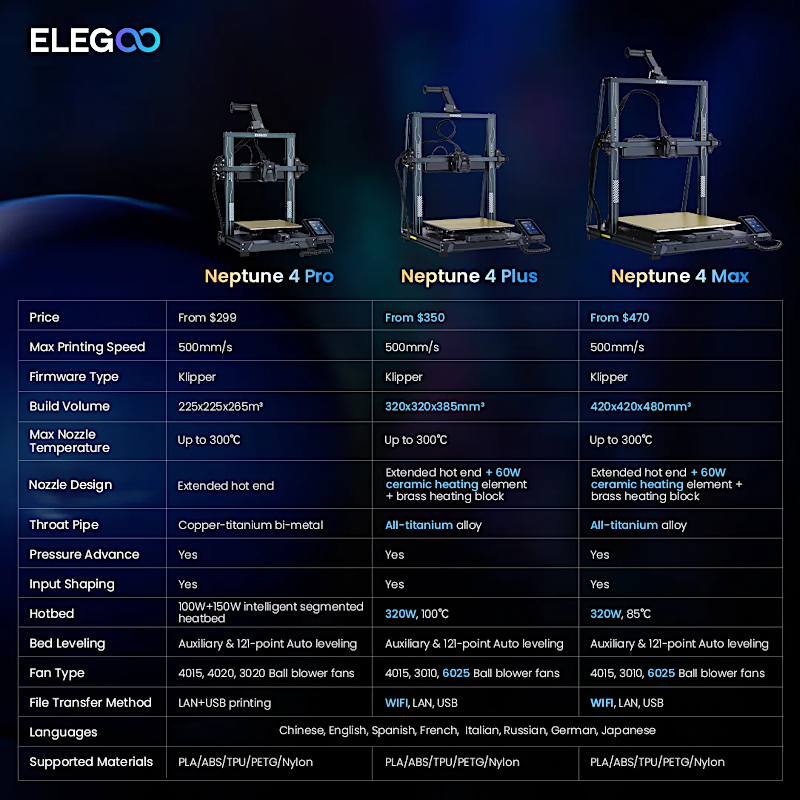
Image: Elegoo
Review Conclusion and Pros & Cons
Having had the opportunity to set up and test the Elegoo Neptune 4, I must say it left a lasting impression on me. The setup process was incredibly straightforward, thanks to the excellent instructions provided. I only had to make a few adjustments to the backlash assembly, followed by the usual z offset and bed leveling procedures.
Once everything was dialed in, I loaded Elegoo’s Cura software and started printing the test models and some designs of my own. I was thoroughly impressed with the printer’s performance. The speed at which it printed was simply astounding, saving me a significant amount of time without compromising on quality or detail. It was my first experience with a printer using Klipper firmware, and I must say, it’s something I will seek out in future printers.
The speed and print quality surpassed those of normal FDM printers, leaving me amazed at the difference in print time. The Neptune 4 truly sets itself apart in terms of speed and performance. Moreover, the printer is well-made, exhibiting high-quality craftsmanship. Considering its specifications, the competitive price point makes it an excellent choice for anyone in the market for an FDM printer.
Compare the Prices & Bundles:
Official Store | Amazon
Elegoo Neptune 4 Review
Review Summary
Whether you’re a beginner just starting or an experienced user seeking top-of-the-line performance, the Elegoo Neptune 4 is a 3D printer I wholeheartedly recommend. Its combination of speed, print quality, durability, and competitive pricing makes it a standout in the realm of FDM printing. Don’t miss the opportunity to experience this exceptional printer for yourself.
PROS
Easy setup
Affordable price
Auto bed levelling
Removable PEI build plate
Klipper firmware
Extra 4-fan cooling
Print speed and quality
CONS
No tool draws
Backlash assembly needed attention on setup
The noise of fans can be turned down in settings


Vibration sensor in the printing head?!?!?! Are you sure of this?