A powerful Snapmaker 10W laser module together with the new features in Luban software make the laser engraving and cutting experience better, faster, and safer. As the laser cutting power is higher, the time to complete a project is now reduced eightfold, and it would take on average up to 2 hours. This process has the potential of becoming one of the preferred ways to create something wonderful at home. Let’s see what the 10 Watt laser can achieve and test it on different materials.
Table Of Contents
- Specifications
- Unboxing, Setup and Calibration
- Luban Software – 1000 Templates
- Camera Capture and Add Background in Luban
- Laser Cutting 3mm Plywood
- Aluminum Engraving
- Air Purifier
- Compare to Other Lasers and Modules
- Conclusion and Pros & Cons
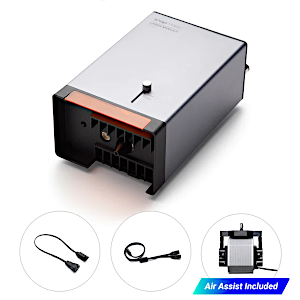
10W Laser Module Specifications
10W High Power
Auto Focus
Upgraded Camera Capture
20/10 material for engraving/cutting
Max. cutting depth: 8 mm (Basswood)
Luban Software
Optional: Air Purifier
Price: $299-459 (Depending on Campaign)
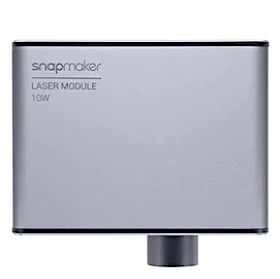
Snapmaker 10W High Power Laser Module
Amazon
Official Website
Update: New Product!
New, powerful 20W & 40W laser modules are available for purchase on the Official Website. Here is the detailed Snapmaker 40W Laser module review.
Disclaimer: Laser cutting and engraving may be hazardous if improperly operated. Please make sure to follow the safety guidelines such as wearing eye-protective goggles and using the machine enclosure while operating.
Disclaimer: All objects tested are matte because highly reflecting objects can damage the laser.
©3DWithUs – Photo: Max Funkner
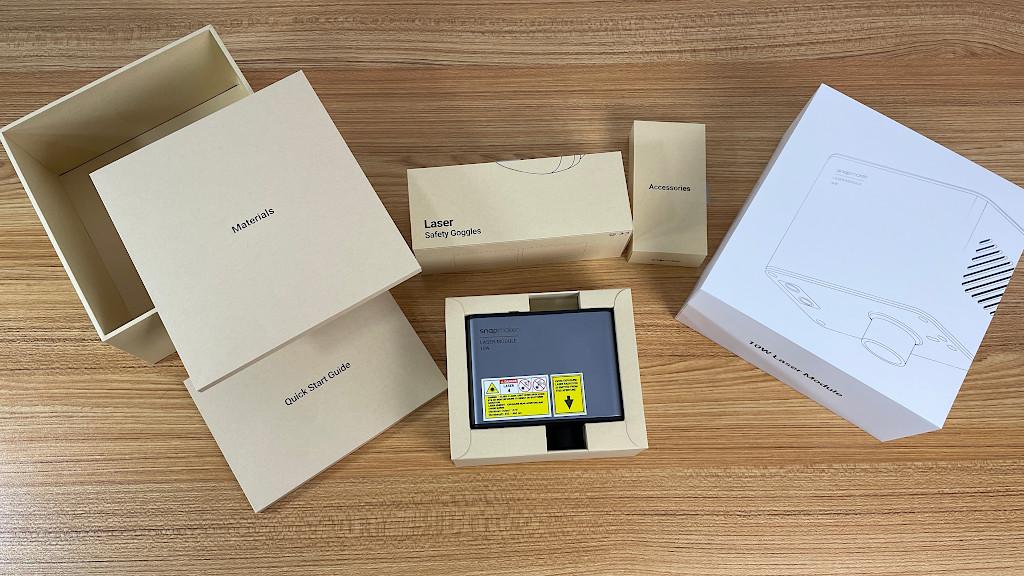
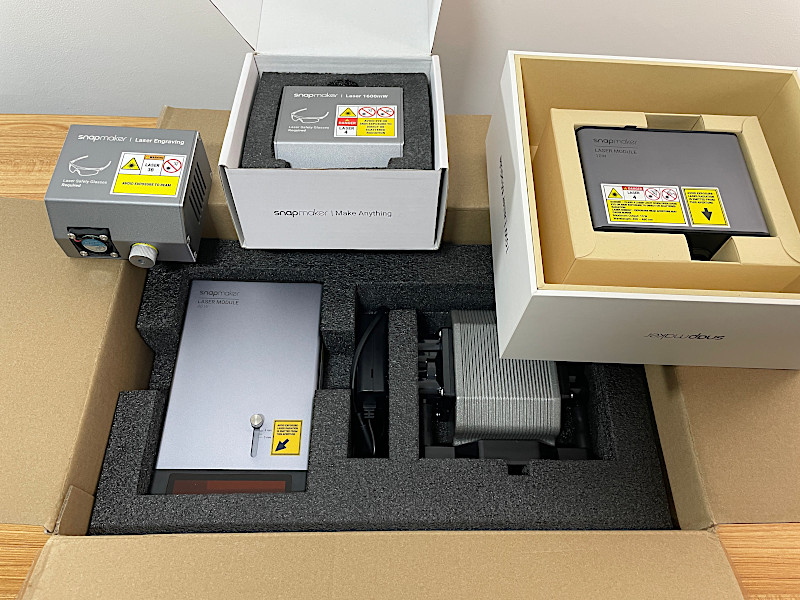
Packaging and Unboxing
In the best tradition, the Snapmaker team keeps producing the best packaging for their products. At the first glance, this product can be confused with a posh fragrance or an expensive watch. For me personally, the main box with the white sleeve is a keeper for collecting small items or keeping various tools.
Included:
– Quick Start Guide (as usual, a good quality guide)
– W10 Laser Module
– Goggles (the same as with the 3-in-1 package)
– M4 Screws
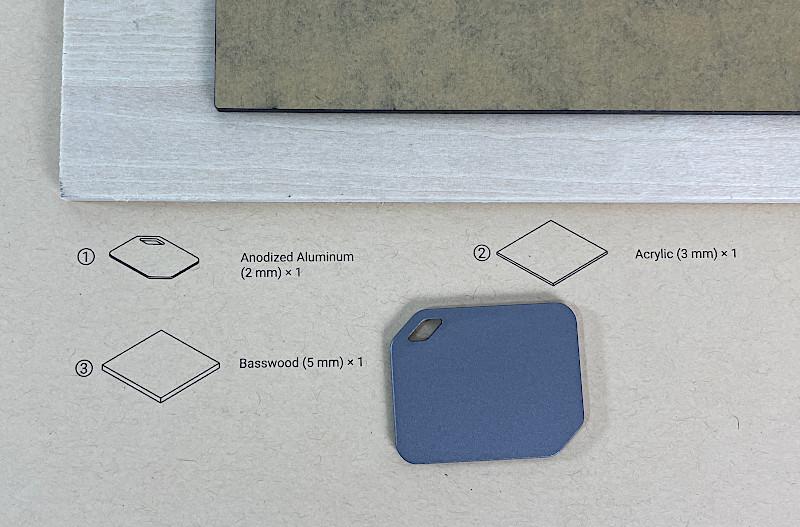
– Materials for testing (Basswood 5mm, Acrylic 3mm, Anodized Aluminum 2mm)
– Calibration Target Plate
– Cotton Swabs
– Extra Laser Lens Protector
10W vs 1600mW Laser Modules Abilities and Comparison
In this review, I will keep comparing a 1600mW to the 10W laser module, as the first one is often bought as part of the 3-in-1 Snapmaker 2.0 bundle.
– Size. The first striking difference is the size. As you can see in the picture below, the 10W module is significantly bigger.

©3DWithUs – Photo: Max Funkner
– Auto Focus. I feel this is a handy feature, in fact, I keep using it and it saves me a lot of time.
– Upgraded Camera Capture. I am a big fan of the “Work Origin” method and like to “Run Boundaries”, just in case. But to make an engraving on a small area, like on the Anodized Aluminum tag provided by Snapmaker, is tricky. It is not easy to set up the origin to the center of the object. The Camera Capture feature feels like the only option here, and it greatly helps to set the object into the material boundaries. Read more about Camera Capture in the software area.
Screenshot: Luban
– Laser Cutting Speed. 10W module is much faster. The Snapmaker team says it should be x8 faster for laser cutting jobs. In my testing, I had a case, the heart-shaped boxes, when I reduced the time from the previous 12 hours with the old 1600mW module to 60 minutes. As I am not very good with optimizations just yet, for me it felt like a huge improvement.
– Material. Snapmaker provides 3 materials to try on. Basswood 5mm, Acrylic 3mm, Anodized Aluminum 2mm. But just to play around, I tested different metals and ceramic tiles. In the official description, there are 10 recommended materials to cut and 20 to engrave. In Luban software, there are 10 pre-sets that I found useful as I tried them for this review.
©3DWithUs – Photo: Max Funkner
10W Laser Module Setup and Calibration
The same screws and the same bed are used as for the previous laser modules. The process is easy and takes approx. 20 mins when switching from either 3D printer mode or CNC mode or just 1-2 mins when changing from the previous laser module.
As I keep using the Wi-Fi mode firmware, updating it for me was very quick. All I had to do was to acknowledge the Safety Notes and move to the Calibration part. The calibration process has 3 steps:
– Tool Head Focus. Similar to other Snapmaker laser modules and involves a flexible calibration card provided.
– Thickness Measurement Calibration. A new item was provided to calibrate a thickness measurement.
– Camera Calibration. In order to calibrate the camera, an A4 paper should be used to laser cut the required area creating the boundaries for calibration. At first, I could not understand what this step was used for until I found the Camera Capture feature in Luban. Please mind that the machine should be wi-fi connected with Luban otherwise the option will be greyed out.
The only drawback is that this calibration procedure needs to be done every time we change modules, which, of course, makes sense.
Luban Software
In our Snapmaker 2 A350T article I reviewed the Luban Software in all three disciplines including laser scanning and engraving. I am pleased to see that the Snapmaker team keeps working on their software and keeps improving it constantly.
– 10W Laser Settings. But before starting with the 10W laser module, a few steps need to be done. It is important to switch from 1600mW to 10W in Settings – > Machine Settings – Laser Module.
– Case Library. After the 10W module setup, four more test objects will be added to the Case Library. I would recommend starting with the test objects first so that the settings don’t feel overwhelming. Then just add your own object to the existing project and copy the previous pre-set.
Screenshot: Luban
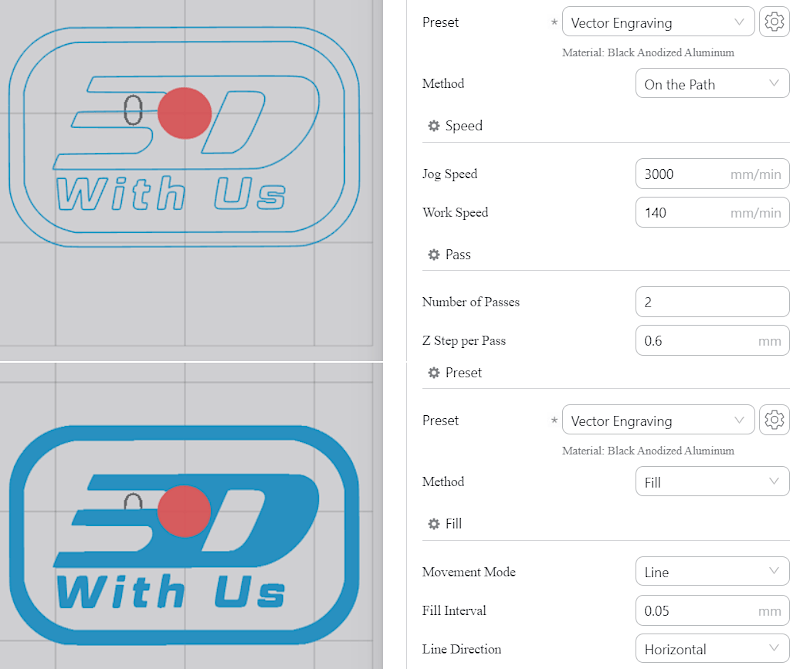
By using the Aluminum Fox test project from the Case Library, I quickly got the right settings for the 3DWithUs logo. Then I changed the Method from “On the Path” to “Fill” and decreased the Fill Interval for the logo to be darker. The object area is small and the laser engraving job lasted 15 min only.
– Preview. A minor issue, that may be confusing, is the preview change on Zoom. Therefore, I would recommend practicing on the smaller, quick engraving jobs to get the feel of the brightness, contrast, and the material as well.
Screenshot: Luban
– Timer. The timer sometimes is completely off. For example, the Job Status indicator may be stuck at 99% for the last 20 minutes. So, I stick to the Luban’s estimated completion timer for guidance.
– First Engraving then Cutting. When creating toolpaths – the engraving job should be always 1st and after that cutting. Otherwise, the material may slightly move, which will affect the engraving’s precision.
Screenshot: Luban
1000+ Templates for Laser and CNC Jobs
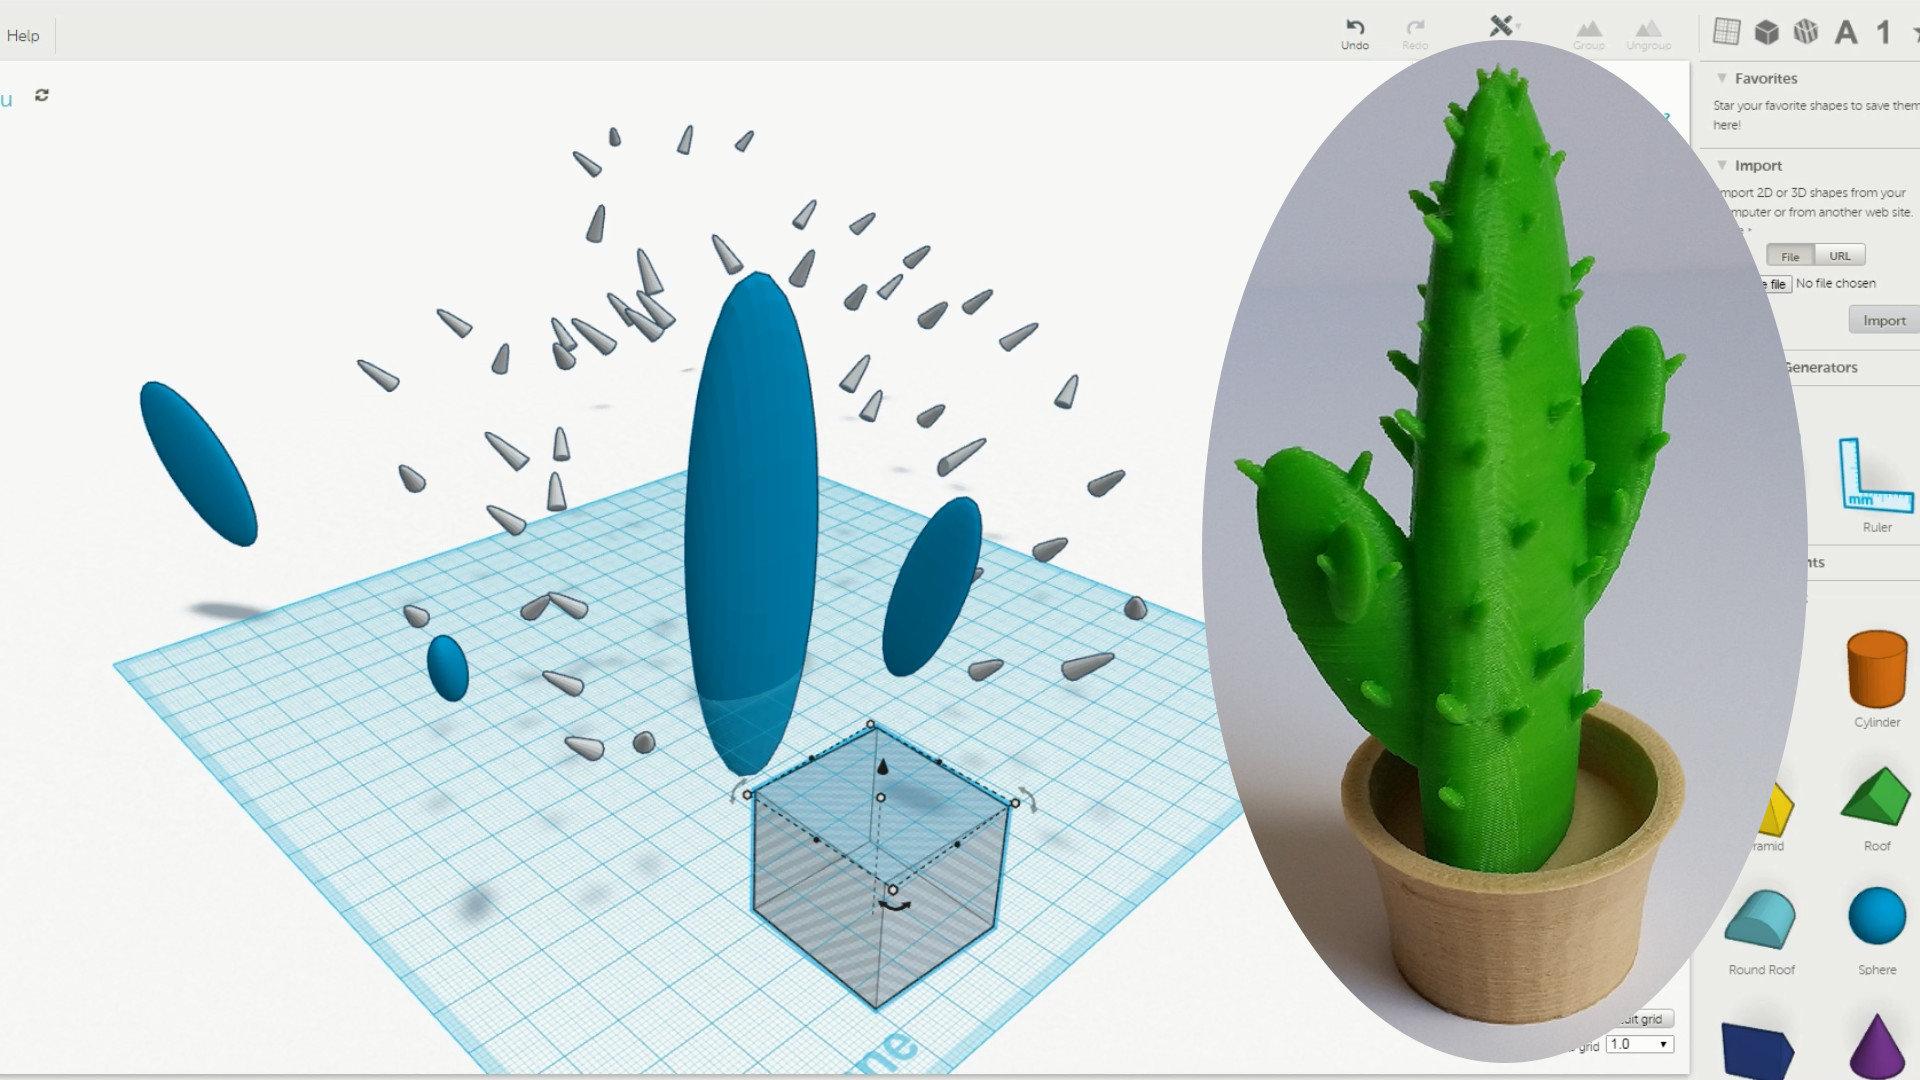
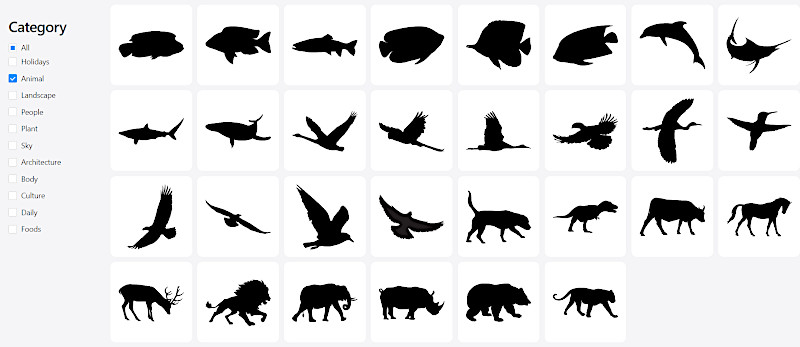
Snapmaker’s latest Luban update introduces a massive .SVG collection. This includes quick templates and designs ideal for creating logos and banners. The full collection is readily accessible via Insert Shape – Online Library, allowing you to add designs to your workspace effortlessly.
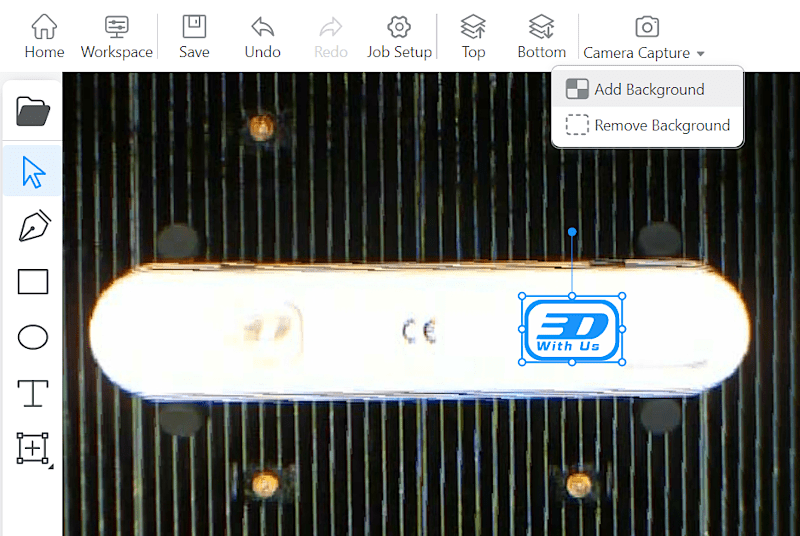
Camera Capture and Add Background in Luban
This feature is worth describing in detail as it is good.
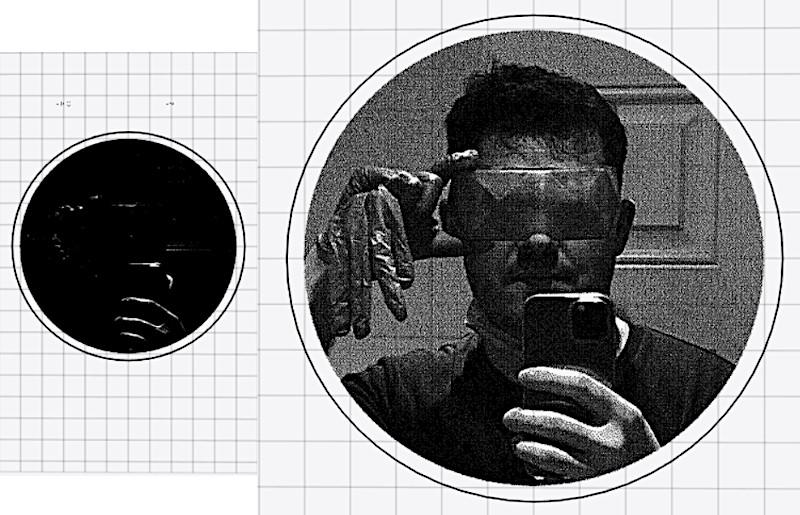
I mentioned before that the newly updated Camara Capture feature can be helpful for small projects, where it is tricky to set Work Origin and Run Boundaries due to the safety measures required when using the powerful 10W laser. It is understandably too dangerous to look with the naked eye and two protective screens (goggles and enclosure) don’t let to see the dot properly.
©3DWithUs – Photo: Max Funkner
In the image above – the right engraving alignment is made manually by setting the Work Origin (center point) and then checking running boundaries. The left engraving is done using the Camera Capture and Add Background feature in Luban. I am pretty confident that the Camera Capture mode is my preferred way to accomplish an alignment on the small objects from now on.
Laser Cutting 3mm Plywood
10W laser should cut a 5mm Basswood in one go. As I bought 3mm thick 300x300mm square plywood sheets on Amazon, specifically for Snapmaker laser testing, I will stick to this material for now as I have plenty of it.
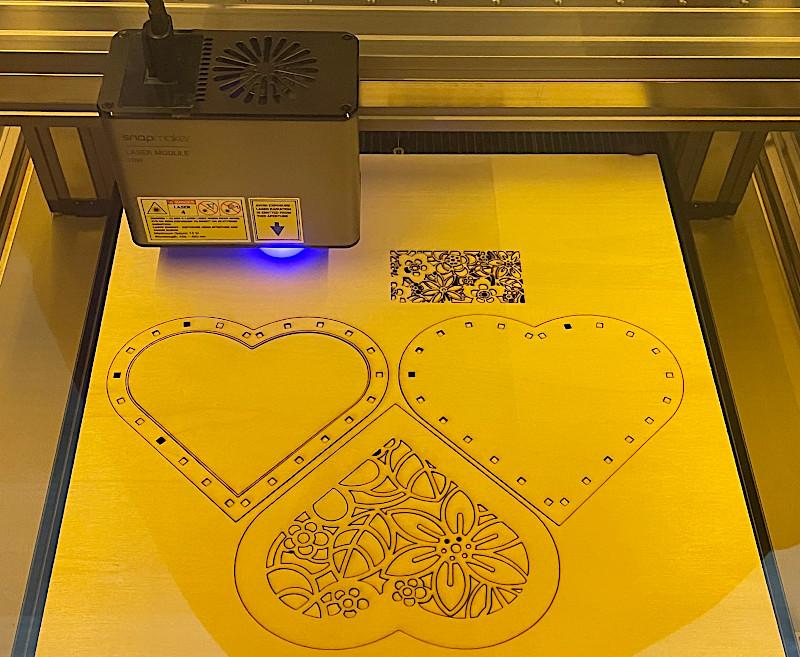
©3DWithUs – Photo: Max Funkner
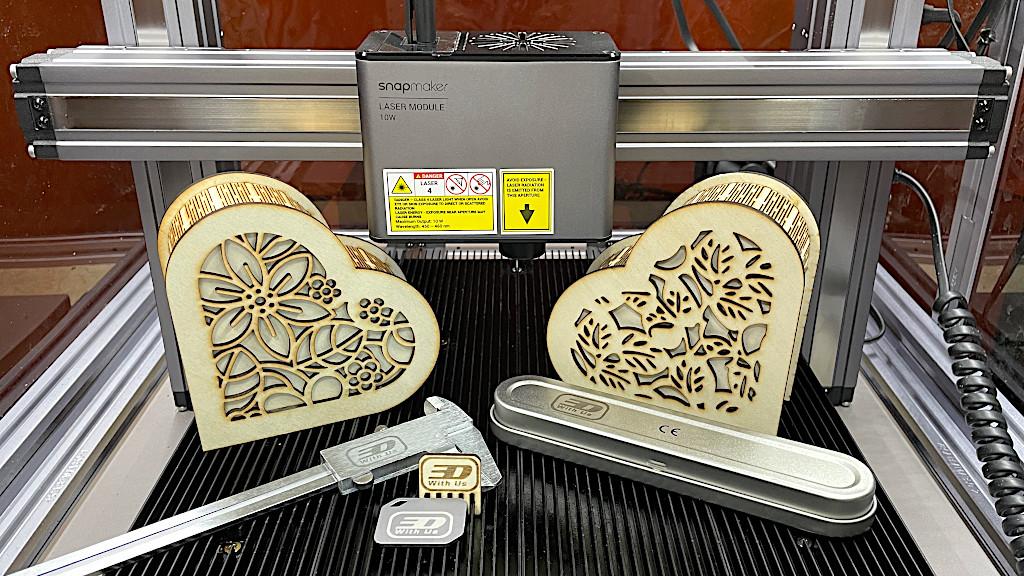
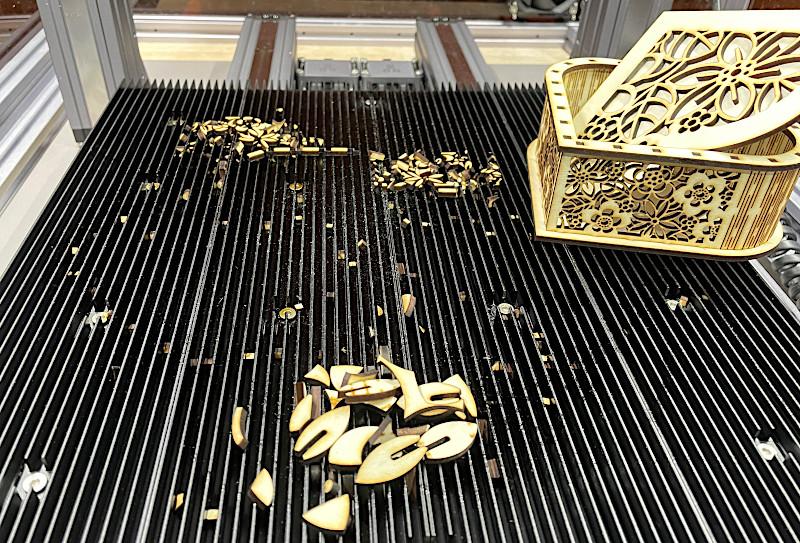
I am a big fan of boxes, and I bought a set of 3 designs of heart-shaped boxes by VectorPortArt on Etsy. It is possible to cut or cut and engrave such objects. The laser cutting job took me 56 minutes. As the 3mm think boxes are fragile and it is easy to snap the parts, the clean-up and putting them together need to be done with extra care.
©3DWithUs – Photo: Max Funkner
An Offcuts Cleaning Comb
This is my first design, specifically for laser cutting and engraving. As some laser cutting projects leave a lot of offcuts and sticky residue on the work bed, it is tricky to clean it even with a vacuum cleaner. A metallic brush would help here, but as a quick solution, this small Offcuts Cleaning Comb plus vacuum cleaner is pretty helpful between the projects as well.
Offcuts cleaning comb in action
©3DWithUs – MP4: Max Funkner
This was a quick design in free GIMP software. After making a drawing in GIMP, using precise measurements, a .PNG image was uploaded to Luban and 3DWithUs logo vector was aligned for engraving as a decoration. Two toolpaths were created: one for cutting and another for engraving. To cut and engrave this piece of plywood took approx. 10 minutes. Here is the file on Gumroad.
Aluminum Engraving
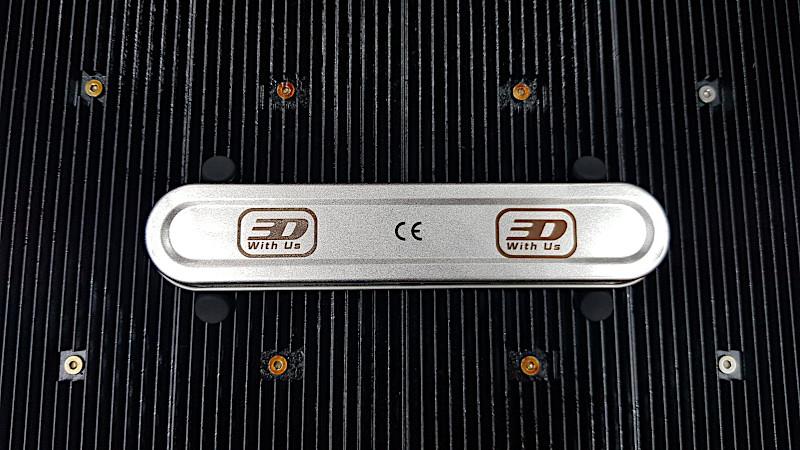
As I mentioned, in Luban slicer settings, I used the Aluminum Fox test project but applied the 3DWithUs logo for engraving it on various metal items. For material thickness measuring, I always used Auto-Mode.
Disclaimer: It is known that engraving and cutting reflective objects may harm the laser’s inner parts when the beam bounces back and heats parts inside the laser. I am not sure if the Snapmaker’s 10W laser has protection for such issues. Just to be safe, I used only matte objects for my testing.
©3DWithUs – Photo: Max Funkner
Engraving on such items was super quick – 15 minutes only. I used the same file for all 4 objects.
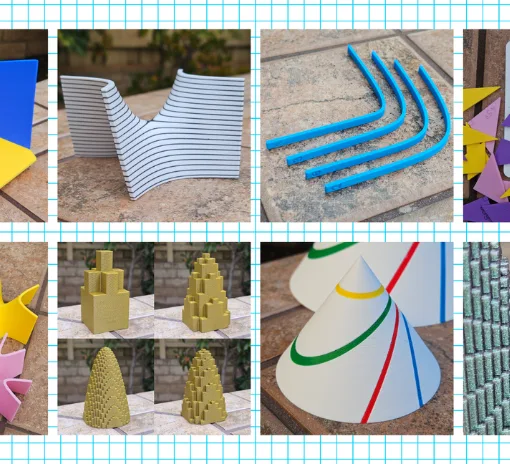
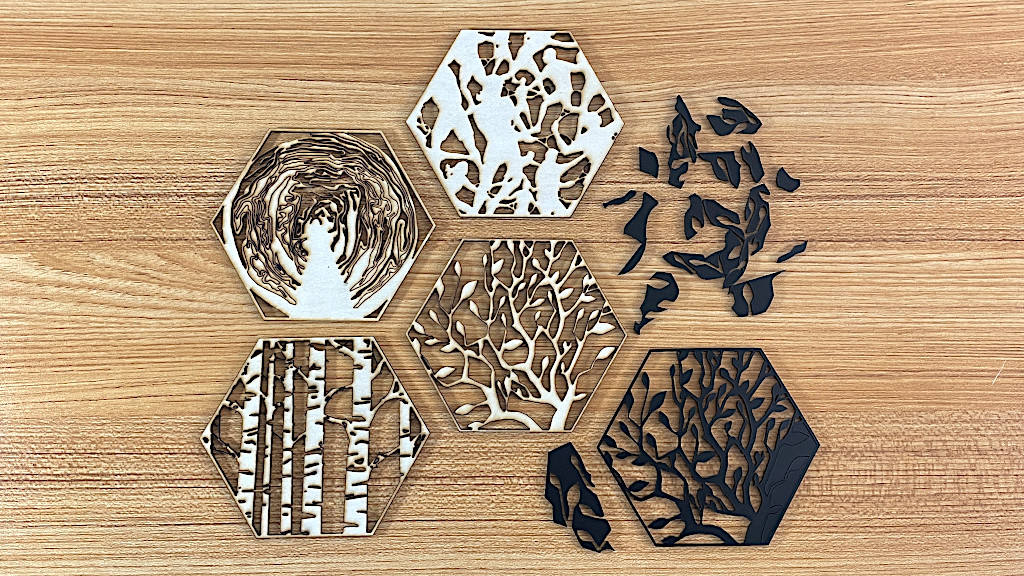
Laser Cut Hexagons
Recently discovered that hexagon designs for 3D printing can be easily laser cut. You cannot beat the wood feel and smell. Here is the full guide on how to design and laser cut hexagons. I tested the idea on Snapmaker 2.0 A350T using a 10W laser module.
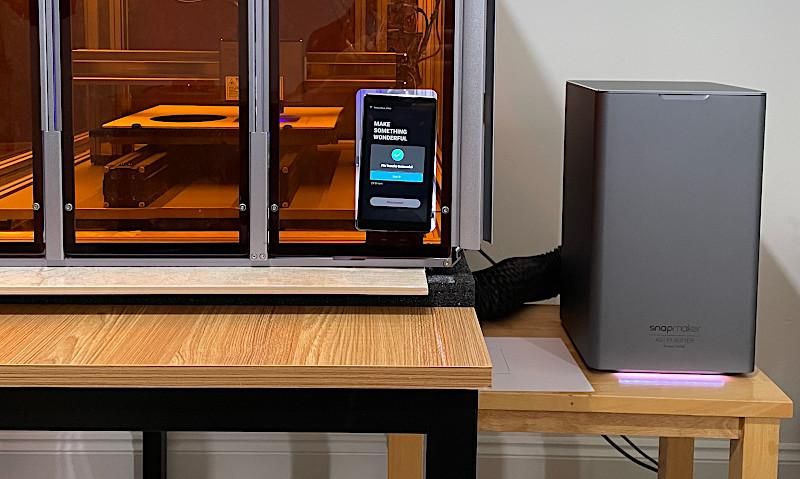
Snapmaker Air Purifier
If the enclosure is a MUST for the eye protection and noise reduction, then the Air Purifier is another MUST for the laser cutting jobs in case, for some reason, you cannot use the connecting hose. Laser cutting jobs produce a lot of smoke and fumes. I would say, the most, compared to laser engraving, 3D printing, or CNC. If the room is not ventilated enough, such smoke can even set off a fire alarm in the proximity.
©3DWithUs – Photo: Max Funkner
Due to excessive smoke while laser cutting Air purifier is highly recommended in some cases
Laser cutting 3mm plywood
MP4: Max Funkner
Everything must be done in order to keep the family happy and safe, right? Also, it is tricky to get a completely detached house, and therefore, neighbors may not be happy with the factory-like noises and smells. When the enclosure partially fixes the noise issues, then the purifier help with the smell, especially when operating Laser Engraver and Cutter.

As I started using it just recently, I feel I need more time to review this product. Coming soon, stay tuned!
Compare to Other Laser Cutters and Engravers
Compare to other Laser Cutters and Engravers for similar functionality and price range.
Will Zubkoff has written a comprehensive review of the Creality Falcon2 and xTool P2 laser cutting and engraving machines. While laser-focused machines like this differ from the ecosystem offered by Snapmaker, it’s nevertheless worthwhile to examine them for comparison.
For a comparison with other laser cutters and engravers please refer to the
detailed budget laser cutter and engravers guide.
Compare to Snapmaker 20W and 40W Laser Modules
New, powerful 20W & 40W laser modules are available for purchase on the Official Website. Here is the detailed Snapmaker 40W Laser module review.
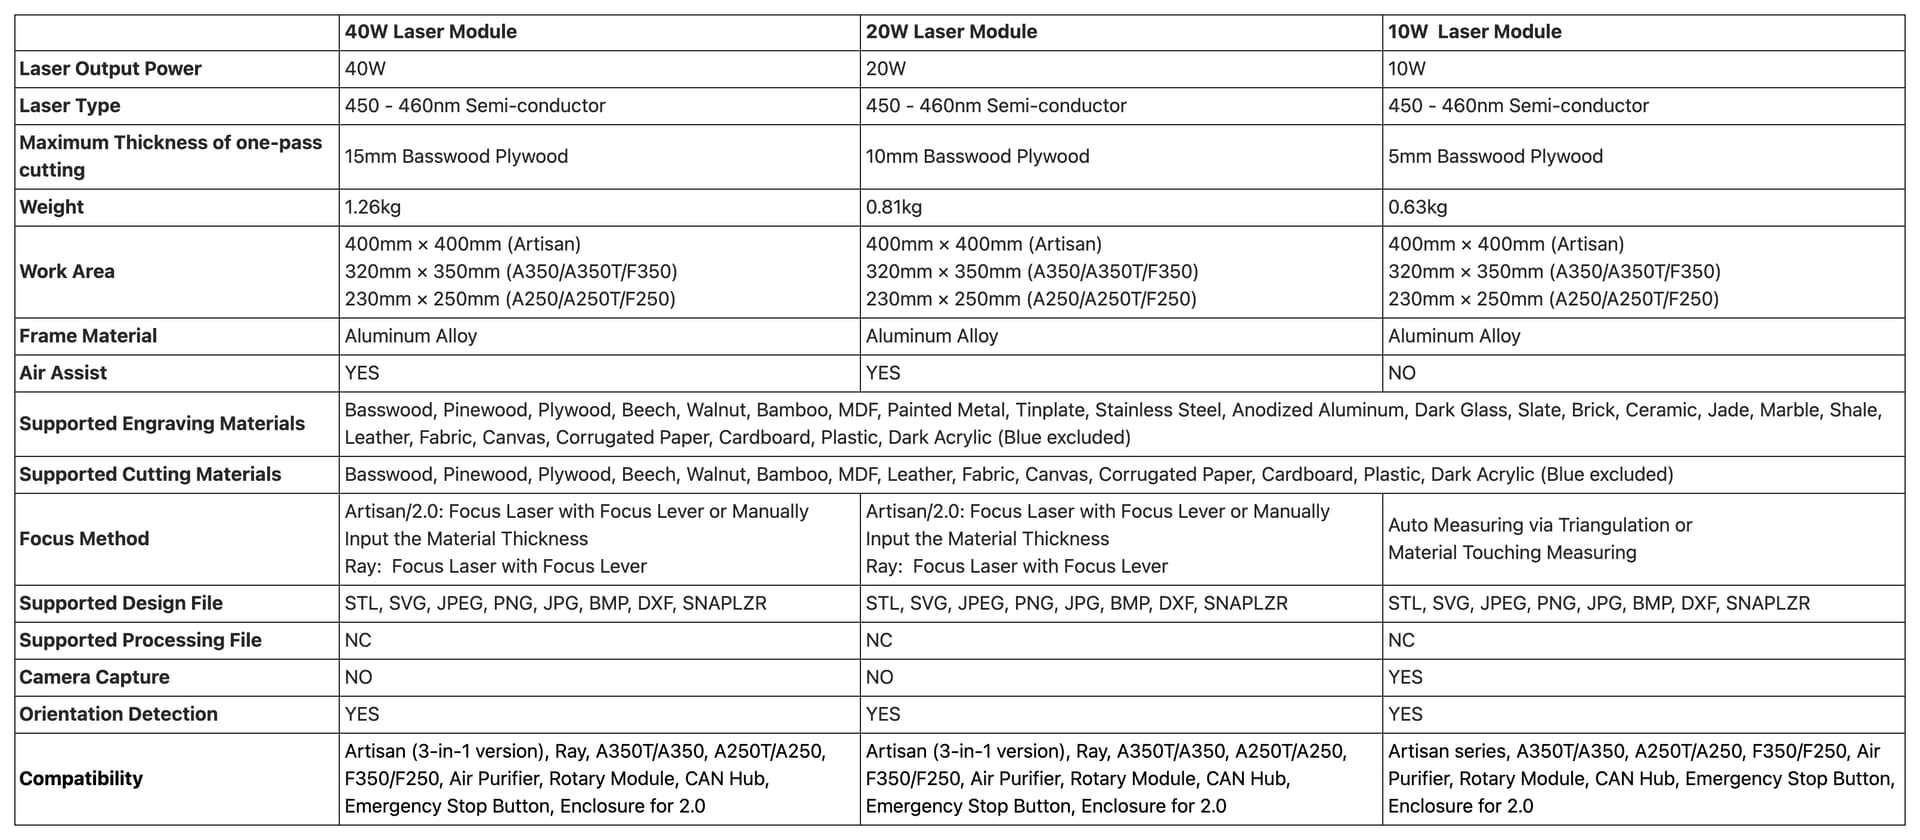
Open in the next tab for better resolution
Image: Snapmaker
In the table above, it is possible to see the main differences, namely supported materials, air assist, and focus method.
©3DWithUs – Photo: Max Funkner
Conclusion and Pros & Cons
Operating a 10W laser and the new features in Luban feel like a leap forward compared to the previous laser cutting and engraving experience. Speed and precision, safety features, such as the enclosure, goggles, and even an air purifier, made me confident, involved, and interested in these disciplines. The ability to work with such natural materials as wood and ceramic tiles make it even more interesting.
Snapmaker 10W High Power Laser Module
Amazon
Official Website
Snapmaker 10W Laser Module Star Rating
Review Summary
A powerful Snapmaker 10W laser module together with the new features in Luban software make the laser engraving and cutting experience better, faster, and safer. As the laser cutting power is higher, the time to complete a project is now reduced eightfold, and it would take on average up to 2 hours. This process has the potential of becoming one of the preferred ways to create something wonderful at home.
PROS:
– Powerful. Cuts up to 8mm depending on the material
– High Speed
– Auto Focus
– Project alignment with the Camera Capture option
CONS:
– Pricey