Snapmaker has recently elevated its laser engraving and cutting capabilities with the launch of their new 20W and 40W laser engraving and cutting modules, a significant upgrade from their previous 10W module. This innovative addition, compatible with the Snapmaker 2.0, Snapmaker Artisan, and the newly introduced Snapmaker Ray, showcases Snapmaker’s commitment to staying at the forefront of consumer laser technology. As an owner of a two-year-old Snapmaker machine, I was eager to explore the potential of this powerful 40W laser. In my comprehensive review, I’ll delve into the details of using the module, including setting up with both an air assist and air purifier, and demonstrate its proficiency in engraving and cutting various models using Luban software. I will also list pros and cons.
Disclaimer: Laser cutting and engraving may be hazardous if improperly operated. Please make sure to follow the safety guidelines such as wearing eye-protective goggles and using the machine enclosure while operating.
Table Of Contents
- Specifications
- Unboxing and Installation
- What is Air Assist and Why it is Needed
- Calibration
- Luban – 1000 Templates
- Supported Material and Settings
- Laser Cutting 3mm and 20mm Wood
- Compare to Other 3D Printers
- Conclusion and Pros & Cons
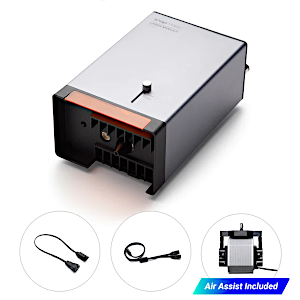
Snapmaker 40W Laser Module
Smart Air Assist Included
Auto Focus and Focus Lever
Extra Safety Shield
Luban (1000 Templates)
Compatibility:
– Snapmaker 2.0 Quick Swap Kit
– Snapmaker 2.0 A350T/A350, A250T/A250, F350/F250
– Snapmaker 2.0 A150 (only compatible with 20W)
– Snapmaker Artisan 3-in-1 3D Printer
– Snapmaker Ray Laser Engraver and Cutter
Price: $799-999
Product affiliate links: 3DWithUs is supported by its audience. Purchases via some links may earn us a small commission at no extra cost to you. This helps us to continue bringing you high-quality content. The product featured was provided for an honest detailed review. Our guides and reviews remain unbiased and independent.
Compare the Prices & Bundles:
Official Store | Amazon
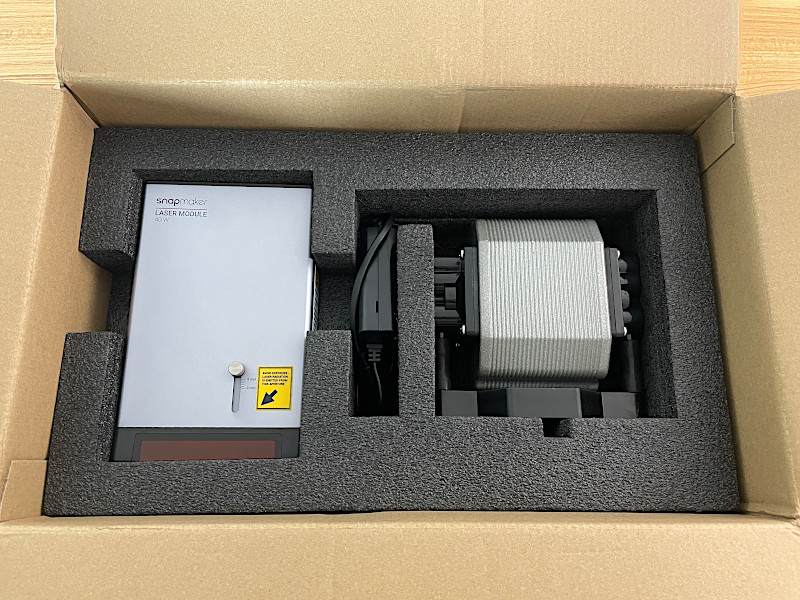
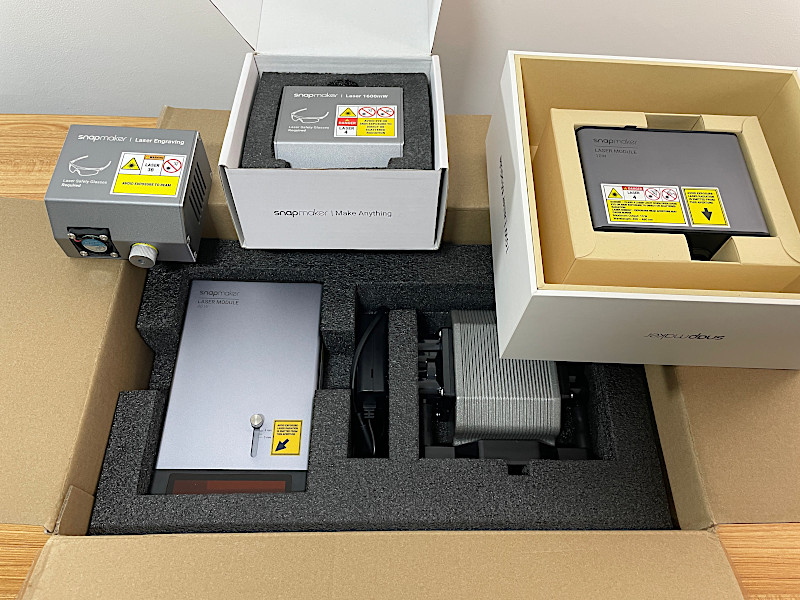
Unboxing and Installation
In comparison to the Snapmaker 10W Laser Module I recently reviewed, the 40W module arrived in a less fancy, but much bigger and heavier box. This is mostly due to the inclusion of an extra air assist pump. All necessary cables for both the Snapmaker Artisan and Snapmaker 2.0 A350T were included.
©3DWithUs – Photo: Max Funkner
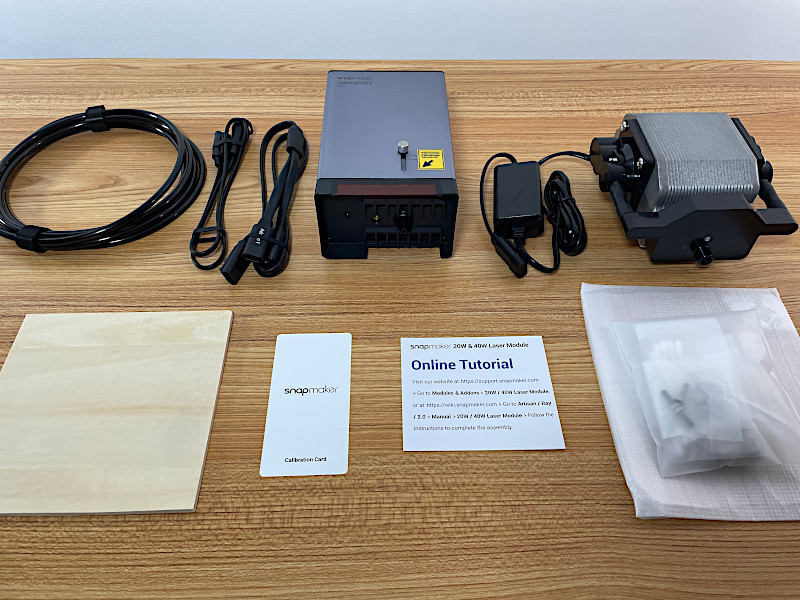
I wish more materials had been included, for example, a frosted acrylic sheet, so I could test it as well. However, this wasn’t a problem for me as I had previously purchased plywood and other softwood packages from Amazon. High-quality material bits can be obtained through the Official Website.
– Quick Swap Kit (Optional). Following the instructions, I quickly assembled the 40W Laser Module using the same four screws. I must admit, that I don’t have swappable brackets for the module or working area; this is something I still need to obtain. For example, the Artisan comes with the so-called Quick Swap system by default, which greatly reduces the time when switching between disciplines. It is possible to purchase a Quick Swap Kit for the Snapmaker 2.0 machines for $149 via the Official Website. With such a bracket system, it literally takes just one minute to switch between CNC, 3D Printing, or Laser work disciplines. For me, it took a couple of minutes to switch the module, and at least 10 minutes to change to the laser engraving and cutting platform.
– Enclosure. A must-have feature for such a powerful laser. If you purchase the Snapmaker Artisan, then the enclosure comes by default. I had my optional enclosure installed when I received the A350T. I can say that the quality of the enclosure is good; it’s a well-thought-through system, and the Snapmaker team takes important safety measures seriously. I like the way my enclosure works together with another optional product – the Snapmaker Air Purifier.
©3DWithUs – Photo: Max Funkner
Recently, Snapmaker introduced a new laser engraving and cutting-only product – Snapmaker Ray. This machine comes with a custom optional enclosure. I had a chance to witness the enclosure at the Formnext AM and 3D Printing Trade Show. At first glance, this enclosure seemed more compact than my enclosure for the A350T, for example.
©3DWithUs – Photo: Max Funkner
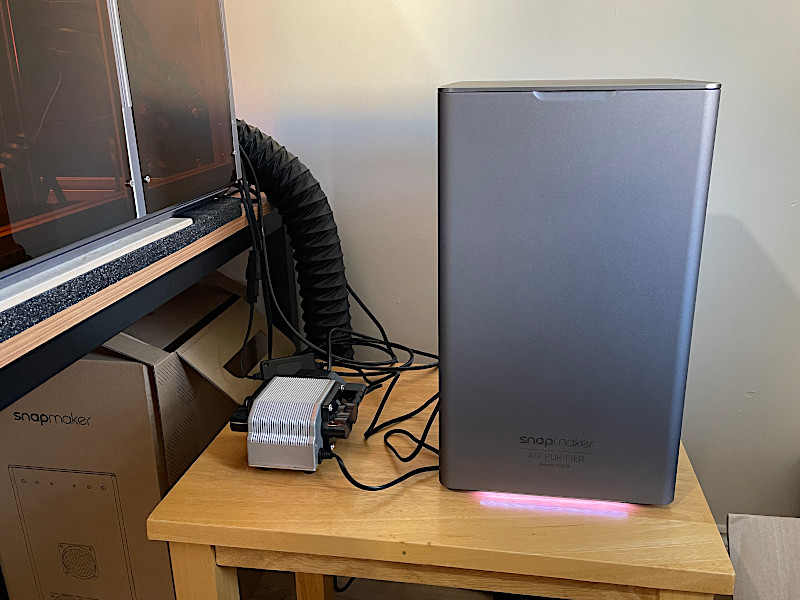
– Air Purifier. Another optional but highly recommended device, especially if we deal with laser cutting, is the Snpamaker Air Purifier. Laser cutting produces the most smoke compared to laser engraving, 3D printing, or CNC. This smoke can quickly set off a fire alarm in the vicinity.
An enclosure for the A350T came with a wide 1-meter-long hose to lead all fumes outside. If, for some reason, you cannot lead the connecting hose outside, an Air Purifier may partially help. In my case, such an Air Purifier is a godsend. As my laser cutting jobs are mostly design/prototype related and in small volumes, these filters last quite long. I must admit I don’t torture-test the filter by overusing it as I try to save it for more projects.
What is Air Assist and Why it is Needed
An included Air Assist is another device in the package whose primary task is to keep cuts cleaner, to prevent excessive post-processing such as sanding, for example. Namely, Air Assist prevents charring, keeps the object clean, and also keeps the laser lenses clean.
– Installation. I followed the Air Assist installation guide to set it up properly. The Air Assist is powered via a heated bed port. Please note that for Snapmaker 2 machines, the setup is slightly different than for the Artisan, as an extra cable is involved.
– Automatic Setting. Basically, in Luban, every time we assign a cutting job, the Air Assist is toggled ON automatically and toggled OFF for laser engraving jobs. You can check the Air Assist settings via Toolpath – Assist Gas ON/OFF in Luban software.
©3DWithUs – Photo: Max Funkner

©3DWithUs – Photo: Max Funkner
– Smoke Residue. Please mind that the Air Assist helped to keep clean only the front of the laser-engraved and cut objects. On the back side, there are clear signs of smoke residue.
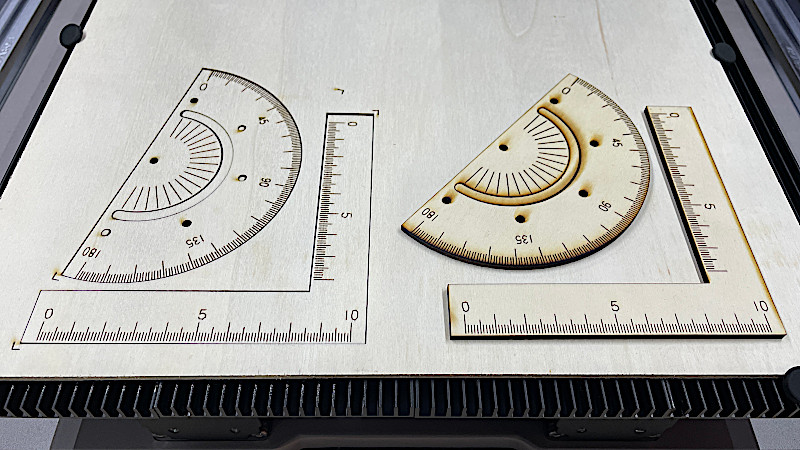
A Quick Start – Beginner’s Guide
For a quick start, I would recommend completing a quick tutorial at the end of which a laser-cut and engraved ruler and angle ruler, featured above, will be completed in a few minutes. After selecting a 3-axis laser job in Luban, the tutorial can be found at Help – Beginner’s Guide. The only setting I had to edit is in Toolpath – Basswood Preset thickness from 5mm to 3mm, as I stocked up with 3mm plywood for such projects.
Calibration
There is no camera on the 40W laser module for background capture and object alignment. I found it was a helpful feature when I applied small engravings on custom objects with the 10W laser. On the 10W laser, it was tricky to see the red dot running the boundaries, for example. Check the camera feature and the result in the 10W review article.
Snapmaker 20W and 40W laser modules, do not feature a built-in camera. They instead rely on a Focus Lever for adjusting the height of the laser platform, providing a straightforward method for calibration. Also, there is a much better visible crosshairs Focus Laser, making it easier to run boundaries.
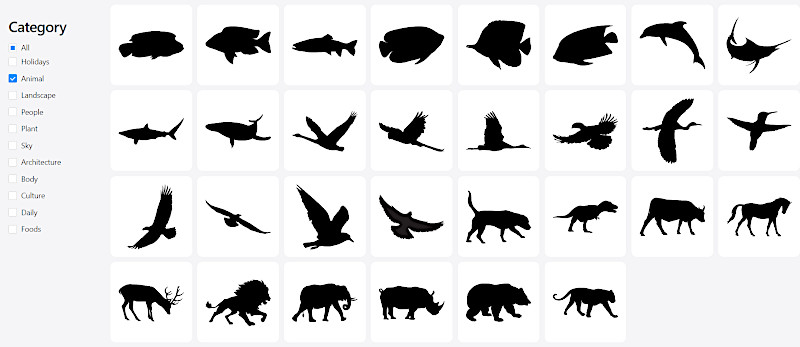
Luban – Templates for Laser and CNC Jobs
Snapmaker’s latest Luban update introduces a massive .SVG collection. This includes quick templates and designs ideal for creating logos and banners. The full collection is readily accessible via Insert Shape – Online Library, allowing you to add designs to your workspace effortlessly.
Screenshot: Luban
Previously in my Snapmaker 2.0 A350T review, I wrote in detail about Luban software and highly praised their development team for regularly providing updates. Basically, Luban software met all my needs in all three disciplines: 3D printing, CNC, and laser, and I believe it is much less intimidating for beginners than other advanced software.
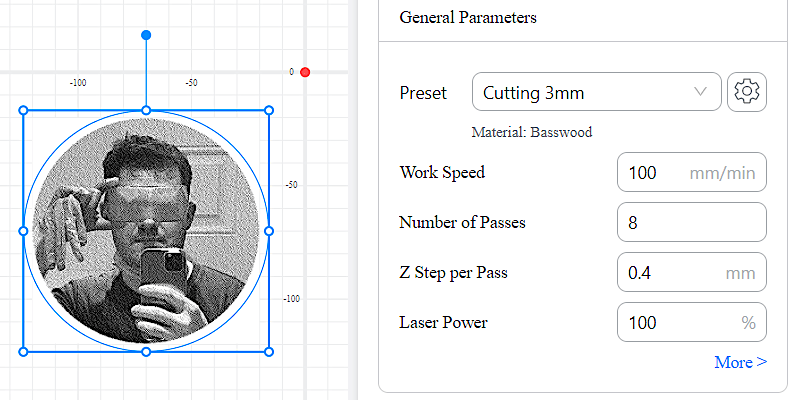
Note: These are settings for the original 1600mW Laser Module
Screenshot: Luban
– WiFi. It is possible to transfer the files via Wi-Fi, but I couldn’t start the job remotely via Luban. I think it is done for safety precautions. This powerful laser cannot be left unattended. If there are changes, I will update this note accordingly.
Supported Material and Settings
Usually, Snapmaker has a page with the best settings for various materials, but since these laser modules are a very recent product, I could not find it on their website just yet. Here is what I found on their table:
Supported Engraving Material
Basswood, Pinewood, Plywood, Beech, Walnut, Bamboo, MDF, Painted Metal, Tinplate, Stainless Steel, Anodized Aluminum, Dark Glass, Slate, Brick, Ceramic, Jade, Marble, Shale, Leather, Fabric, Canvas, Corrugated Paper, Cardboard, Plastic, Dark Acrylic (Blue xxluded).
Supported Cutting Material
Basswood, Pinewood, Plywood, Beech, Walnut, Bamboo, MOE, Leather, Fabric, Canvas, Corrugated Paper, Cardboard, Plastic, Dark Acrylic (Blue excluded)
Snapmaker created a video where they featured some of the settings for operating the Snapmaker Ray. Slightly modified settings worked for me when cutting 2mm wood. Here are the settings featured in the video:
Settings
Material: Pinewood
Thickness: 20mm (one pass)
Job Speed: 120mm/min or 2mm/s
Power: 100%
Initial Cutting Height Offset: 4mm (or -4mm – I had to set this with a negative value to work on my machine.)
Comment: Worked with my unknown 20mm thick wood, see the images below.
Material: 304 Stainless Steel Sheet
Thickness: 0.1 mm (one pass)
Job Speed: 3mm/s
Power: 100%
Initial Cutting Height Offset: Omm
Material: Basswood Plywood
Thickness: 15mm (one pass)
Speed: 3mm/s
Power: 100%
Initial Cutting Height Offset: 3mm
Material: Leather
Thickness: 2mm (one pass)
Speed: 50mm/s
Power: 100%
Initial Cutting Height Offset: Omm
I would recommend testing these settings on small bits first. When using these settings, please conduct a test first. For this review, I had no chance to test laser engraving and cutting on leather and steel materials, but I will update the article once testing is done.
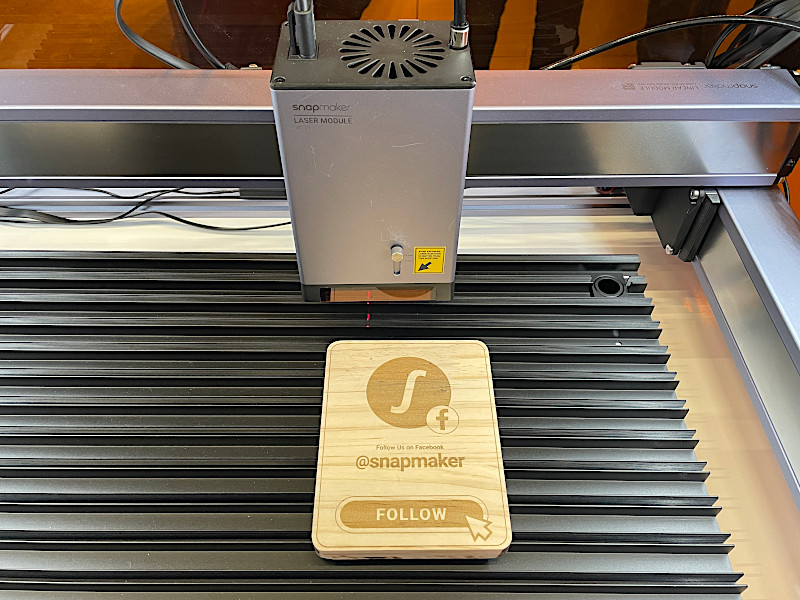
Laser Cutting 3mm and 20mm Wood
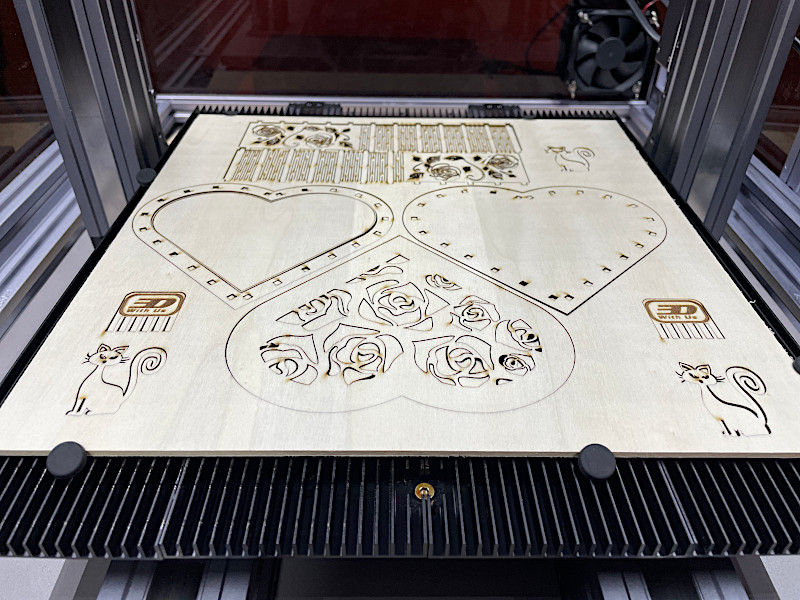
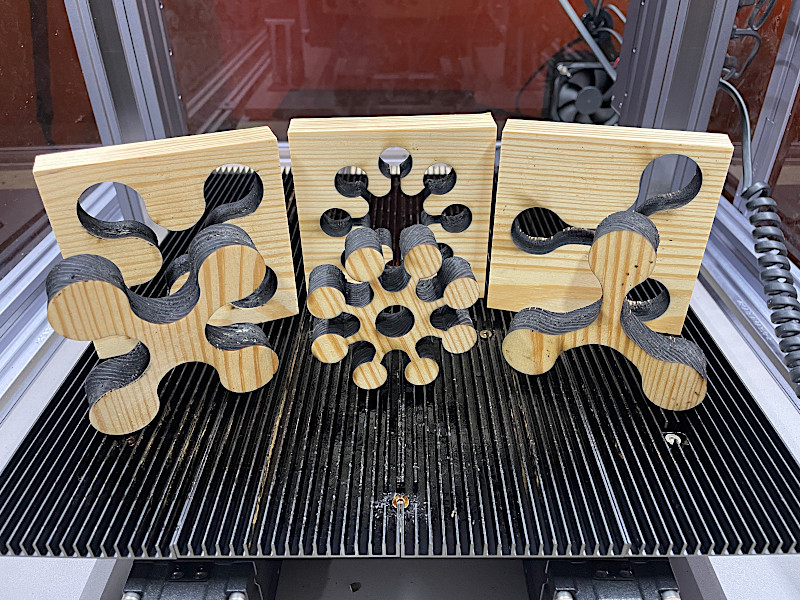
– 3mm Plywood. Previously, I bought 3mm thick 300x300mm square plywood sheets on Amazon, specifically for Snapmaker laser testing. To utilize it, I tested the 40W laser module on this material.
©3DWithUs – Photo: Max Funkner
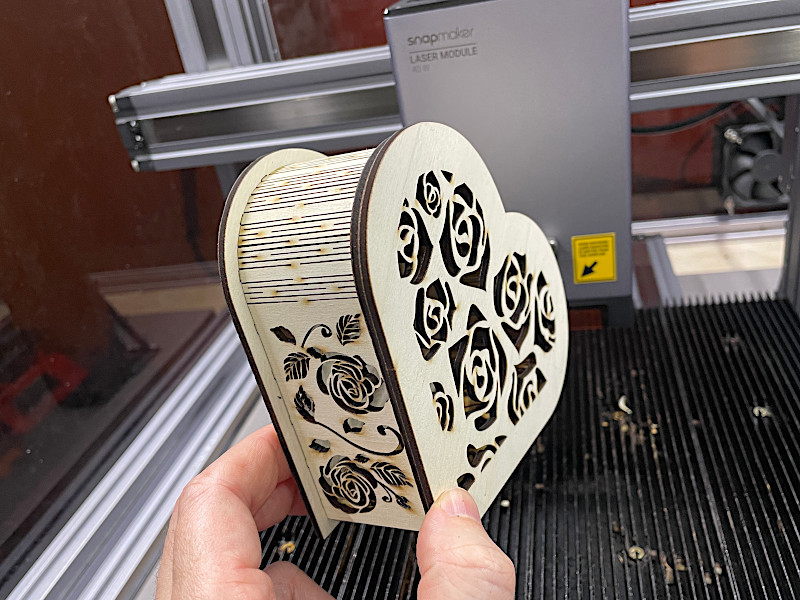
Speed, in comparison, is mind-blowing. With the Luban default settings, I cut the main object, Heart-shaped Box parts by VectorPortArt, which I purchased on Etsy, in just 25 minutes. In comparison, a similar box with the 10W module took me 56 minutes, and with the original 1600mW laser module I received with the machine, it took 8 hours and multiple passes.
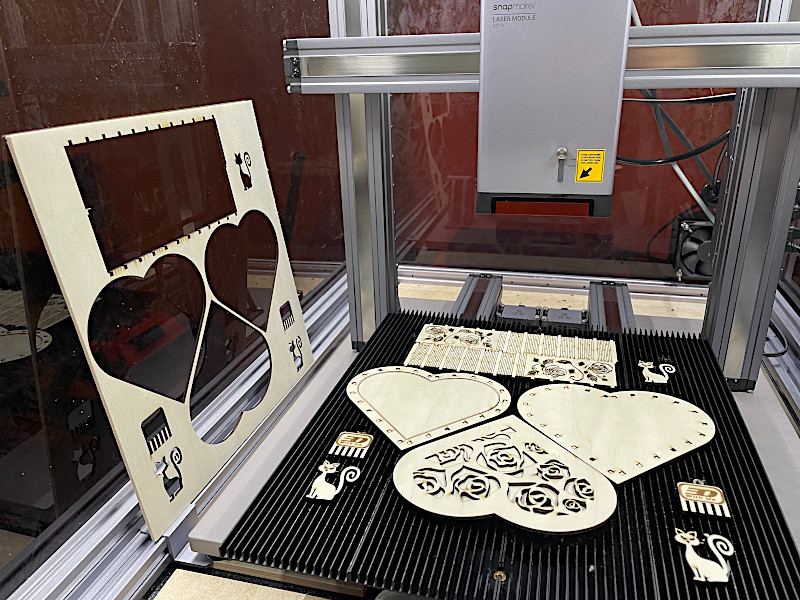
To utilize the whole board, I laser engraved and cut the Halloween Cat I found in the Luban library and my Offcuts Cleaning Combs, a tiny design I am really proud of. The laser cut was so clean that when I picked up the sheet, the cut objects were left on the cutting platform. No plywood imperfections, such as knots, for example, stopped such a powerful laser.
Design by VectorPortArt on Etsy
©3DWithUs – Photo: Max Funkner
Clean cuts also helped to fold such a box much quicker, as any tiny imperfection would make assembling such a box much more complicated.
©3DWithUs – Photo: Max Funkner
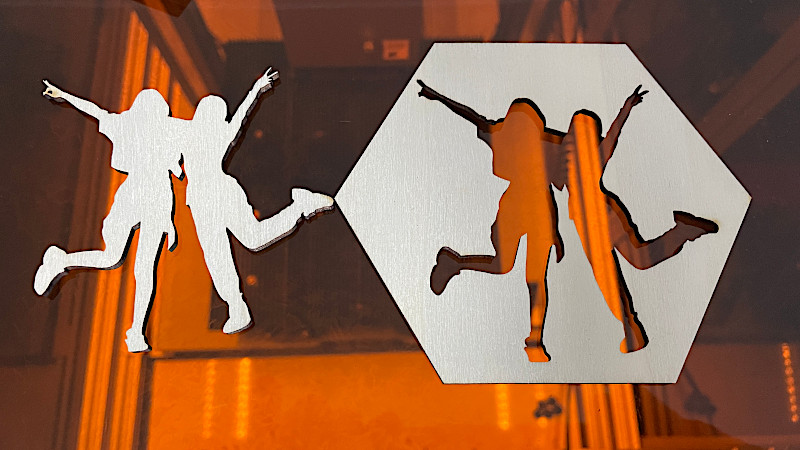
Here is the combination of templates I quickly put together using files from the Luban library. My latest discovery was that 3mm plywood can be cut into very nice hexagon tiles and ultimately create a mural. Such honeycomb murals can be very unique, including known artworks and custom memorable events. Read more about laser-cut hexagons in my guide.
– 20mm Wood.
As I am not sure what type of wood I have, and since there are no presets for 20mm basswood, I created a new Custom Preset for 20mm wood using the following settings: One Pass, Job Speed: 120mm/min, Power: 100%, Initial Cutting Height Offset: -4mm
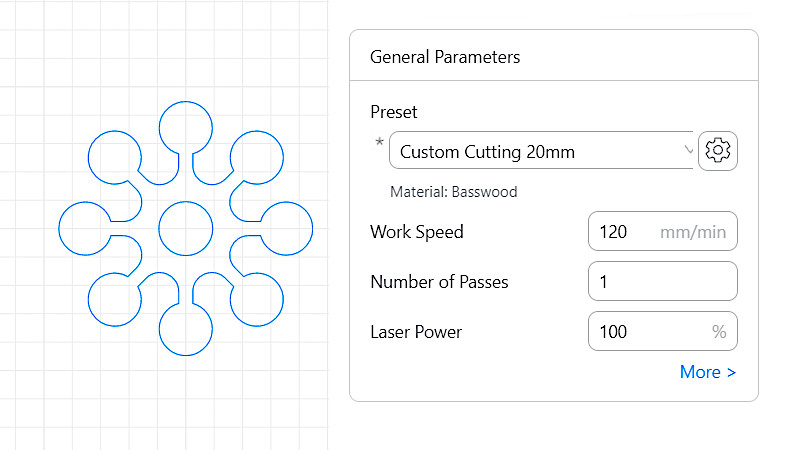
After some testing I had to put a negative value for For Initial Cutting Height Offset setting.
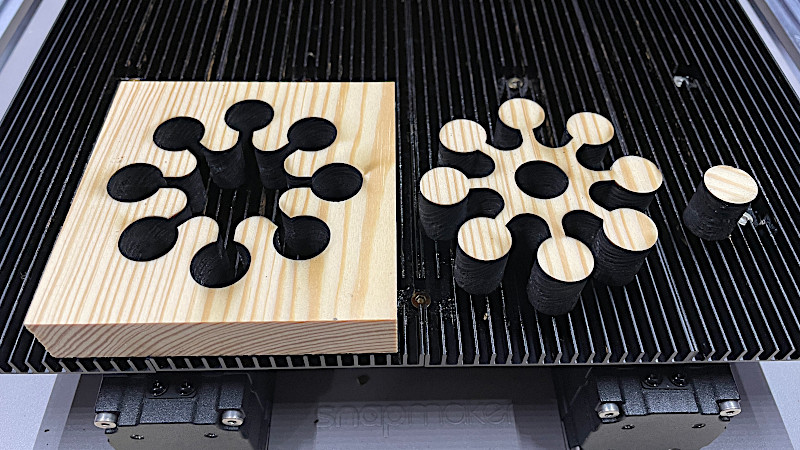
Shape from Luban Library
©3DWithUs – Photo: Max Funkner
Cutting cleanly through 20mm wood feels like magic. It was very impressive to achieve such results in a relatively short time. Literally, it took seconds or minutes, depending on the shape. The featured shapes above are from the Luban library.
Compare Snapmaker 40W Laser Module to Other Products
Slowly but steadily, 20W and 40W laser engraving and cutting heads are becoming available to the consumer market. Apart from Snapmaker, there are a couple more brands that offer powerful lasers, namely Creality and xTool.
For a comparison with other laser cutters and engravers, please refer to the detailed Best and Budget Laser Cutters and Engravers Guide.
Compare to Snapmaker 10W, 20W Modules and Snapamker Ray:
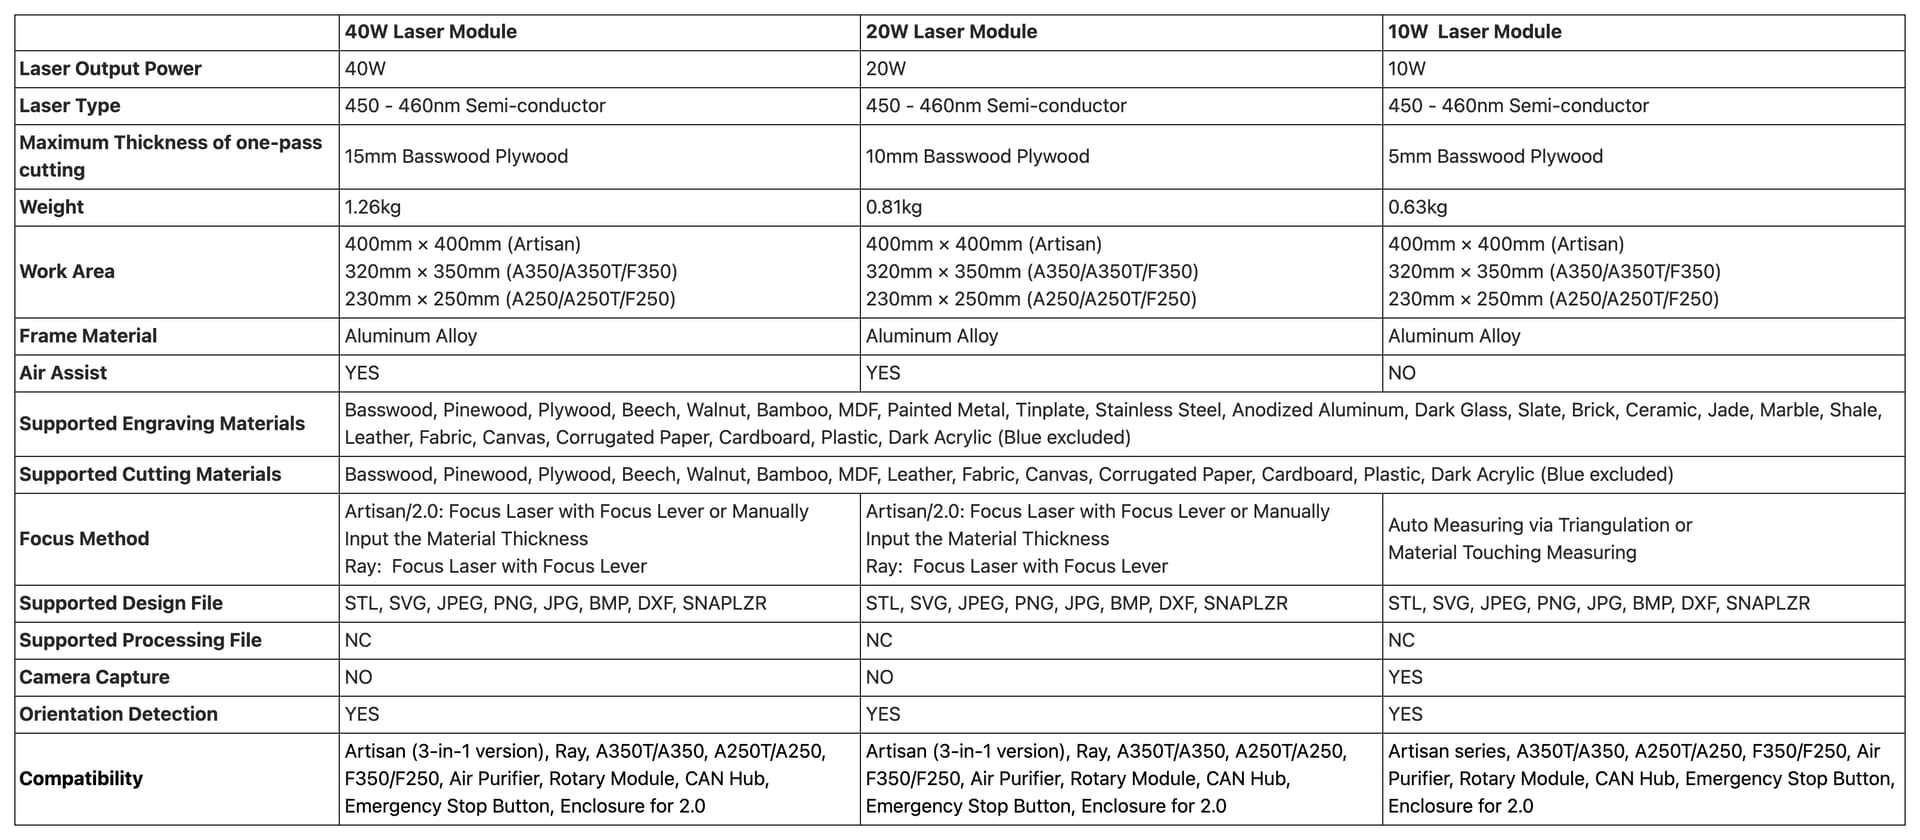
Open in the next tab for better resolution
Image: Snapmaker
In the table above, it is possible to see the main differences, namely supported materials, air assist, and focus method.
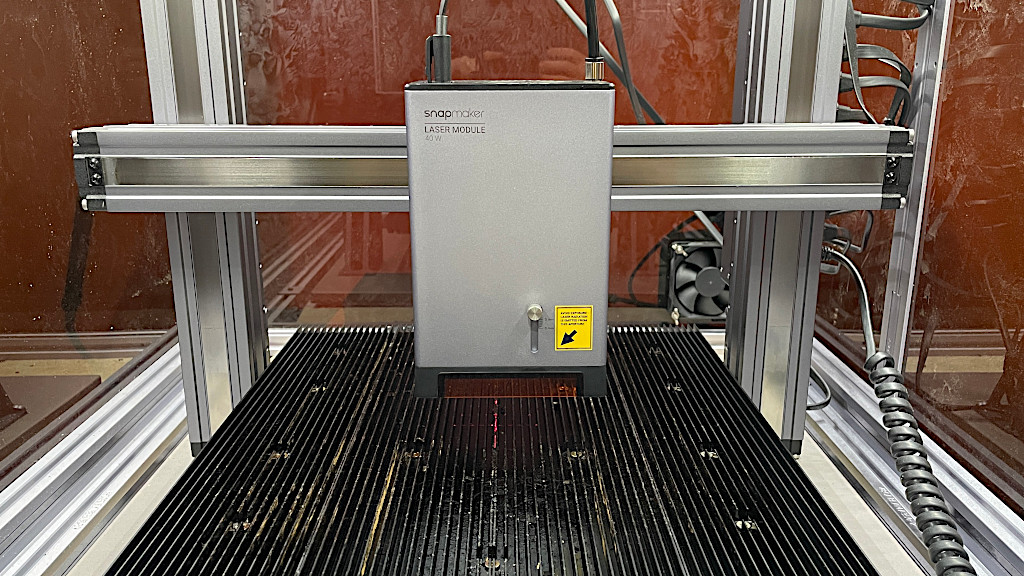
©3DWithUs – Photo: Max Funkner
Just for comparison, I took a picture of the four Snapmaker laser modules I have, including those from the previous machine, such as the Snapmaker Original (yes, I still have it). In the image, you can find the 200mW to 1600mW, 10W, and 40W modules.
Conclusion and Pros and Cons
Compare the Prices & Bundles:
Official Store | Amazon
Disclaimer: Laser cutting and engraving may be hazardous if improperly operated. Please make sure to follow the safety guidelines such as wearing eye-protective goggles and using the machine enclosure while operating.
Snapmaker 40W Laser Module Review
Review Summary
The installation and operation of the Snapmaker 40W laser engraving and cutting module on my two-year-old Snapmaker 2.0 A350T was remarkably straightforward. I am glad that Snapmaker continues to bring new updates for the owners of the previous machines. The 40W module is as powerful as promised, and I managed to laser cut 20mm wood with only one pass. This marks the technology as getting quicker and better, and allows consumers to achieve new targets.
Regarding safety, the Snapmaker 40W module incorporates comprehensive precautions, including sophisticated chambers and additional laser safety shields. When used in conjunction with the optional Air Purifier, the setup becomes particularly appealing for designers and innovators who create and test prototypes. This combination of power, ease of use, and safety measures makes the Snapmaker 40W laser module a valuable tool for a wide range of creative and technical applications.
Pros
Powerfull
Quick
Quiet (without Air Purifier)
Easy to Operate
Air Assist
Cons
Price
No Focus Camera
Smell from Cutting Materials