Once your new 3D printer arrives it is good to understand its capabilities. There are many 3D printing test files to choose from on file repositories. The reason to use a proper test file is because it contains all hard-to-print bits. After printing such object it becomes clear what settings you need to complete tricky and detailed projects. Also these files are designed in a way that you don’t use a lot of filament and printing time.
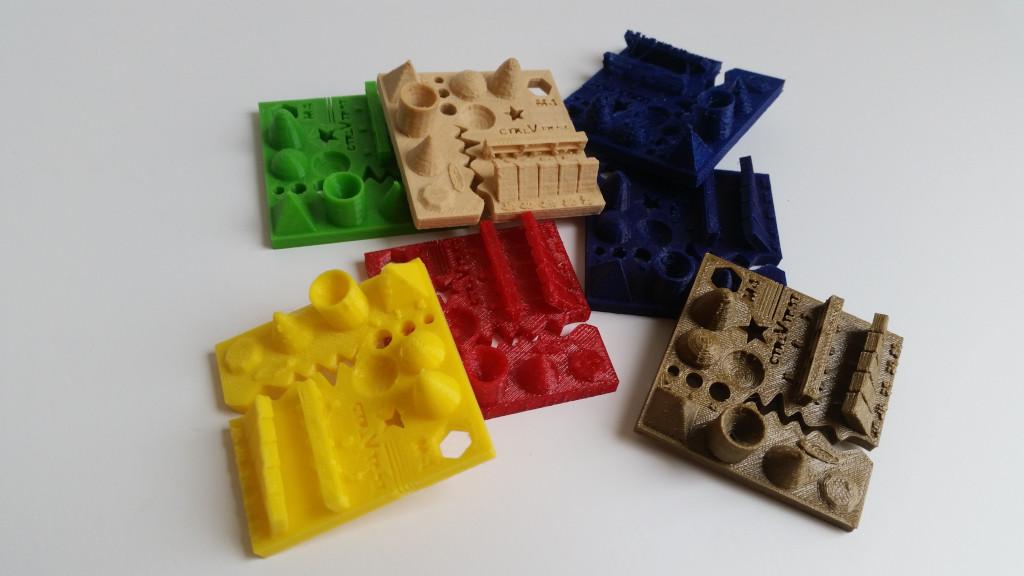
3D Printing Test – Ctrl V Test File
As each 3D printer is different it may take a few attempts to get your print right. Changing particular slicer settings and trying, again and again, will eventually result in tuning your printer correctly. The picture above demonstrates how wrong it can come out in the very beginning. Lower temperature and printing speed can help with bridges and tricky corners. More details can be achieved with layer height at 0.1 mm.

(Image: 3DWithUs)

(Image: 3DWithUs)
3D Printing Test – Stringing
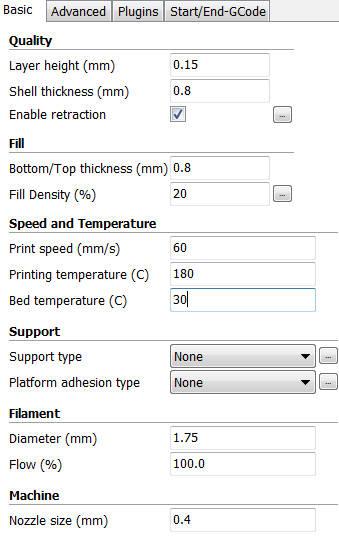
As it is shown in the picture below (Red) there is a lot of stringing. A big part in this is played by retraction settings. Later we changed retraction speed to 60 mm/s. Also, Z hop when retracting was changed to 0.075 mm which is recommended for Delta 3D printers. High temperature can also add to stringing. It is best to print at lower temperature to allow filament to cool down. PLA at 180 C should be the most suitable for this type of 3D printing test.

(Image: 3DWithUs)
But, we have to keep in mind that, compared to PLA and ABS, PET and PETG materials are prone to stringing. Therefore the best models for this material are all sorts of objects that can be 3D printed without infill and supports. Please don’t get us wrong, it is possible to print any functional item with retractions but the item’s look may suffer in the end because of excessive oozing and stringing. Read more about PET and PETG.

(Image: 3DWithUs)
Travel Speed
Another setting to mind is travel speed. By default, it can be set at 150 mm/s in your slicer. It might help raising it to 250 mm/s. This way filament won’t be dragged along. Hopefully, all the tips above will help you to set up your 3D printer correctly and avoid the stringing. However, as we mentioned before, you may have such filament in your hands that will make stringing worse than others.

(Image: 3DWithUs)
Before trying to use wood filament we would recommend to become comfortable using PLA first and get to know your 3D printer well. As this filament may appear hard to handle. Read more about wood filament.

(Image: 3DWithUs)
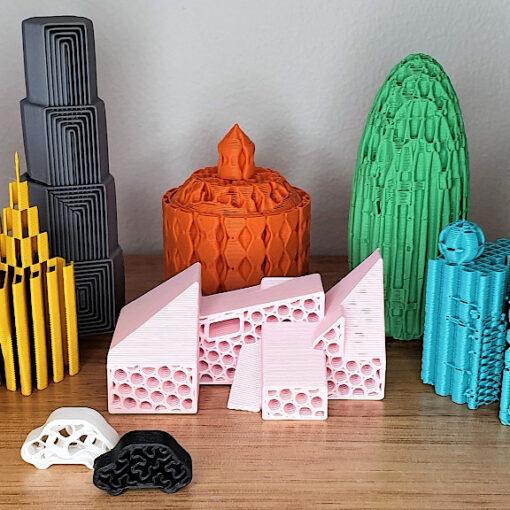
Overall we showcased 4 different filament materials: PLA, PET, Wood, and ABS. Every time ctrlV test file had to be tuned in Cura slicer software according to manufacturers guidelines. Usually, it is the temperature we play with.
Our 3D printing test is made on Delta Wasp 2040. Please bear in mind that some settings are specific for this type of 3D printer only (bowden extruder), such as Z-hop setting.
Read More: Vase Mode 3D Printing – Cura, Prusa and Simplify3D Settings
When 3D printing in vase mode, the machine’s extruder is set to move in a corkscrew, or spiral, mode. There are no retractions. Simplify3D, Cura, and Prusa slicer software all have such mode settings under different names. Check how to setup “Spiralyze Outline Contour”.

(Image: 3DWithUs)
SUNLU PLA Filament on Amazon (affiliate link)
STL Files:
“Test your 3D printer” file
by ctrlV
3DBenchy
by Creative Tools

Read More: Settings for Small 0.2mm and Large 0.8mm 3D Printer Nozzles
If you’ve never changed a nozzle on your printer before, there’s never been a better time than now to experiment with different sizes. If you’re interested in learning more about how to change a nozzle and when to use different sizes, be sure to check out the examples used in this article.

11 thoughts on “3D Printing Test – Stringing”
3DWithUs,
Your prints looks pretty crappy
This is the whole point of testing.
Hiya there by chance could you upload pics of all the most recent cura settings you have for the Delta Wasp 2040 please?
Many thanks and kind regards
Hi Bluekingdom. Sorry, but we haven’t used new Cura yet. Can’t recommend the settings as we have to test them first.
Thanks, I am trying those setting now. I have the Delta Wasp 2040 just like yours. It prints the demo models perfectly (I now have a nice gnome) but any gcode I make via Cura prints very roughly and in general badly. Is there any set-up you did when installing Cura that I might have messed-up? Also I am using the Mac version of Cura. Any further help will be appreciated tremendously.
thanks for the tips. i have this printer too, but i have not been able to get nice prints yet. can you give me more advice on the settings in Cura?
Hi Eli,


It took us a while to figure this out as well. What printer do you have? If you use PLA our Delta printer worked well with these settings:
Thanks, I am trying those setting now. I have the Delta Wasp 2040 just like yours. It prints the demo models perfectly (I now have a nice gnome) but any gcode I make via Cura prints very roughly and in general badly. Is there any set-up you did when installing Cura that I might have messed-up? Also I am using the Mac version of Cura. Any further help will be appreciated tremendously.
Thanks so much, the settings worked perfectly. You are real masters of this stuff so again thanks a million.
A big problem was also the OSX version of Cura, it was messing up my gcodes, so I used a PC to make the last gcode and bingo the printer did what it is capable of. It is an awesome machine, can’t wait to get more stuff going.
Any chance you’d be willing to share the Cura settings you used for that beautiful wood print you made?
In your debt,
Eli
Thanks!
You are welcome!
Here we go: https://3dwithus.com/wood-filament