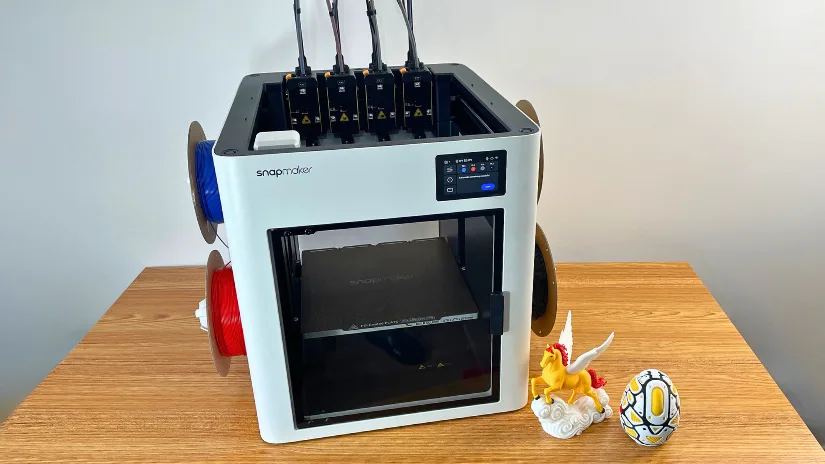
I first saw the Snapmaker U1 at a trade show, and what stood out immediately was how compact it felt for a toolchanging system. Seeing it in person already gave a sense of what Snapmaker was aiming for with this machine. Now, with the unit on my desk, it is time to see how it performs beyond first impressions. In this guide, I go through the setup process, software workflow, and test print results, including both pre-sliced models and custom projects based on 3D scans.
Table of Contents (Jump to a Section)
Where to Buy the Snapmaker U1
Price: $849 – $999

What’s Included – Accessories
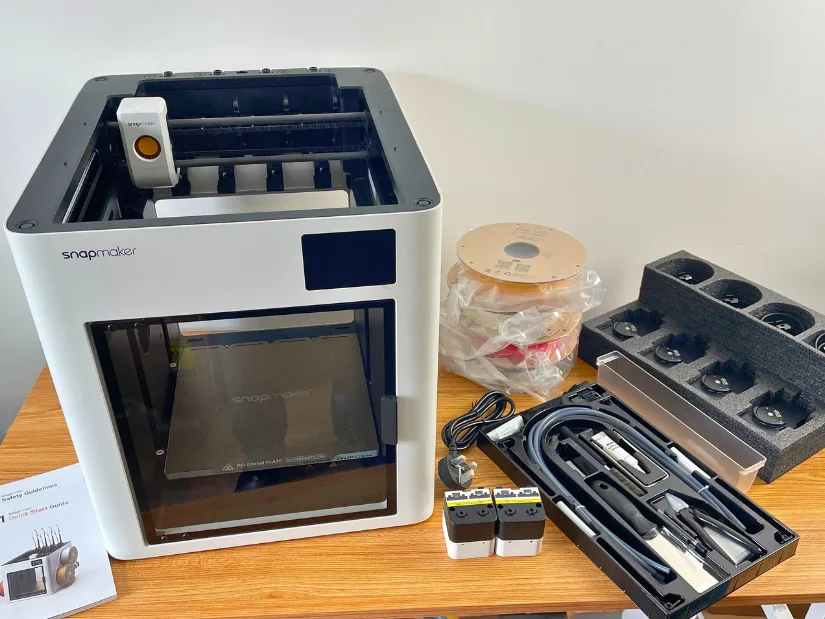
The Snapmaker U1 comes with everything needed to get started. The package includes the enclosed printer with a textured PEI steel sheet, four toolheads, four spools of SnapSpeed PLA, filament holders, feeders, and a waste collector, along with all necessary cables and a tool kit. Safety Guidelines and a Quick Start Guide are also included, making the setup process straightforward. Overall, it feels like a complete package right out of the box.
Snapmaker U1 Specifications
- Printing Technology: Fused Deposition Modeling (FDM)
- Build Volume: 270 × 270 × 270 mm
- Max Toolhead Speed: 500 mm/s
- Max Acceleration: 20,000 mm/s²
- Toolheads Included: 4
- Max Flow Rate: 32 mm³/s
- Nozzle: Stainless Steel (more options in testing)
- Max Nozzle Temperature: 300°C
- Nozzle Diameter: 0.4 mm
- Filament Diameter: 1.75 mm
- Part Cooling: Main & Auxiliary Fans
- Build Plate: PEI
- Max Bed Temperature: 100°C
- Basic Materials: PLA, PETG, TPU, PVA
- With Optional Seal Cover (Coming Soon): PET, ABS, ASA
- With Seal Cover & Hardened Nozzle (Coming Soon): PC, PA, PA-CF, PA-GF
Find the full and regularly updated list of specifications on the Official Website.
©3DWithUs – Photo: Max Funkner
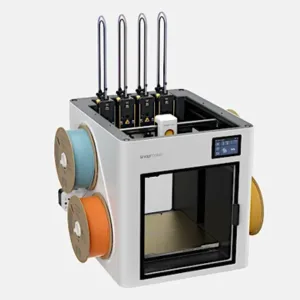
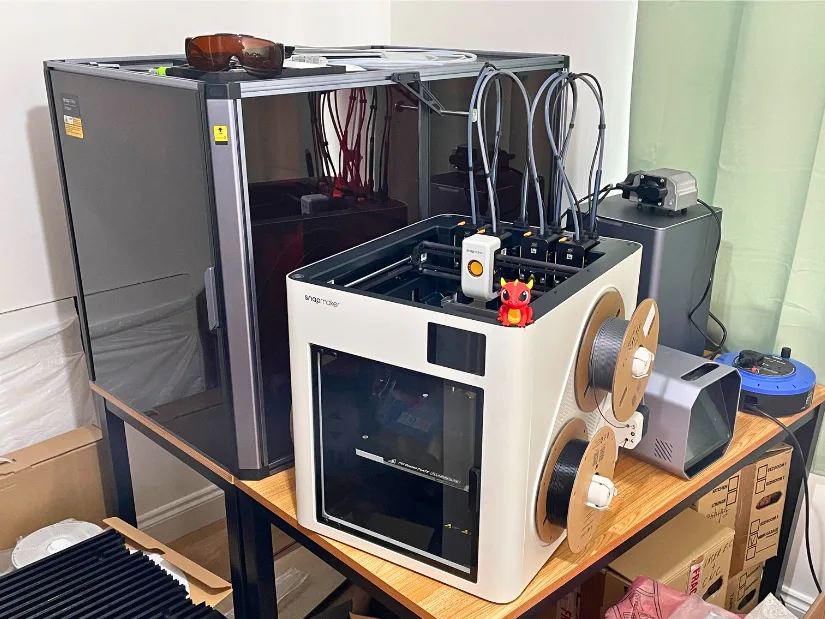
I could not resist showing both Snapmaker machines side by side. It also provides a useful size comparison. The U1 is noticeably more compact, especially when placed next to the Artisan. The Artisan system takes up more space overall, as it is designed to support multiple functions in one device. With separate modules for different disciplines, the footprint naturally grows, while the U1 stays focused and compact.
Setup and Design
The Snapmaker U1 arrives well packaged and mostly pre-assembled. With a boxed weight of around 26 kg, it feels solid straight out of the box. This is one of the rare cases where I did not need to rely on a YouTube video for assembly; the included instructions were clear and sufficient to get started quickly.
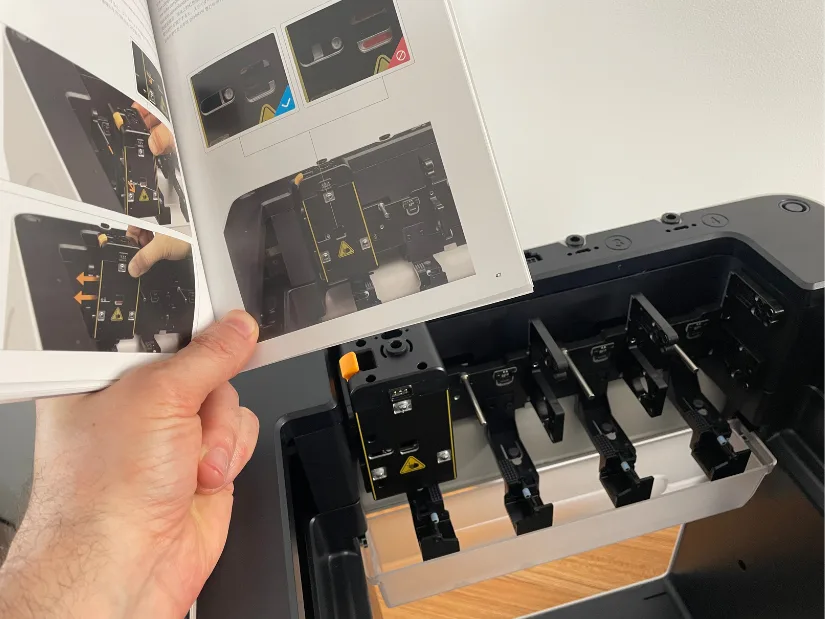
Setup is straightforward and does not require extensive assembly. After removing transport protection screws and securing four tools and filament holders, the main steps include loading filament, powering the machine, and completing the initial calibration via the touchscreen interface. The process is guided and beginner-friendly.
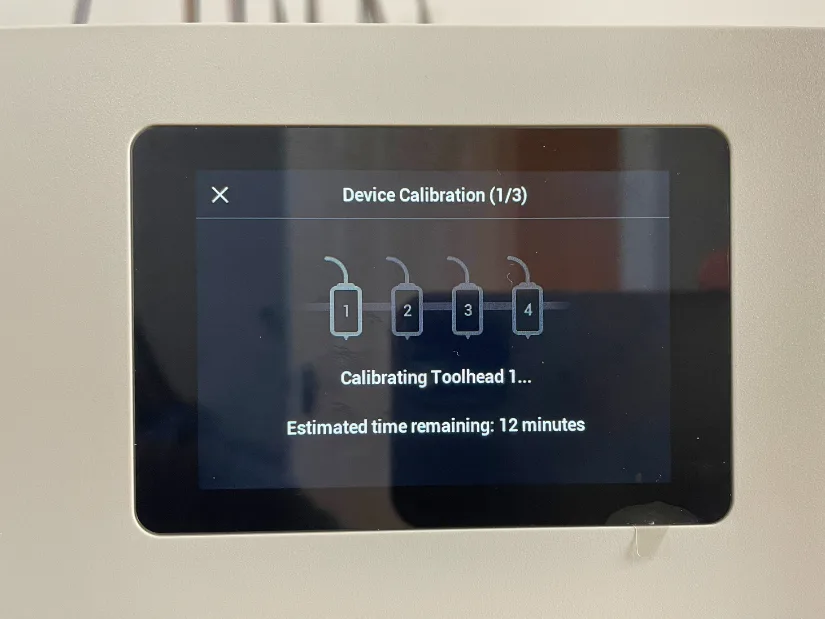
– Calibration. The calibration process is clearly guided via the touchscreen interface, with progress indicators and time estimates, making it easy to follow even for first-time users.
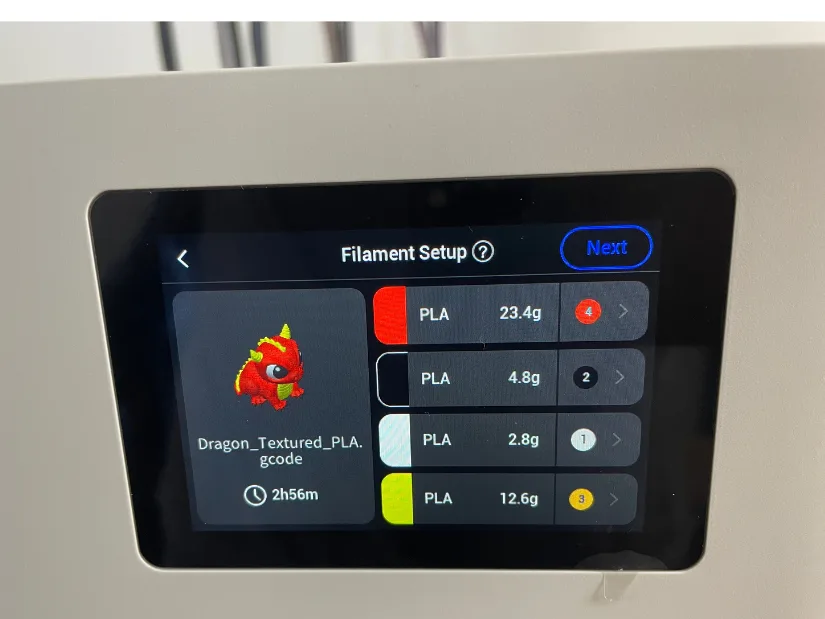
Filament setup for a print is also straightforward. The interface clearly shows material usage and assigned colors. There is also the option to change filament colors directly from the project screen, which adds flexibility before starting a print.
My only minor struggle was finding the filament loading and unloading screen. It appears when tapping on the color indicators rather than through the main menus.
– Wi-Fi. Setting up the Snapmaker App and connecting to Snapmaker Orca via Wi-Fi was easy. I printed my first four models without even opening the slicer. One model, Cute Dragon, comes preinstalled, while over 30 more are available directly from the app. Having this many high-quality models ready to print is a smart move. Print results of some of them are shown in the Testing and Results section.
Software: Snapmaker Orca & Snapmaker App
– Snapmaker App. I am very happy with the app overall. Having over 30 high-quality models available directly in the app was a good incentive to install it. Monitoring prints is probably the most used feature, and for good reason. I often find myself checking in on ongoing prints, especially on models I sliced myself.

Overall, the Snapmaker App works well as a companion tool rather than a replacement for the slicer. It covers quick access, model selection, and remote monitoring reliably. If the print stops for any reason, the app sends a notification, which is very handy.
– Snapmaker Orca. Based on the well-respected Orca slicer, Snapmaker has added a few features and tuned profiles since I first tried it around a year ago. Preparing my own models was a smooth experience. Features like color painting and support painting are all well implemented and easy to use.

One of the features I find myself using more and more is the multi-build-plate layout. It helps organize projects, especially those with multiple parts. Switching between plates, adjusting settings, and preparing builds becomes much easier, making the overall workflow more efficient.
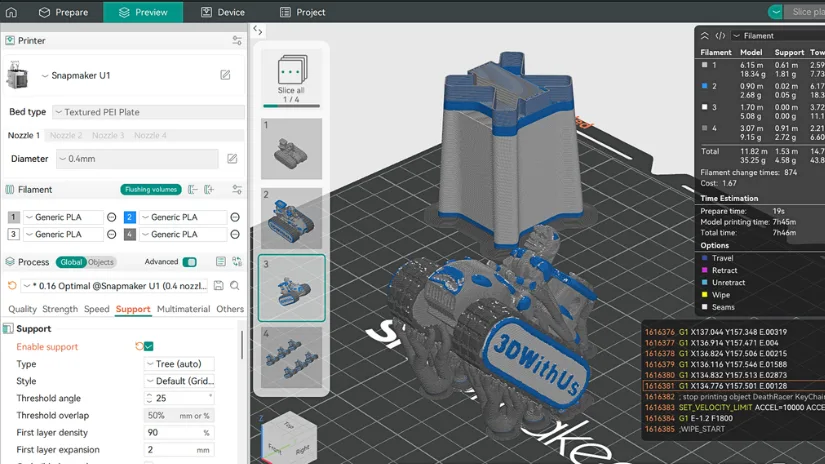
The ability to apply colors and preview the sliced result gives a quick understanding of whether a model needs further tuning or adjustments. It is also easy to check how supports are generated and decide if manual support painting is needed.
For the DeathRacer miniature keychain, supports were applied automatically and worked well without any extra adjustments. Color painting is the most time-consuming step. I completed it in about 1–2 hours, though it can easily take longer. It is a surprisingly relaxing process, almost like a coloring book.
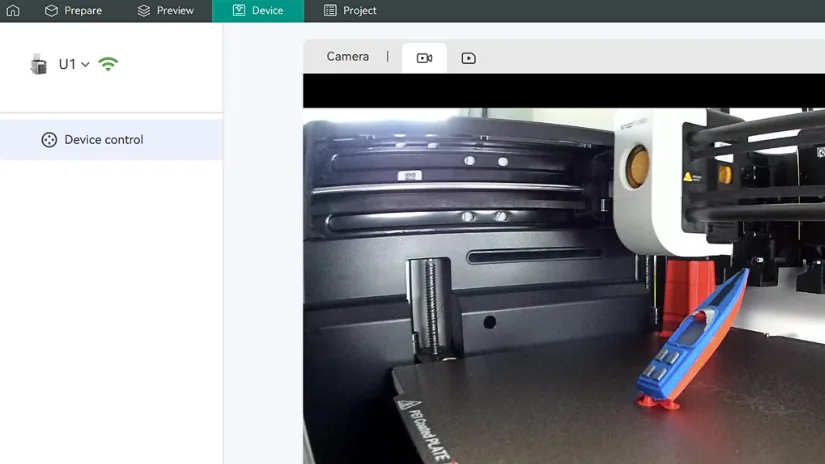
– Print Monitoring & Timelapse. Similar to the app, Snapmaker Orca also allows live monitoring of the print process. This is especially useful when the printer is in a different room from the workspace. The built-in camera view works reliably and makes it easy to check progress at any time. Timelapse recording also works well. Just remember to enable it at the start of the print, as it is not turned on by default.
Testing and Results
Included Models Collection
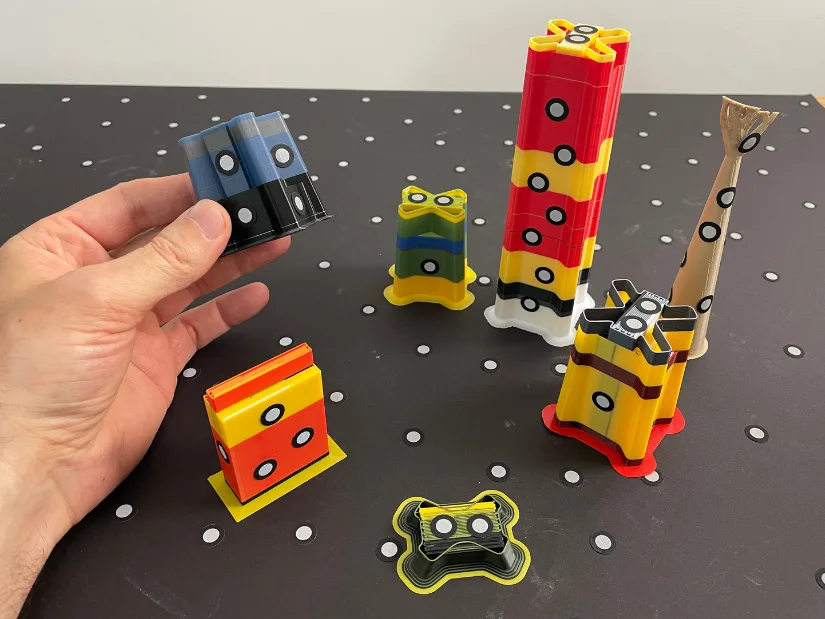
I am genuinely impressed with the selection of test models included. These can be loaded directly via the Snapmaker app or Snapmaker Orca, making it easy to start printing straight away. I found myself printing one model after another. The collection features work from talented designers in the 3D printing community. This approach works well, as it gives a clear idea of what the machine can achieve, with reliable and repeatable results.
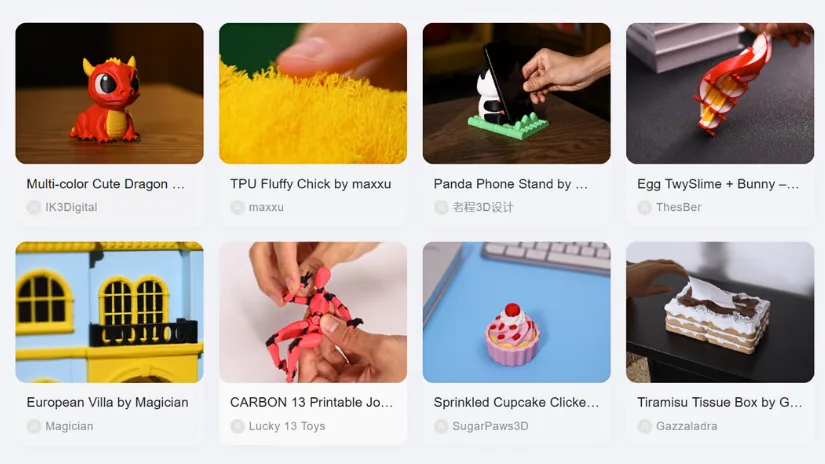

Each model includes detailed print information such as estimated time, material usage, and layer settings. It gives a clear overview before printing and removes much of the usual trial and error. For multicolor printing, this kind of guidance is particularly useful. After a few test prints, I found the estimated print times to be accurate as well.

Model: Multi-color Pegasus with Cloud by Snapmaker
Another strong point of this collection is its educational value. These models provide useful clues on how to slice our own designs. Even after 10 years in 3D printing, I found myself learning something new, particularly in the way supports were generated for the Pegasus features. In this case, a thin layer (in yellow filament) was added between the model and the supports, making them much easier to remove once the print was complete. It is a small detail, but one that makes a noticeable difference in post-processing. Always something new to learn.
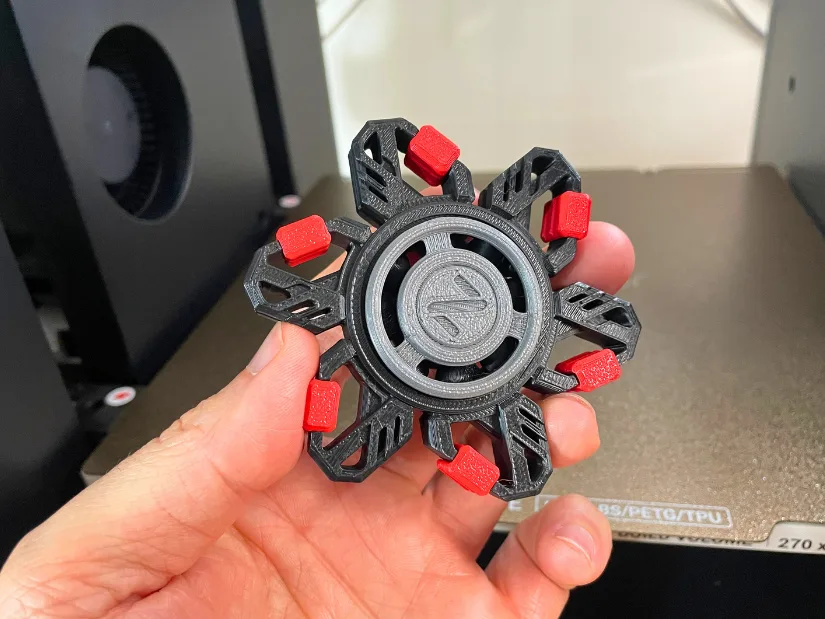
Model: Mecha Fingertip Gyroscope by JINQITOYS
This collection included a fidget spinner, which was also a pleasant surprise. I remember printing many fidget spinners for the guide in the past, often relying on metal bearings to make them functional. Here, the bearing is printed directly in place using plastic, with no assembly required. This is a great example of what makes 3D printing stand out from other manufacturing methods; everything is produced in one go, with zero post-processing needed.
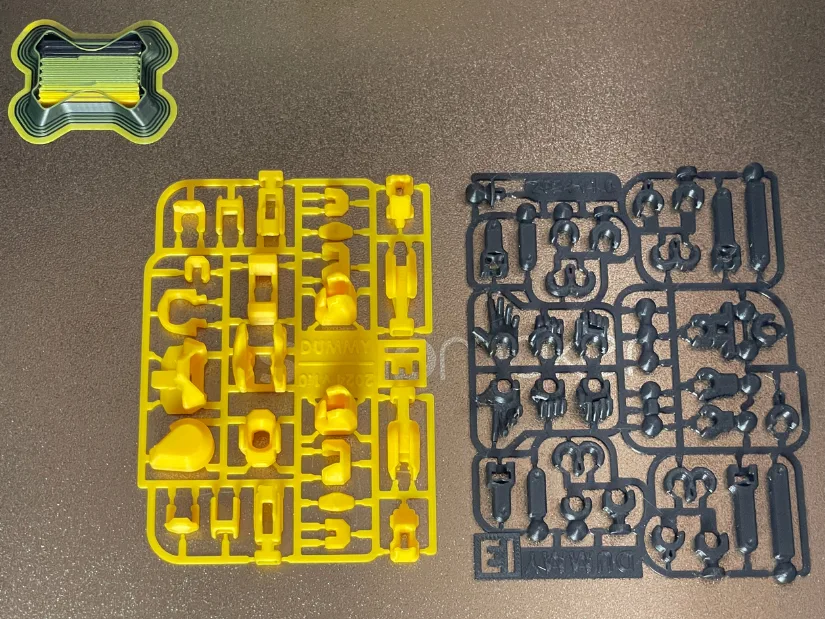
Dummy 13 by Lucky13Toys may feel intimidating at first. When fully assembled, it looks like a model with many tiny parts that could be challenging for bed adhesion. In practice, this was not the case. The model is designed as a set of two kit cards, meaning all parts are connected during printing. It still serves as a good test for bed adhesion on the U1, but the process felt stable and predictable.
Overall, it is a great model, and I am glad I finally printed and assembled it. I can see why it is so popular in the community. The quality is excellent, and the final result looks impressive. Assembly took some time, following instructions from Printables and a YouTube video, but the process was straightforward.
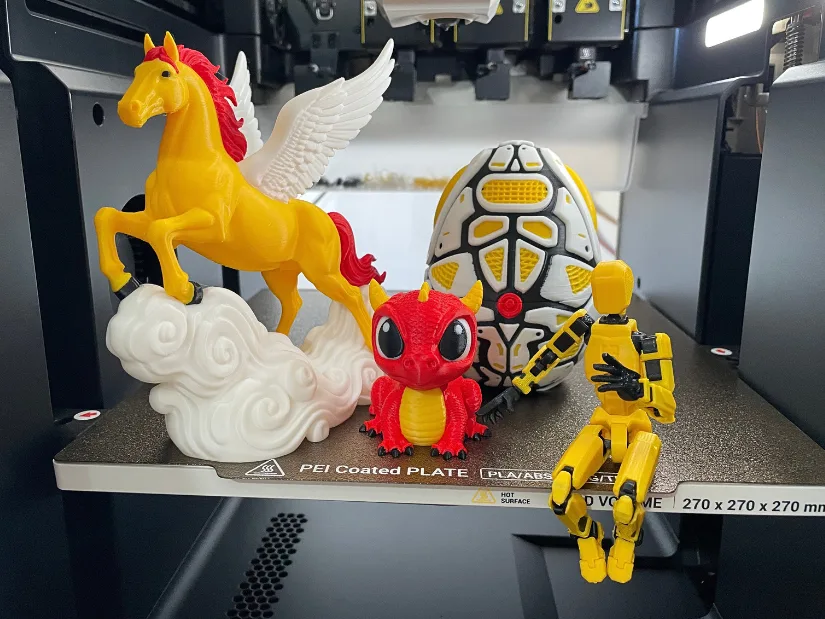
I also printed Cute Dragon by IK3Digital and Mecha Snake Egg by JINQITOYS. Both models printed exceptionally well, with clean color transitions and solid overall quality. You can see these and other models in action in this short YouTube video.
Well done, Snapmaker. This level of collaboration with designers is impressive and not something we often see. U1 users will clearly benefit from having access to such a well-prepared collection of 31 models.
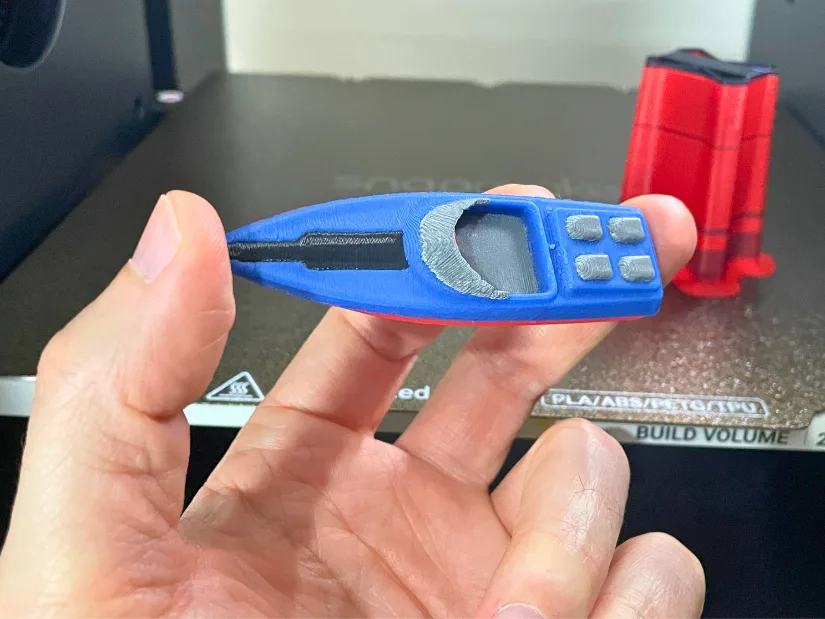
Model from 3D Scan – DeathRacer Keychain
For a more practical test, I used one of my existing 3D scan projects, a DeathRacer model scaled down into a small keychain. This type of model is far from ideal, with uneven surfaces, required supports, and small details, making it a good test case.
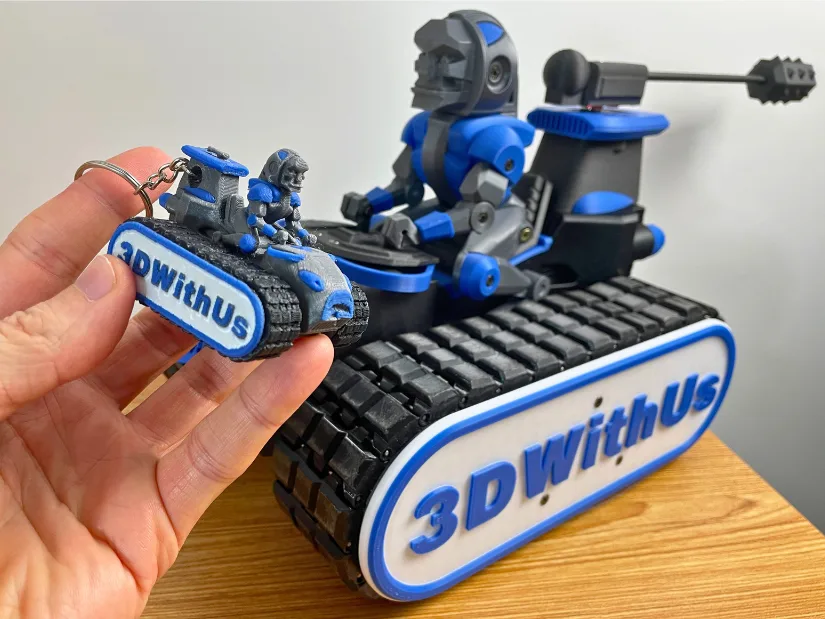
DeathRacer Piranha Build by OFF●SET on Printables
©3DWithUs – Print and Photo: Max Funkner
This model was 3D scanned using the Einstar Rockit and then significantly scaled down into a keychain. Even at this reduced size, a surprising amount of detail was preserved by the Snapmaker U1. Small elements, such as the Piranha teeth damaged in battle at SMRRF 2026, were still clearly visible.
Initially, I tried to print this object flat, which turned out to be a mistake. The scaled-down DeathRacer tracks are very fine, which resulted in a lot of post-processing. Printing at a 45-degree angle was the right approach. While it slightly increased the print time to over 7 hours due to the taller build, the overall result was much cleaner. The model was printed using the 0.16 mm Snapmaker Optimal preset for U1.
Overall, I am very pleased with how this project turned out. From slicing in Snapmaker Orca to the final print, the entire process felt smooth, with no issues during tool changes or multicolor transitions. The most time-consuming part was the color painting; I probably spent a few hours on it, but it was a calming experience.
Note: The hole for the keyring was created in Blender using a Boolean operation. I hope a Mesh Boolean option will be implemented in Snapmaker Orca soon, as that was the main reason I had to switch to Blender for this and similar keychain projects. It would save time, especially since the option appears to exist but is currently greyed out.
This is where 3D scanning for 3D printing shines. Even though a keychain like this is not the most functional use case, it still gives me a real sense of satisfaction. After spending almost a year building the DeathRacer (here are the quote posts chain on X) and taking part in the battle at the SMRRF, having a small piece like this feels meaningful. Highly likely, I will keep it as a souvenir, maybe even as a Christmas tree decoration.
Model from 3D Scan – RC Boat Miniatures
Before scanning and printing miniature from the DeathRacer, I worked on a number of RC boats from a local boat club, using different 3D scanners. What started as a small side project last year has slowly turned into a hobby, and now I have a growing collection of these miniatures. Many of these boats are quite unique.
This particular miniature was created by scanning an RC boat using the 3DMakerpro Toucan. Follow the link to read more about the scanning process if you’re interested.
I was particularly looking forward to revisiting some of these models with the Snapmaker U1. Converting them into small keychains using a simple Boolean operation in Blender worked well. Normally, printing objects under 100 mm in multicolor would result in a lot of purge waste. With the U1, the process felt much more efficient, with the purge tower being the only noticeable waste, while the prints themselves remained clean and quick to produce.

The next model is a miniature based on an RC boat prototype. I originally scanned this object while testing the Revopoint INSPIRE 2. While the geometry is simpler, it still serves as a good test for multicolor transitions and overall surface quality at a reduced scale. More details about the scanning process can be found in the related guide.
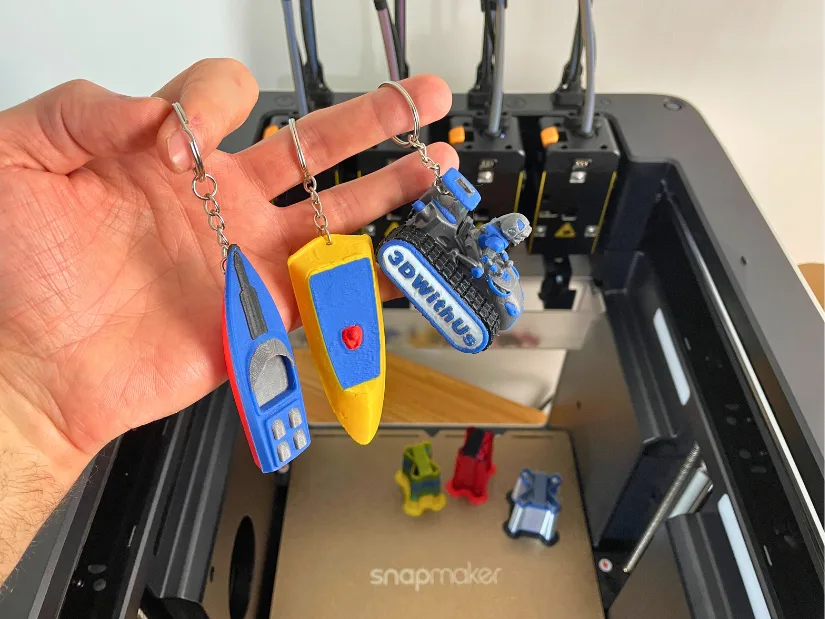
As with the DeathRacer miniature, these RC boat models also carry some sentimental value. Scanning each object takes time, and over that process, a certain connection is built. Turning them into small keychain miniatures feels like a natural extension of that work. It is a simple idea, but one that works well. The collection is slowly growing, and each piece has its own story. Recommend.
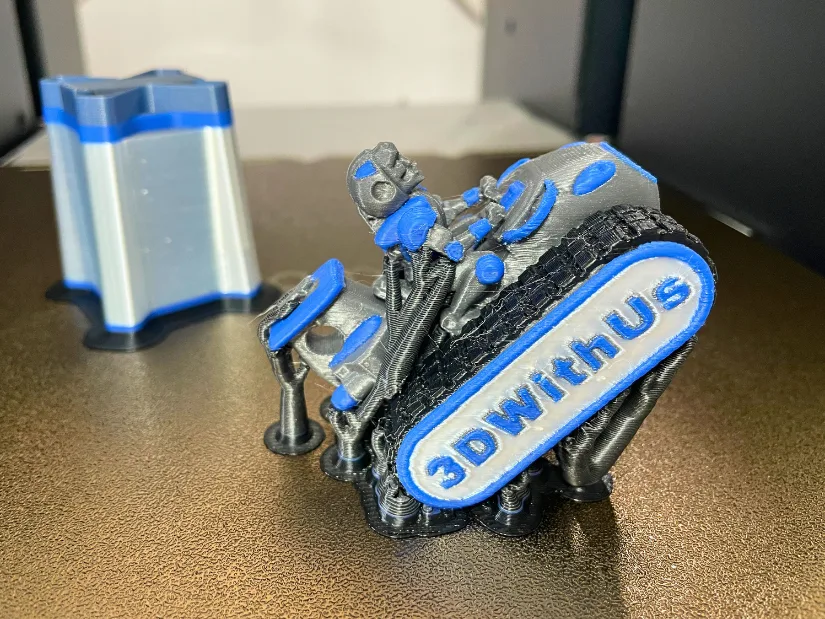
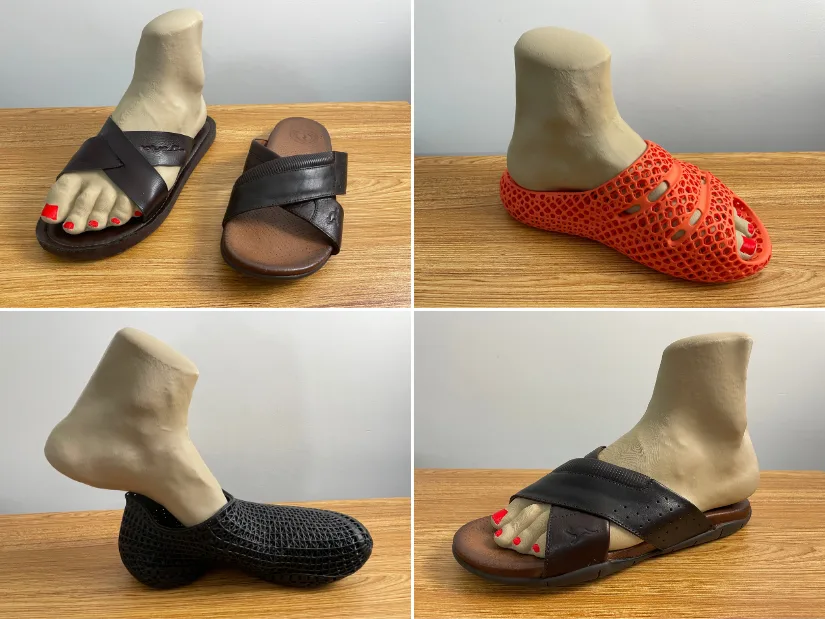
Large Print – Scanned Foot
One of the larger and more unusual test prints on the Snapmaker U1 was a 3D printed foot model, created from a scan made with the Revopoint POP 4 scanner. The original idea was to use the scan-to-print workflow as a simple shoe-stretcher experiment. It was not the most practical method compared to a proper shoe stretcher from Amazon, but it became a useful case study for combining 3D scanning, 3D printing, and fit testing.
The print itself was a good stress test for the U1. The model was relatively large, organic in shape, and included small color details in the form of red printed nails. The red nails printed surprisingly well, although from a practical point of view, this was not the most efficient choice. Adding a second color increased print time, purge waste, and the risk of failure. If I wanted the same effect again, painting the nails afterwards would probably be the smarter option.
©3DWithUs – Print and Photo: Max Funkner
This test also connected nicely with the scanning side of the workflow. The scanned foot was not a perfect replica, especially around the sole area, but it was accurate enough to create a physical model for footwear-related testing. For more details about the 3D scanning process, color scanning, shoe-stretcher experiment, and the POP 4 workflow, check my full Revopoint POP 4 Review.
Marker towers: The small marker blocks shown here are actually purge towers from Snapmaker U1 color prints. Instead of recycling them away, I reused them for POP 4 marker tracking, and the angled shapes worked surprisingly well as a DIY alternative to a dedicated marker block kit.
Compare to Other 3D Printers
At 3DWithUs, we have tested a variety of Snapmaker machines over the years, including the Original Snapmaker and the Snapmaker Artisan. The closest comparison to the U1 within the Snapmaker lineup would be the IDEX system on the Artisan. One feature that stood out to me was the swappable nozzle system, where the entire extruder could be changed as a single unit, allowing for quick adjustments such as switching to a wider nozzle.
Here are a few related articles you may find helpful:
In 2025, Snapmaker made a strong impact on the 3D printing market with a highly successful Kickstarter campaign for the U1, attracting 20,680 backers and over $20.6 million in funding. By the time of writing, the machine is fully released and available through official website.
At the time, the Prusa XL was the main consumer-facing toolchanger system on the market, setting a benchmark for this approach. The Snapmaker U1 enters this space with a different focus, aiming to reduce filament waste and simplify multicolor printing through a compact and more accessible system. With a significantly lower price point, it positions itself as a more approachable option for a wider range of users.
If you are comparing across different price ranges, you can explore our broader guide here: Budget FDM 3D Printers
Compared to AMS-style systems, the toolchanging approach used by the U1 reduces material waste, though it introduces mechanical complexity. In practice, it also offers a quicker multicolor workflow, especially for models with frequent color changes.
Have questions? Feel free to ask in the comment section below.
For a wider discussion or to share your own Snapmaker U1 prints, join us in the forum:
Conclusion and Pros & Cons
Snapmaker U1 Review
Review Summary
In my view, the Snapmaker U1 is a very strong entry into the toolchanging space. It is surprisingly user-friendly for a system of this type, and the overall workflow feels well thought through. From setup to printing, everything works in a consistent and predictable way.
The collaboration with talented 3D designers is a particularly smart move. Having a curated library of pre-sliced models not only helps new users get started, but also showcases what the machine is capable of. It is no surprise that the U1 is gaining a lot of attention on social media.
After a few weeks of use, I can say that I like the direction Snapmaker is taking. The app and Snapmaker Orca work well together, color changes are intuitive, and print monitoring via camera is reliable. Notifications and timelapse features also work as expected. Overall, it feels like a complete and evolving ecosystem rather than just a standalone machine.
Pros:
- Reduced filament waste compared to traditional multicolor systems
- Fast and clean toolchanging approach
- Compact footprint for a toolchanging printer
- Strong ecosystem: App, Orca slicer, and model library
- High-quality pre-sliced models from well-known designers
- Beginner-friendly setup and guided workflow
- Reliable print monitoring and notifications
Cons:
- Lighting inside the enclosure could be improved (single-side LED)
- Noticeable noise during tool changes
- Mesh Boolean feature in Snapmaker Orca not yet available
- Timelapse recording is not enabled by default