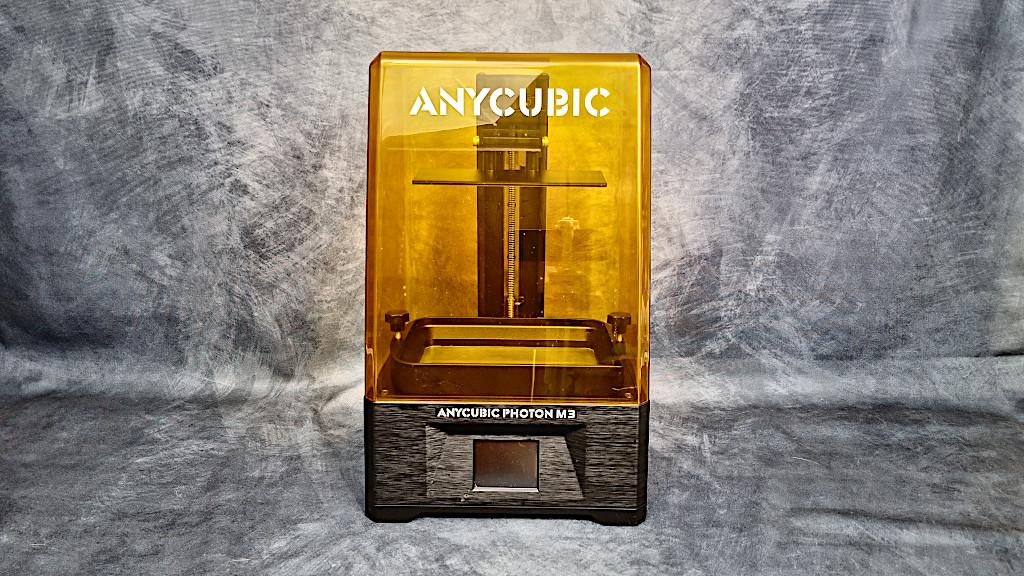
The Photon M3 from Anycubic is a cutting-edge MSLA 3D printer. It meets all of the current resin 3D printing trends with its mid-range build capacity, 4K+ screen, and monochrome display. The Anycubic Photon M3, housed in a beautiful black frame with a simple user interface, is capable of generating high-quality prints with minimal effort. Let’s take a look at Photon Workshop Slicer, play with the settings and print a few high detailed models.
Anycubic Photon M3
Price: $187-299

Amazon
AliExpress
Official Website
Photon M3 Specifications
7.6” Monochrome LCD screen
Laser-etched build platform
build volume: 163 x 102 x 180 mm
Anycubic LighTurbo Uv Matrix LED
4K+ screen: 4098 x 2560 px
Screen protector pre-installed
Horiziontal accuracy: 40um
Vertical accuracy: 10um
Print speed: ≤ 5 cm./hr. ≤ 1.97 in./hr.
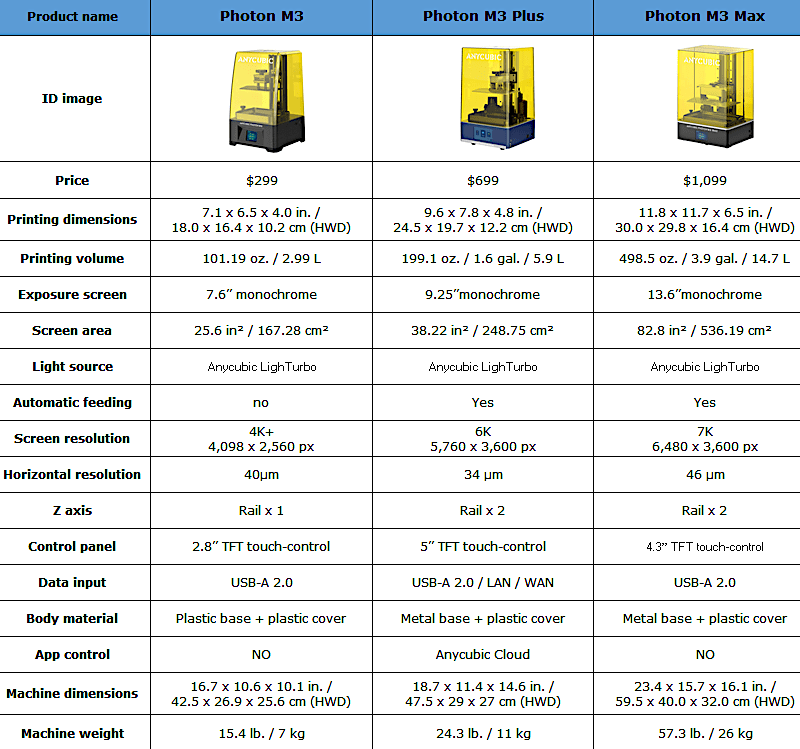
Photon M3 Comparison Table
Anycubic LighTurbo UV Matrix
The M3’s main feature is a 7.6-inch monochrome LCD display. Monochrome displays have quickly become the new standard for current MSLA 3D printers. Faster curing times, less energy consumption, and a longer lifespan than previously utilised RGB-screens are only a few of the advantages.

© 3DWithUs – Photo: Will Zoobkoff
With Anycubic LighTurbo, the Anycubic M3 uses a parallel light matrix. UV light in RGB screen printers is virtually underutilised since the LCD filters out the majority of it, lengthening each layer’s curing time and causing the screen to deteriorate faster. Curing periods can be reduced from 6 seconds to 1.5-2 seconds per layer using mono screens with significantly improved (UV-) light permeability.

© 3DWithUs – Photo: Will Zoobkoff
Monochrome screens typically last about 2000 hours, which is four times longer than their non-mono counterparts. Anycubic gives the user-customizable intensity control for the M3 and lowers the UV-light level to 70–80% to extend the longevity even more.
M3 Resolution and Build Volume
The screen boasts a 4K+ resolution of 4098 x 2560 pixels, which are dispersed across a printed area of 163 × 102 mm, giving an XY-pixel size of 40 microns — on par with similar mid-sized competitors. The Photon M3 has a total build capacity of 163 x 102 x 180 mm.

© 3DWithUs – Photo: Will Zoobkoff
Thanks to a single linear rail and anti-backlash nut combination, the Photon M3’s Z-axis travels with steadiness and precision. The build plate levelling on the Photon M3 is straightforward, as it is on most MSLA printers. Loosen four screws, home the plate on a piece of paper, apply light pressure, and tighten the screws again.

© 3DWithUs – Photo: Will Zoobkoff
Overall, the style and form of the Anycubic Photon M3 are exactly what you want in a resin 3D printer. The sturdy chassis houses the 2.8-inch colour touchscreen in the front and the USB port on the right side, and it’s topped off with the Anycubic-like yellow removable lid: no surprises here, just a classy design with a slight curve towards the top of the cover.
Unboxing, Setup and Review

© 3DWithUs – Photo: Will Zoobkoff
• Power supply
• Spatula tool
• Plastic scraper
• Three pairs of gloves
• Three resin filters
• Resin vat
• Aluminum laser engraved build plate
• Printer
• UV Cover
• Allen keys
• Screen protector
• User manual
• Level Sheet
Photon M3 Bed Levelling

© 3DWithUs – Photo: Will Zoobkoff

© 3DWithUs – Photo: Will Zoobkoff
AnyCubic is known for making high-quality 3D printers with low setup requirements. Remove the Photon M3 from the package, place the printer on a level surface, and turn it on, just like any other AnyCubic printer. The first step is to level the build platform with the accompanying sheet of paper. Now that the platform is in place, loosen the four screws on the bed to allow the bed to slide up and down. When you hit home, the bed will lower onto the sheet of paper on the screen.

© 3DWithUs – Photo: Will Zoobkoff
Once the bed is in position, apply light pressure and tighten them. Once everything is in place, push the z=0 button to complete the levelling operation. Then the resin vat is then bolted in place, and it’s just a case of following the brief instructions on screen, making sure the build plate is tight and the cover is on. You’re now ready to print.
Anycubic Photon Workshop Slicer Settings
The Photon M3 keeps things as easy as possible, so after the initial successful print, I decided to try printing a few more models. Importing into the Anycubic Photon Workshop Slicer was simple enough to browse all of the functions and features, including density, position, and drainage holes, among others.

Screenshot: Photon Workshop Slicer

Screenshot: Photon Workshop Slicer

Screenshot: Photon Workshop Slicer
The only difficulty I had was with the supports, as the auto support option was a little erratic, and it took a few tries to get the support amounts to be consistent. I eventually discovered that I could tweak the settings to achieve the desired effect, and the models began printing without problems after that.

© 3DWithUs – Photo: Will Zoobkoff
High-Quality 3D Printing
After the models had been printed, washed, and cured using the Anycubic station, I examined them and found them to be of high quality. The 4K+ screen produces some of the cleanest and sharp details I’ve seen on SLA. The lines and surfaces are smooth, and while there are some minor blips on the supports, they are minor and easily removed. Overall, the print quality is excellent, and the print difference in quality between this and an FDM 3D printer is remarkable. Layer markings are less defined, and models can be printed with a greater degree of complexity. I printed a few test models and found the overall quality to be excellent.

© 3DWithUs – Print & Photo: Will Zoobkoff

© 3DWithUs – Print & Photo: Will Zoobkoff

© 3DWithUs – Print & Photo: Will Zoobkoff
All featured models were printed in Anycubic Craftsman grey resin, read more about the Craftsman resin and check the settings in the review on 3DWithUs.
There are, however, a few notes on the prints. Supports are critical to the success of your prints, so take the time to ensure that there are enough of them and that they are all in the right place. While the application auto supports are good, the settings require some fine-tuning to get them just right. When it comes to support removal, it’s best to do so after washing and before curing; once cured, the resin plastic becomes extremely hard.
The most important thing to do is sieve the resin every three to four prints to remove the plastic flecks that can form in the resin. It’s a messy business, but once you get the hang of it, it’s relatively quick and easy. It’s also a good idea to do this if you leave the resin in the vat for more than 24 hours. After more than 48 hours in the open, I discovered that the resin should be discarded. When it comes to ease of setup and use, there are a few flaws, and you can be up and running with your first print within 30 minutes of opening the box.

© 3DWithUs – Print & Photo: Will Zoobkoff
General Tips & Tricks
When compared to FDM printing, it’s mainly smooth sailing, but there are a few peculiarities and a step-by-step learning curve. To begin, the build plate level is crucial; even if it is slightly off, you will fail. Additionally, exposure times and lift speeds have a significant impact on print quality and success rate. If you’re having failures despite the fact that your plate is level, you may require more exposure time or a slower initial lift speed. Similarly, after each print, strain or use the scraper to pull out any parts that have fallen into the resin. Be careful not to scratch or scrape the FEP itself; I prefer to clean my vats with a silicone spatula. If the resin vat contains any hard residue, the build plate will not lay flat and your print will fail.

© 3DWithUs – Print & Photo: Will Zoobkoff
Finally, resin printing improves with practice, and the more you use the software and understand how to apply supports properly, the more successful you will be. To get the greatest results, you’ll need to tilt your models, add rafts, and support them, but you’ll also need to experiment, which means a steep learning curve for those new to resin printing. In the end, there’s not much that can go wrong after you learn to deal with the resin, keep things clean, and develop a logical workflow. The initial mess and attempts were well worth it; the prints are of amazing quality, coming as near to injection moulding as you can get from home. I would definitely recommend the Anycubic Photon M3 if you want to make the transition from FDM to SLA.
Anycubic Photon M3, Photon M3 Plus, and Photon M3 Max Comparison
Anycubic has released three printers in the Photon M3 line: the Photon M3, the Photon M3 Plus, and the Photon M3 Max. Please find the differences in the table below.
Compare to Other 3D Printers
Compare to the similar volume resin 3D printers in the same price range:
Compare with other Anycubic Photon M3 printers:
- Read more: Photon M3 Plus Review
- Read more: Photon M3 Max Review
Amazon
AliExpress
Official Website
Anycubic Photon M3 Review
Review Summary
Overall, the style and build of the Anycubic Photon M3 are exactly what you want in a resin 3D printer: the neat design of the machine and high-quality 3D printing. The size is perfect for printing high detailed figurines and could be great as a starter 3D printer. Also, it is a good choice if you so far have been working only with FDM.
PROS:
– 4k+ resolution
– Laser-etched build plate
– Bed always straight due to lip on arm
– Easy to clean build plate
CONS:
– Mess as with any sla printer
– Cleanup

Hi! Do you think this worth paying 70 bucks over mono 4k? It will be my first machine but I can’t decide between Mono 4k and M3.