
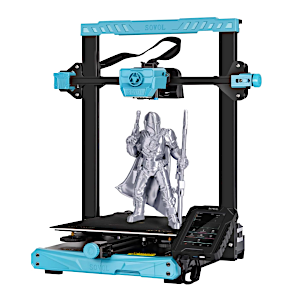
As the consumer desktop FDM 3D printer market undergoes the ‘print speed race,’ Sovol was one of the first manufacturers to offer Klipper firmware-enabled technology on budget 3D printers. The feature-packed large build volume Sovol SV07 Plus was recently released. Let’s review the machine, print some awesome and challenging models, check some slicer settings, share some tips, and outline the Pros and Cons.
Table of Contents
- Specifications
- Unboxing and Assembly
- Accelerometer – Input Shaper Calibration
- Automatic and Manual Bed Leveling
- Klipper, Fluidd and Wi-Fi
- Slicer Software Profiles
- Automatic Pause for the Filament Change
- Test Prints
- Compare to Other 3D Printers
- Conclusion and Pros & Cons
Sovol SV07 Plus Specifications:
Firmware: Klipper
Build Volume: 300 x 300 x 350mm / 11.8” x 11.8” x 13.7”
Dual-Gear Direct Drive Extruder
Bed Leveling: Automatic/Manual
Print Speed: Max – 500 mm/s, (Recommended – 250 mm/s)
Max Temperature: 300°C
Triple Cooling
Material: PLA, ABS, PETG, TPU, Nylon, Other
Reversible Flexible Textured PEI Build Platform
Tool Drawer
Connectivity: USB, Type-C, Wi-Fi
Interface: 5-inch Klipper Screen
Price: $309-379
Product affiliate links:
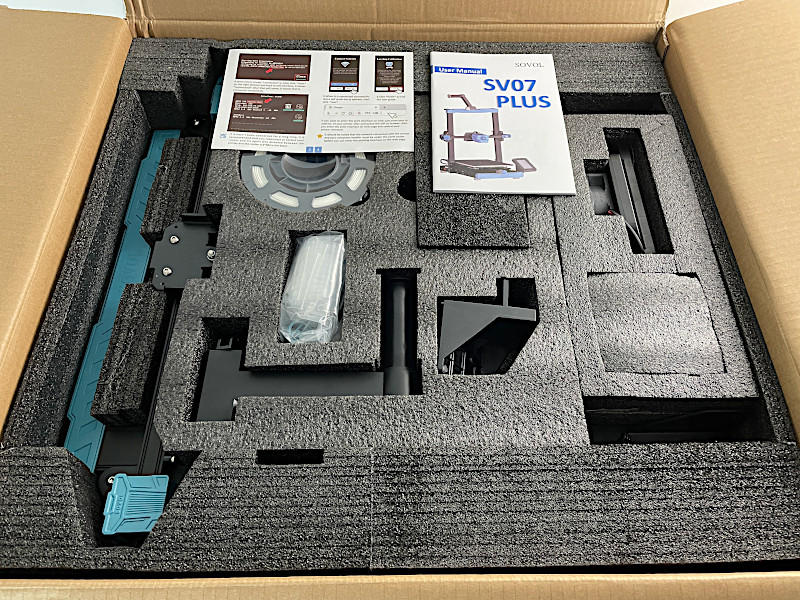
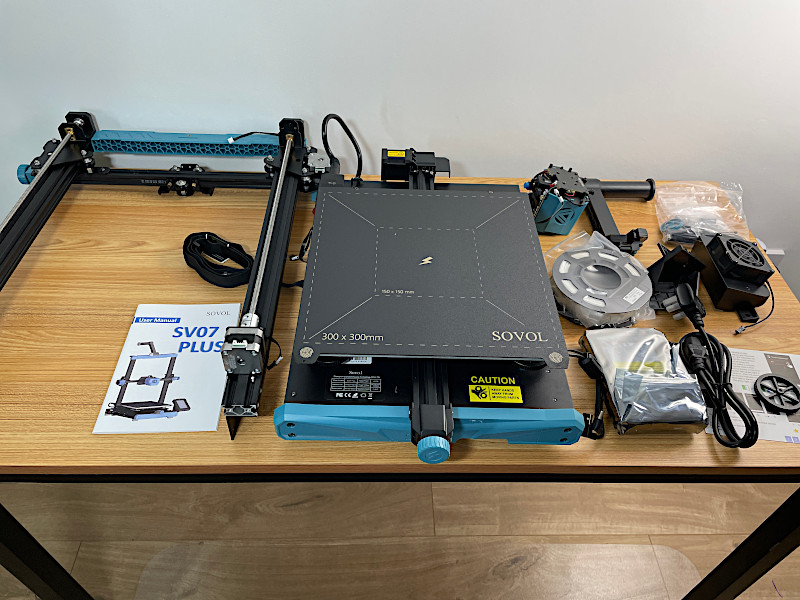
Unboxing and Assembly
The machine arrived in a branded box with a lot of foam to ensure the safety of the parts. The printer’s big parts gave me the impression of a professional machine rather than one for hobbyists. It took me roughly 20 minutes to assemble the machine, and then another 40 minutes to calibrate the bed.
©3DWithUs – Photo: Max Funkner
My table was just about right for assembling and hosting this plus-size printer.
– Tool Drawer. Tools and spare parts were found in a dedicated tool drawer just in front of the machine.
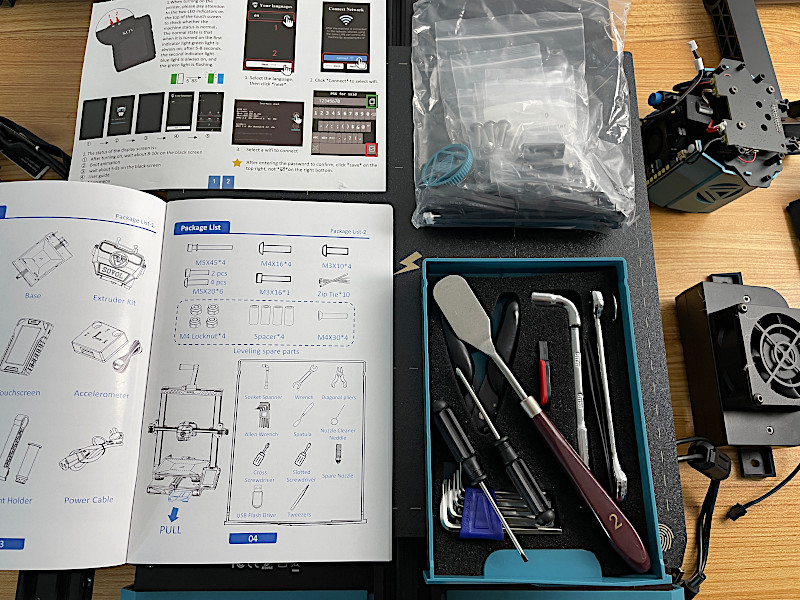
– Guide. Overall, the guide was clear, and the only section I would suggest they improve is where to tie and secure the extruder cable.
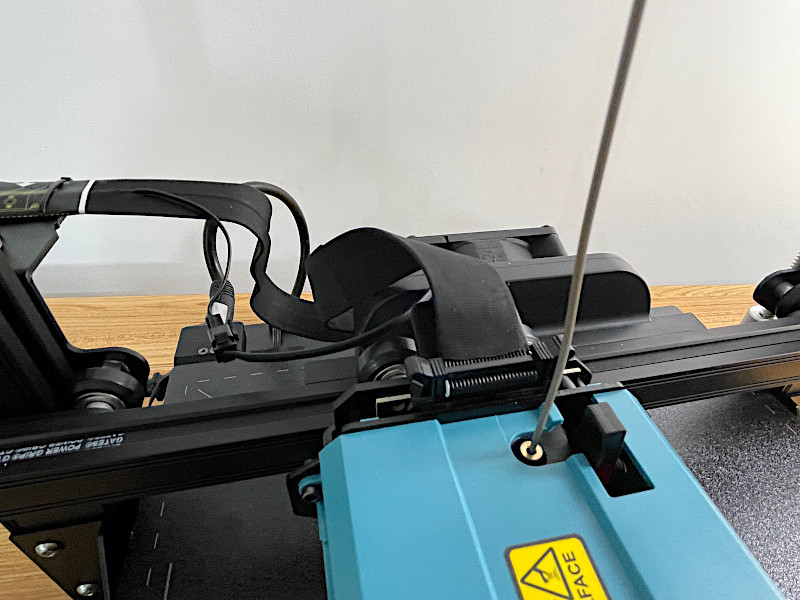
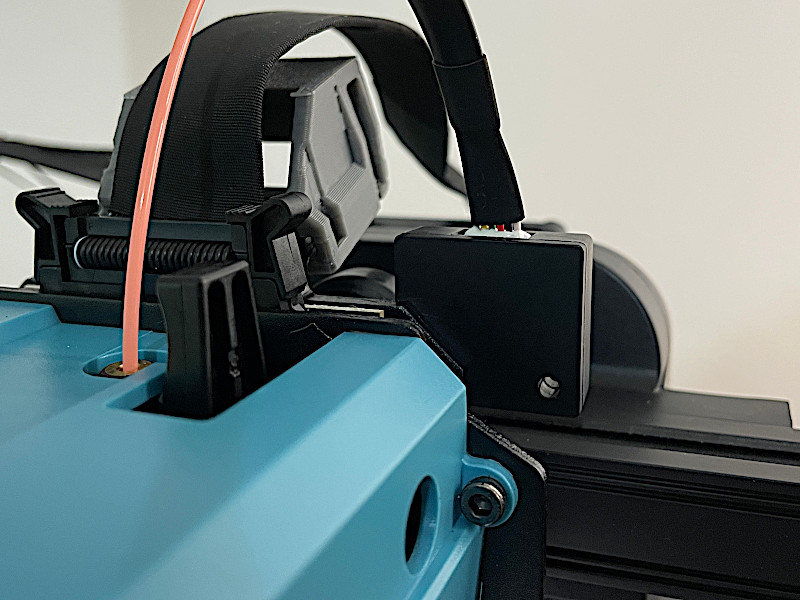
– Extruder cable. I found that the extruder ribbon cable is too loose, rubs against fan parts, and may even catch the print in some circumstances. I briefly Googled and found that there are printable solutions available to maintain the cable, more or less. Moreover, Sovol added ‘Cable Buckle’ as a test file to print.
Accelerometer – Input Shaper Calibration
A tiny device, an accelerometer, was in the package. This device is supposed to help configure Input Shaper, one of the main Klipper features that helps to preserve print quality during high-speed printing. Initially, as this module was marked in the guide as optional, I skipped the process and printed a few models without Input Shaper calibration. Both 3DBenchy and Autodesk/Kickstarter models printed well at high speeds. Apparently, my machine was calibrated well at the factory.
©3DWithUs – Photo: Max Funkner
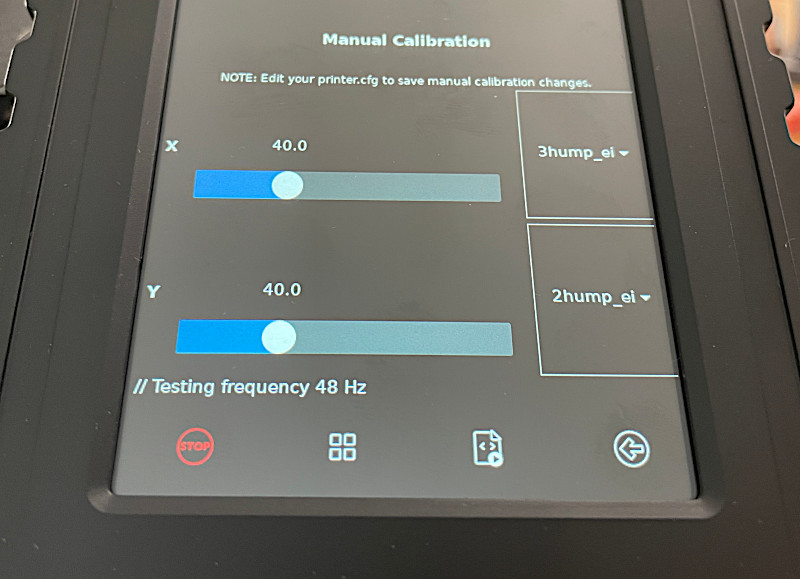
For review purposes, I tried Input Shaper calibration anyway. To perform Input Shaper calibration, after the accelerometer is assembled on the X or Y axis, go from the Home screen to Configuration, then to Input Shaper, and then to Auto-calibrate – Measure X or Y accordingly. The printer will perform a measuring process. After the process is done, the UI will ask to save the new configuration.
©3DWithUs – Print & Photo: Max Funkner
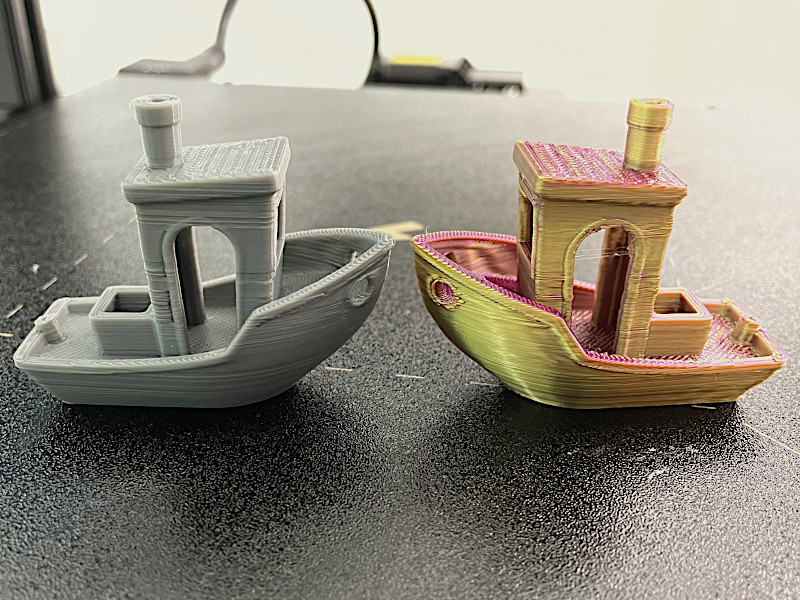
Both 3DBenchy and Autodesk/Kickstarter test files didn’t show a significant difference in print quality before and after Input Shaper calibration. This feature is quite new; I will edit this review if there are any changes in Input Shaper performance.
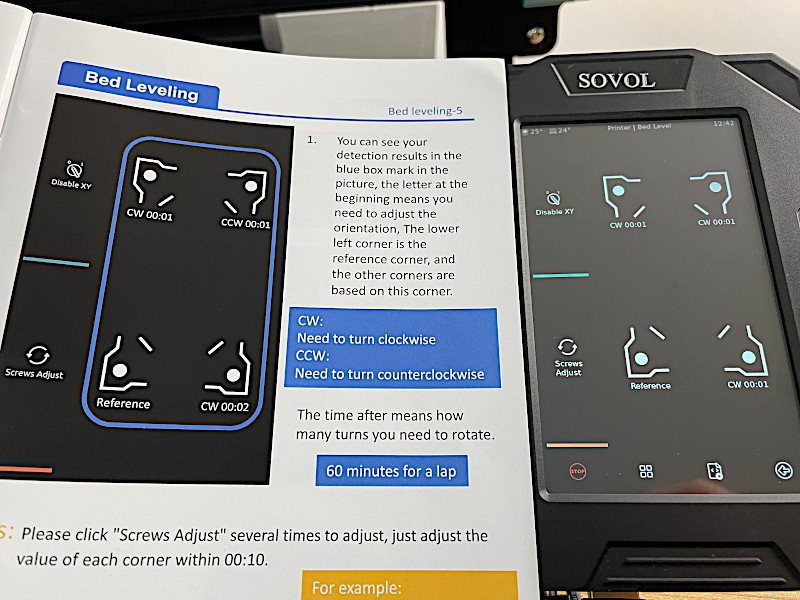
Automatic and Manual Bed Leveling
It took me longer to calibrate the bed because I was unfamiliar with the Klipper firmware touchscreen. Also, it is important to do as the instructions suggest: ‘Tighten all leveling nuts counterclockwise until they are as tight as possible, then turn them clockwise to loosen two turns’.
©3DWithUs – Photo: Max Funkner
The ‘Bed Level’ option on the touchscreen was particularly useful, and I haven’t seen such a function anywhere else yet. Namely, when pressing ‘Screw Adjust,’ the printer performs calculations at three corners, showing the offsets instantly on the screen. This feature was quite useful for me, and I leveled the bed successfully.
©3DWithUs – Photo: Max Funkner
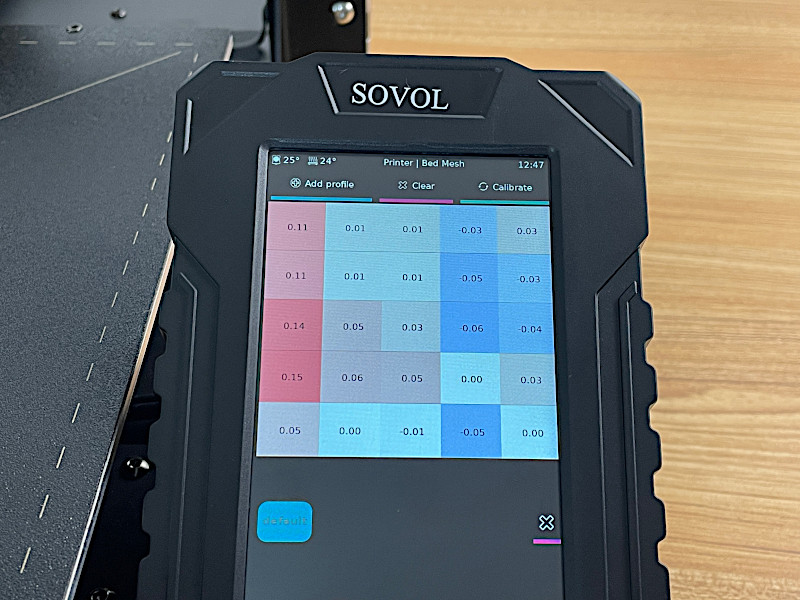
Then, after the manual process is done, it is possible to double-check and save the Bed Mesh. The printer will perform a 25-point automatic calibration, and the Bed Mesh results will be available to see.
Noise
The machine is noisy, especially when printing at high speeds and with the big fan ON. Apparently, this is the new normal for all machines that have entered the ‘print speed race,’ as the last three Klipperized machines I tested had the same issues. To maintain a speedy flow and high temperature, bigger fans are involved. The noise from vibration is also significant.
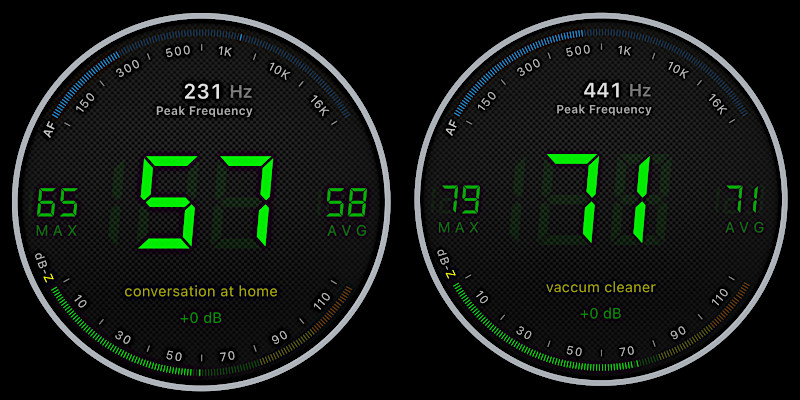
– Noise reduction tips. One of the noise sources is a massive fan in the middle of the X-Axis, and it is possible to tune it slightly down during printing. This will significantly reduce dB levels. Another tip would be installing a noise damper by using protective foam and stone slabs underneath the 3D printer, similarly to how I did for my old Original Prusa i3 MK2.5S. Of course, an enclosure would reduce the noise even more, but building an enclosure for a plus-size 3D printer may be space-wise challenging.
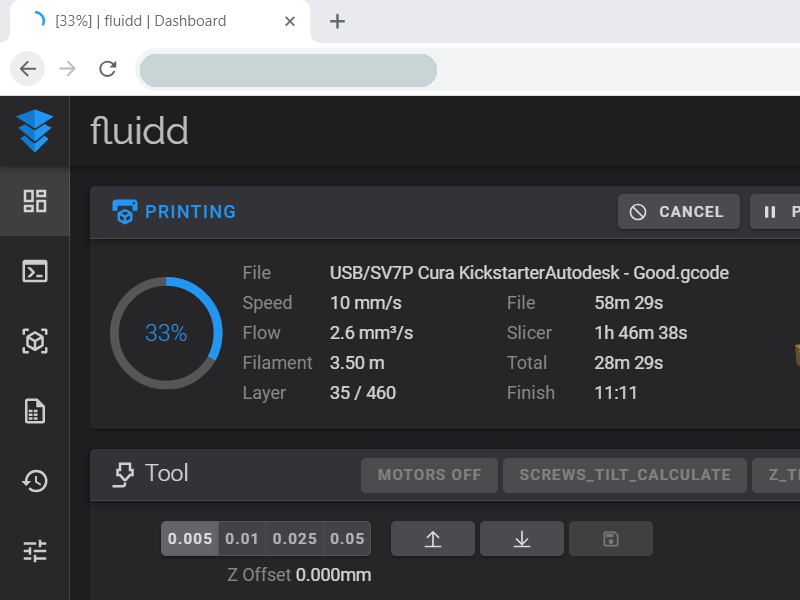
Klipper, Fluidd and Wi-Fi
I used a USB stick for a few prints before testing the Wi-Fi option and it also worked OK; the prints were done, but then I didn’t use all the features that Klipper and its browser interface, Fluidd, offered to me. It was easy to set up the Wi-Fi connection following the instructions on an extra leaflet provided. Once I switched to Wi-Fi connectivity, I immediately forgot about the existence of the USB stick.
Preview: Fluidd
As I work on my laptop in a different room, Wi-Fi connectivity works better for me than the Ethernet connection offered on the Elegoo Neptune 4 Pro, for example. Having a Fluidd tab open allows me to check regularly on ongoing print jobs.
In a few words, Klipper’s Input Shaping and Pressure Advance functions are the main culprits behind the recent ‘print speed race’ by many consumer FDM printer manufacturers, by effectively reducing errors and improving print accuracy at high print speeds. On top of everything, it is an open-source firmware that gets developed further by manufacturers and the community.
If needed, Klipper-enabled extruders can also be calibrated similarly to Marlin. Here is the Extruder Calibration Process for Klipper Firmware.
Slicer Software – Sovol SV07 Plus Profiles
Since the machine was recently launched, I could not find fine-tuned Sovol SV07 Plus profiles, except in the included Sovol3D version of Cura. Even if the majority of tasks can still be completed without issues, such a Cura version is still outdated and may lack the sophisticated new additions that the Cura and PrusaSlicer teams keep adding to their slicers.
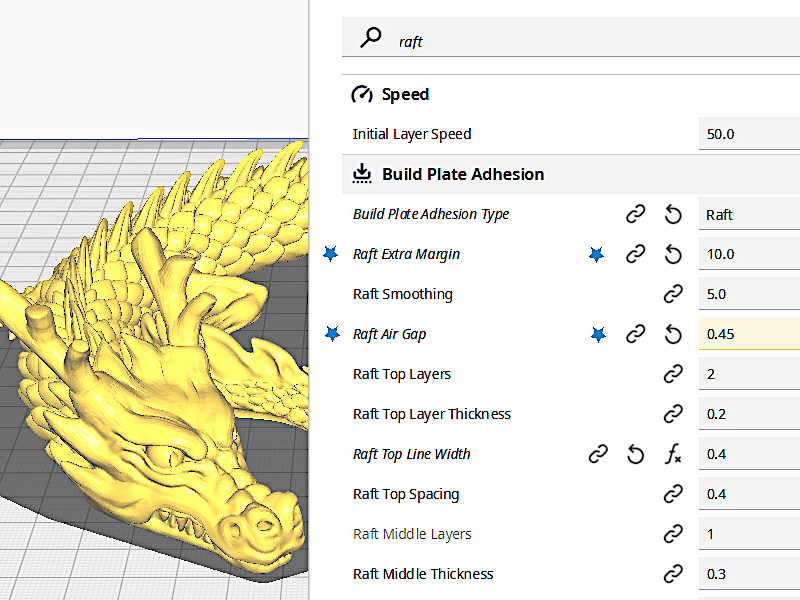
Nevertheless, I successfully printed some complex models with some tuning. I printed in ‘Spiralize Outer Contour’, adjusted Raft settings for a specific filament for a multi-part object, and implemented the ‘Pause on Specific Layer’ command.
Preview: Cura
As I failed to remove the articulated dragon from the raft in one case I increased the ‘Raft Air Gap’ setting from 0.3mm to 0.45mm. I called it an adjustment for the specific filament as my SUNLU marble filament didn’t need such adjustment while normal SUNLU filament needed. Please find the results of the Articulated Dragon print below.
I turned once to Simplify3D for its manual supports for my specific model, as there was no SV07 Plus profile available yet; I used the existing Sovol SV07 profile instead. Worked well.
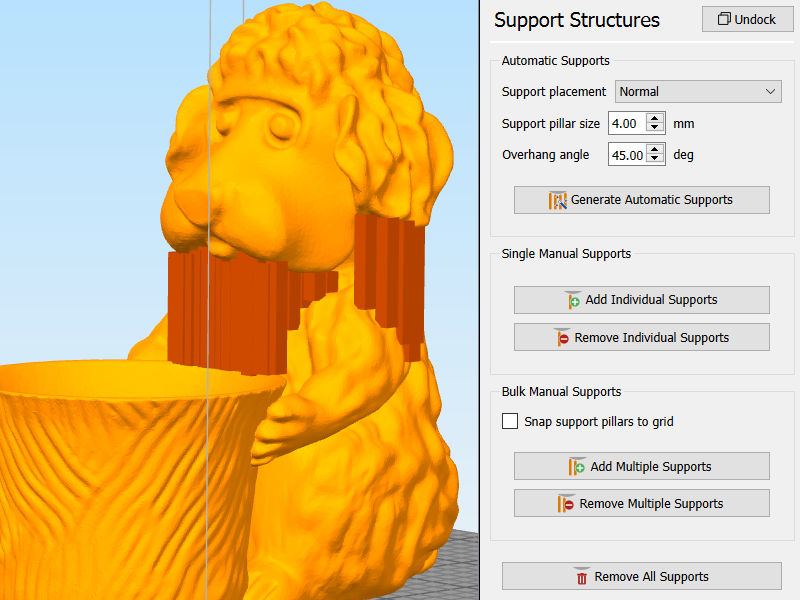
Yes, there are still cases when manually placed supports beat the sophisticated tree supports offered by Cura and PrusaSlicers. Apart from Simplify3D, such manual support placement can be used on free ideaMaker software. To stay updated, here is the list of existing slicer software.
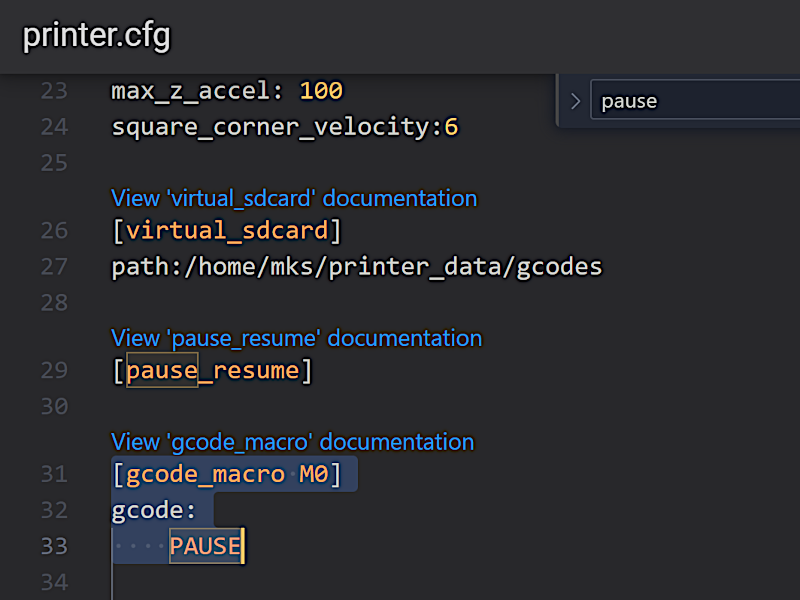
Automatic Pause for the Filament Change on a Specific Layer
In various slicer software, it is possible to add an extra command that would automatically pause the printing process at a specific height or layer for a filament change. For printers with Marlin firmware, such commands were M600 or M0, but these commands don’t work on Klipper firmware. Here’s a tip to work around it.
Preview: Fluidd
I did the following, and it worked for me.
– Tip. Go to In Fluidd -> Configuration -> printer.cfg. Then, after pressing Ctrl+F, type ‘pause’ into the search. This will lead you to the [pause_resume] area.
Add the following code, as shown in the screenshot:
[gcode_macro M0]
gcode:
PAUSE
Click the Save & Restart button in the upper right corner.
Then, in Cura, go to Extensions -> Post Processing -> Modify G-Code -> Pause at Height.
I prefer ‘Layer Number’ over ‘Layer Height’ as it allows me to double-check it in the slicer preview to ensure I am switching at the correct layer.
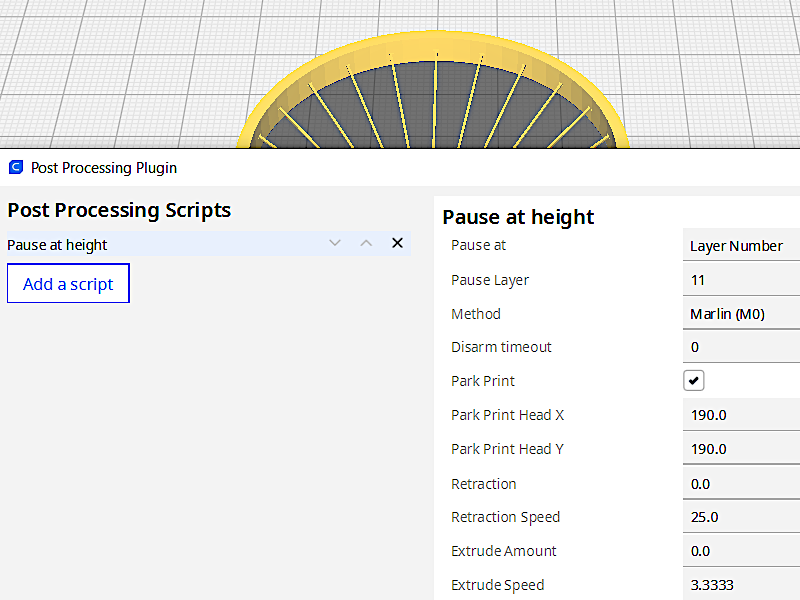
Preview: Cura
When the pause is triggered, the extruder will move away from the print, and the temperature will start dropping. Heat it up again and extrude until the color/material changes. Resume the print. Just before the extruder moves, try to catch excessive filament from the nozzle with tweezers.

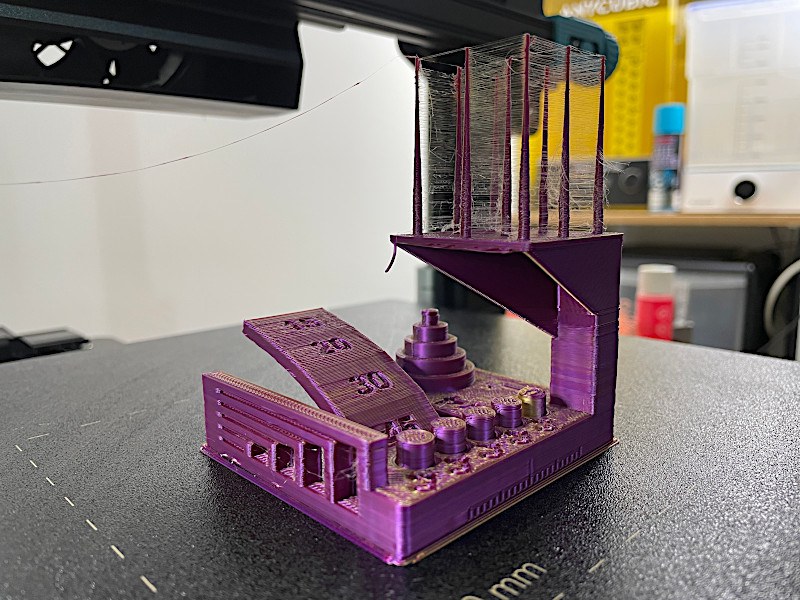
3D Model by 3DPrintBunny on Thangs
©3DWithUs – Print and Photo: Max Funkner
This is a quick, 6-minute String Test model by 3DPrintBunny. The color swaps from gold PLA to purple PLA. This print also tested the machine’s ability to print long bridges/strings at high speed. To print such strings successfully, the layer height was increased to 0.3mm and the ‘Print Thin Walls’ setting was turned ON.
Test Prints
Most prints are sliced using the default profile settings I found in the included Cura slicer software. The Sovol SV07 Plus, via the Klipper Screen and Fluidd interface, offers many features and possibilities for tuning the print settings live if needed. Overall, I am happy with the results. As I continue testing it, I may add some extra prints in the future.
3D Model on Printables
©3DWithUs – Print and Photo: Max Funkner
Apart from a quick Benchy, one of the best test prints is the Kickstarter & Autodesk Collab 3D Printer Test model. Why is this print challenging? It tests bridges, overhangs, tolerances, and more, all at a high speed. It came out well, apart from some stringing at the end, which I believe can be eliminated with further fine-tuning of filament settings. It’s impressive, considering the print was completed in just two hours on such an inexpensive machine.

©3DWithUs – Print and Photo: Max Funkner
Here is an example of a double fail in one print. Not only did this print’s bed adhesion fail, but I also couldn’t remove the part from the raft. The issues were addressed and the slicer software was tuned. For extra adhesion, I used Magigoo from Amazon. I truly like this glue and keep applying it to all types of print sheets I’ve dealt with recently, especially when a multi-part print job is involved. To ease the part removal from the raft, I tuned the Cura slicer ‘Raft Air Gap’ setting from 0.3mm to 0.45mm. The SUNLU Pink and Grey PLA fuse together extremely well. As I mentioned before, the same brand’s Marble PLA works well with 0.3mm.
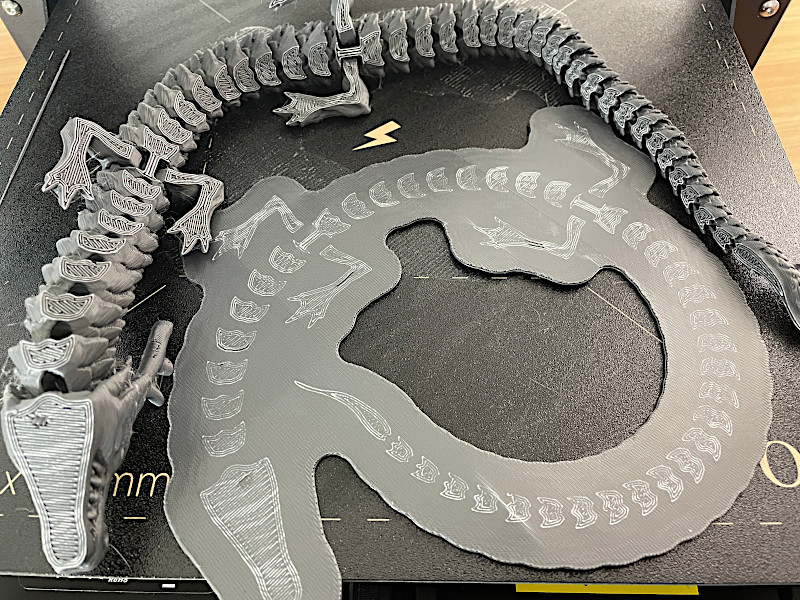
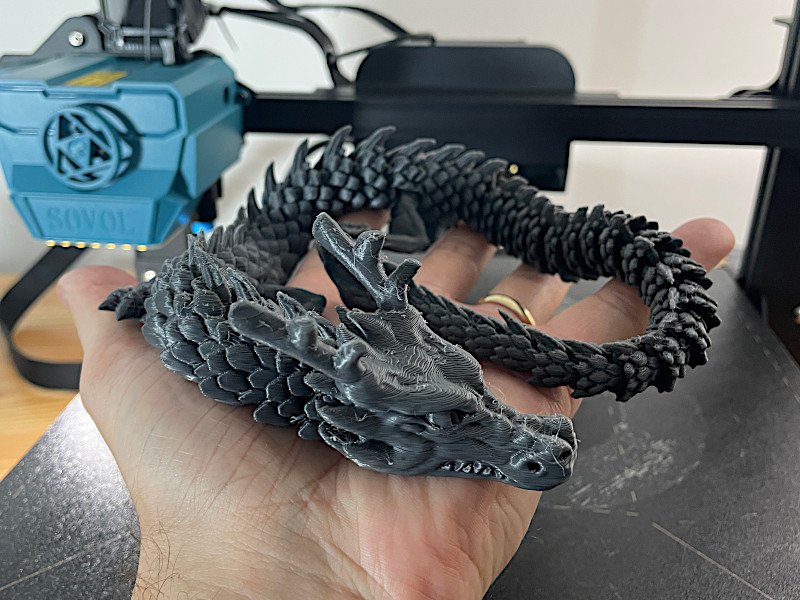
3D Model by McGyBeer on Cults
©3DWithUs – Print and Photo: Max Funkner
One of the best ways to torture test a 3D printer is to print flexible articulated dragons. On Klipperized printers, printing such challenging models has become easier as the print time is greatly reduced. If previously such a print took me 18 hours, now I printed it with a raft included in only 9 hours. I absolutely love the result.
The print had a little bit of cobweb that I removed with a heat gun (can also be done with a regular fan) very quickly. Printed in SUNLU Grey High-Speed PLA from Amazon.
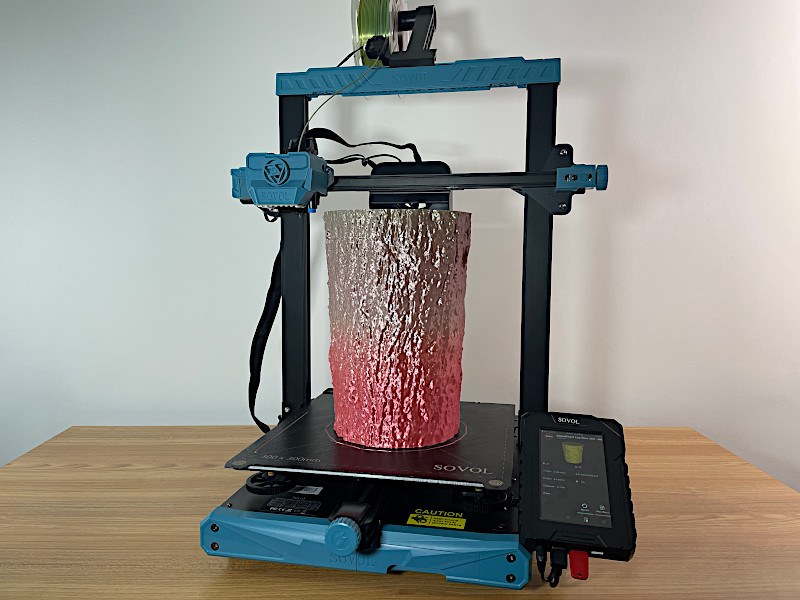
Tree Trunk Scan Collection on Cults
©3DWithUs – Print and Photo: Max Funkner
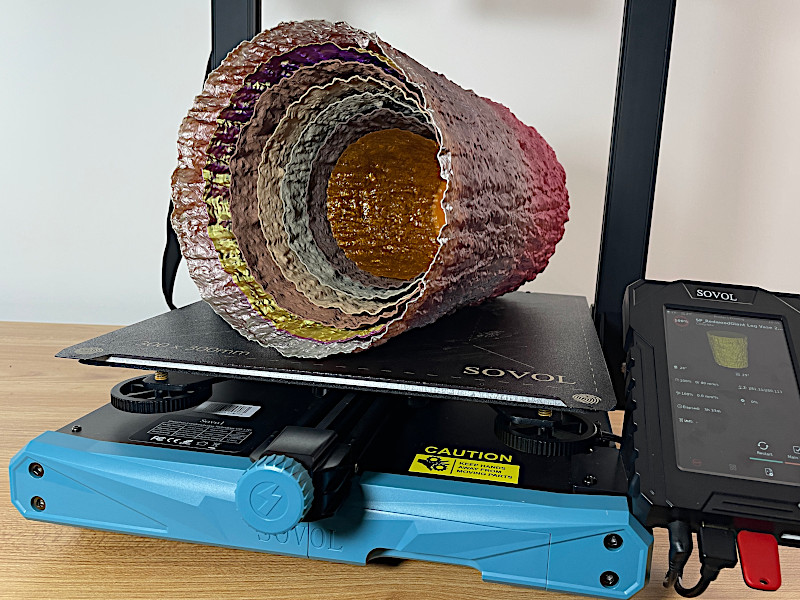
To feature the large build volume (300 x 300 x 350mm / 11.8” x 11.8” x 13.7”), I printed a Redwood Giant Tree Trunk Vase. Such vases are easy to print with both wood and flexible filaments. In the image above, vases of different sizes and materials are stacked together. Cura setting: Spiralize Outer Contour.
3D Model on Cults
©3DWithUs – Print and Photo: Max Funkner

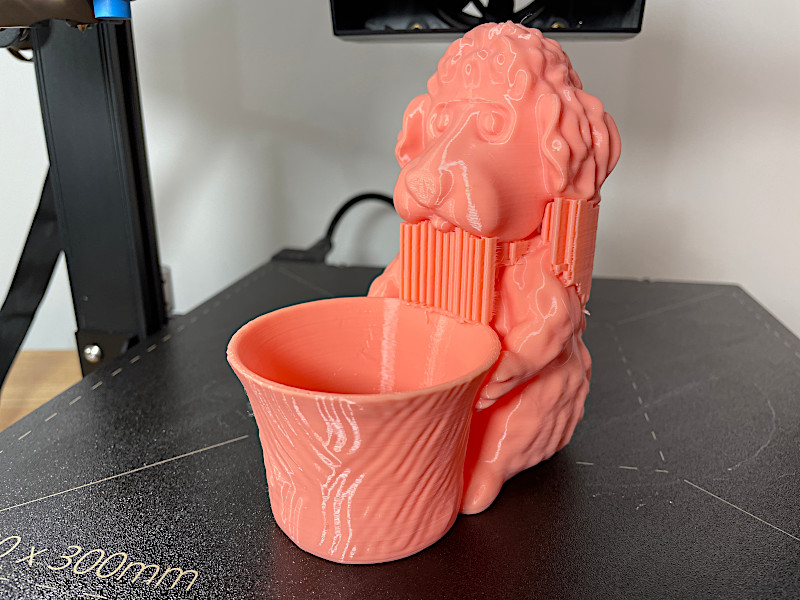
To test manually placed supports in Simplify3D/ideaMaker and their removal from the print, I often print my ‘Dog The Gardener’ model. I am very happy with the result. Printed in SUNLU Pink PLA.
3D Model on Cults
©3DWithUs – Print and Photo: Max Funkner
The next model is a Post-it Note Holder printed in Marble SUNLU PLA. It was printed in 1 hour using default settings. This model should be printed on its back without adhesion settings, but Magigoo or other glue should be applied to the bed just in case. Also, the ‘Wall Ordering’ setting should be ‘Outside to Inside.’
Compare to Other 3D Printers
Compare to the similar volume budget FDM 3D printers in the same price range:
The Sovol SV07 Plus, Elegoo Neptune 4 Plus, and Anycubic Kobra 2 Plus entered the market at the same time, so these are the machines to watch in this build volume and price category. All these versions have Klipper versions, and therefore there is no point in comparing them to last year’s printers. In terms of build volume, the Creality K1 Max also falls into this group, but it is much pricier.
Compare to other Sovol SV series 3D printers:
Sovol has been on the market since the last decade and they launched a lot of SV series machines. Check out their previous 3D printers here.
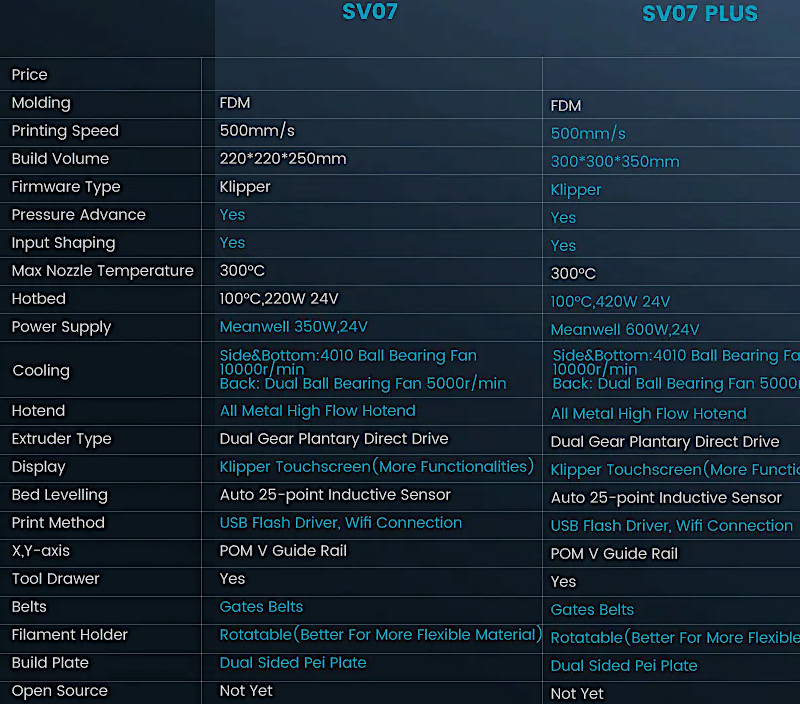
Image: Sovol
Review Conclusion and Pros & Cons
Sovol SV07 Plus Review
Review Summary
The Sovol SV07 Plus gave me the impression of a machine for professionals and workshops rather than beginners, primarily because of the machine size. But also because of the vast amount of features for calibration and tuning both before and during the printing process. Klipper firmware enables fast speeds and stable quality, and together with the user-friendly interface, it contributes towards an overall positive experience, and it will be hard to go back. On top of that, the machine comes with a competitive price tag.
Pros:
Price
Klipper
Large Volume
WiFi
Cons:
Noise
Extruder Cable Management


I have bought the Sovol SV07 Plus and sad to say that I beleive I have wasted my money. There has been an extremly high failure rate with this machine. I have had to have the control board replaced after the first one kept crashing. The bed leveling system had to be reset after every attempted print. I have have the machine change the position of the base in the middle of the print several times. The program failedevery time if there machine had to restart (filament runout, power failure). I have continualy trying to get this machine to work and chased numerous “fixes” to sort the problems. I can see only one use for this and that is as an ancor for a boat.