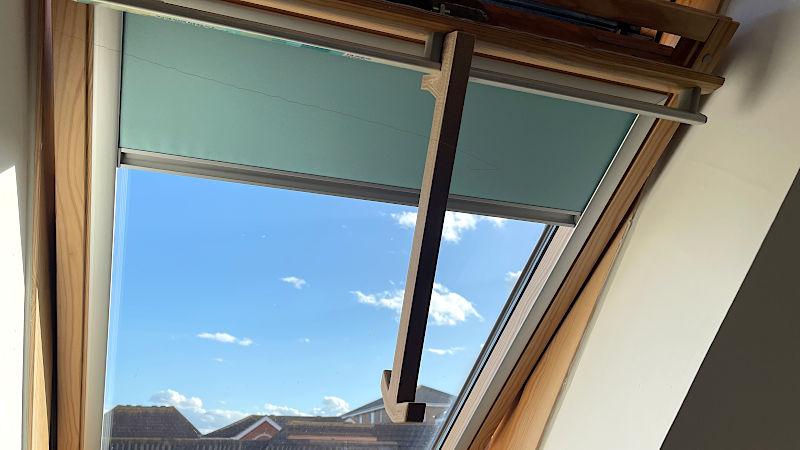
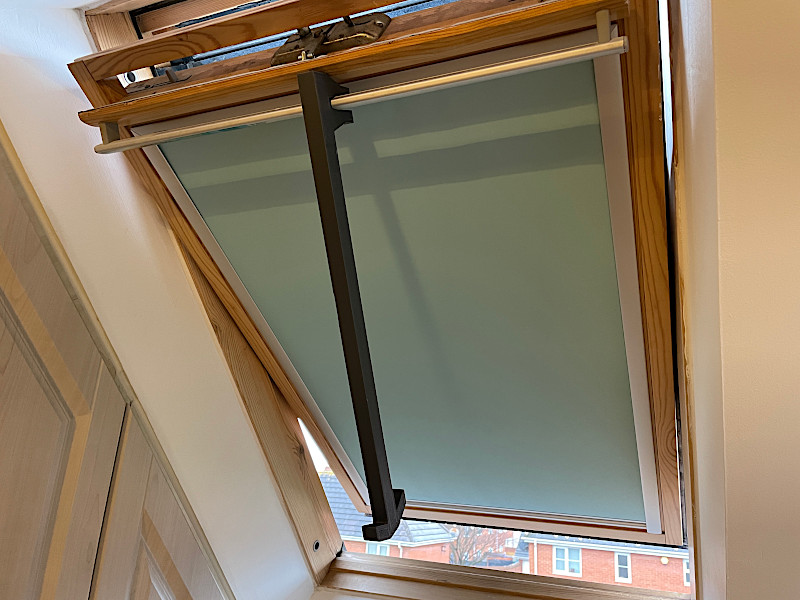
If someone asks me what is the most used object that I have ever 3D printed, I would answer that it is a roof window handle extension – a customized tool that helps me and my family to open and close windows in a bathroom and bedroom that are too high to reach. Luckily, our roof windows are not very high and I was able to 3D print this tool on a Plus-size 3D printer. In this article, I will go into detail describing the life-improving idea and what’s involved when designing, slicing, and printing such a heavily used, 3D printed at home, object.
This Guide Covers (Jump to a Section)
- Telescopic Poles and Adapters
- Designed in Blender
- Material of Choice
- How to Print – Slicer Settings
- 3D Printer of Choice
- 520mm Print on Neptune 4 Max
- Assembly
- Conclusion & Files
Disclaimer. The object described in this article is only an idea with an example STL file. The design is in testing and we won’t bear any responsibility for any accidental damage to the property if such occurs.
Disclaimer. Before printing this item, make sure the measurements match your specific window handle.
Telescopic Poles and Adapters
There are an official pole and adapters available for a particular window type usually found in lofts or attics. These would work in most cases, especially with the higher-positioned windows. But, when a roof window is used daily, our custom handle extension solution may be worth looking at. As a bonus, there is no need for a long pole that takes extra space to keep.
Before going further, there is one thing that is important to mention in any case. Maintain your windows by applying some lubricant solution to the hinges once in a while.
Designed in Blender
Once I started exploring Blender, I prefer to stay on it as it is a sandbox and has it all. As usual, it all started with the cube which got expanded, sides and faces extruded into a lever-looking object. The top part was measured to fit the original window handle and the rest of the object was stretched to fit the Snapmaker A350T build platform diagonally. The final object is 380mm (15 inches) long.
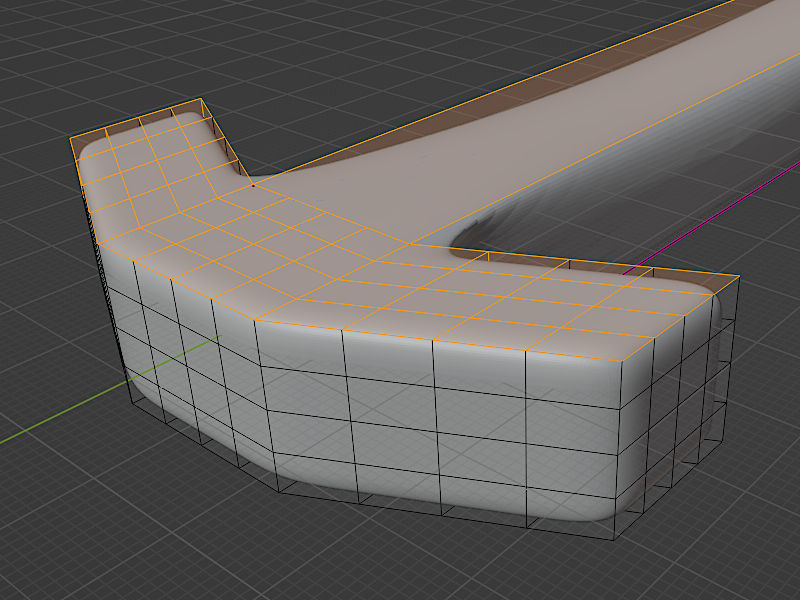
The Subdivision Surface modifier helped to smooth the sharp corners of the handle, while the Edge Crease option made sure the base of the object was flat and printable.
I think it is possible to make this object a bit fancier by adding a curve, for example, or applying some texture. As this object is still in the testing phase I left it as it is.
Material of Choice
For the testing purposes, I used the material I had. And below are the results. Please mind that we open our windows a few times per day.
Handle One
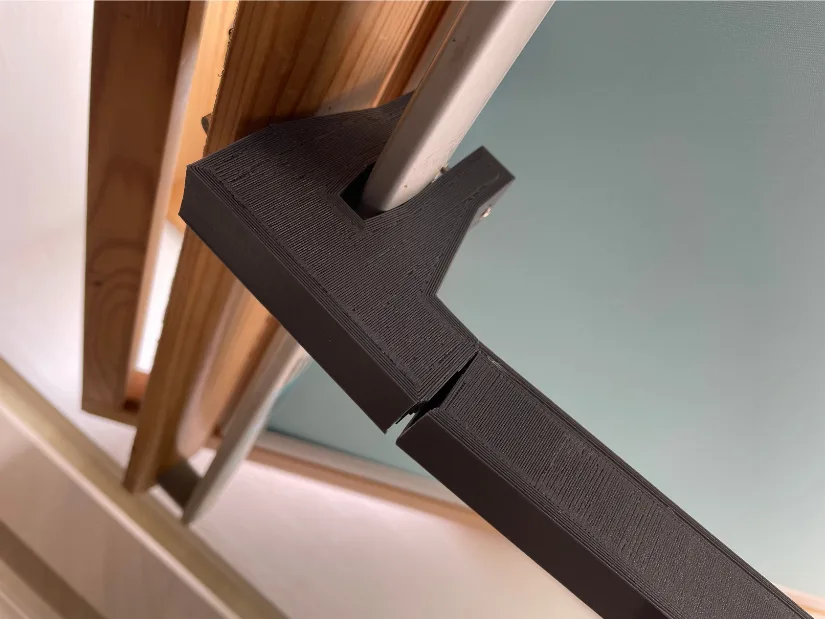
Material – PLA Plus. Environment – bathroom. I knew from the beginning that PLA will struggle to last long in a room with high humidity levels. So, the toughest I had was reinforced Black PLA Plus by SUNLU. This filament produces strings, requires higher temperatures, and has poor bed adhesion. Generally, the qualities are similar to PETG. Result – still works after 2 years (some visible cracks but still works).
Handle Two
Material: Wood PLA – failed after 9 months. Then print in ordinary PLA failed after 1.5 years.
Update: Engineering Grade Materials
While testing engineering-grade materials, one of our functional prints — a 3D printed roof window handle extension — failed after 1.5 years of daily use. It was originally made from PLA and couldn’t withstand the constant stress from frequently opening roof windows. Since I had a spool of Inslogic PC-ABS on hand (in white), I decided to reprint the part using that. After a few tuning attempts to get the bed adhesion right, the result was solid and functional.
These roof handles are definitely heavy-use, day-to-day functional parts — you can see them in action in this short video. Now that the design is printed in a much more reinforced filament, there’s hope it will last significantly longer. However, engineering-grade materials come with their own set of challenges: they require specific machines with reinforced nozzles, enclosures, heated beds up to 110°C, filament dryers, and proper bed adhesion solutions. If you’re interested in learning more about how to work with these advanced filaments, check out our full guide on Engineering-Grade Filaments, complete with settings, tips, and use case examples.
How to Print – Slicer Settings
FDM 3D printing has some weaknesses that should be addressed when slicing an object that will have to resist certain forces. Our extension handle should be printed horizontally only with many perimeter shells.
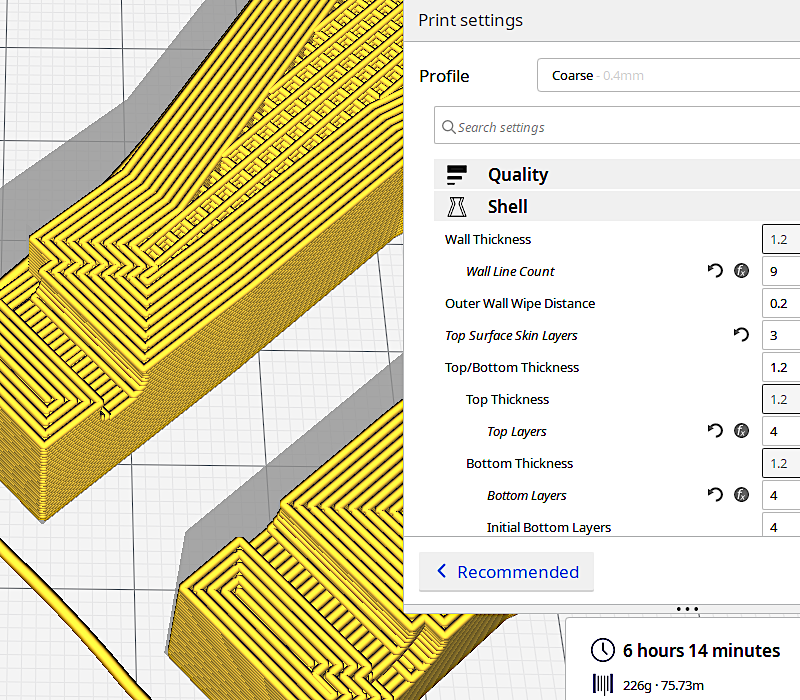
Excessive perimeter shells (wall line count) and high percentage infill add to the object weight and printing time. When I was tuning the slicing settings, I focused on the area where M3 40mm screw and M3n locking nut will sit. To make sure the plastic will be consistent there to melt properly and withstand certain forces.
3D Printer of Choice
As I mentioned before, the roof window extension handle was scaled to fit the print bed. Initially, it was the Snapmaker A350T 3D printer that the object had to fit. Snapmaker with the enclosed chamber can be good for printing such items in materials like ABS or Carbon Fibre-type filaments, for example. The controlled environment in the enclosed chamber helps against warping.
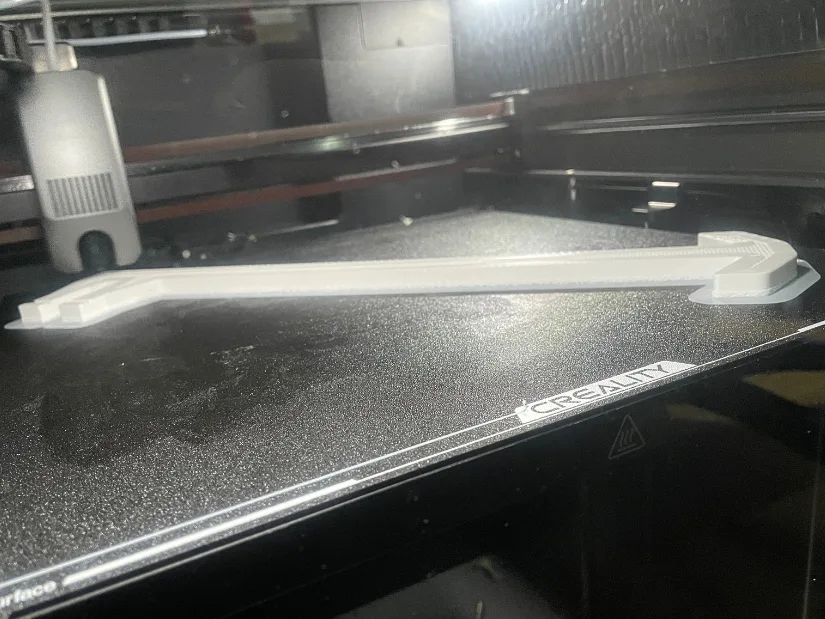
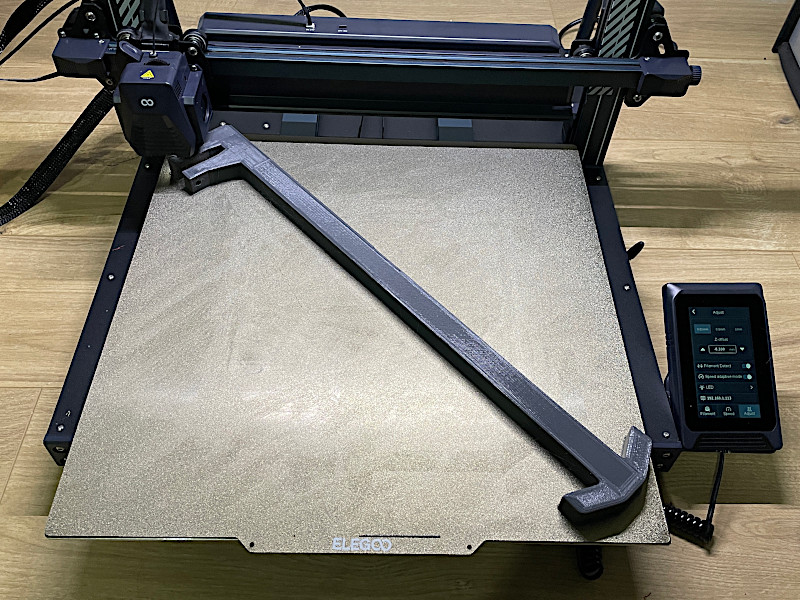
The second printer of choice was Elegoo Neptune 3 Plus. Luckily, the same STL, without scaling a model, fit the print bed diagonally.
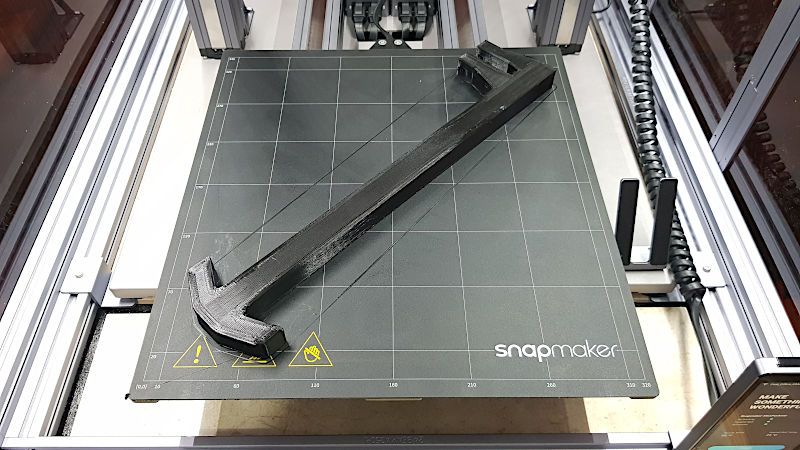
©3DWithUs – Print & Photo: Max Funkner
On large print beds like on Elegoo Neptune 4 Max (420 x 420 x 480mm), Anycubic Kobra Max (400 x 400 x 450mm) such a tool could be made even longer, approximately up to 500mm (19.6 inches) long.
There are 3D printers that are initially designed to print objects that are long but low. Such printers are highly likely to be custom-built, rare, and therefore be much more expensive than the sub-$500 3D printers I featured above. Belt 3D printers are suitable for printing such objects, but the resulting print will be very weak and might break quickly. The fusion between the layers will be much weaker compared to that when printing horizontally with the continuous flow.
3D Printing 520mm (20.5 inches) Handle with Elegoo Neptune 4 Max
My roof window handle, 3D printed on the Elegoo Neptune 4 Max, came out to be 520mm (20.5 inches) long, which is 140mm longer than what I printed on the Neptune 3 Plus. This time, to reduce the weight of the object, I printed it partially hollow. Check my hollow settings here. Let’s see if there will be any issues. Still testing…
©3DWithUs – Photo: Max Funkner
Just a quick note, for my continuous testing, this object is printed in PLA, but I would recommend printing such heavy-use objects in PETG or other stronger materials instead.
Roof Window Handle Extension Assembly
== DO NOT OVERTIGHT ==
The assembly is straightforward. I would recommend putting the nut in place before attaching the extension to the handle as it will be trickier to do afterward.
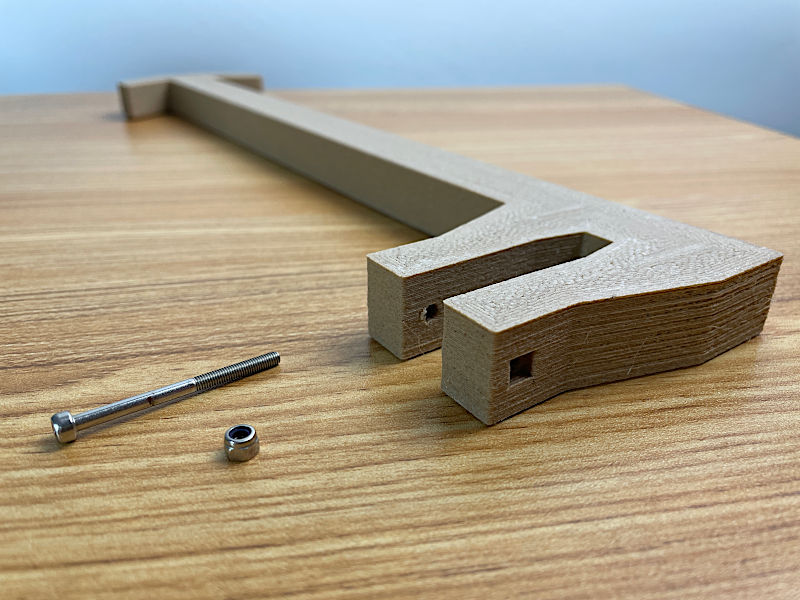
These are spare M3 bolts and nuts from my previous Prusa MK2 3D printer. Amazon’s equivalent: of the bolts and nuts.
The roof window handle extension in action
©3DWithUs – Print & MP4: Max Funkner
Conclusion and Files
This is an object that I use on a daily basis. I am very proud of this model and the idea, and that I had a chance to bring my design and 3D printing skills to something useful at home. In the comments below, please let me know if there is a possibility to improve such a model.
Files on Cults and Printables.
According to our 3D print cost calculator, this 3D print job costs $20.57 if printed in Timberfill and $8.90 in other inexpensive and less fancy materials.
Read more: Functional 3D Printing at Home – Useful 3D Prints
Functional 3D printing does not get the same publicity as printing for fun. The share of useful 3D prints in domestic 3D printing is growing but such models are not appreciated enough. In our opinion, both types of modeling are needed and it all goes in the right direction. Here is the list of ideas for practical 3D printing at home.