
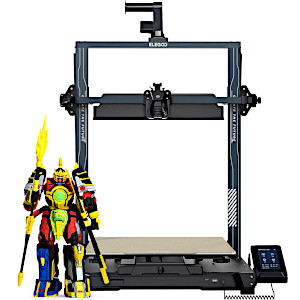
Elegoo Neptune 4 Max is the latest 3D printer in the series. As the consumer desktop FDM 3D printer market goes through the ‘print speed race’, Elegoo updated its Plus and Max size Neptune 3D printers to new versions. Klipper firmware-enabled technology, a higher-temperature dual gear extruder, and an extra cooling feature pushed the Neptune 4 Max to come with the default high printing speed. These are great additions to this machine as they greatly help to speed up the printing process for such a massive, 420 x 420 x 480 mm³ build volume. There are not many brands that offer such big volume printers for a budget price. Let’s review the machine, print some awesome and challenging models, check some slicer settings, and outline the Pros and Cons.
Table Of Contents
- Specifications
- Assembly
- Included Model Test Prints
- Slicer Software Settings Slicer and Tips
- 3D Printing with Different Infill Settings
- Automatic Filament Change Pause
- Other Test Models
- Filament Shelf Brackets in PETG
- Articulated Print-in-Place
- 3D Printing in Vase Mode
- Batch 3D Printing
- Compare to Other 3D Printers
- Conclusion and Pros & Cons
Elegoo Neptune 4 Max Specifications
Max Volume: 420 x 420 x 480 mm³ (16.5 x 16.5 x 18.8 inch³)
Max Speed: 500 mm/s (default 250mm/s)
Auto Bed Leveling: 121 Points
Dual Gear Direct Drive Extruder
Nozzle Temperature: Up To 300°C
Filaments: PLA/TPU/PETG/ABS/ASA/Nylon
File Transfer: WIFI/WLAN/USB (8GB Storage)
Klipper High-Speed Motherboard
Firmware: Klipper
Price: $470-$550
Product affiliate links: 3DWithUs is supported by its audience. Purchases via some links may earn us a small commission at no extra cost to you. This helps us to continue bringing you high-quality content. Our guides and reviews remain unbiased and independent.
Compare the Prices & Bundles:
Official Store | Amazon
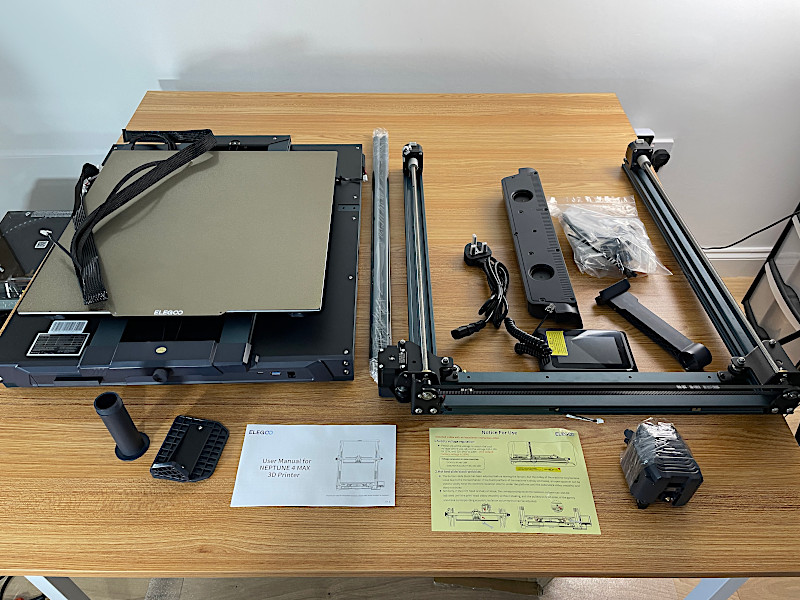
Unboxing and Assembly
First of all, it is important to mention how big and heavy this machine is. Initially, I even bought a second matching table to accommodate the machine, but after a few test prints, I had to move it to the floor anyway, as my tables were shaking too much and this affected the quality of the prints.
©3DWithUs – Photo: Max Funkner
Overall, it took me about 30 minutes to put the machine together. Installing the extruder was easier as step two, rather than step one. When the main gantry is installed and secured, it is much easier to deal with tiny screws when assembling the extruder. I also assembled the Neptune 4 Pro the same way a few months earlier. Watching the included assembly video is highly recommended.
©3DWithUs – Photo: Max Funkner
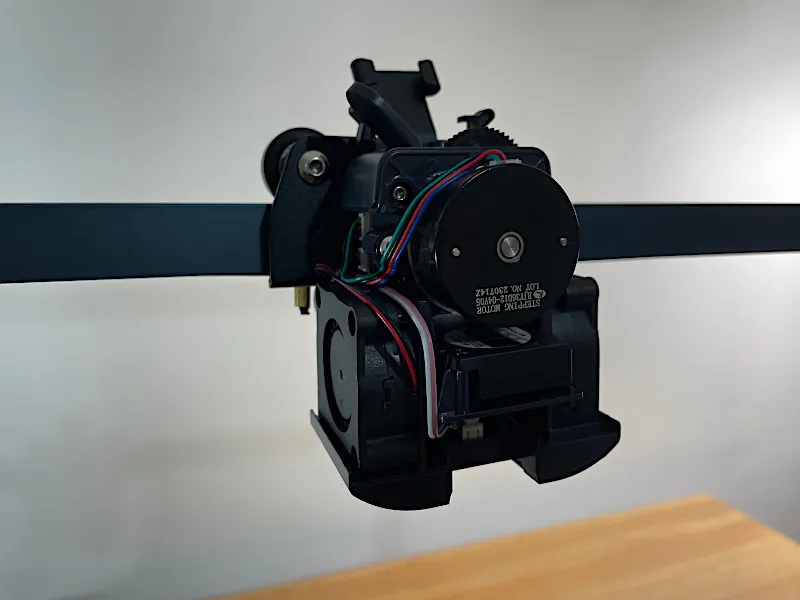
In comparison to Neptune 3 series machines, changing the nozzle on Neptune 4 Plus and Neptune 4 Max became harder as more parts need removing first. Elegoo’s official video demonstrates it the best.
©3DWithUs – Photo: Max Funkner
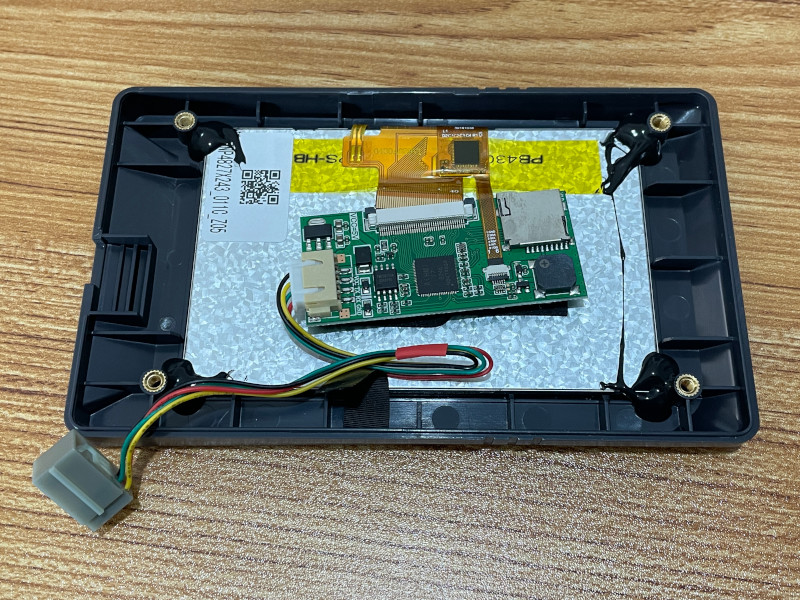
– Screen. Initially, my Neptune 4 Max screen didn’t work. After quick troubleshooting, I had to take the screen apart and manually adjust the connector. I did it carefully in order not to snap anything. It has worked well since then.
©3DWithUs – Photo: Max Funkner
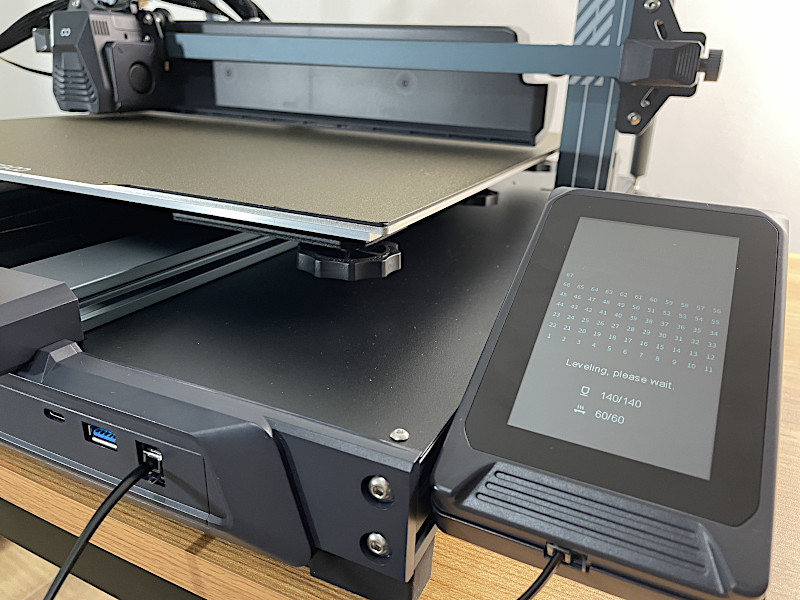
– Bed leveling. Same as on previous machines from the Neptune series, I am really happy with the combination of both manual and automatic bed leveling. If manual bed leveling, wheels, I had to do just once, then automatic bed leveling I had to do a second time when I changed the nozzle. The process is straightforward.
©3DWithUs – Photo: Max Funkner
– WiFi. If the Elegoo Neptune 4 Pro has Ethernet cable and SD card connectivity only, then the Neptune 4 Max has a Wi-Fi antenna. For my setup, where the 3D printers and PC are in separate rooms, the Wi-Fi feature is very convenient.
Included Model Test Prints
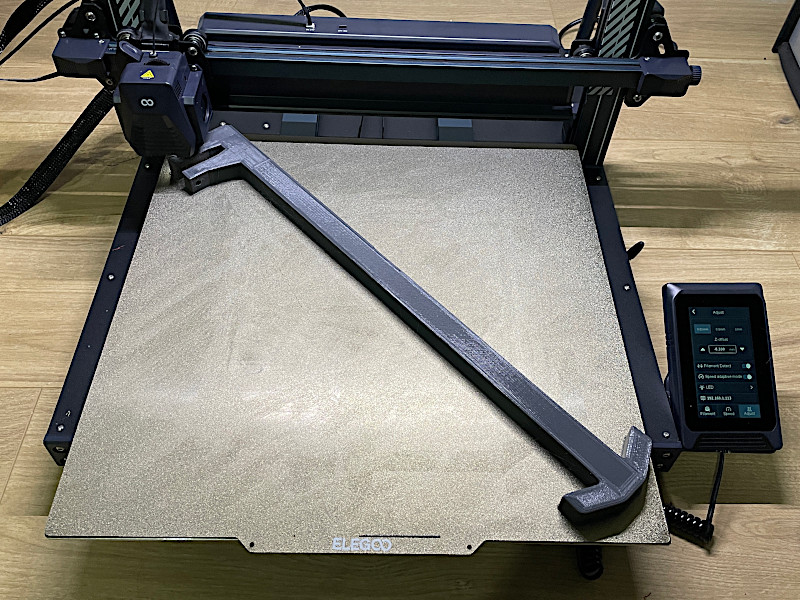
It appeared that my workshop table is not stable enough for large 3D printers. An inexpensive foldable table from Amazon shakes too much when 3D printers work on it, especially at high speeds. If with small printers the issue is unnoticeable, then the bigger machine gave me a clear sign.
Print on the table and on the floor
©3DWithUs – Photo: Max Funkner
When I printed the included Buddha test print on the table, the result was significantly worse than when I printed on the floor. Since then, I have printed all other models on the floor.
©3DWithUs – Photo: Max Funkner
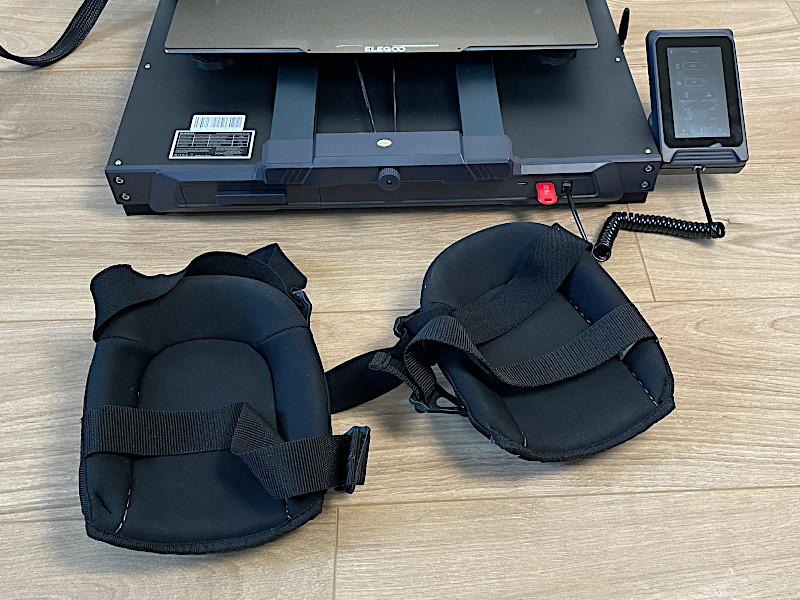
My DeWalt knee protectors became handy, especially when I was catching filament bits during the filament change. A small old cushion or towel would also work well in such situations. For the nozzle change, I took the printer back to the table, but it is doable from the floor as well if you lift the extruder higher.
Slicer Software – Profile, Settings and Tips
For this review, I worked with the provided Elegoo Cura slicer and am generally happy with the provided Elegoo Neptune 4 Max slicer profile. As the printing volume is very large, I had a task to optimize some of the prints for quick printing and reducing filament consumption. I also managed to set up an automatic pause for the filament change for multicolor prints, and I plan to use bigger nozzles (when I get the 0.6mm and 0.8mm nozzles).
Different Infill in Different Areas
I managed to reduce approximately 100g of filament or 1/3 of the weight of the model by applying different infill patterns to different areas. To do so, I had to add a support blocker first, scale it according to my model, and then choose ‘modify settings for overlaps.’ I added new infill density and infill pattern settings. Now my heavy-use Roof Window Handle Extension has two different infill density areas – 100% for the base and 20% for the handle.
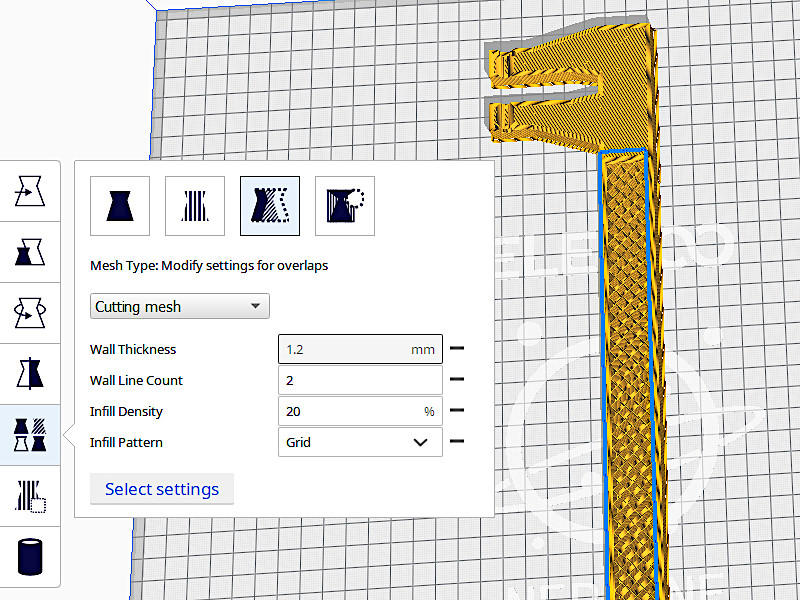
Screenshot: Cura
©3DWithUs – Photo: Max Funkner
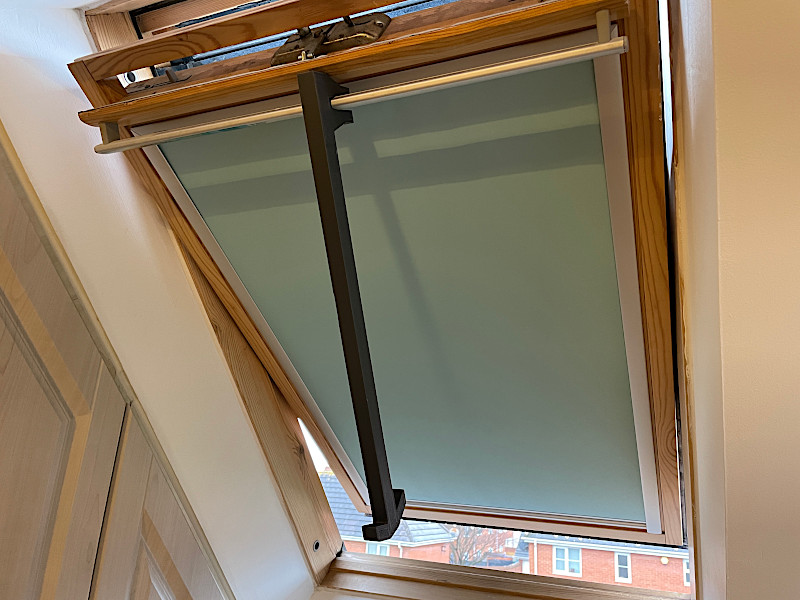
My roof window handle came out 520mm (20.5 inches) long, which is 140mm longer than I printed on the Neptune 3 Plus. This is genuinely the most used 3D printed object in my household. Let’s see if there will be issues with the partially hollow handle in the future. Just a quick note, for my continuous testing, this object is printed in PLA, but I would recommend printing such heavy-use objects in PETG or other stronger materials instead.
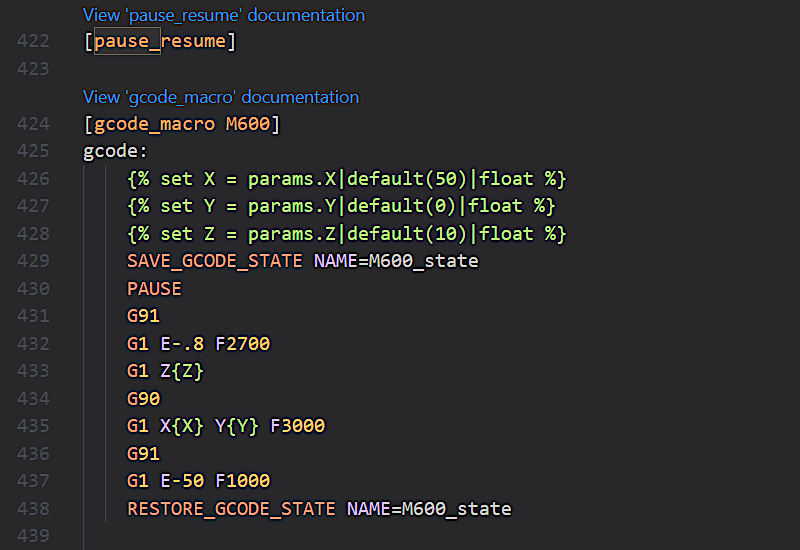
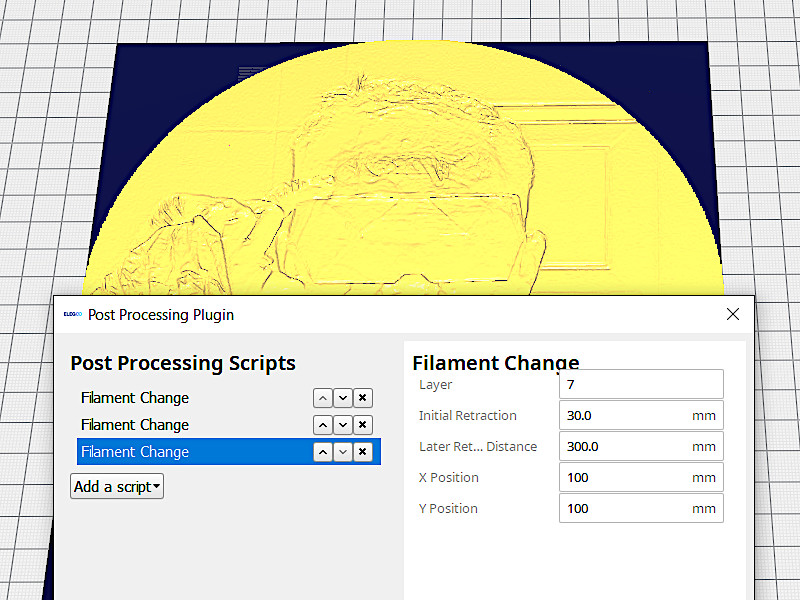
Automatic Pause for the Filament Change on a Specific Layer
In various slicer software, it is possible to add an extra command that would automatically pause the printing process at a specific height or layer for a filament change. For printers with Marlin firmware, such commands were M600 or M0, but these commands don’t work on Klipper firmware. Here’s a tip to work around it.
Preview: Fluidd
I did the following, and it worked for me.
– Tip. Go to In Fluidd -> Configuration -> printer.cfg. Then, after pressing Ctrl+F, type ‘pause_resume’ into the search. This will lead you to the [pause_resume] area.
Add the following code, as shown in the screenshot:
[gcode_macro M600]
gcode:
{% set X = params.X|default(50)|float %}
{% set Y = params.Y|default(0)|float %}
{% set Z = params.Z|default(10)|float %}
SAVE_GCODE_STATE NAME=M600_state
PAUSE
G91
G1 E-.8 F2700
G1 Z{Z}
G90
G1 X{X} Y{Y} F3000
G91
G1 E-50 F1000
RESTORE_GCODE_STATE NAME=M600_state
Click the Save & Restart button in the upper right corner.
Please note that such macros may change in due time. For updates or other macros, please go to the Klipper Official GitHub page.
Then, in Cura, go to Extensions -> Post Processing -> Modify G-Code -> Filament Change. Apply as many filament changes as needed. Double-check in preview if the change happens on the correct layer.
Preview: Cura
When the pause is triggered, the extruder will move away from the print. Change the filament, resume the print. Just before the extruder moves, try to catch excessive filament from the nozzle with tweezers.
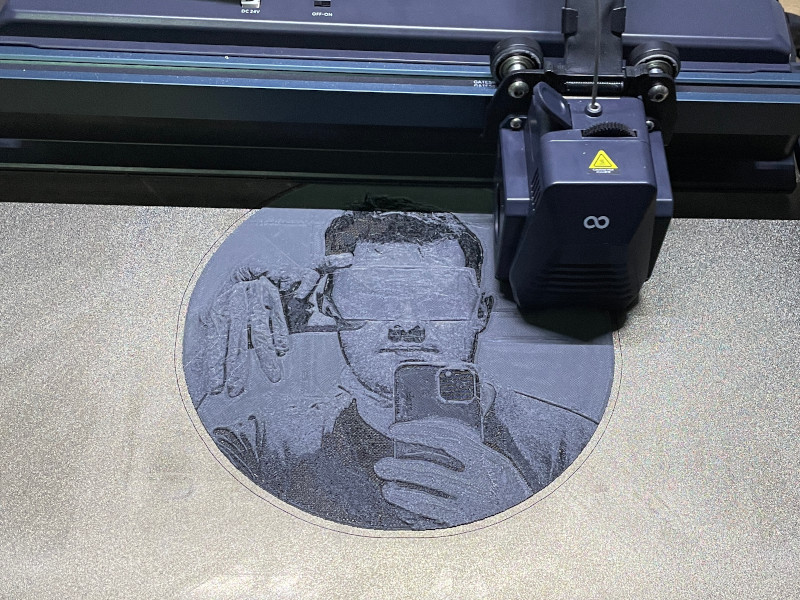
The Elegoo Neptune 4 Max is ideal for printing models created by HueForge, as it has a massive print footprint and very good adhesion. As it was my first attempt at creating paintings with HueForge, I used the default settings.

©3DWithUs – Print & Photo: Max Funkner

©3DWithUs – Print & Photo: Max Funkner
I must admit I haven’t fully cracked HueForge to print in other vibrant colors, so my initial try was with black, grey, light grey, and white filaments – a 4-hour print with 3 color changes. I am very happy with the result; such paintings are not a shame to put on the wall.
©3DWithUs – Print & Photo: Max Funkner
Here is a failed try. My first attempt to recreate the 3DWithUs logo in HueForge failed. It was supposed to have at least 3 color changes, white – light blue – blue – navy blue to feature a gradient color transition. Even though I didn’t get what I wanted, the result is still impressive. The bed adhesion, with the help of extra glue Magigoo from Amazon, was very good. Stay tuned as I will definitely publish more makes involving the Elegoo Neptune 4 Max 3D printer and HueForge software.
Testing Other Models
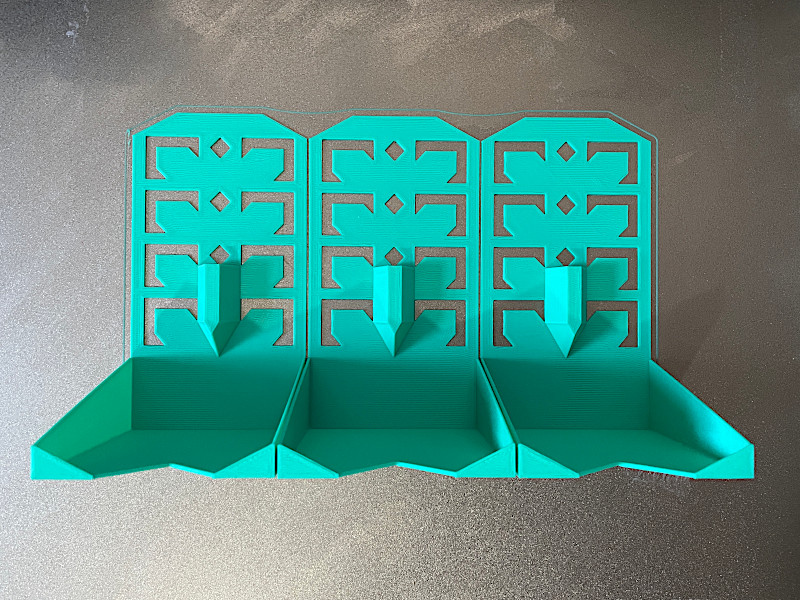
3D Printing Filament Shelf Brackets in PETG
It is a popular trend in the 3D printing community to 3D print needed brackets for the filament shelves. My filament shelf story is not that peachy but with a happy end. PLA brackets broke after 3 years in service. Initially, they were wrongly printed as well, namely with perimeter shells but only 20% infill. Look how the perimeter shells got split on one of the images. New reinforced ABS and PETG 100% infill brackets (plus one extra) are in place now.
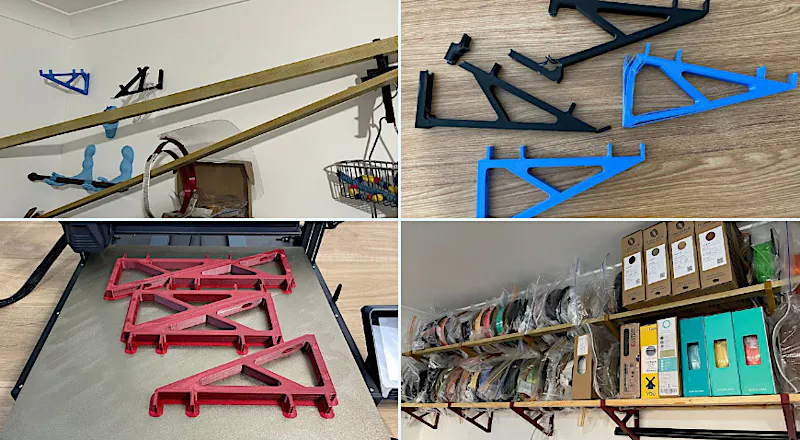
3D Model by Joel Telling YouTube
©3DWithUs – Print & Photo: Max Funkner
It was very convenient to print 5 brackets in one go. Neptune 4 Max build plate is so large I could print 8 of them in one go. PETG print with Magigoo and brim as extra adhesion printed flawlessly. I failed to print such brackets in ABS due to warping. The bracket got bent and lost adhesion in the middle of the print. Magigoo and brim didn’t help. I had to print the batch in ABS on another printer with an enclosed chamber.
It is an ongoing trend in the 3D printing community to print such brackets to build customized filament-holding shelves. To see such shelves in action and view other functional print ideas, have a look at this guide.
3D Printing in Vase Mode
To feature the large build volume (420 x 420 x 480 mm³ / 16.5 x 16.5 x 18.8 inch³), I printed a Redwood Giant Tree Trunk Vase. Such vases are easy to print with both wood and flexible filaments. In the image below, vases of different sizes and materials are stacked together. Cura setting: Spiralize Outer Contour.
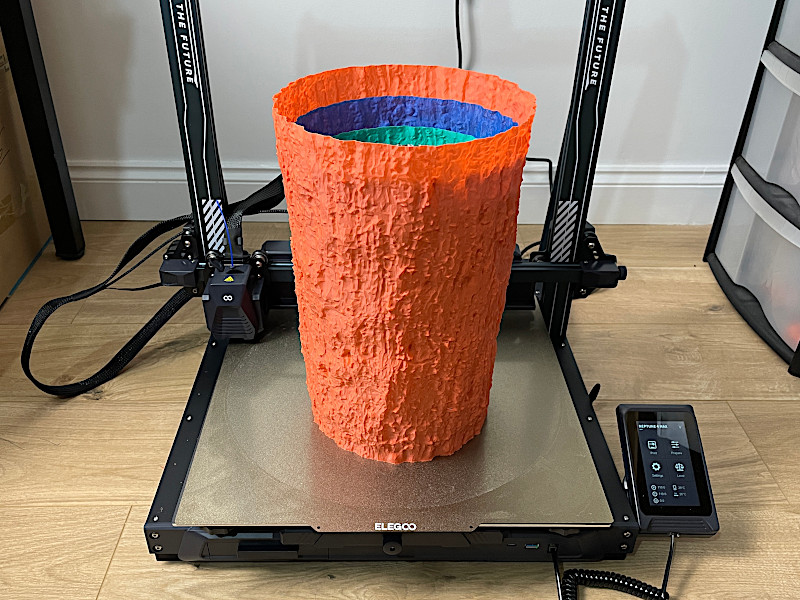
©3DWithUs – Print & Photo: Max Funkner
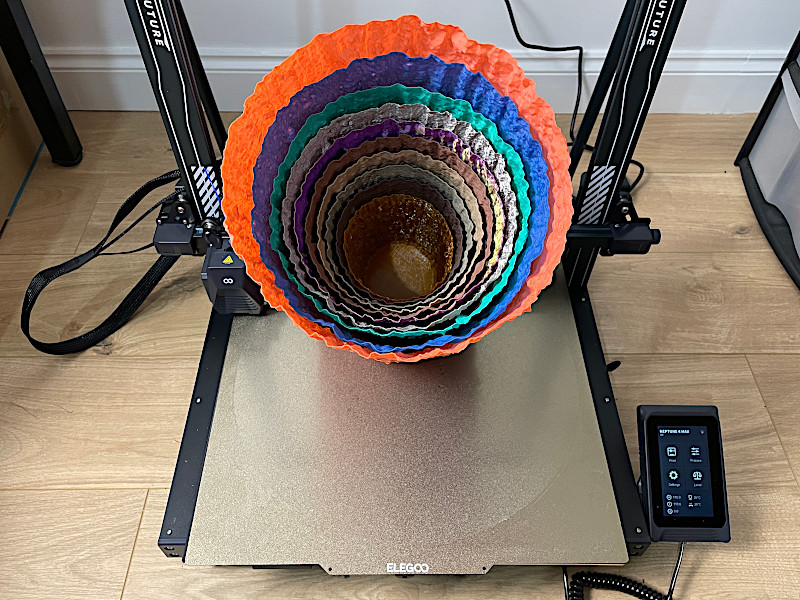
This model is Scanned Giant Redwood Tree Trunk Vase, a part of the Scanned Tree Trunk Models collection on Cults. A lot of items can be created from such precursor models and from the idea. On 3DWithUs, we have a 3D Scanned Tree Texture for 3D Printing Guide and a video on this subject. The Elegoo Neptune 4 Max prints such objects without any issues. I will add more images when I finally reach the maximum of the volume. Still waiting for the 0.6mm and 0.8mm nozzles.
3D Printing Articulated Models
As usual, when testing a new printer with a challenging model, I pick something print-in-place, such as articulated dragons, for example. These models are a great test for bed adhesion. This time, I decided to play it safe in order to save time and filament. Using a raft greatly eliminates adhesion issues by printing a few layers as a wide base for the models, which can be easily removed from the object when the print is completed. I like Cura’s rafts. They’ve always worked well for me.
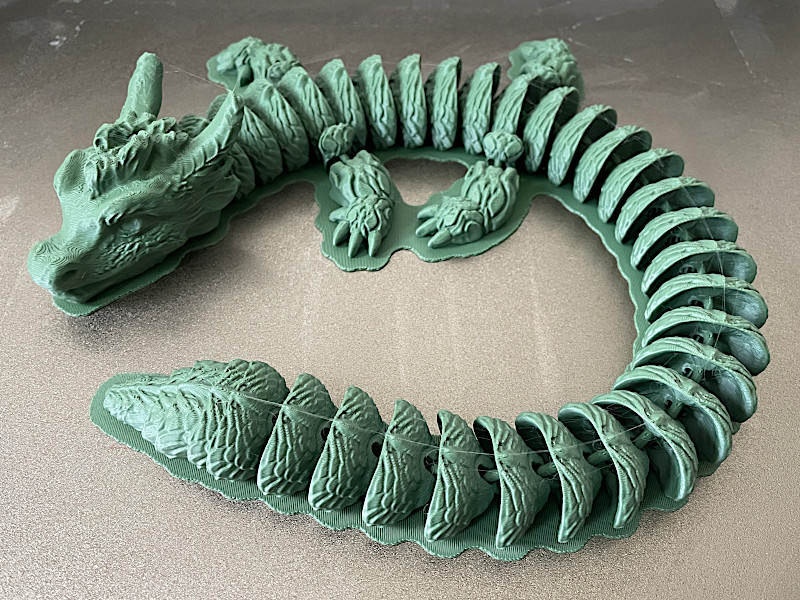
3D Model by Mimetics3D on Thangs
©3DWithUs – Print & Photo: Max Funkner
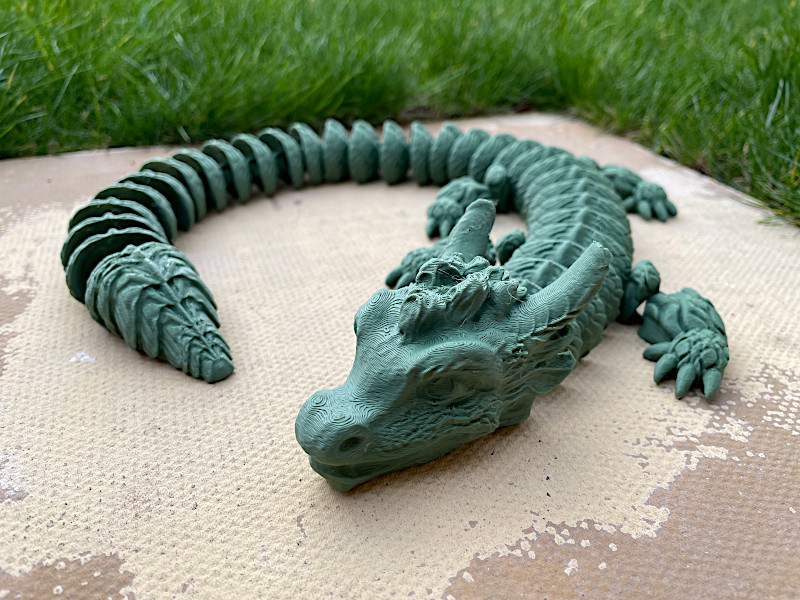
This particular print participated in the Mimetics3D and Thangs weekly make contest. I didn’t win anything, but it was fun. And again, the Elegoo Neptune 4 Max in 7 hours produced a quality print despite being a big machine. Default settings print fast.
Batch 3D Printing
Similar to the filament shelf brackets in PETG, I tried to print my Post-it-Note Holders in bulk. Such a model on default settings is printed in 1 hour. Three items together were printed even quicker. No issues with the print. With Cura’s ‘Outer Before Inner Wall’ setting, this model is printed without supports.
©3DWithUs – Print & Photo: Max Funkner
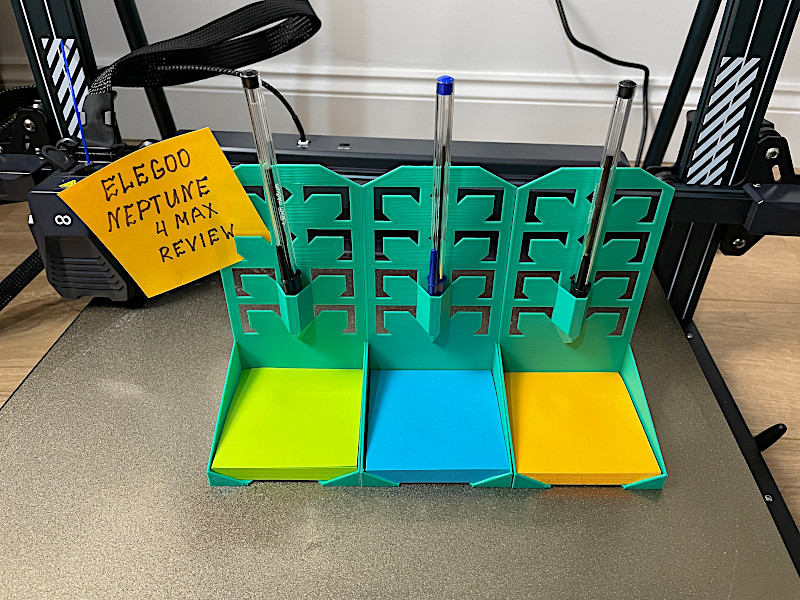
I am pretty confident that the Elegoo Neptune 4 Max can print batches without issues. During my extensive testing, this machine worked well and provided quality prints!
In my YouTube Short, I briefly showcase the 3D printing process of various models.
Compare to Other Neptune Series 3D Printers
Together, the Elegoo Neptune 4, Neptune 4 Pro, Neptune 4 Plus, and Neptune 4 Max constitute the latest products in the Neptune FDM 3D printer series. If some of the machines haven’t been reviewed on our website yet, you can refer to their primary comparison table in the image below to get a general overview.
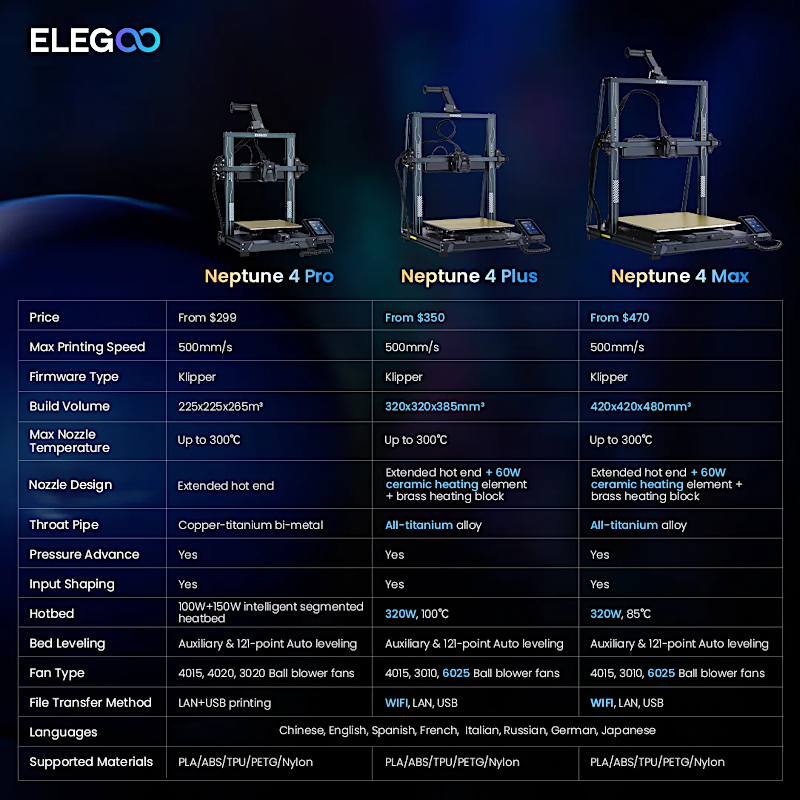
Image: Elegoo
Elegoo OrangeStorm Giga
Recently, a machine with a build volume even larger than that of the Neptune Max 4 was developed by the company. A year following the initial campaign, Elegoo fulfilled most of the pledges, and the machine is now available for pre-order on the official website.


The OrangeStorm Giga is Elegoo’s newest addition to their lineup of large-format 3D printers. It offers an expansive build volume, high print speeds, and multiple extruders, all for a pre-order price of $2,499. Deviating from Elegoo’s usual Solar System-themed product names like Jupiter, Neptune, and Mars, the OrangeStorm Giga distinguishes itself not only by its name but also by its impressive size.
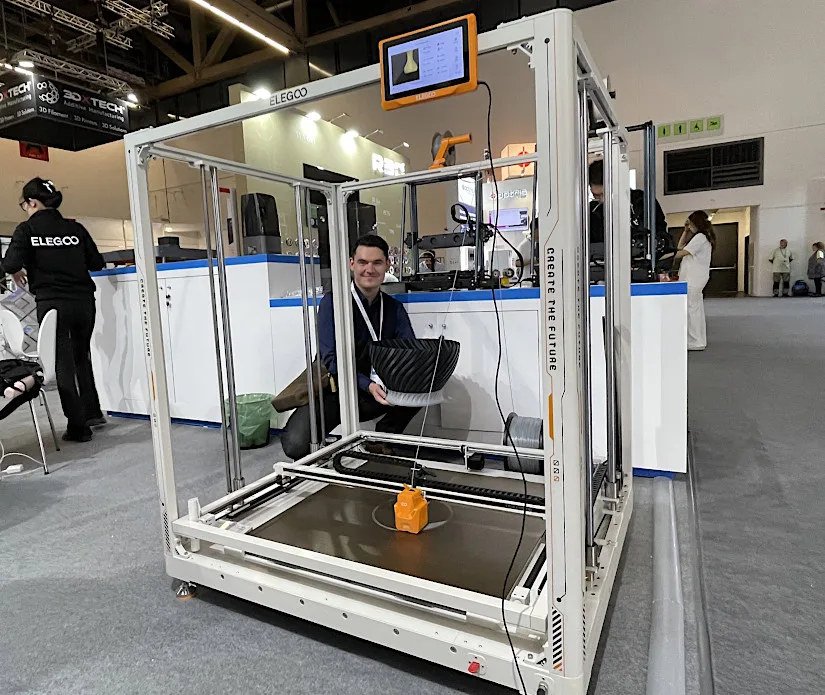
©3DWithUs
It is astonishing how Elegoo is bringing such a large-scale OrangeStorm Giga to the mass market. Read more and images: A Quick Look by Andrew Sink.
Compare Elegoo Neptune 4 Max to Other 3D Printers
Compare to the similar volume FDM 3D printers in the same price range:
There are not many brands that offer such a big volume 3D printer at such a budget price. The first that come to my mind that have the build volume of 400mm+ in the Max category printers would be Anycubic Kobra 2 Max and Creality CR-M4 (CR-10 Max). As the ‘print speed race’ continues, brands are also in a hurry to switch their Max machines to Klipper firmware as well.
Price-wise, these machines fall into the $600+ category in our budget FDM 3D printers guide. Compare the price, volume, and general builds there.
Conclusion and Pros & Cons
Compare the Prices & Bundles:
Official Store | Amazon
Elegoo Neptune 4 Max Review
Review Summary
I am impressed with the Elegoo Neptune 4 Max. Its vast build volume, combined with excellent bed adhesion, enables the completion of a wider range of projects. The Klipper stability features, which enable high-speed 3D printing, are particularly useful for accelerating the printing process when dealing with such large volumes. Once again, Elegoo managed to pack so many features into a machine at such a budget price; and as there are not many brands that offer such large volume printers, I find this machine is in a good position. I had a small hiccup with the screen in the beginning and therefore reduced the overall rating to 4.5 stars. I’m still waiting for 0.6mm and 0.8mm nozzles to arrive in order to test them as well.
PROS:
Budget Price
Large Print Volume
High-Speed
Klipper
CONS:
Big and Heavy
Had to Fix Screen

Hi Max, I have a problem. I must use a micro SD-Card to get my gcodes to the printer in the cellar. WLAN doesn’t work! My Computer was nor able to read the card from one day to the other. I tried a lot of adapter and three computers. The last option was to formate the card. But know, the printer (elegoo neptune 4 max) can not read the card. Can you send me the files I need on the card?