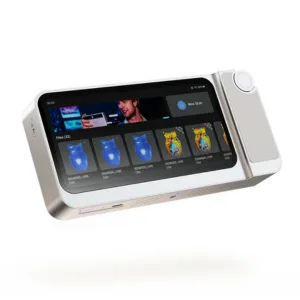
The 3DMakerpro Toucan is a standalone handheld 3D scanner designed to make scanning more accessible, portable, and self-contained. Instead of relying on a connected PC, the Toucan combines scanning, basic processing, and file management directly on the device, aiming to simplify real-world workflows. In this article, we focus on hands-on use, practical scanning modes, and real examples to show how the Toucan performs across different objects, and use cases. As usual, we’ll wrap up with final thoughts and a list of pros and cons.
Table Of Contents (Jump to a Section)
- Specifications
- What’s Included – Accessories
- Setup and Design
- Software: JMStudio
- Testing and Results
- Compare to Other 3D Scanners
- Conclusion and Pros & Cons
Where to Buy the 3DMakerpro Toucan
Price: $1,499.00 – $1,999.00
Compare the Prices & Bundles:
Official Website | Amazon
Key Specifications (At a Glance)
– Scan Modes: Continuous handheld scan, Single Shot (photo-based), and table scan
– Scanning Technology: Blue structured light with adjustable power levels
– Camera System: 4 cameras plus 48 MP RGB camera for texture capture
– Accuracy: Up to 0.03 mm in Near Mode and 0.1 mm in Far Mode
– Resolution: Up to 0.05 mm (Near) and 0.1 mm (Far)
– Scan Volume: From 10 × 10 × 10 mm up to 4000 × 4000 × 4000 mm
– Working Distance: 200–1000 mm
– Scanning Speed: Up to 15 frames per second
– Tracking Methods: Feature-based tracking and marker-based tracking
– Processing Hardware: 8-core 2.4 GHz CPU with Mali-G52 GPU
– Memory & Storage: 32 GB RAM and 256 GB built-in storage
– Battery: 6600 mAh with fast charging (up to 80% in 30 minutes)
– Connectivity: Wi-Fi 6, Bluetooth 4.1, USB-C
– Weight: 735 g
– Special Notes: Transparent, dark, or highly reflective objects require scanning spray
What’s Included – Accessories
Premium package includes: Toucan 3D Scanner, Power Adapter & Cable, Manual Turntable, Markers, Calibration Board, Silicone Case, Lanyard, Tripod, Carrying Case.

©3DWithUs – Photo: Max Funkner
Standard version includes: Toucan 3D Scanner, Power Adapter & Cable, Manual Turntable, Markers, Calibration Board, Silicone Case, Lanyard
Setup and Design
– Build. No plastic here. The Toucan features a solid, full-metal body with a large touchscreen. The physical button on top is particularly handy for Single Shot mode, allowing the scanner to be operated much like a DSLR camera when needed.
– Wi-Fi. File handling is via Wi-Fi. Initially, I expected to miss a wired connection for transferring files, but after working with scans exceeding 1 GB, I started to appreciate the wireless approach. No extra cables around the workspace.
– Battery. Battery life is sufficient for several scans, depending on their size. Recharging is fast, with the manufacturer stating that the battery reaches 80 percent in around 30 minutes, and full charge takes under an hour in practice. As with similar scanners, it makes sense to use battery time for scanning and handle cleanup or merging while the device is charging.
– Touchscreen. I was initially sceptical about using a touchscreen for scan cleanup, especially with my not-so-slim fingers. To my surprise, it worked well, and I was able to remove debris and make basic edits directly on the device without frustration.
– Brightness wheel. One design feature that stands out is the brightness adjustment wheel, something I haven’t seen on many other scanners. I personally didn’t use it much.
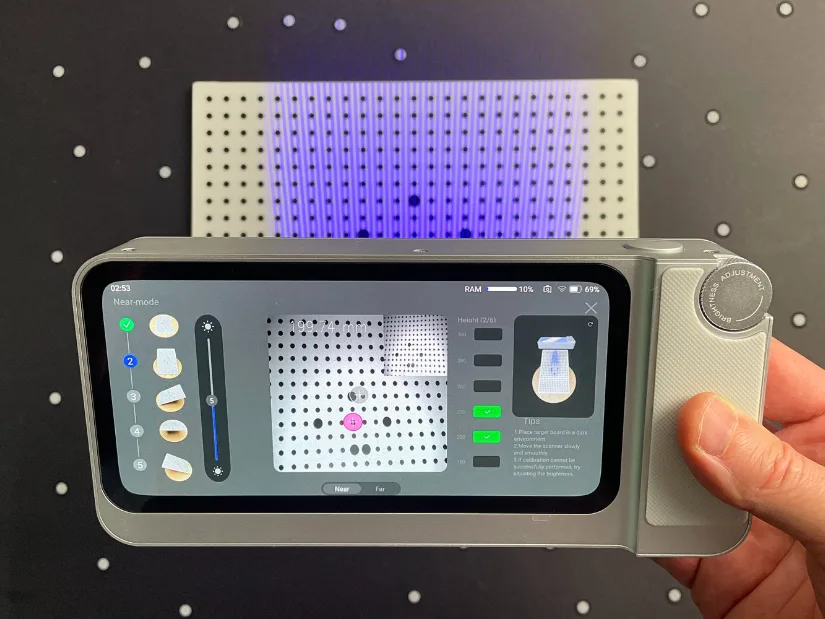
– Calibration. My unit arrived well calibrated, and I did not need to perform recalibration at all. However, to understand the process better and document how it works, I took a closer look at the calibration interface. According to the manufacturer’s guidance, it is recommended to restore the factory calibration profile rather than performing a manual recalibration yourself. For reference, here is the official recalibration video.
– Silicone Case and Lanyard. Before taking the ‘Toucan for a walk’ outside, I decided to install the lanyard and the silicone protective cover. Attaching the lanyard was slightly fiddly, as catching the end of the cord is not that easy, and I ended up using a pair of pointed tweezers to guide it through.

©3DWithUs – Photo: Max Funkner
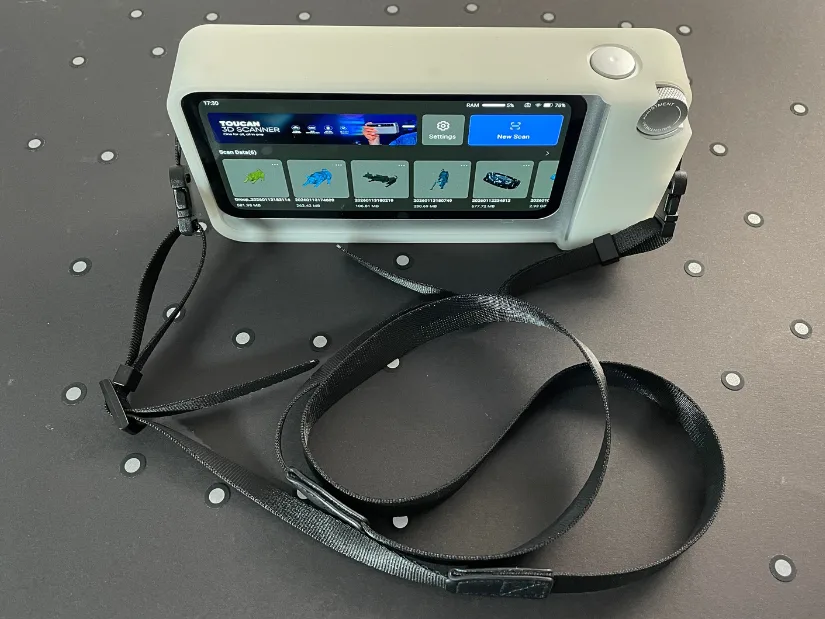
I find this protective setup to be very important. The Toucan has a sturdy, full-metal build and is a relatively heavy device. In dusty or dirty environments such as garages and warehouses, a lanyard becomes especially useful, allowing the scanner to hang around the neck much like a DSLR camera. While the Toucan is not advertised as an outdoor scanner and I used it without a lanyard at home, taking it outside to a boat club proved that this setup works very well in real-world conditions.
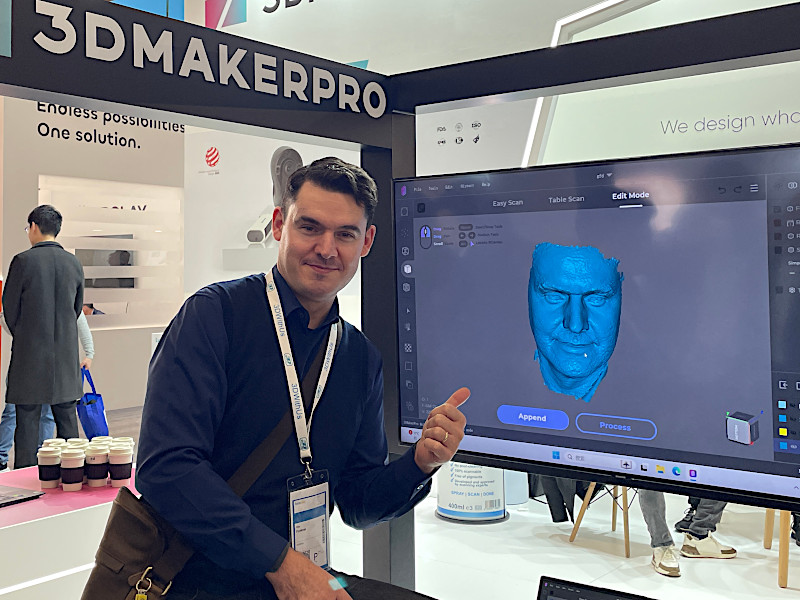
Software: JMStudio
JMStudio can be downloaded directly from the official website under the Support tab. The software feels fast and responsive, and having worked with many other 3D scanning applications in the past, I found it easy to get used to the interface. On startup, JMStudio prompts users to create an account and sign in, but there is also a Guest Mode option, which I used for multiple scans without any issues.

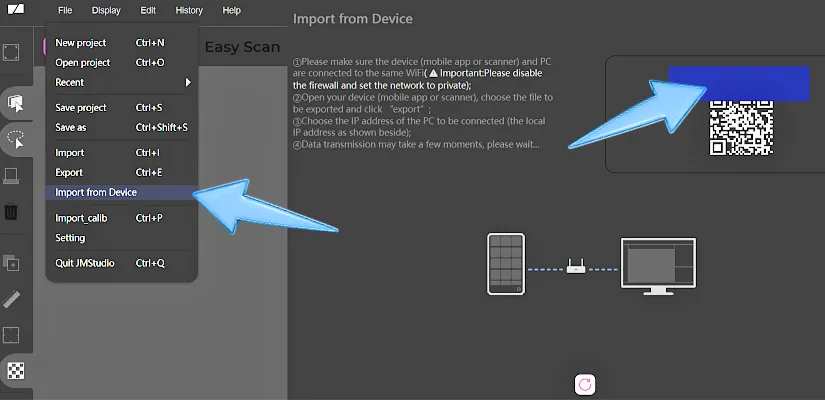
– Transfering Files. As described in the Toucan manual on page 33, both the scanner and the PC need to be connected to the same network for file transfer. In JMStudio, open the main menu and select Import from Device, which brings up an interface showing your local network IP address. From there, simply follow the on-screen instructions to transfer scan files directly from the Toucan to your computer.
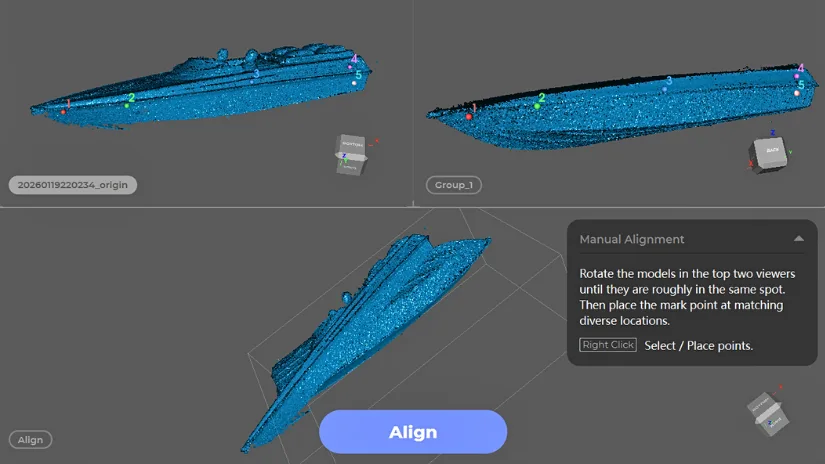
– Scan Merge. To create complete scans of larger objects or models with specific features, it often makes sense to scan individual parts separately and then merge the point clouds. The Toucan can handle simple merges directly on the device, but in my case, I used JMStudio for more control. I switched to manual alignment and selected five reference points on each scan, marked in different colours and matched as points one through five, which resulted in a successful merge. Check the final results of the RC boat below.
Testing and Results
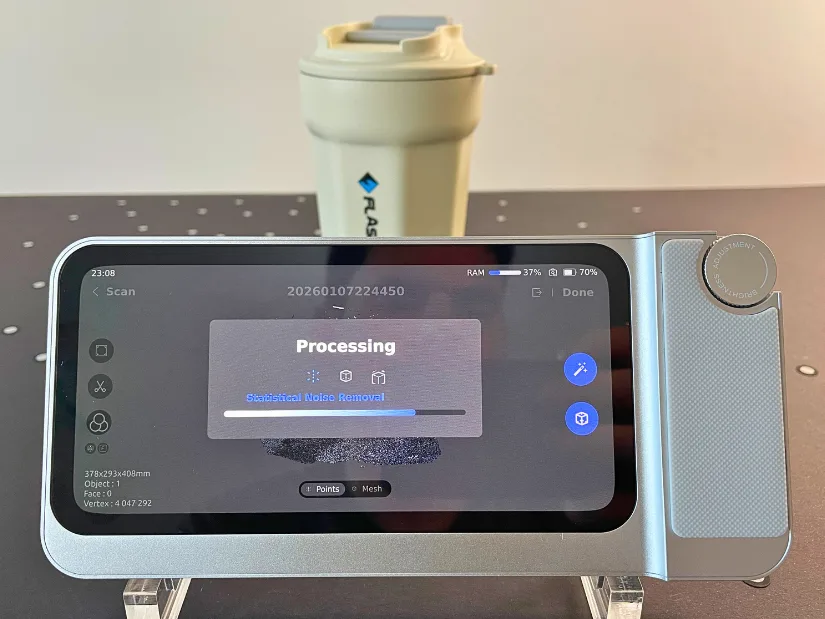
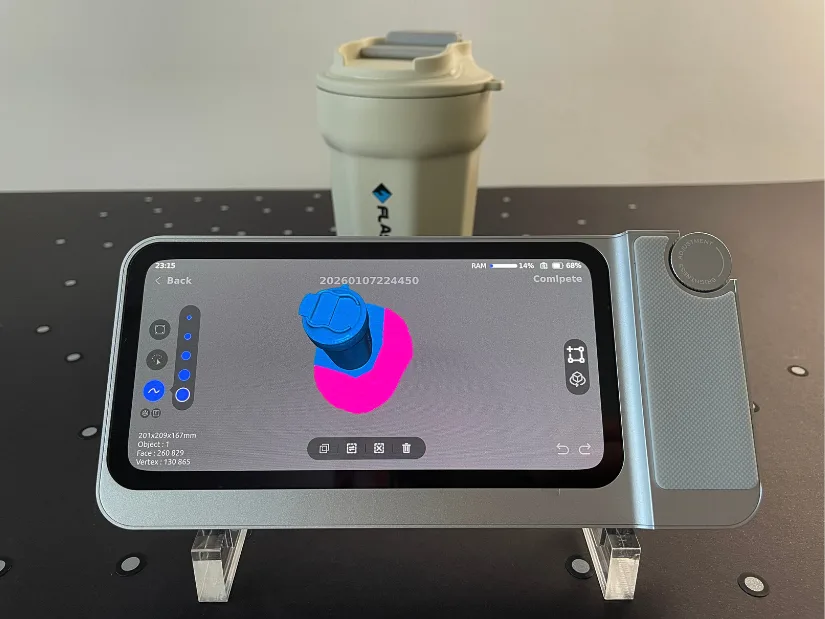
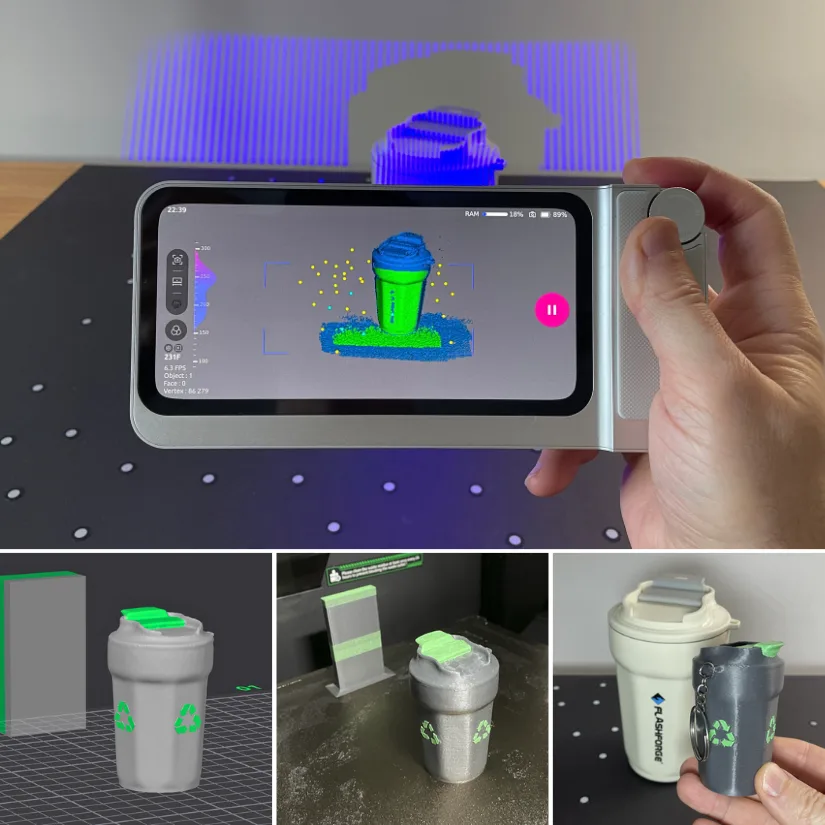
Texture Mode – Travel Mug, Scan to 3D Print
My first object scanned with the 3DMakerpro Toucan was a clear success. I started with a travel mug featuring the Flashforge logo, which turned out to be a very scan-friendly object. The geometry and surface details were captured well, and within a short time, I was able to turn the scan into multiple variants, including a keychain, a miniature, and even a small Christmas tree ornament.
©3DWithUs – Scan, Print and Photo: Max Funkner
For cleanup, I initially used JMStudio. JMStudio handled the scan processing and mesh cleanup smoothly, and it gave me a solid file that was already suitable for 3D printing with minimal extra work.
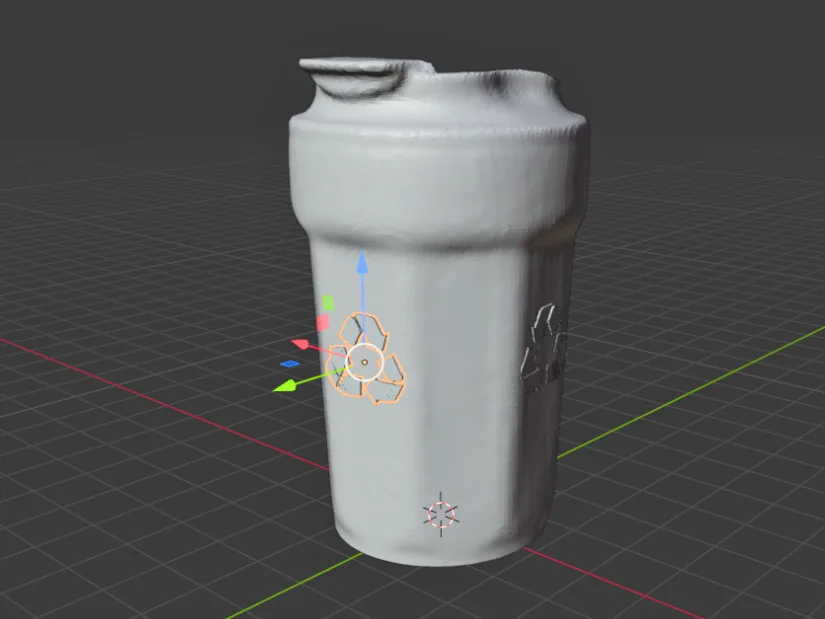
– Editing in Blender. To take it a step further, I moved into Blender. I wanted to add an extra design element to the model. While I could have recreated the Flashforge logo from the image, I was short on time, so I asked ChatGPT to generate a simple 2 mm-thick ‘Recycle’ feature from an image instead, which I could then embed directly into the model. This was an interesting discovery. ChatGPT provided me with the element I needed very quickly.
– 3D Printing. In Creality Print slicer, I added a hole for a keyring, applied colors, and sliced the model for printing on the Creality K2 Pro. I’m happy with how the model turned out, and with a little more time, I could experiment with many more colors if needed.
This is one of my favourite examples of how custom objects from current projects, everyday items, or even gifts and memorabilia can be scanned and scaled down into something meaningful. In the past, I scanned and scaled down an RC boat I was working on and turned it into a miniature ornament for the Christmas tree. You wouldn’t bring a boat to the dinner table with food and turkey, but the ornament proudly hanging from the tree became a great conversation starter.
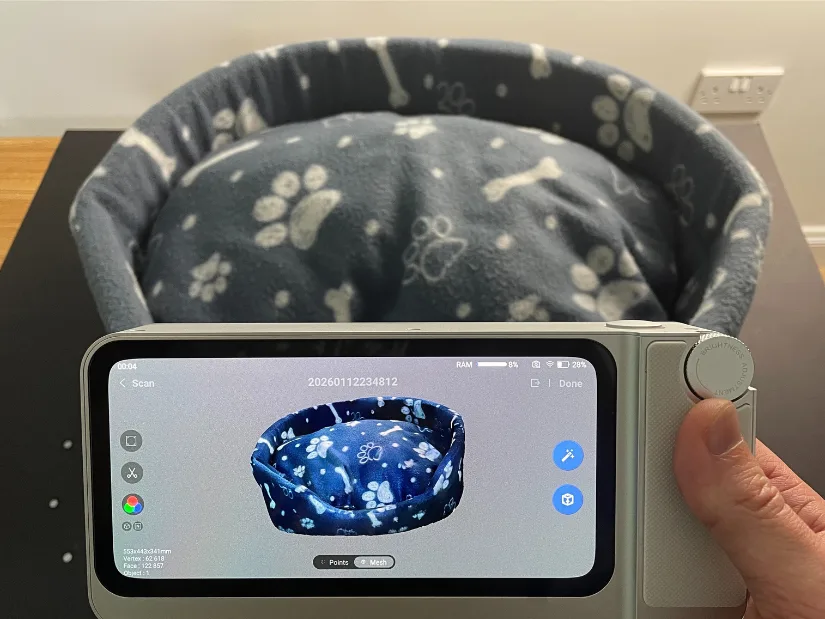
Texture Color Mode – Pet’s Bed, RC Boat Feature
As expected, blue laser handheld 3D scanners perform best when scanning matte objects, and my dog’s bed turned out to be an ideal candidate for capturing color details with the Toucan. Due to the size of the object, I scanned it using Texture Far Mode. The result came out nicely, with the fabric pattern and overall shape captured well, making this scan a good candidate for use as a VR or game asset.
Another object I scanned using color texture mode was the drivers figures module from the RC boat. In this case, I applied too much scanning spray, which affected the colour capture.
– 3D Scanning Spray. 3D scanning spray is another area where a certain level of skill is required, especially if preserving color matters. This is something I still find challenging, as it is easy to apply too much spray, which can wash out colours and leave the surface looking white. In this case, however, the model was quite shiny, so applying scanning spray was necessary to make the surface matte for a few hours and achieve a usable scan.
Color scanning generally works best on matte surfaces, where textures and colours can be captured clearly and consistently. Shiny or reflective objects often require scanning spray, which can reduce or completely obscure color information. Finding the right balance between surface preparation and color preservation is key when working with texture-based scans.
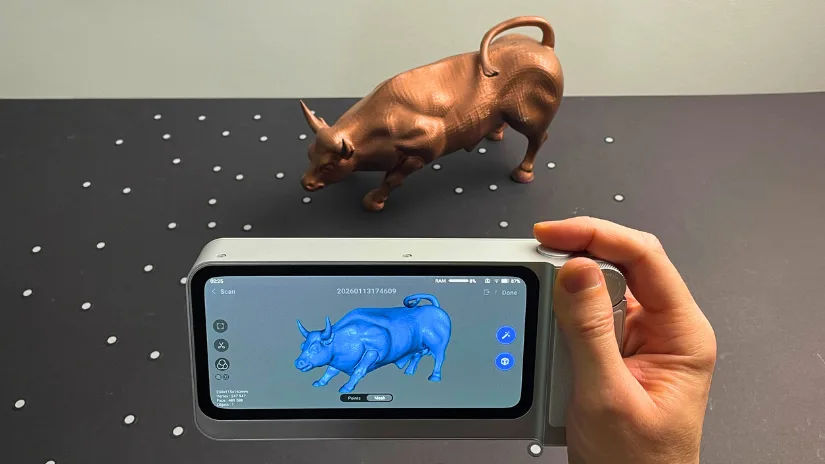
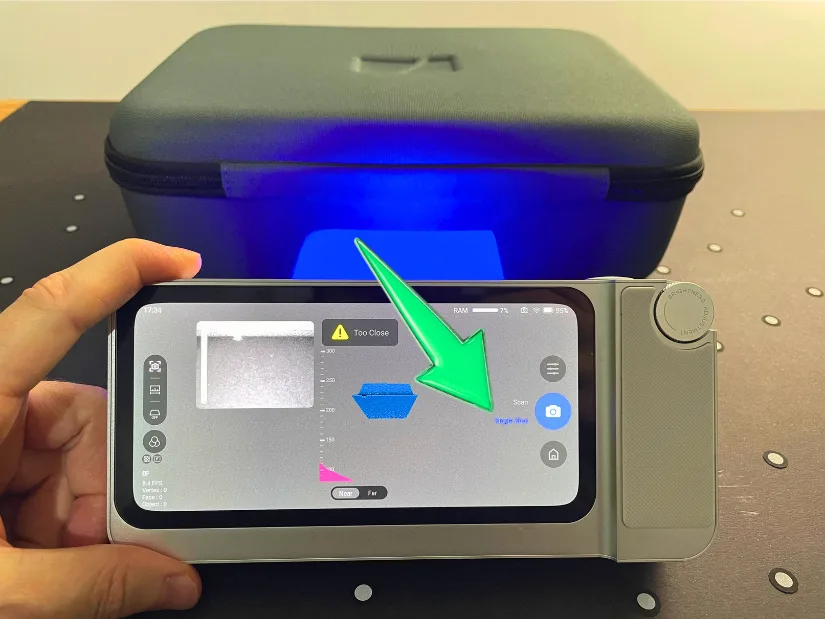
Single Shot Mode – Charging Bull
It was initially difficult to figure out how to use Single Shot mode. The ‘Coming Soon’ message shown for the Fixed Shot mode in the settings added to the confusion. Later, after seeing other users on Facebook successfully creating scans using Single Shot Mode, I realised that the easily overlooked ‘Single Shot’ label on the interface actually functions as an option button.
I absolutely welcome this option, especially since the main physical button on the device makes it possible to use the Toucan much like a regular camera. The technique feels very familiar to me, as it closely resembles the workflow I used over five years ago when I was working with photogrammetry. The key difference now is that the frames are captured very precisely using blue light lasers.
Another important point is that Single Shot mode produces not only accurate results but also very lightweight scans. While it does take longer to capture compared to a continuous scan, the processing time is significantly shorter. This balances out the overall workflow and reduces the total time needed to achieve a usable result. I highly recommend trying this feature in specific cases where accuracy and clean data matter most.
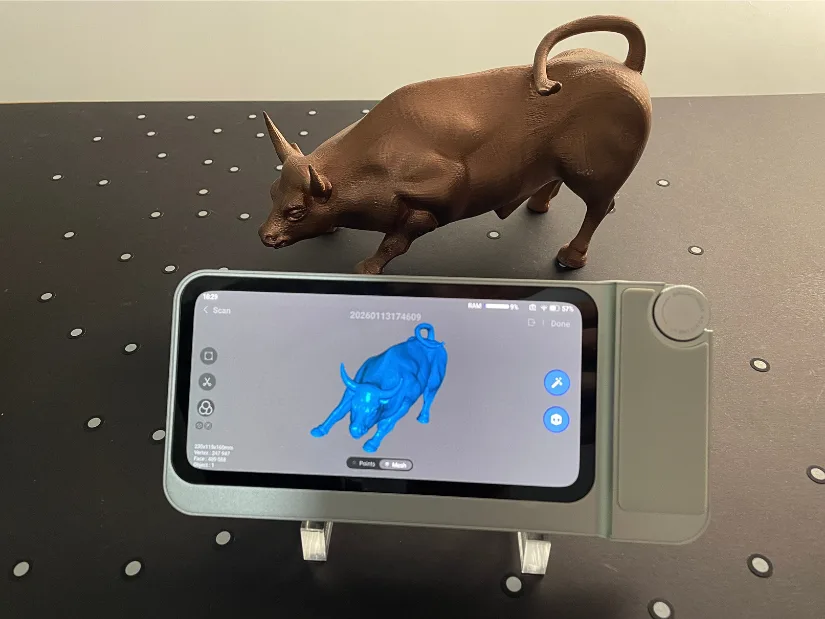

The low-poly 3D-printed replica of the Wall Street Charging Bull turned out to be a well-sized object for scanning in Single Shot Mode using Near Mode. The first attempt produced the best results and took approximately 120 shots to complete. While there were still a few missing patches underneath, the scan was already very usable as a base model.
Marker Far Mode – RC Boat
I scanned this RC boat using Single Shot mode again, as I find it very convenient when it comes to quick post-processing and lightweight files. The model is arguably small for Far Mode, but I decided to try it anyway to see how it would perform. Even in this setup, Single Shot scanning in Far Mode proved to be a fast and efficient process. Longer to scan but quicker to process.
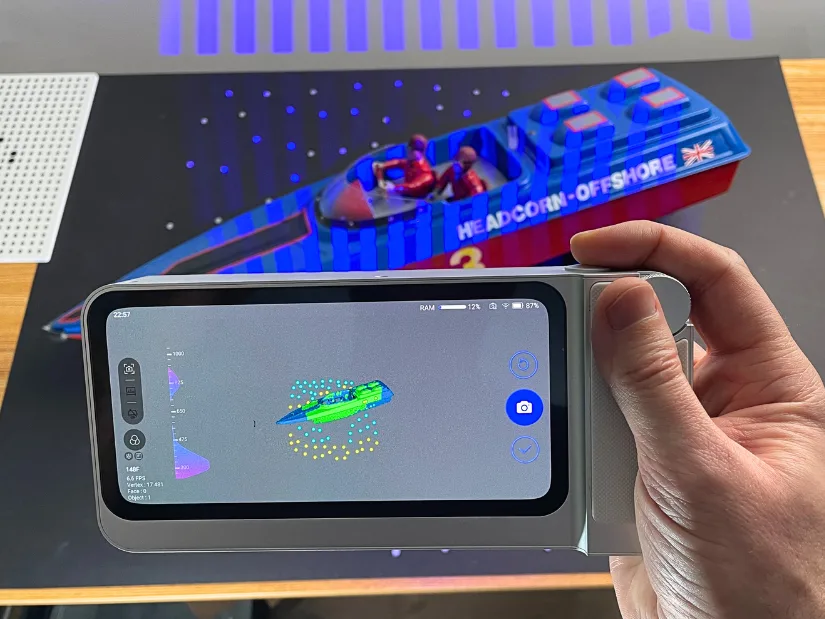
– Reflective Markers. These help the scanner track the object more precisely, but they can also be time-consuming to remove from the model afterward. While scanning the RC boat, I found that dedicating a black A1 sheet was a great solution. The markers stay on the sheet permanently, and the black surface is practically invisible in certain scanning modes. Highly recommended! It saves a lot of time and keeps the object clean.
– 3D Scanning Spray. 3D scanning spray is another area where a certain level of skill is required, especially if preserving color matters. This is something I still find challenging, as it is easy to apply too much spray, which can wash out colours and leave the surface looking white. In this case, however, the model was quite shiny, so applying scanning spray was necessary to make the surface matte for a few hours and achieve a usable scan.
This detachable element from the RC boat makes sense to scan separately using Geometry Near mode. In the 3D printing workflow, this part can be further optimised by adding more intricate details. With multicolour 3D printing, additional colours can be applied directly during printing, without the need for painting.
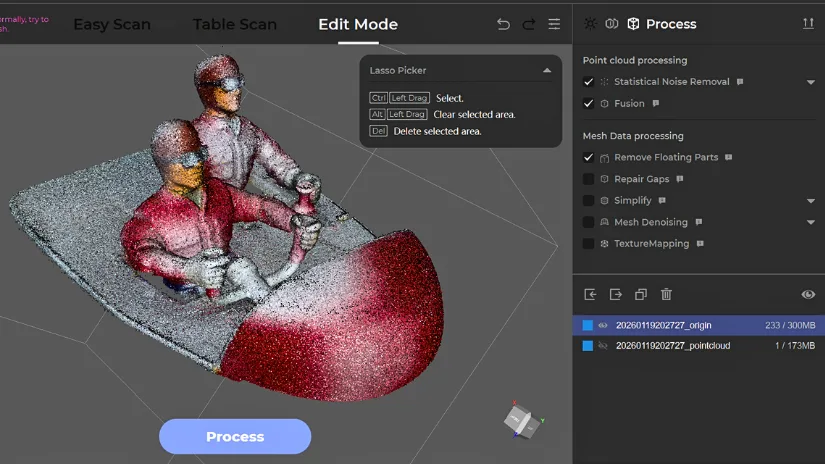
– Scan Merge. To scan this model completely, I captured the top and bottom as separate scans and then merged them in JMStudio. Automatic alignment did not work in this case, as the overlapping geometry between the scans was very limited. I therefore switched to manual alignment and selected five reference points on each scan, marked in different colours and matched as points one through five. Using this approach, the alignment was successful.
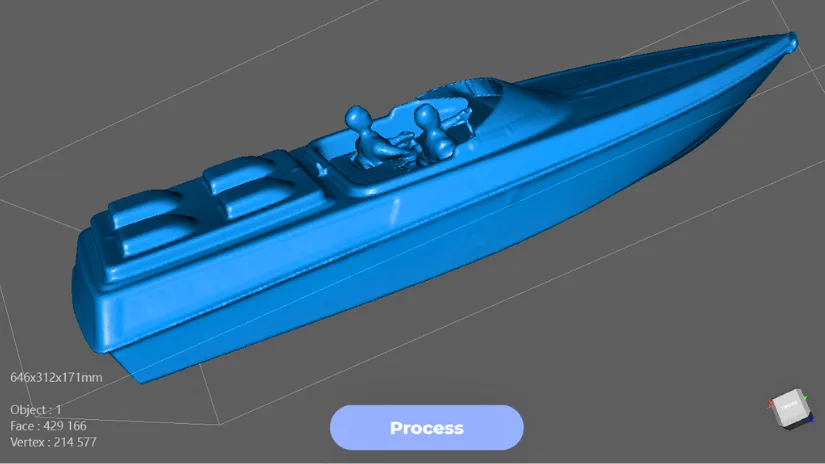
Processing in JMStudio took care of the rest. It removed noise, fused the model, and repaired gaps. I was happy with the final result, as this scan is more than good enough to create a miniature replica on a multicolour 3D printer. Projects like this are mostly done for fun, as memorabilia, or simply as decorative pieces.
In the past, I have also scanned a broken RC boat, recreated the hull and top parts using 3D scanning and 3D printing. Thanks to such scans a slightly larger, fully functional RC boat was created and tested. A big thank you goes to Clive from SouthendMBC for helping with these projects and allowing me to scan his boats. This is a great example of how 3D scanning combined with 3D printing can help preserve, customise, and repair physical models. Read more: RC Model Boats: Traditional and 3D Printed
Compare to Other 3D Scanners
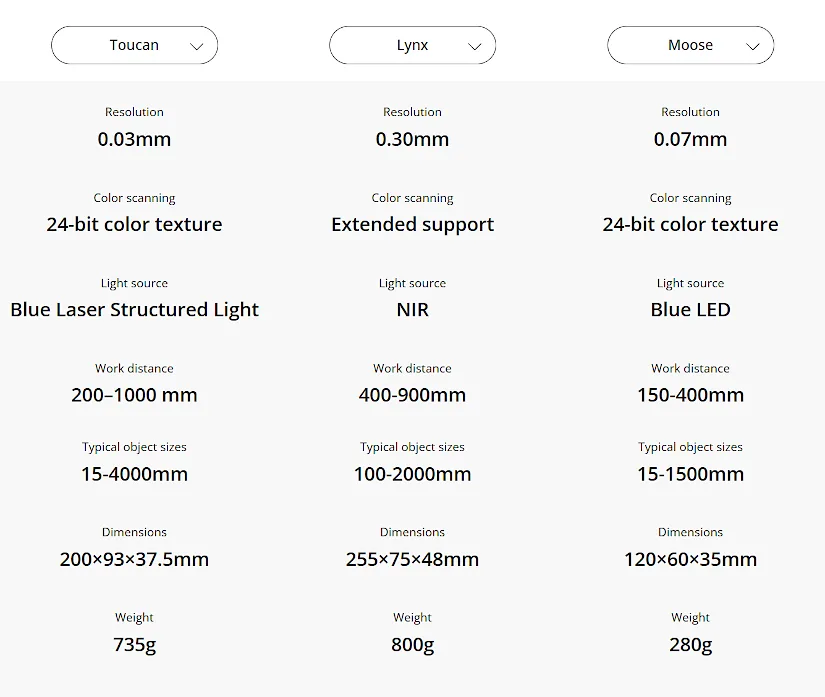
On the 3DMakerpro product page, the ‘Find your perfect scanner’ comparison tool allows you to switch between the Toucan, Lynx, and Moose to quickly identify the right scanner based on use case and budget. The Toucan sits at the higher end of the lineup, offering an all-in-one, standalone scanning experience with on-device processing. Lynx is positioned as a more compact and budget-friendly handheld option, while Moose focuses on precision scanning for smaller objects where accuracy is the priority.
In the past, we have reviewed the Lynx and provided an overview of the 3DMakerpro Eagle scanners. This broader lineup shows that 3DMakerpro is serious about the 3D scanning market, offering a wide range of devices tailored to different needs, from entry-level scanning to more advanced and specialised workflows.
As 3D scanning technology becomes accessible, there is also competition with offerings from brands like Revopoint, Creality, and Einstar. Read more about other 3D scanners on our website.
In this category of standalone handheld scanners, the closest alternatives to the Toucan are Revopoint MIRACO and EINSTAR VEGA by SHINING 3D. All three aim to reduce reliance on a connected PC by offering on-device processing and screens, making them well suited for portable and field-based scanning. The Toucan distinguishes itself with its compact form factor and integrated workflow, while MIRACO and VEGA target users who may prioritise different balances of performance, ecosystem, and brand familiarity.
On 3DWithUs, we have featured 3DMakerpro scanners across both entry-level and prosumer categories, as they play an important role in bringing accessible 3D scanning to a wider audience. Their consistent presence at Formnext over the past few years, where they actively showcase their scanners and demonstrate live scanning on the show floor, highlights this commitment. This approach reinforces 3DMakerpro’s growing confidence and focus on the consumer and prosumer 3D scanning market.
Have questions? Feel free to ask in the comment section below.
For a wider discussion or to share your own Toucan scans, join us in the forum:
Conclusion and Pros & Cons
Compare the Prices & Bundles:
Official Website | Amazon
3DMakerpro Toucan Review
Review Summary
The 3DMakerpro Toucan stands out as a practical standalone 3D scanner, removing the need for a connected PC while offering flexible scanning modes and on-device processing. During hands-on use, apart from the usual scanning, features such as Single Shot mode, marker tracking, and wireless file handling proved practical in certain workflows.
What works particularly well is the Toucan’s ability to handle scanning, basic cleanup, and processing directly on the device. This makes it easy to capture objects and only move to desktop software when more advanced editing is required. While some workflows, such as manual alignment or color preservation on shiny objects, still benefit from experience and post-processing in JMStudio. In scanning for 3D printing, JMStudio is required.
Overall, the Toucan is best suited for makers, designers, and prosumers who want a portable, self-contained 3D scanning solution with minimal setup friction. It may not replace high-end metrology systems, but for practical scanning, prototyping, digitising objects, and creative projects, it delivers a well-balanced combination of convenience, capability, and flexibility.
Pros
– Portable and compact standalone design with a premium feel
– On-device scanning and basic processing without the need for a PC
– Single Shot mode is effective and produces lightweight scan files
– Fast charging and good overall battery performance
Cons
– At 735 g, it may feel heavy for some users during longer sessions
– Exporting large scan files over Wi-Fi can take time
– Scans must be processed before saving, with no option to keep raw data and start a new scan immediately