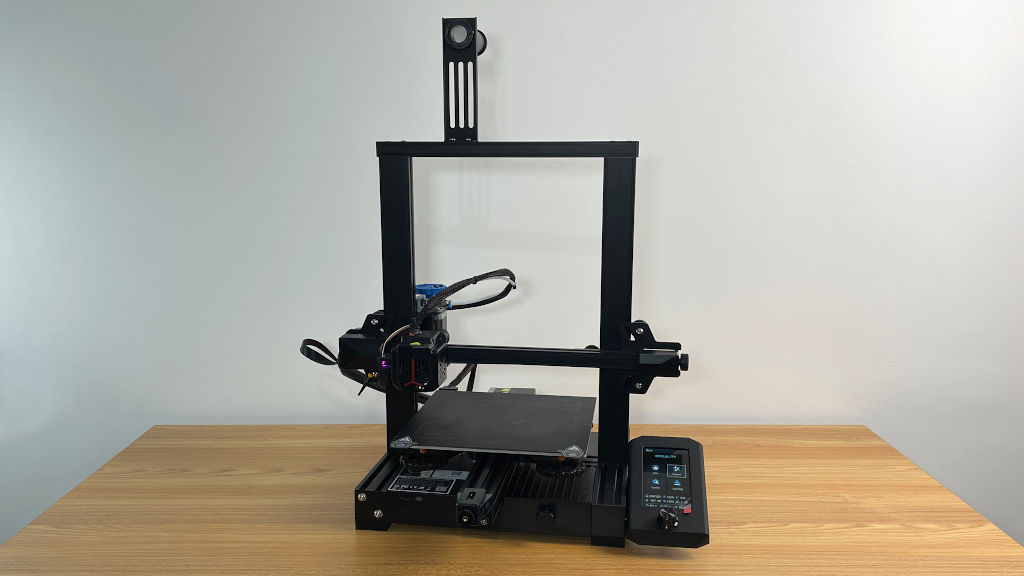
Creality Ender 3 V2 Neo 3D printer is a further upgrade to the classic most popular Ender 3 machine. It offers silent printing, 16-point automatic bed leveling, a flexible spring sheet, an integrated toolbox, and a build volume that is not small yet not too big. The printer itself is the right size to be easily moved around. All that, with minimal assembly, makes it a strong entry-level machine. Let’s review Ender 3 V2 Neo, tune some slicer software settings, print a few awesome models, and outline the Pros and Cons.
Creality Ender 3 V2 Neo
Price: $259-$319

Amazon
AliExpress
Official Website
Creality Certified Store
Table of Contents
- Specifications
- Unboxing and Assembly
- CR Touch Auto-Leveling and Manual-Leveling
- Included Test Prints
- Resume Printing – Recovery After a Powercut
- Slicer Software – Creality, Cura, Simplify3D
- Test Printing in Creality PLA
- Test Printing in Dual Color PLA
- Automated Filament Change for Color/Material Switching
- Compare to Other 3D Printers
- Filament Dryer as an Extra Device
- Conclusion and Pros & Cons
Creality Ender 3 V2 Neo Specifications
Build Volume: 220 x 220 x 250mm / 8.66” x 8.66” x 9.84”
Extruder: Full-metal Bowden
Max Nozzle Temperature: 260℃
Max Bed Temperature: 100℃
Bed Leveling: CR Touch Auto-leveling and Manual
Material: PLA, PETG, ABS
Build Platform: PC Spring Steel Magnetic Build Plate
Connectivity: Micro SD Card, Cable
Interface: 4.3” Color Knob Screen
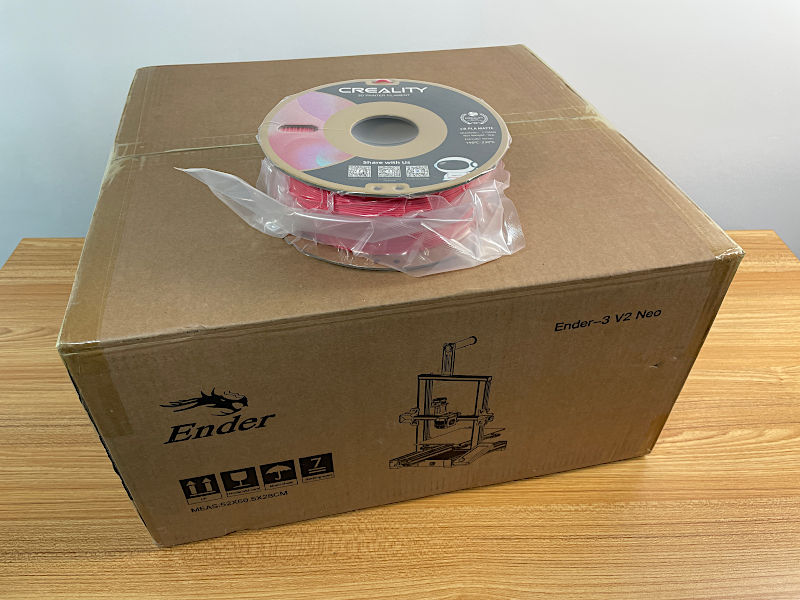
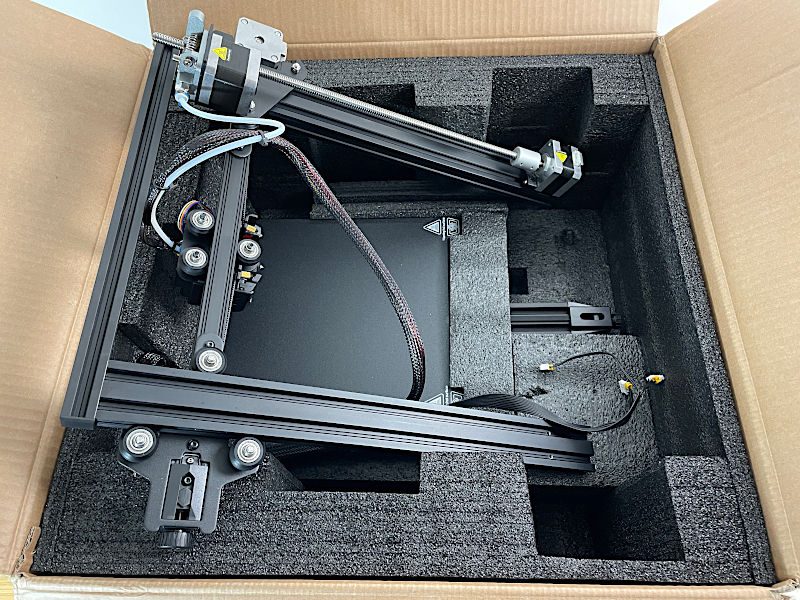
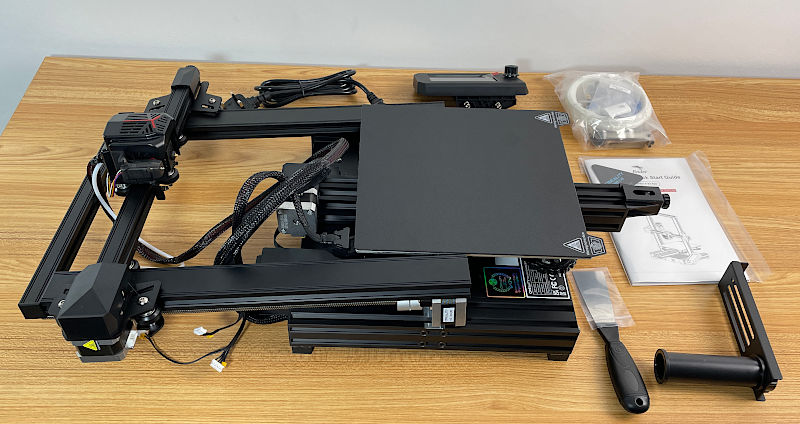
Unboxing and Assembly
Creality Ender 3 V2 Neo arrived in a standard box with a lot of protective foam to secure the items. Please mind that a spool in the picture is not included unless you go for a bundle printer offer during particular sale events. Nevertheless, a significant amount of white PLA sample was included, enough to print at least two test models.
©3DWithUs – Photo: Max Funkner
©3DWithUs – Photo: Max Funkner
– Assembly. Two main full-metal gantry pieces are wired together. It might seem tricky to take the machine out of the box without help, but this machine is small enough, and it is possible to take it out and assemble it without the need for a 2nd person.
©3DWithUs – Photo: Max Funkner
– Instructions. The leaflet instructions were clear apart from automatic bed leveling. The micro SD card – (TF Card), included in the package, had a .rar file that needs to be extracted in order to get access to the video assembly tutorial. It can also be watched on YouTube. The assembly tutorial video shows step-by-step how to assemble and fire up the machine. As I have assembled similar 3D printers before, it took me approximately 20 minutes to set it up.
– TF Card. I would recommend saving the manufacturer’s files somewhere else because micro SD cards tend to get corrupted. Also, I find it difficult to hold such small cards in my hands as I cannot feel their weight. Well, everything takes time, and I got used to them.
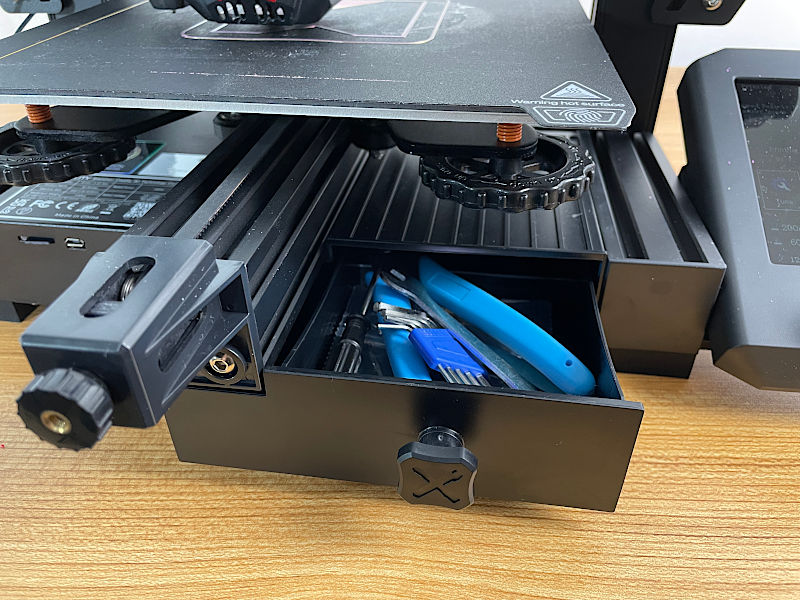
– Integrated Toolbox. Creality Ender 3 V2 Neo has a neatly integrated toolbox where most of the essential tools and replacement parts, such as nozzles, can be stored.
©3DWithUs – Photo: Max Funkner
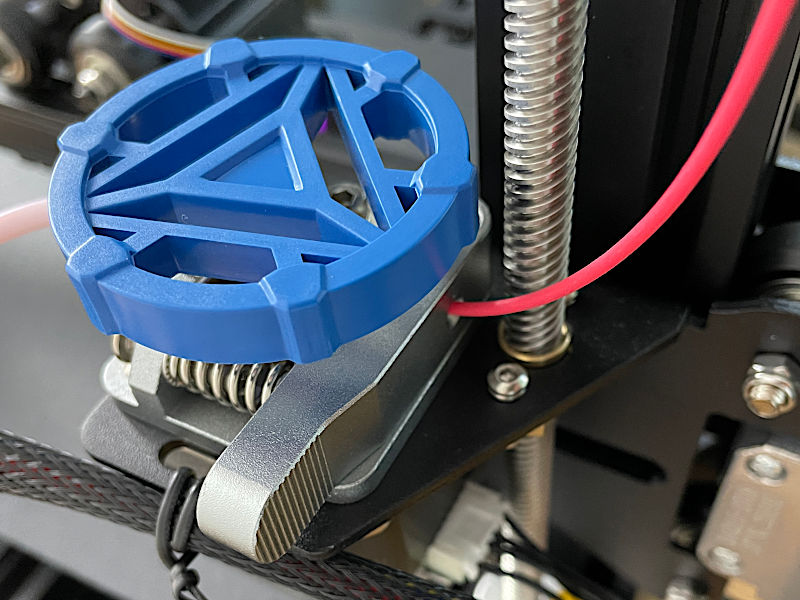
– Extruder. This is the first 3D printer I tested that had no Load/Unload option. Maybe for the better, the procedure to change the filament is much quicker: gently Push In / Pull out. A filament holder on the side, or even a filament dryer that I featured below, could reduce the risk of brittle filament getting snapped.
©3DWithUs – Photo: Max Funkner
CR Touch Auto-Leveling and Manual-Leveling Combination
I absolutely respect such manual and automatic bed leveling combinations, especially for big-volume build plates like Neptune 3 Plus. In my experience, after I level the bed well once, it works without issues for a long time. And again, to set it up properly from the beginning, I would recommend watching the tutorial video from 6.32 min.
– Build plate. Generally, I am happy with the flexible spring sheet with a special coat, but I have to admit, it took me a few prints to get the right feel. The thing is, if the Z-offset is too low, then some paste-like filaments may stick to the surface too deeply and stay there. If Z-offset is too high, then there will be issues with adhesion. After printing a few models, I found myself getting addicted to an extra bed adhesion solution like Magigoo from Amazon.
©3DWithUs – Photo: Max Funkner
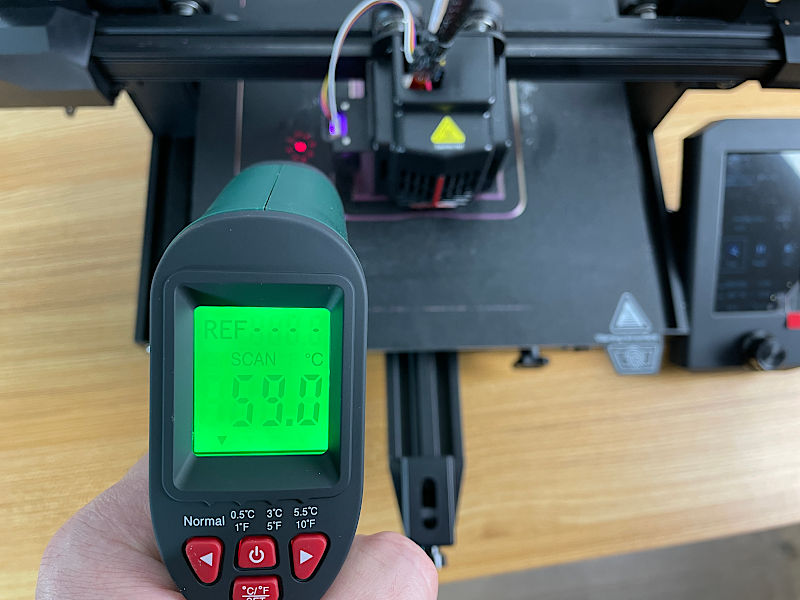
Both the nozzle and bed temperatures reach 200/60°C degrees relatively quickly. My infrared thermometer showed a relatively constant temperature on the whole bed surface.
Test Prints
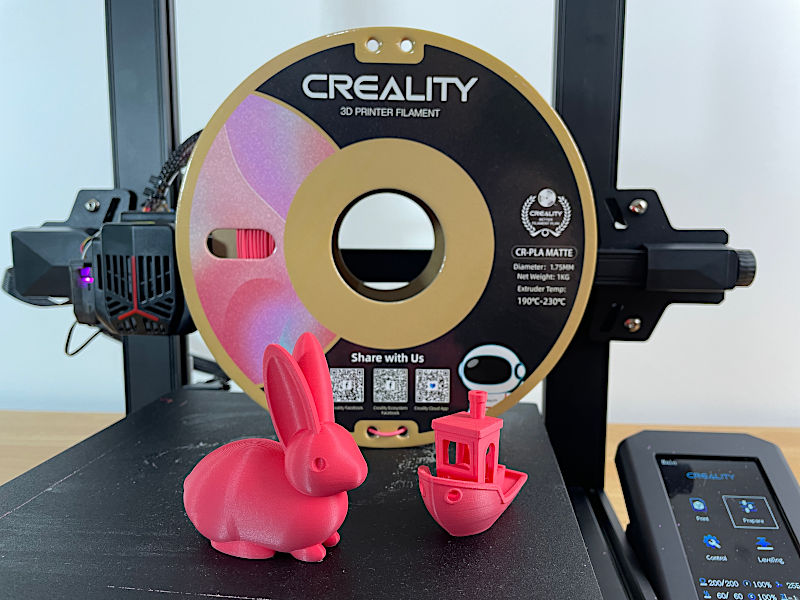
There are two pre-uploaded test files, and I printed them both. A Boat – 3DBenchy and a Rabbit. All came out well in Creality Red CR-PLA Matte. A very nice color, especially for events such as Valentine’s Day.
©3DWithUs – Photo: Max Funkner
Both a Rabbit and 3DBenchy had an unnoticeable seam on the sides, apart from that, I didn’t see any issues. Keep reading as there will be more challenging prints in this review.
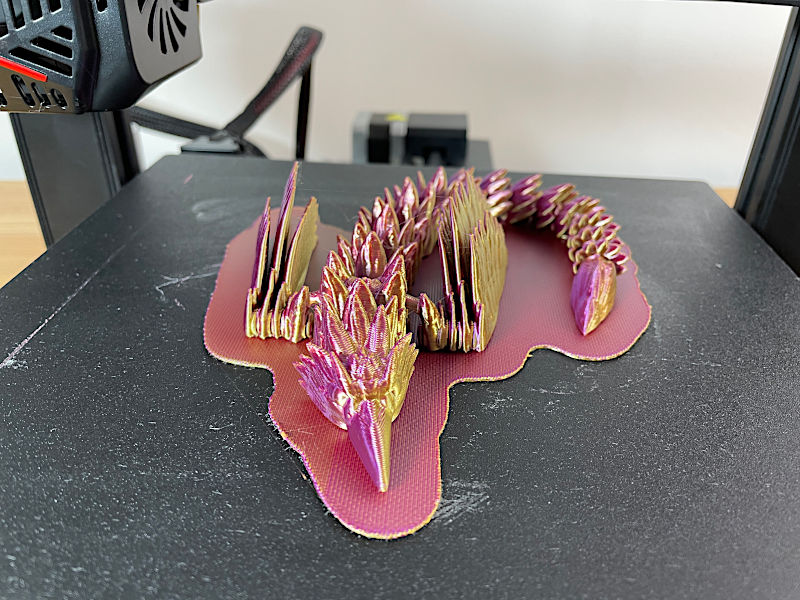
Recovery After a Power Cut
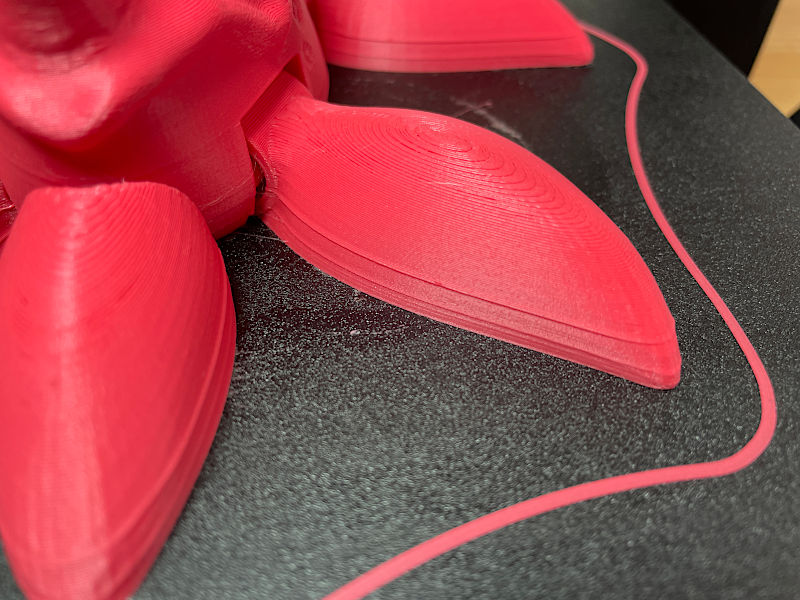
I had the planned works at home and the power had to be cut by an electrician. As I set up the print job from the early morning, a Lapras by Dragons Den has been printing for two hours by then. To my delight, I managed to use the Resume Printing option twice after two 10-minute power cuts. As a result, the model has two visible lines. In some cases, this could be an issue, but in my case, the defect was minor and can be even sanded away if needed.
©3DWithUs – Print & Photo: Max Funkner
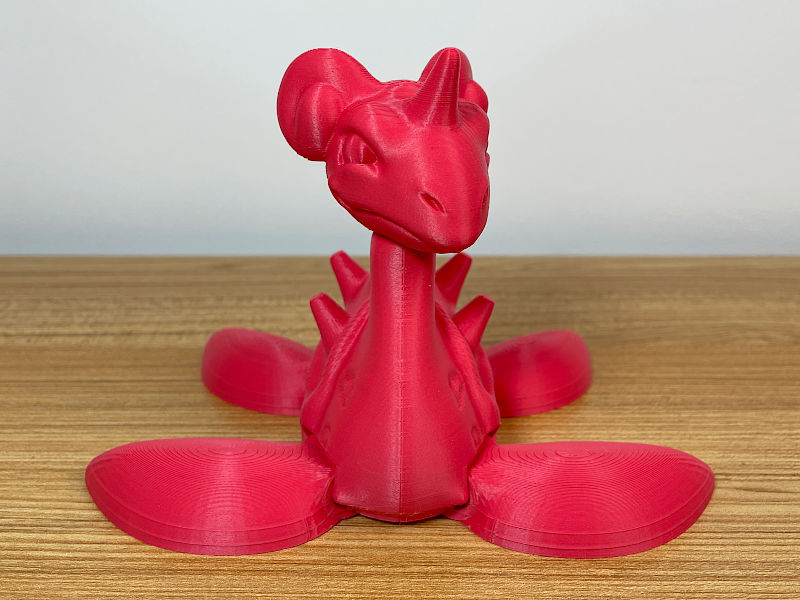
Lapras by Dragons Den
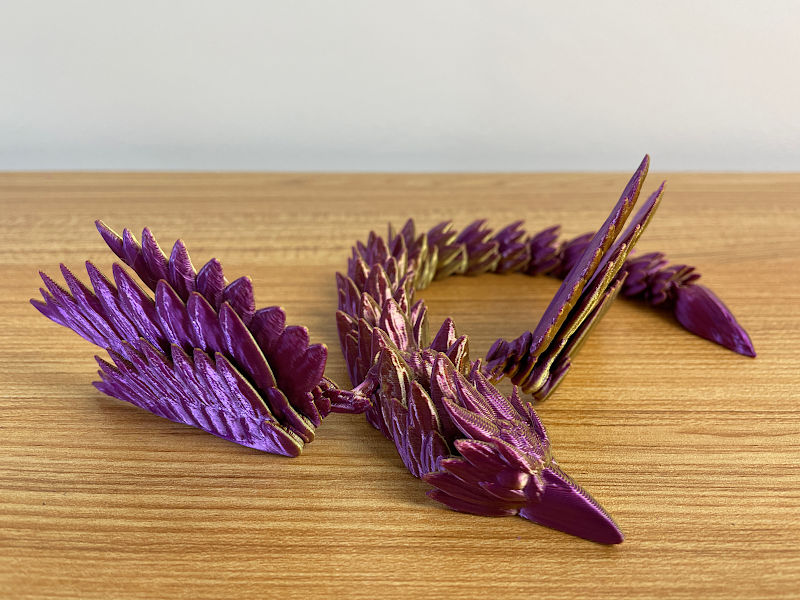
©3DWithUs – Print & Photo: Max Funkner
This model, in its original size, took me only 11+ hours to print because I optimized the default slicer settings. The gorgeous flexible articulated dragon model is available for free on CrealityCloud.
Slicer Software & Settings – Creality, Cura, Simplify3D
I used the provided Creality slicer software for most of the tasks. As I mentioned before in other reviews, I like the preview option in Cura-based slicers and use it as a tool when checking some difficult areas.
Stringing Test by 3DPrintBunny
©3DWithUs – MP4: Max Funkner
– Bed Adhesion. For beginners, I would recommend getting familiar with the adhesion settings. When there is just a tiny amount of model part touching the build plate, it has a big chance of not holding onto the build plate or getting knocked in the middle of the print. It is possible to switch between Brim and Raft in the advanced settings.
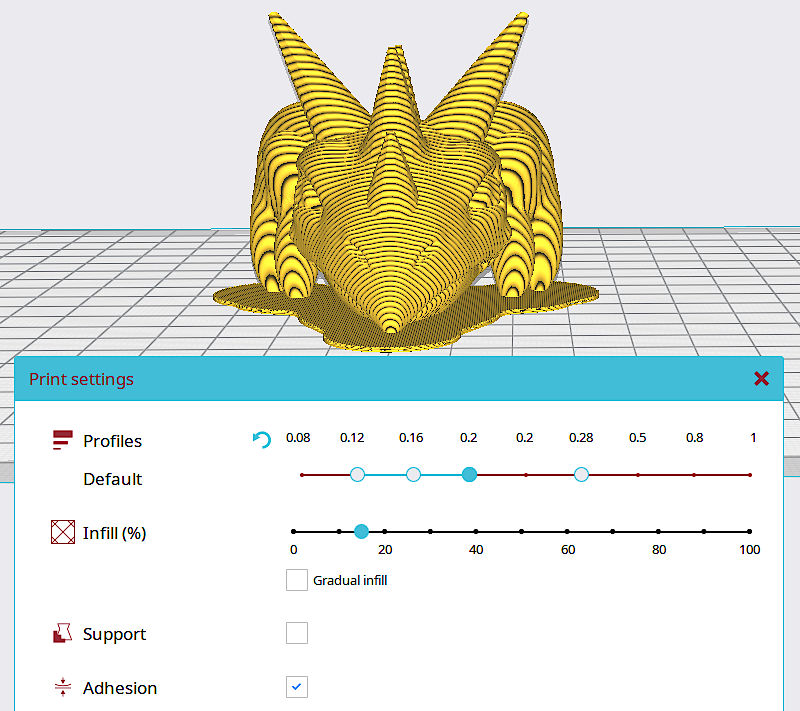
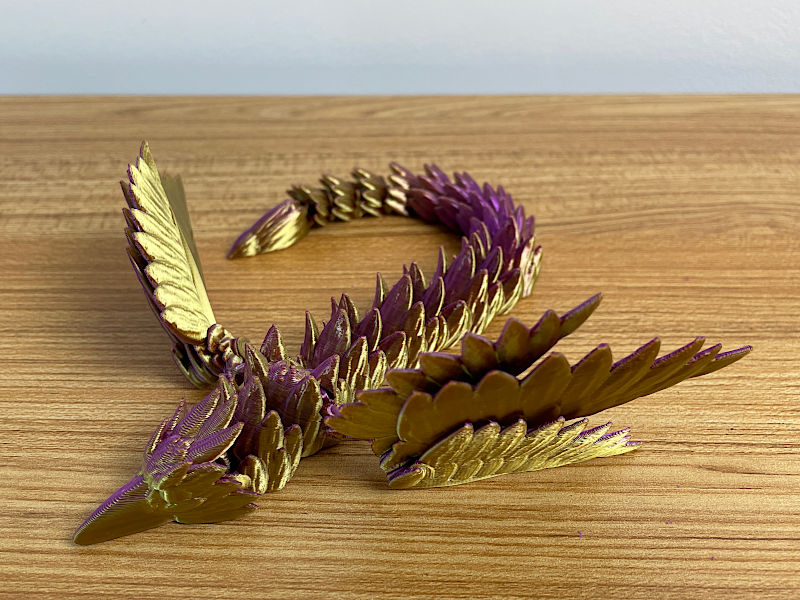
I keep recommending using rafts for such models as articulated dragons, for example, when there are a lot of small separate parts involved. Such models are at high failure risk mostly because of failed adhesion.
– Scale and Speed Settings. If your family is wary of leaving a 3D printer working overnight, it is possible to optimize the project completion time by scaling the model and tuning the speed and other settings. Even a flexible articulated dragon can be squeezed into a 12-hour frame. I increased the 3D printing speed to 80mm/s and was happy with the results.
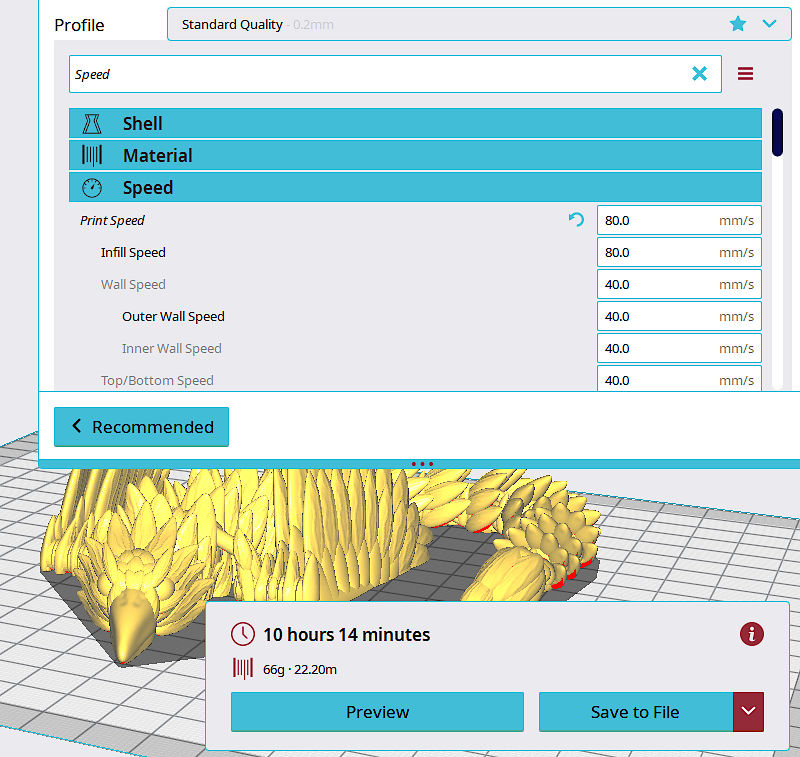
Preview: Creality Cura Slicer
Custom Supports in Simplify3D – Ender 3 V2 Profile
For one particular print, I had to turn to Simplify3D (it could be done in a free ideaMaker as well). My Dog the Gardener model needs custom supports. It will work with automatic tree supports in the Cura slicer as well, but in Simplify3D, supports are better optimized, and as the result, there will be less material waste and better quality with no retraction-related imperfections or stringing between the model and the support structure.
Preview: Simplify3D
In the new version of Simplify3D, there are no profiles for Ender 3 V2 Neo just yet, so I used Ender 3 V2 profile instead and it worked very well. It was a surprise to see a silhouette of the new Ender 3 version with the new UI in the slicer preview. Read more about other slicer software on our website.
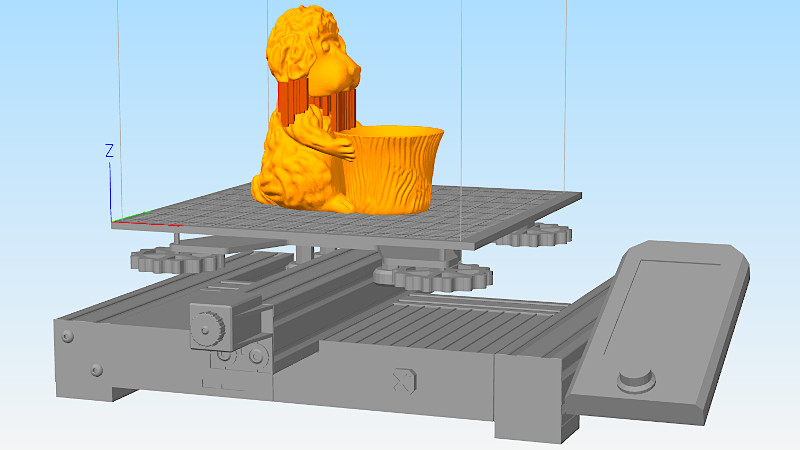
3D printing in Creality PLA
As I mentioned Creality sent me Red Matte CR-PLA to test together with the printer. Their range has six colors: white, black, blue, red, grey, and green. I have to say, I am happy with the filament because it flows well and the matte finish is good for many projects. Such matte materials work very well for printing objects with sculpted detail. This will not beat the high quality produced by resin printers but it is a good option for FDM 3D printers.

©3DWithUs – Prints & Photo: Max Funkner
These are the models from my Toy Pot Planter Collection on Cults. The cute models with simple functional tasks.
3D Printing in Dual Color PLA
I printed a Hummingbird by Dragons Den in Eryones Silk Dual Color PLA from Amazon. Dual-color materials are different compared to Rainbow PLA and it is trickier to get the pattern right, but nevertheless, an interesting filament to play with. On this particular 10-plus-hour print, the pattern came out surprisingly well.
©3DWithUs – Print & Photo: Max Funkner
Articulated Hummingbird by Dragons Den
©3DWithUs – Print & Photo: Max Funkner
©3DWithUs – Print & Photo: Max Funkner
Automated Filament Change for Color/Material Switching
First of all, I have to say that the Ender 3 V2 Neo, being a Bowden type 3D printer, has a less comfortable filament change procedure compared to 3D printers with direct drive extruders. Changing filament involves pulling out a lengthy filament bit and replacing it, so a lot of pushing and pulling is required.
For this task, I usually use PrusaSlicer as it offers various 3D printer profiles, including Ender 3 V2 Neo, and configurations. The Gcode Preview feature allows for precise color combination experimentation, which is useful for simulating color changes before the initial print job.
©3DWithUs – Print & Photo: Max Funkner
As I didn’t fine-tune any other settings in PrusaSlicer, the 3D print job itself wasn’t too smooth. At the start of the print, there was a lengthy automatic bed leveling process that can be disabled in the Custom Gcode area. The M600 pause for the filament change command worked well, but as soon as the filament was pulled out, the temperature dropped 150℃ degrees. We need to be patient here and insert the filament gradually. After resuming the print, the machine will extrude a bit more filament that needs to be cleared out using tweezers.
©3DWithUs – Print & Photo: Max Funkner
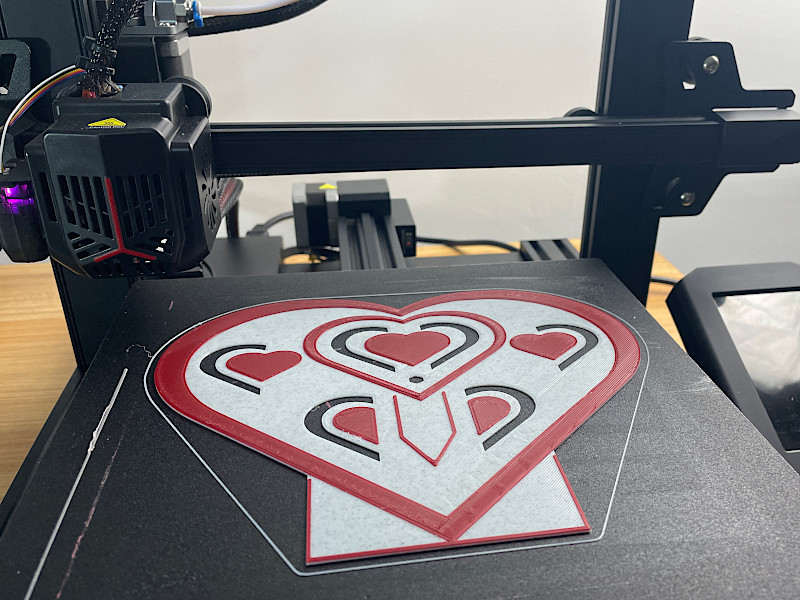
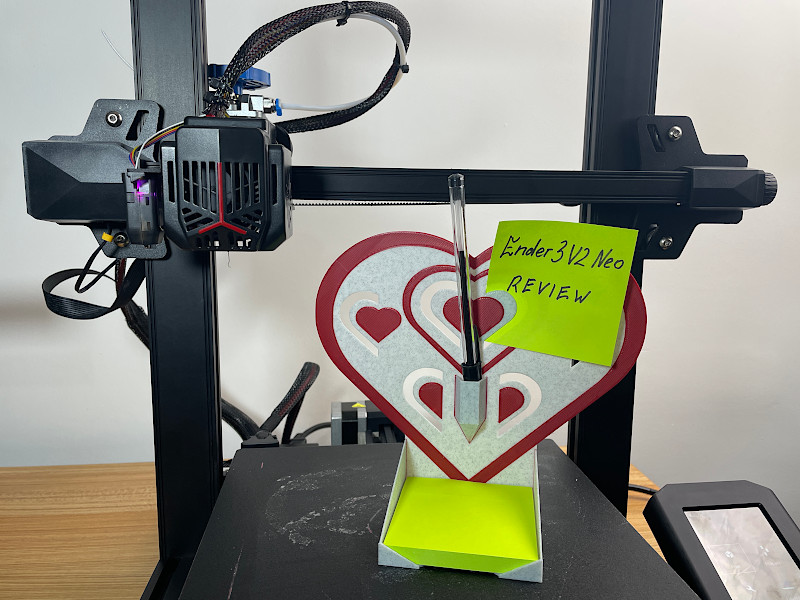
This is my Valentine’s Day version of the Post-It Note Holder. With the slight help of Magigoo, there were no issues with bed adhesion. On the contrary, the object has a lovely first-layer texture. The Marble PLA from Amazon works very well to conceal any imperfections on the top layer, which are very rare since PrusaSlicer settings can be well-tuned for such tasks. This time, I didn’t use the Ironing setting.
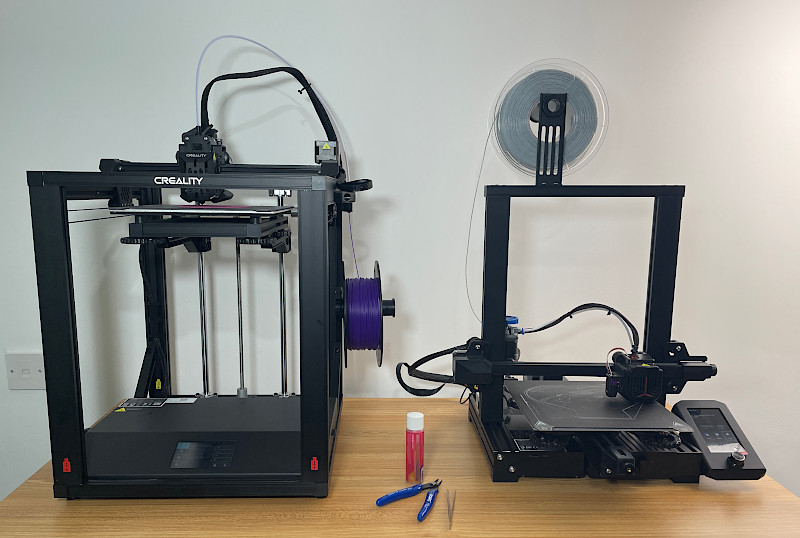
Compare Creality Ender 3 V2 Neo to Other 3D Printers
Compare to the similar volume FDM 3D printers in the same $300 price range:
Compare to other Creality 3D printers:
©3DWithUs – Photo: Max Funkner
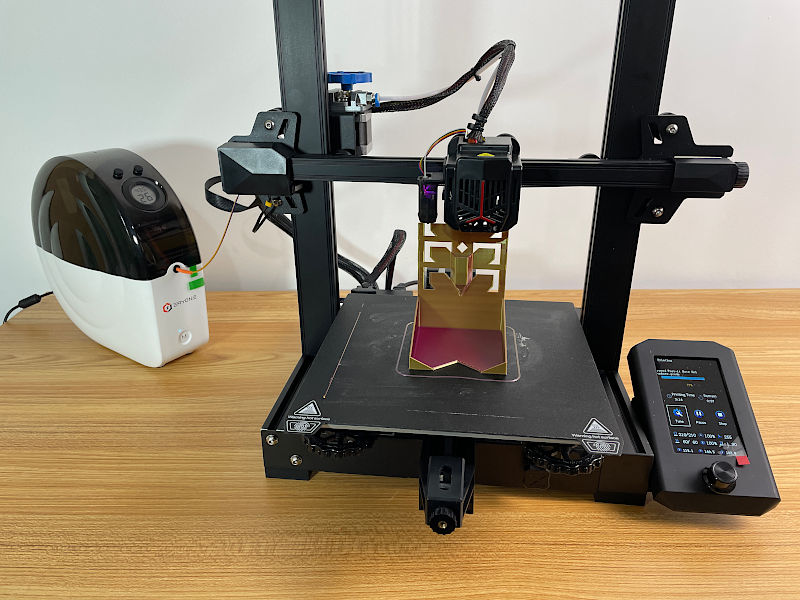
Optional Extra Device
There are a lot of tools and accessories that can be used with any FDM 3D printer. One device I would particularly recommend is the filament dryer. To make sure all filament spools stay of good quality, such dryers recover the filament by removing excess moisture and making it less brittle. This is important for Bowden extrusion systems where filament moves through long PTFE tubes and has extra tension.
©3DWithUs – Photo: Max Funkner
Conclusion and Pros & Cons
There is a lot of competition in this price segment, but a big community, a dedicated printing platform, and the popularity of the brand give Creality Ender 3 V2 Neo an advantage. I hope my Creality Ender 3 V2 Neo review helped you to make the right decision and gave you a tip or two on how to print better. If there are any questions, please do not hesitate and write in the comment section below.
Amazon
AliExpress
Official Website
Creality Certified Store
Creality Ender 3 V2 Neo Review
Review Summary
Creality Ender 3 V2 Neo 3D printer is a further upgrade to the classic most popular Ender 3 machine. It offers silent printing, 16-point automatic bed leveling, a flexible spring sheet, an integrated toolbox, and a build volume that is not small yet not too big. The printer itself is the right size to be easily moved around. All that, with minimal assembly, makes it a strong entry-level machine. There is a lot of competition in this price segment, but a big community, a dedicated printing platform, and the popularity of the brand give Creality Ender 3 V2 Neo an advantage.
PROS:
Affordable price
All-metal sturdy build
A combination of automatic and manual bed leveling works well
CONS:
No filament runout sensor
Small TF card – fiddly to handle

Have you tried doing 2-color prints on the Neo by using the Pause At Height script in Slicer and changing spools? I set it up in Slicer, and it has never paused while printing. I’ve seen posts from others about this, but haven’t seen a solution.
Pls email a response.