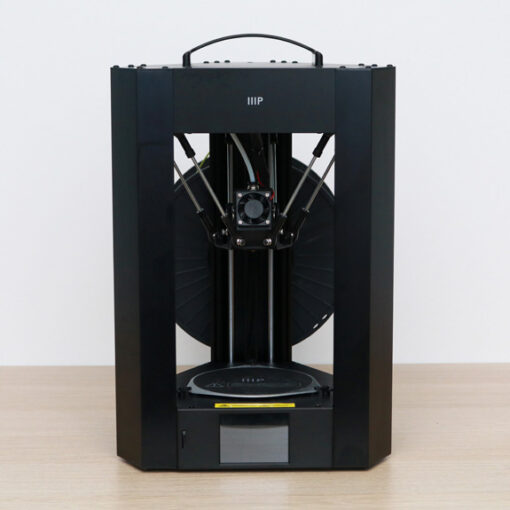
This year Elegoo surprised us by producing two Saturns, Saturn 3 12K and Saturn 3 Ultra 12K. On our website, you can find the reviews of both machines and their predecessors to compare the major differences. In this review, we will talk about Saturn 3 12K, print a few awesome and challenging models in different resins types, compare it to other 3D printers, and outline the Pros and Cons.
Table Of Contents
- Specifications
- Unboxing and Hardware Features
- Build Platform Leveling
- Printing with Chitubox – Tips and Settings
- Washing and Curing 3D Prints
- Test Printing in ABS-Like Resin
- Test Printing in Basic Resin
- Test Printing in Wax Resin
- Compare to Other 3D Printers
- Conclusion and Pros & Cons
Elegoo Saturn 3 12K Specifications:
X Pixel Size: 19 micron (0.019mm)
Y Pixel Size: 24 micron (0.024mm)
Print Speed: Up to 150 mm/h
Build Volume: 218mm x 122mm x 250mm / 8.62” x 4.84” x 10.24”
Material: Standard, Water-Washable, ABS-like UV Resin, High-Speed Resin, Wax
Masking LCD Resolution: 11520px x 5120px (12K)
Masking LCD Size: 10” Mono LCD
Connectivity: USB
Price: $399-$450
Product affiliate links:

Product affiliate links: 3DWithUs is supported by its audience. Purchases via some links may earn us a small commission at no extra cost to you. This helps us to continue bringing you high-quality content. The product featured was provided for an honest detailed review. Our guides and reviews remain unbiased and independent.
Compare the Prices & Bundles:
Official Store | Amazon
Elegoo Saturn 4
Compare the Prices & Bundles:
Official Store | Amazon
Elegoo Saturn 3 12k, apart from a better resolution LCD, doesn’t have many differences from its predecessor, Saturn 2. Last year, I wrote an extensive review with many awesome and challenging prints and was generally happy about the machine. This year, Saturn 3 plays more like a budget version of Saturn 3 Ultra 12K, which, apart from the look, also has a lot of novel features. For the full Elegoo Saturn 3 Ultra 12K review, please refer to the article by Andrew Sink.
Unboxing and Hardware Features
As usual, the Elegoo Saturn 3 12k arrived in a well-packed, branded box.
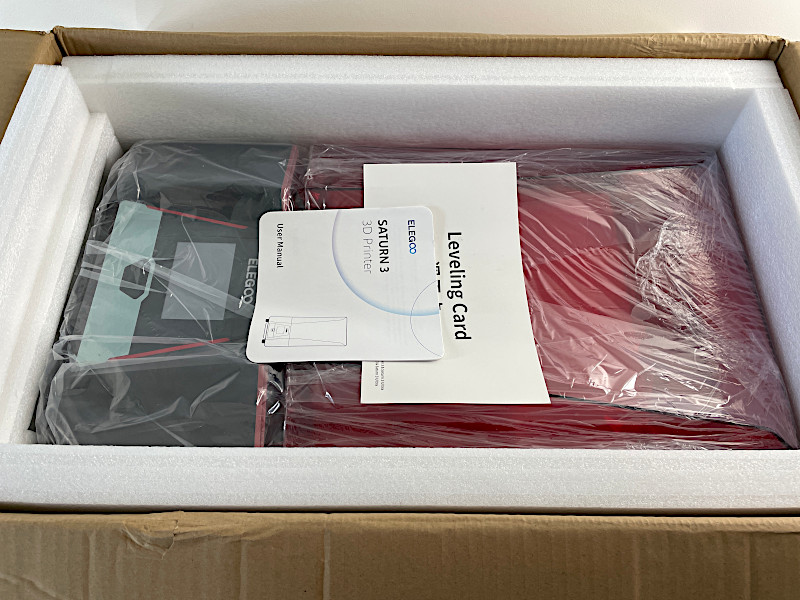
©3DWithUs – Photo: Max Funkner
In comparison to FDM 3D printers, assembling resin 3D printers is quicker. The toolkit has everything needed to start printing, apart from the resin.
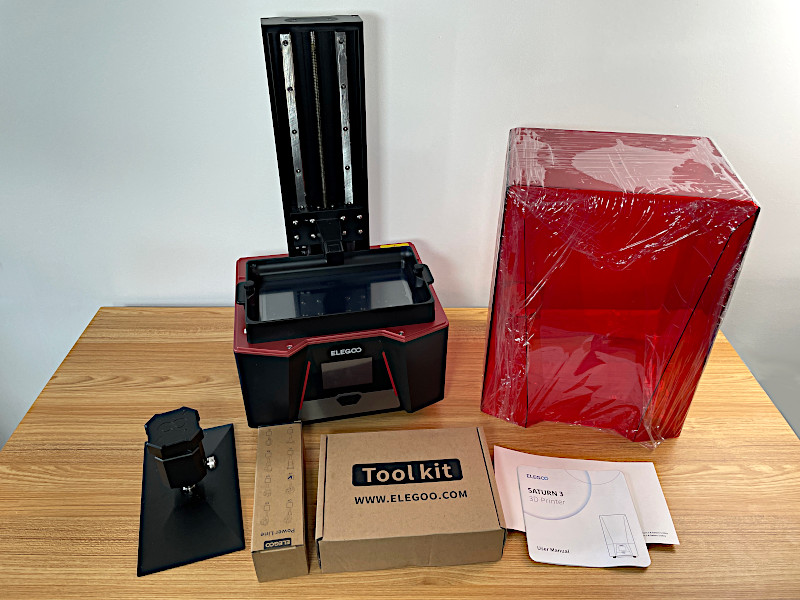
©3DWithUs – Photo: Max Funkner
– Volume. Size and volume-wise, Saturn 3 is a medium-sized printer, which stands between Elegoo Mars 4 and Jupiter. A large build plate allows for printing many parts at once. Below, I tried multiple object 3D printing a couple of times and am happy with the results.
– 12K mono LCD. It should be a significant jump in resolution that will take more time to test and compare. For me personally, even with an 8k resolution, the prints were of high enough quality.
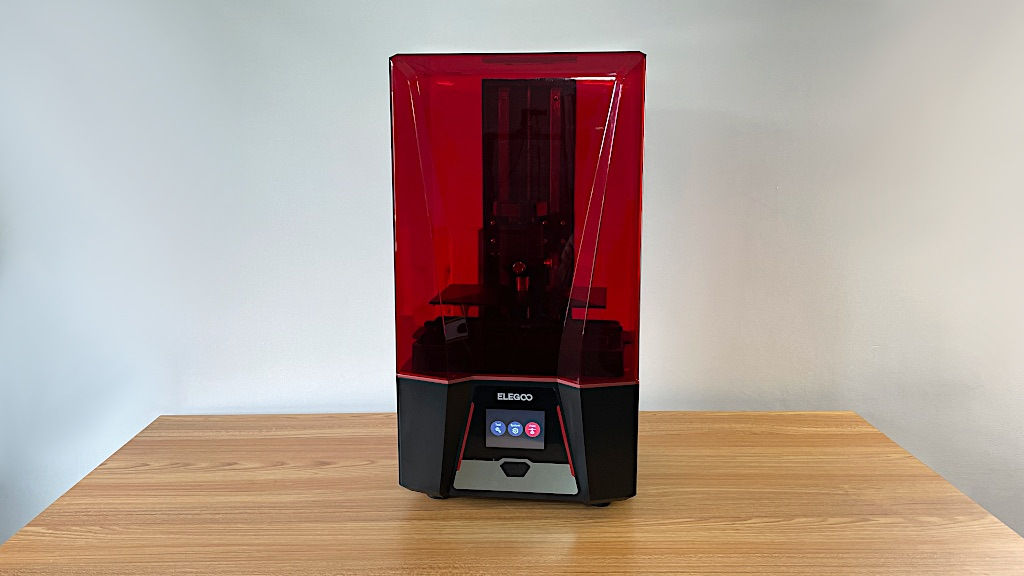
– Machine Design. As I mentioned before, I like the curves of the cover. This machine looks stylish, with a sturdy solid base and a distinctive UV protective cover.
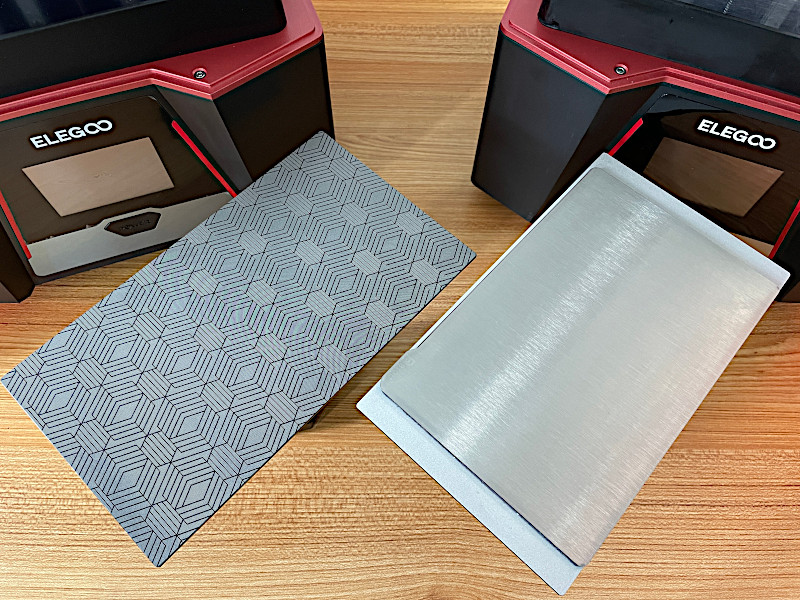
– Build Plate. The build plate texture got changed from Laser etched to Laser carved. Such a build plate leaves a nice texture on the bottom of the print if printed directly on it.
©3DWithUs – Photo: Max Funkner
I tried a flexible magnetic sheet for a build plate from Amazon on the Saturn 2; it worked OK. Unfortunately, I couldn’t equip the build plate of the Saturn 2 to the Saturn 3, and therefore couldn’t test the flexible sheet on this machine. I bet for certain projects, such a build plate is a very good option to go for.
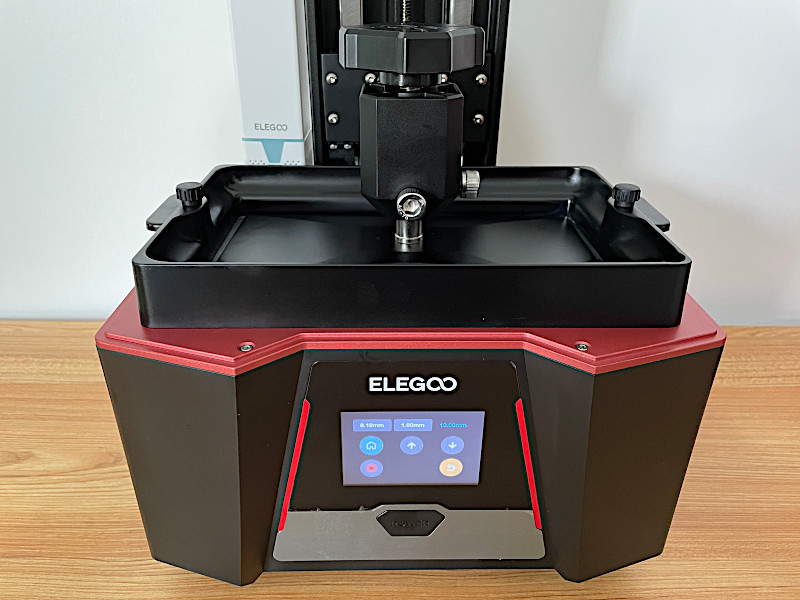
Bed Leveling and Adhesion
I struggled with bed adhesion. I had at least five failed attempts in a row. After browsing online, I confirmed my fear that the leveling card may be too thick. So, I leveled the bed directly in the vat against the film.
©3DWithUs – Photo: Max Funkner
Then I slightly sanded the build plate to increase the grip. Also, I stopped trying to print the Elegoo test file Rook and instead started printing my own files with the slightly adjusted settings.
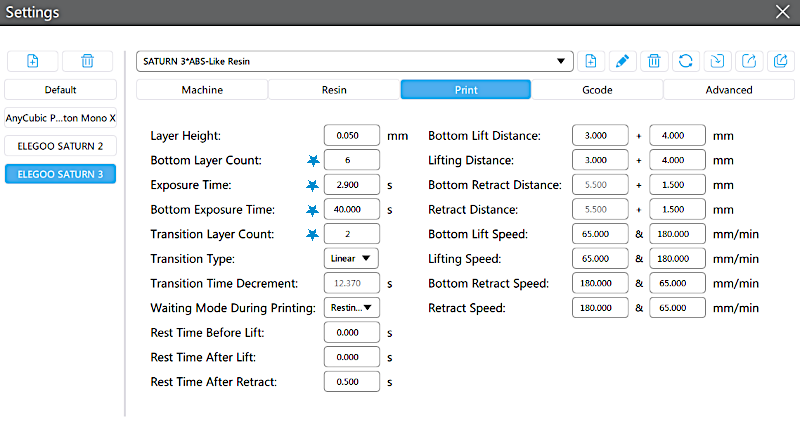
Namely, I increased the number of bed adhesion layers from 2 to 6 and increased the exposure time to 40. These settings helped me with the bed adhesion of all 3 types of resins I tried: SUNLU Wax, Elegoo ABS-Like, and Anycubic Basic.
Quick Comparison. While Saturn 3 has an old two-point bed calibration system, Saturn 3 Ultra has a four-point build platform leveling process, similar to Anycubic printers like the Photon Mono X. While the four-point build platform has worked well for me in the past in terms of stability, I agree with Andrew Sink that such a system is much harder to clean from the resin. Read more about Saturn 3 Ultra 12K bed leveling in Andrew’s review.
File Transfer
Saturn 3 only has USB, while Saturn 3 Ultra supports both WiFi and USB. Working with WiFi can be very convenient. I recently reviewed the FDM 3D printer AnkerMake M5 and can say that a well-functioning Wi-Fi and app system can be quite addictive.
Air Purifier
An air purifier with built-in activated carbon reduces the resin odor and stabilizes the air environment in the chamber. All resin smelled much less than when I printed without it. My room still has a strong smell of IPA (Isopropyl Alcohol) I am using to wash prints, but that is unrelated.
Chitubox Slicer Software Tips and Settings
On the included USB, there are files for two software programs: Chitubox and VoxelDance Tango. While trying to assess Tango may take more time and a separate article, Chitubox is more familiar to me, and we even have a guide about it on 3DWithUs.
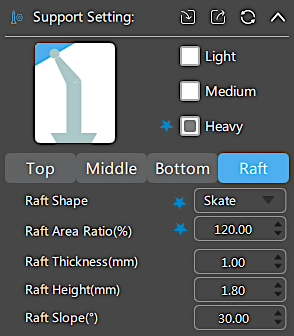
Apart from tweaking the settings to improve the bed adhesion, I also played it safe and increased the normal layers’ exposure time to 2.9 sec. This made my printing slightly slower, but made me confident that mostly automatically placed supports will work.
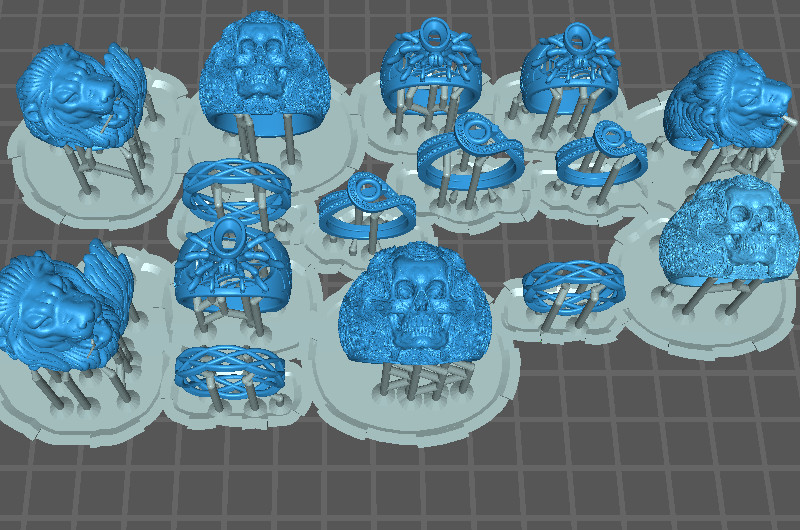
– Supports and Raft. When I printed 15 rings with automatically generated supports, I played it safe, applied wide Skate Rafts, and placed the objects close together so the independent rafts would fuse with each other to create a solid base. This trick secures adhesion for the whole lot and makes the objects easier to remove from the build plate when printing is done. Also, instead of washing the whole build plate, such a unified print is easier to wash as one object.
To be safe I used Heavy Support settings. One out of 15 rings still failed to start. In the end it worked well for me but if I were printing another batch I would fine-tune settings for each ring individually in order to make postprocessing easier.
Printing from the build plate. In rare cases, I try to print the objects from the build plate in order to save delicate features like a face or to decrease post-processing. Have a look at how I printed and removed the Articulated Dragon by McGyBeer (36 independent parts) on Saturn 2.
Washing and Curing 3D Prints
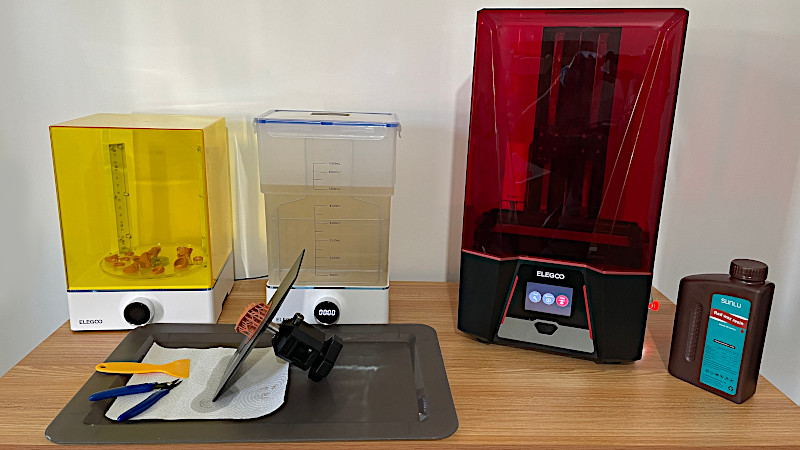
While featuring an Elegoo resin 3D printer, it is convenient to mention the Mercury X Bundle from Amazon. Washing and curing post-processing stations make post-processing much easier. For $200-250, Elegoo offers both washing and curing devices with their individual platforms. In comparison with the 2-in-1 Mercury Plus (review), two separate devices are convenient but may take up more storage space.
©3DWithUs – Photo: Max Funkner
For a casual user, such a setup is quite enough for most of the projects. If frequent washing is involved, I would recommend obtaining an extra washing bucket for the initial rinse. The thing is, Isopropyl Alcohol (IPA) quickly becomes saturated if you place the whole build plate with the print into the washing tank as recommended. An optimized way would be to remove the print from the build plate, then rinse it in one bucket, and fine rinse it in another. It is possible to clean/reuse IPA safely, and that is the topic for another guide. Read more about washing and curing stations.
Test Printing in ABS-Like Resin
Elegoo Grey ABS Like Resin on Amazon.
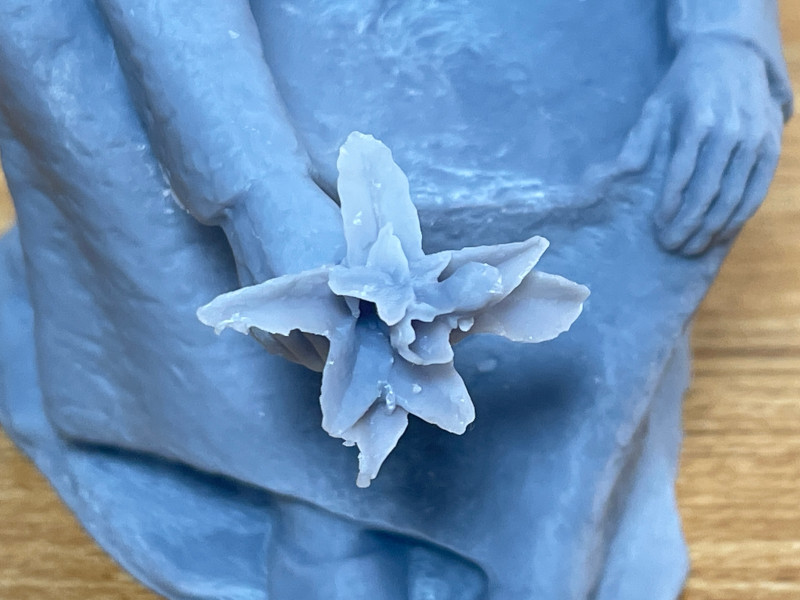
The following example will be a resin print from a 3D scan. While on holiday, I scanned a statue of Ibn al-Baytar (Sculptor: Reed Armstrong), a botanist and physician from the 1200s. This monument is especially interesting as it presents a challenge for both 3D scanning and 3D printing. The bronze flower in Ibn al-Baytar’s hand is a small but important element of the entire monument. I managed to complete the scan of the monument by taking 240 images in Polycam’s Auto-Photo mode. Here is the link to the model with the original texture on Polycam (review), where it is possible to rotate the model 360 degrees.
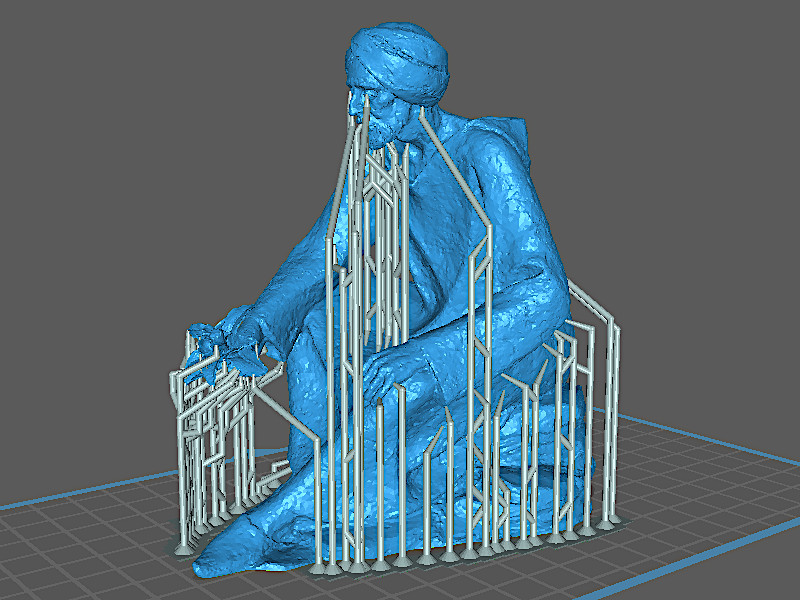
In Blender, I cut the base more evenly and made the model solid for 3D printing. The scaled and rotated model in Chitubox took approximately 50% of the Saturn 3 print capacity. For the first time, I didn’t dare to print this model any larger. I decided to print the model straight from the bed and moved all support bases away to make sure these won’t fuse with the model’s base. This model could be made hollow, but I chose not to do so this time.
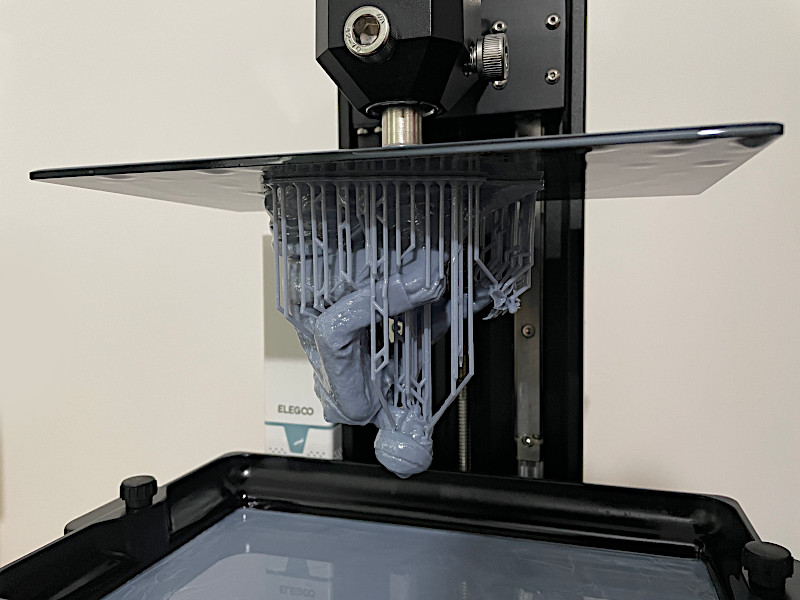
©3DWithUs – Print & Photo: Max Funkner
Elegoo Grey ABS-like resin worked well for this model. I like the color and the feel of the completed model.
The only place where the print failed is the sleeve. One of the supports failed to build up until the sleeve started, and therefore the printing of the sleeve didn’t start in time. Luckily, it didn’t affect the entire print, and the model is still gorgeous. I am not sure whether to blame Chitubox or the machine for this. Just in case, I added extra supports under the sleeve for future prints.

Model on MyMIniFactory
©3DWithUs – Print & Photo: Max Funkner
Post-processing proceeded as follows: The model was washed with supports in IPA for 2 minutes; the supports were then removed; it was washed again for another 2 minutes; it was then dried and finally cured for 2 minutes standing up, plus an additional 2 minutes on its side.
©3DWithUs – Print & Photo: Max Funkner
I feel that my 3D scan / 3D print project was overall a success, but a couple of the flower petals had very thin walls and didn’t print precisely. I’ve added the version I printed to the Scan the World collection on MyMiniFactory. You can read more about the Scan The World initiative on 3DWithUs. For those who want to further refine the model for larger-scale prints, for example, please download the model from the Polycam repository.
Test Printing in Basic Resin
Anycubic Basic Resin on Amazon.
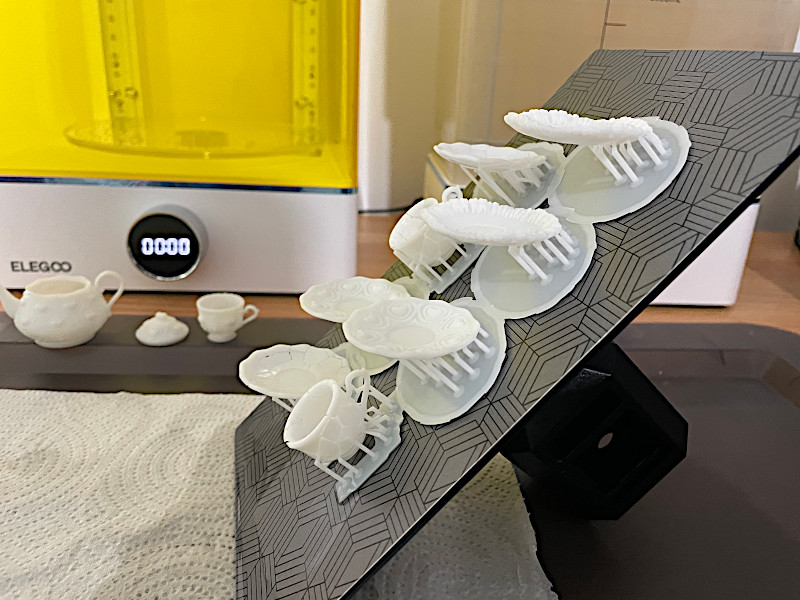
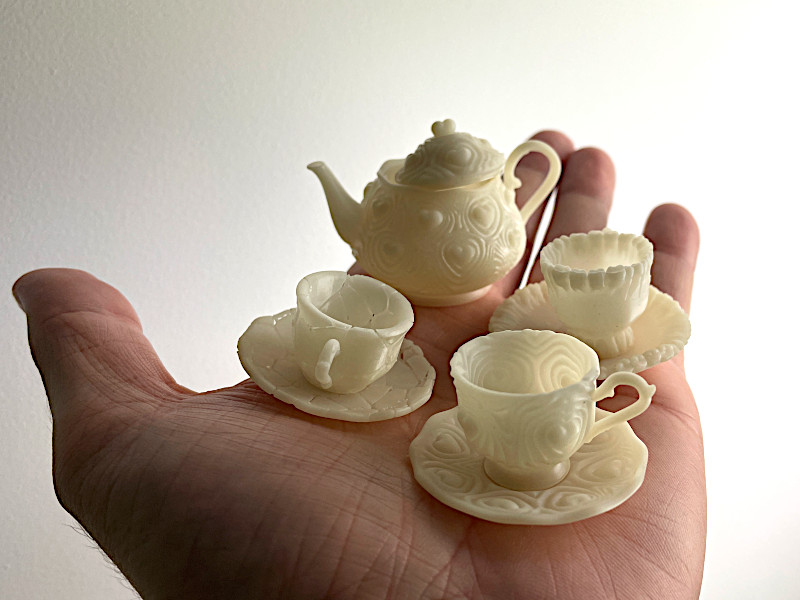
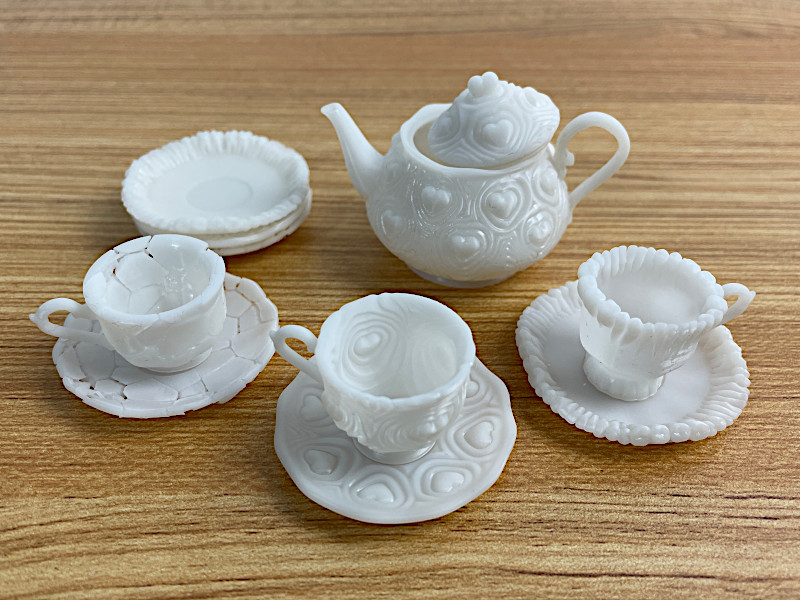
Another resin I tried while testing Elegoo Saturn 3 was Anycubic Basic White. I always wanted to print DaveMakesStuff models and this resin and shade worked well with the task. Dave’s designs are awesome and he also promotes them by producing well-taken images and videos of the prints. Pastel white PLA complements his designs well. Here are the miniature versions of his designs in resin.
Models by DaveMakesStuff on Thangs
©3DWithUs – Print & Photo: Max Funkner
Crockery. In order to complete this mini project, I took the models from three themes: Heartbeat, Teeth, and Smashed. I scaled the models to 35% of the original. I think these are slightly bigger than printing for the dollhouse. I am sure these can be scaled down even further. The Saturn 3 build plate can accommodate a lot of them in one go.
Models by DaveMakesStuff on Thangs
©3DWithUs – Print & Photo: Max Funkner
The most challenging objects were the Smashed Crockery. More supports and post-processing were required in comparison to other themes.
Models by DaveMakesStuff on Thangs
©3DWithUs – Print & Photo: Max Funkner
Resin 3D printed parts are usually printed to be buffed and painted further. As I don’t possess such skills yet, I try to find objects that look gorgeous straight after curing. Dave’s crockery looks nice after being printed, without any painting involved.
Test Printing in Wax Resin
SUNLU Red Wax Resin coming soon on the official website.
Jewelry. 3D printing jewelry models in wax resin for further casting is one of the biggest applications where resin 3D printing is widely and successfully used. I briefly searched for the jewelry casting process and this short video explains it the best. In a couple of words: such 3D prints are used to create a mold, so the wax resin prints, while creating a mold, are getting melted away at specific temperatures. Then, liquid metal is poured into the mold, cooled down, and the objects are post-processed.
©3DWithUs – Print & Photo: Max Funkner
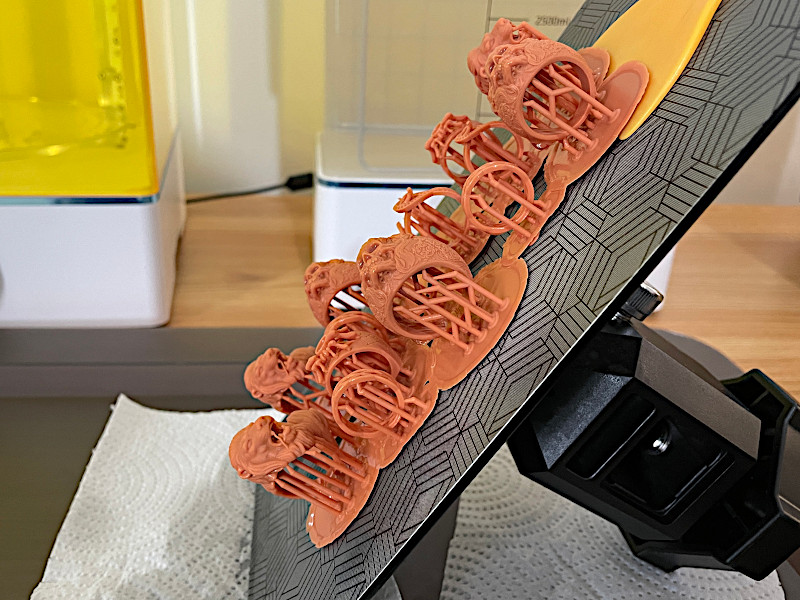
One fail out of 15. The first attempt to 3D print the jewelry in wax resin came out great despite one of the spider rings failing to print. I think it was a good idea to move the objects closer to each other so they created a single base out of the support bases. This secured the first layer adhesion and made it much easier to remove after the print was washed.
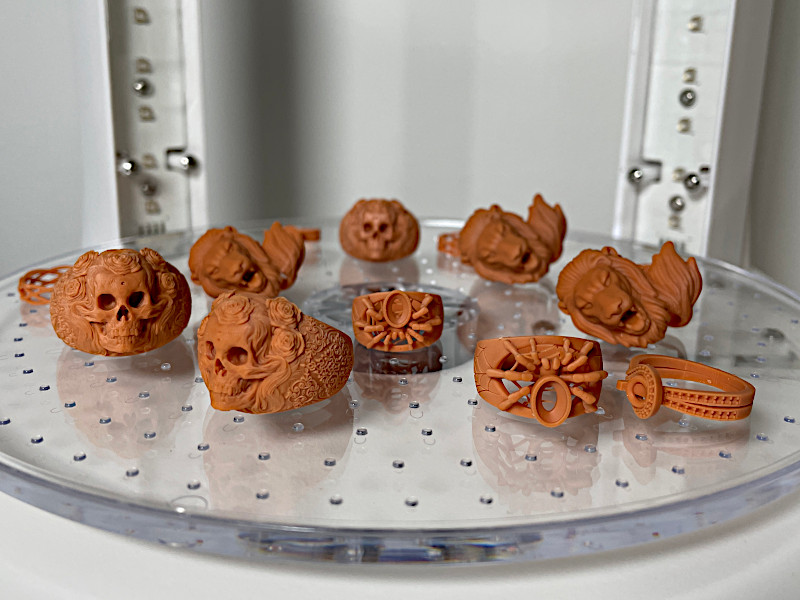
Models by Cadagency on Cults
©3DWithUs – Print & Photo: Max Funkner
There is a bunch of high-quality jewelry models for free by Cadagency on Cults. I printed five different models. I duplicated some of them for different sizes.
©3DWithUs – Print & Photo: Max Funkner
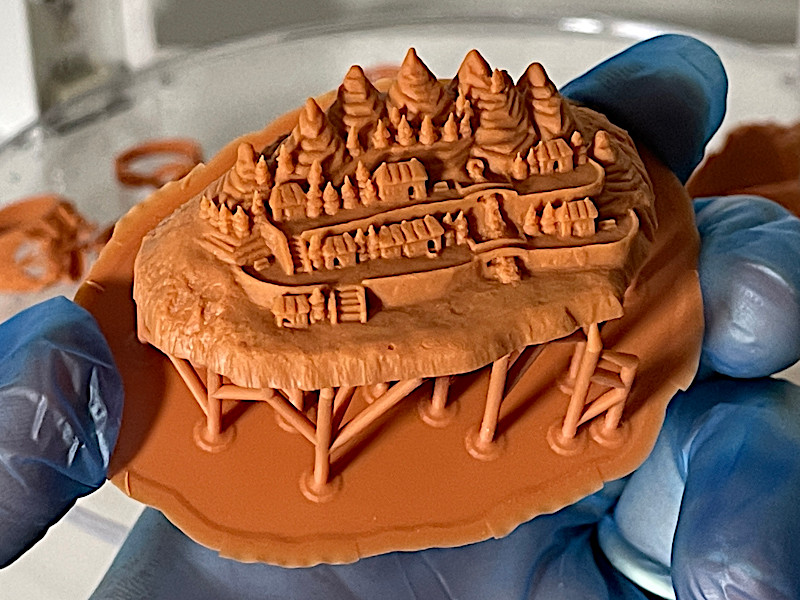
Sandcastle is another 3D scanned object. The original Sandcastle is approximately 4 meters long and 2 meters wide. Thanks to resin 3D printing, I managed to print it much smaller. I also printed this model on FDM 3D printers using various PLAs. Have a look at the article dedicated to 3D scanned sand art.
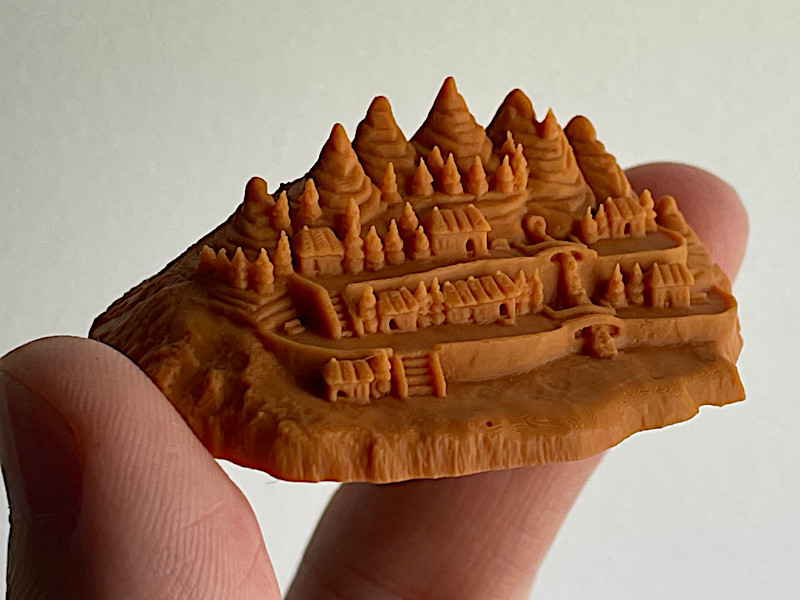
Model on Cults
©3DWithUs – Print & Photo: Max Funkner
I liked this SUNLU Red Wax resin shade, it is more dark orange/beige than red though. If I were the artist creating such sandcastles and other sand art, I would definitely capture them and print them out in the form of such small miniatures as souvenirs. The Saturn 3 build plate is large enough to print a bunch of them in one go just in a couple of hours. Post-processing is a little bit messy, but as there is a small amount of supports, it should still make this process quick.
Compare to Other 3D Printers
Compare to the similar volume resin 3D printers in the same price range:
Currently, we see tough competition between Saturn 3, Saturn 3 Ultra 12K, and Anycubic Photon Mono M5s. If Photon Mono M5s’ automatic bed leveling is its strongest point, then Saturn 3 and Saturn 3 Ultra win at the price point.
Compare to the Elegoo Saturn series resin 3D printers:
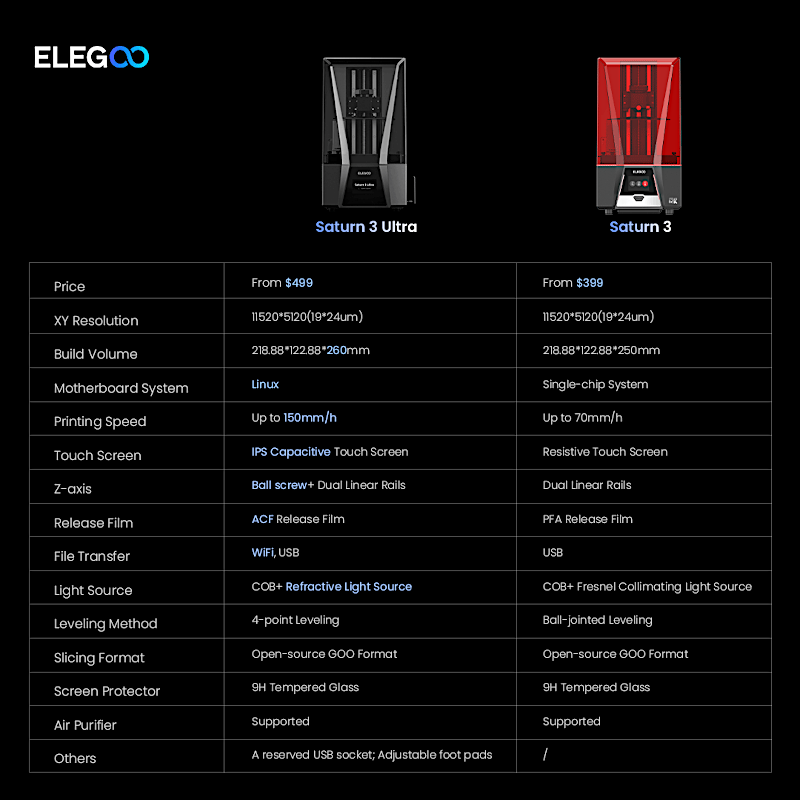
Image: Elegoo
Conclusion and Pros & Cons
Compare the Prices & Bundles:
Official Store | Amazon
Elegoo Saturn 4
Compare the Prices & Bundles:
Official Store | Amazon
Elegoo Saturn 3 12K Review
Review Summary
Elegoo Saturn 3 12K, apart from higher resolution, doesn’t have many differences compared to its predecessor and therefore it is still a stable machine that does the job well and looks nice. Stability, a strong community behind it, and a good price are the major factors why I believe this model will still be popular in 2023/2024.
PROS:
Competitive Price
12K Resolution
Original Design – the machine looks attractive
Community – a strong community surrounds the brand
CONS:
No WiFi
Bed leveling can be tricky